Blog
Engineering
Kubernetes
12
minutes

Installing Karpenter: Lessons Learned From Our Experience

This article shares our experience migrating from the AWS Cluster Auto Scaler to Karpenter. We provide an overview of the steps we took to install Karpenter. This article is the first in a series dedicated to Karpenter. In future posts, we will cover other aspects of using Karpenter.
September 26, 2025
Pierre Gerbelot-Barillon
Software Engineer
Summary
Twitter icon
linkedin icon

But before getting started, let's explain what Karpenter is...

What's Karpenter?

AWS Karpenter is an open-source, flexible, high-performance Kubernetes cluster autoscaler. It was developed by AWS to address some of the inherent limitations of the default Kubernetes autoscaler, particularly around efficient resource allocation and cost optimization. Karpenter dynamically adjusts the volume and compute resources to meet application demands, significantly reducing costs and improving application performance. Discover more about Karpenter on its official page.

Karpenter and Qovery

At Qovery, we allow our users to spin up Kubernetes clusters on AWS, GCP, and Scaleway in 5 minutes. Karpenter is also an option that can be turned on with one click when creating an EKS cluster.

This option is free - feel free to give it a try.

Deployment Options for Karpenter Controllers

When we migrated from the AWS Cluster Auto Scaler to Karpenter, one of the first decisions was determining where to run the Karpenter controller. Karpenter can be deployed:

  • on AWS EKS managed node groups
  • directly on EC2 instances
  • on AWS Fargate

It is not recommended to run the Karpenter controller on a node managed by Karpenter itself. One of the main reasons is the bootstrapping issue and the risk of unavailability. If the nodes running Karpenter are removed, no other node will be started to rerun the Karpenter controller, leading to potential downtime and unavailability.

Note: When this article was written, Karpenter 1.0.0 was not out; we are using Karpenter v0.36.2. However, the installation process does not change with Karpenter 1.0.0; this shared experience is still valid.

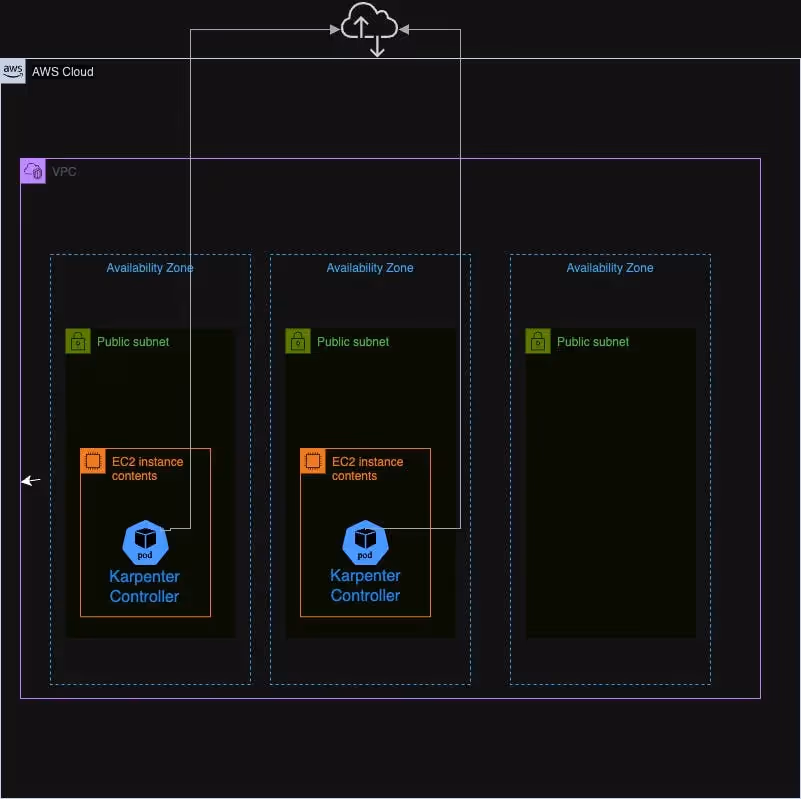
Option 1: EKS managed Node Group or directly on EC2 instances

Nodegroup Diagram

Running the Karpenter controller on a small EKS node group involves setting up a dedicated group of EC2 instances to host the controller pods. This approach offers:

  • Control and Customization: You have complete control over the EC2 instances.
  • Consistent Performance: EC2 instances provide predictable performance with dedicated CPU and memory resources.

However, this option also comes with some challenges:

  • Operational Overhead: Managing the node group requires additional effort for scaling, patching, and monitoring the instances.

Running the Karpenter controller directly on EC2 instances introduces further challenges compared to using a managed node group. It involves manual configuration of the EC2 instances to install and manage the Kubernetes Kubelet, update the operating system, apply security patches, and keep Kubernetes versions up to date. Additionally, you must set up your own monitoring solutions and handle the replacement of unhealthy instances.

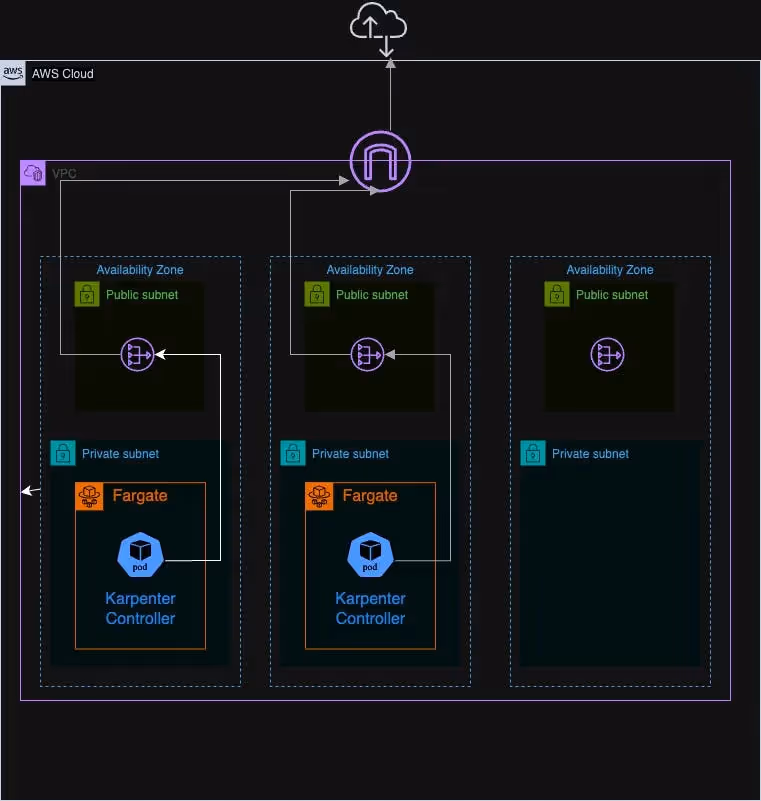
Option 2: AWS Fargate

null

Deploying the Karpenter controller on AWS Fargate abstracts away the underlying infrastructure, offering a serverless compute engine for containers. This approach has several advantages:

  • Simplified Management: Fargate removes the need to manage and scale EC2 instances, reducing operational overhead.
  • Automatic Scaling: Fargate automatically scales based on demand, ensuring the controller always has the necessary resources.

However, there are some considerations:

  • NAT Gateway Requirement: A Fargate profile must be set up with private subnets and do not have a direct route to an Internet Gateway. However, internet access is necessary to download the Karpenter image or for Karpenter to download pricing data over time. Therefore, connecting the subnets used for the Fargate profile to the internet using a NAT Gateway is necessary. This introduces additional costs for clusters, but this setup is compliant with best practices as it increases security by preventing the internet from initiating connections with instances on private subnets.

Why We Chose Fargate

After evaluating the options, we decided to deploy the Karpenter controller on AWS Fargate. Here’s why:

  1. Reduced Management Overhead: By using Fargate, we significantly reduced the operational burden of managing EC2 instances.
  2. Security and Isolation: Running in Fargate provides enhanced security through isolation and managed infrastructure.

Terraform for AWS Resource Creation

The installation of a cluster with Karpenter will be divided into several phases. The first phase involves creating all the necessary AWS resources using Terraform. In the next section, we will describe the additional resources required for installing Karpenter.

IAM Roles:

There are three additional roles to create:

fargate-profile: This role is an IAM role used by the Fargate node to make AWS API calls. The AmazonEKSFargatePodExecutionRolePolicy managed policy must be attached to this role. Kubelet on the Fargate node uses this IAM role to communicate with the API server. This role must be included in the aws-auth ConfigMap so that Kubelet can authenticate with the API server. When a Fargate profile is created, this role is automatically added to the cluster's aws-auth ConfigMap.

resource "aws_iam_role" "fargate-profile" {
name = "qovery-eks-fargate-profile"
assume_role_policy = jsonencode(
{
Statement = [{
Action = "sts:AssumeRole"
Effect = "Allow"
Principal = {
Service = "eks-fargate-pods.amazonaws.com"
}
}]
Version = "2012-10-17"
}
)
}

resource "aws_iam_role_policy_attachment" "karpenter-AmazonEKSFargatePodExecutionRolePolicy" {
role = aws_iam_role.fargate-profile.name
policy_arn = "arn:aws:iam::aws:policy/AmazonEKSFargatePodExecutionRolePolicy"
}

karpenter-node-role: This role is assigned to the EC2 instances that Karpenter provisions. It allows these instances to interact with various AWS services required for their operation. This role must be set in the aws-auth ConfigMap. This part will be described in the following section.

resource "aws_iam_role" "karpenter_node_role" {
name = "KarpenterNodeRole"
assume_role_policy = jsonencode(
{
"Version" : "2012-10-17",
"Statement" : [
{
"Effect" : "Allow",
"Principal" : {
"Service" : "ec2.amazonaws.com"
},
"Action" : "sts:AssumeRole"
}
]
}
)
}

resource "aws_iam_role_policy_attachment" "karpenter_eks_worker_policy_node" {
role = aws_iam_role.karpenter_node_role.name
policy_arn = "arn:aws:iam::aws:policy/AmazonEKSWorkerNodePolicy"
}

resource "aws_iam_role_policy_attachment" "karpenter_eks_cni_policy" {
role = aws_iam_role.karpenter_node_role.name
policy_arn = "arn:aws:iam::aws:policy/AmazonEKS_CNI_Policy"
}

resource "aws_iam_role_policy_attachment" "karpenter_ec2_container_registry_read_only" {
role = aws_iam_role.karpenter_node_role.name
policy_arn = "arn:aws:iam::aws:policy/AmazonEC2ContainerRegistryReadOnly"
}

resource "aws_iam_role_policy_attachment" "karpenter_ssm_managed_instance_core" {
role = aws_iam_role.karpenter_node_role.name
policy_arn = "arn:aws:iam::aws:policy/AmazonSSMManagedInstanceCore"
}

karpenter-controller-role: This role is used by the Karpenter controller to provision new EC2 instances.


resource "aws_iam_role" "karpenter_controller_role" {
name = "KarpenterControllerRole-${var.kubernetes_cluster_name}"
description = "IAM Role for Karpenter Controller (pod) to assume"

assume_role_policy = jsonencode(
{
"Version" : "2012-10-17",
"Statement" : [
{
"Effect" : "Allow",
"Principal" : {
"Federated" : "arn:aws:iam::${data.aws_caller_identity.current.account_id}:oidc-provider/${aws_iam_openid_connect_provider.oidc.url}"
},
"Action" : "sts:AssumeRoleWithWebIdentity",
"Condition" : {
"StringEquals" : {
"${aws_iam_openid_connect_provider.oidc.url}:aud" : "sts.amazonaws.com",
"${aws_iam_openid_connect_provider.oidc.url}:sub" : "system:serviceaccount:kube-system:karpenter"
}
}
}
]
}
)
tags = local.tags_eks
}

resource "aws_iam_role_policy" "karpenter_controller" {
name = aws_iam_role.karpenter_controller_role.name
role = aws_iam_role.karpenter_controller_role.name
policy = jsonencode(
{
"Statement" : [
{
"Action" : [
"ssm:GetParameter",
"ec2:DescribeImages",
"ec2:RunInstances",
"ec2:DescribeSubnets",
"ec2:DescribeSecurityGroups",
"ec2:DescribeLaunchTemplates",
"ec2:DescribeInstances",
"ec2:DescribeInstanceTypes",
"ec2:DescribeInstanceTypeOfferings",
"ec2:DescribeAvailabilityZones",
"ec2:DeleteLaunchTemplate",
"ec2:CreateTags",
"ec2:CreateLaunchTemplate",
"ec2:CreateFleet",
"ec2:DescribeSpotPriceHistory",
"pricing:GetProducts"
],
"Effect" : "Allow",
"Resource" : "*",
"Sid" : "Karpenter"
},
{
"Action" : "ec2:TerminateInstances",
"Condition" : {
"StringLike" : {
"ec2:ResourceTag/karpenter.sh/nodepool" : "*"
}
},
"Effect" : "Allow",
"Resource" : "*",
"Sid" : "ConditionalEC2Termination"
},
{
"Effect" : "Allow",
"Action" : "iam:PassRole",
"Resource" : "arn:aws:iam::${data.aws_caller_identity.current.account_id}:role/${aws_iam_role.karpenter_node_role.name}",
"Sid" : "PassNodeIAMRole"
},
{
"Effect" : "Allow",
"Action" : "eks:DescribeCluster",
"Resource" : "arn:aws:eks:${var.region}:${data.aws_caller_identity.current.account_id}:cluster/${var.kubernetes_cluster_name}",
"Sid" : "EKSClusterEndpointLookup"
},
{
"Sid" : "AllowScopedInstanceProfileCreationActions",
"Effect" : "Allow",
"Resource" : "*",
"Action" : [
"iam:CreateInstanceProfile"
],
"Condition" : {
"StringEquals" : {
"aws:RequestTag/kubernetes.io/cluster/${var.kubernetes_cluster_name}" : "owned",
"aws:RequestTag/topology.kubernetes.io/region" : "${var.region}"
},
"StringLike" : {
"aws:RequestTag/karpenter.k8s.aws/ec2nodeclass" : "*"
}
}
},
{
"Sid" : "AllowScopedInstanceProfileTagActions",
"Effect" : "Allow",
"Resource" : "*",
"Action" : [
"iam:TagInstanceProfile"
],
"Condition" : {
"StringEquals" : {
"aws:ResourceTag/kubernetes.io/cluster/${var.kubernetes_cluster_name}" : "owned",
"aws:ResourceTag/topology.kubernetes.io/region" : "${var.region}",
"aws:RequestTag/kubernetes.io/cluster/${var.kubernetes_cluster_name}" : "owned",
"aws:RequestTag/topology.kubernetes.io/region" : "${var.region}"
},
"StringLike" : {
"aws:ResourceTag/karpenter.k8s.aws/ec2nodeclass" : "*",
"aws:RequestTag/karpenter.k8s.aws/ec2nodeclass" : "*"
}
}
},
{
"Sid" : "AllowScopedInstanceProfileActions",
"Effect" : "Allow",
"Resource" : "*",
"Action" : [
"iam:AddRoleToInstanceProfile",
"iam:RemoveRoleFromInstanceProfile",
"iam:DeleteInstanceProfile"
],
"Condition" : {
"StringEquals" : {
"aws:ResourceTag/kubernetes.io/cluster/${var.kubernetes_cluster_name}" : "owned",
"aws:ResourceTag/topology.kubernetes.io/region" : "${var.region}"
},
"StringLike" : {
"aws:ResourceTag/karpenter.k8s.aws/ec2nodeclass" : "*"
}
}
},
{
"Sid" : "AllowInstanceProfileReadActions",
"Effect" : "Allow",
"Resource" : "*",
"Action" : "iam:GetInstanceProfile"
},
{
"Action": [
"sqs:DeleteMessage",
"sqs:GetQueueUrl",
"sqs:ReceiveMessage"
],
"Effect": "Allow",
"Resource": aws_sqs_queue.qovery-eks-queue.arn
"Sid": "AllowInterruptionQueueActions"
}
],
"Version" : "2012-10-17"
}
)
}

SQS Queue

Karpenter uses an SQS queue to monitor specific events from AWS services, such as instance interruptions or scheduled maintenance events. When these critical events are received, Karpenter can take appropriate actions to maintain the stability and performance of your nodes. For example, if an instance interruption event is detected, Karpenter can proactively launch new instances to replace the affected ones, ensuring continuous availability and minimizing downtime. By leveraging this event-driven approach, Karpenter enhances the resilience and reliability of your infrastructure.

locals {
events = {
health_event = {
name = "HealthEvent"
description = "Karpenter interrupt - AWS health event"
event_pattern = {
source = ["aws.health"]
detail-type = ["AWS Health Event"]
}
}
spot_interrupt = {
name = "SpotInterrupt"
description = "Karpenter interrupt - EC2 spot instance interruption warning"
event_pattern = {
source = ["aws.ec2"]
detail-type = ["EC2 Spot Instance Interruption Warning"]
}
}
instance_rebalance = {
name = "InstanceRebalance"
description = "Karpenter interrupt - EC2 instance rebalance recommendation"
event_pattern = {
source = ["aws.ec2"]
detail-type = ["EC2 Instance Rebalance Recommendation"]
}
}
instance_state_change = {
name = "InstanceStateChange"
description = "Karpenter interrupt - EC2 instance state-change notification"
event_pattern = {
source = ["aws.ec2"]
detail-type = ["EC2 Instance State-change Notification"]
}
}
}
}


resource "aws_sqs_queue" "qovery-eks-queue" {
name = var.kubernetes_cluster_name
message_retention_seconds = 300
sqs_managed_sse_enabled = true

tags = merge(
local.tags_common,
)
}

data "aws_iam_policy_document" "queue" {
statement {
sid = "SqsWrite"
actions = ["sqs:SendMessage"]
resources = [aws_sqs_queue.qovery-eks-queue.arn]

principals {
type = "Service"
identifiers = [
"events.amazonaws.com",
"sqs.amazonaws.com",
]
}
}
}

resource "aws_sqs_queue_policy" "qovery_sqs_queue_policy" {
queue_url = aws_sqs_queue.qovery-eks-queue.url
policy = data.aws_iam_policy_document.queue.json
}

resource "aws_cloudwatch_event_rule" "qovery_cloudwatch_event_rule" {
for_each = { for k, v in local.events : k => v }

name_prefix = "qovery-cw-event-${each.value.name}-"
description = each.value.description
event_pattern = jsonencode(each.value.event_pattern)

tags = merge(
local.tags_common,
)
}

resource "aws_cloudwatch_event_target" "qovery_cloudwatch_event_target" {
for_each = { for k, v in local.events : k => v }

rule = aws_cloudwatch_event_rule.qovery_cloudwatch_event_rule[each.key].name
target_id = "KarpenterInterruptionQueueTarget"
arn = aws_sqs_queue.qovery-eks-queue.arn
}

Fargate Profiles

We are creating a Fargate profile to run the Karpenter controller pods. Below is an example Terraform configuration for the Fargate profile:

resource "aws_eks_fargate_profile" "karpenter" {
cluster_name = aws_eks_cluster.eks_cluster.name
fargate_profile_name = ""
pod_execution_role_arn = aws_iam_role.karpenter-fargate.arn
subnet_ids = ["", ""]

selector {
namespace = "kube-system"
labels = {
"app.kubernetes.io/name" = "karpenter",
}
}
}

The subnets associated with an AWS fargate profile must be private and have no direct route to an Internet Gateway.

In addition to the Karpenter controller profile, we need to create three other Fargate profiles to run essential pods required for Karpenter to be operational. Once Karpenter is installed and configured, these Fargate profiles can be deleted, allowing these pods to run on EC2 instances started by Karpenter.

The applications that require Fargate profiles are:

  • CoreDNS: Installed through AWS add-on, it is crucial for internal DNS resolution within the cluster.
  • EBS CSI: Also installed through AWS add-on, this driver manages EBS volumes and provides persistent storage for the cluster.
  • Qovery User Mapper: Developed by Qovery, this tool configures the aws-auth ConfigMap to include the role karpenter-node-role in the mapRoles section. You can find a complete description of this tool in the following article.
data:
mapRoles: |
- rolearn:
username: system:node:{{EC2PrivateDNSName}} │
groups: │
- system:nodes │
- system:bootstrappers

Add Tags to Subnets and Security Group

Karpenter must know which subnets and security groups to use when creating EKS instances. These subnets and security groups can be configured explicitly during the deployment of Karpenter using the Karpenter Helm chart. However, Karpenter can also automatically identify these resources if they are tagged with the key karpenter.sh/discovery and the value set to the name of the cluster. Therefore, if you decide to use tagging, you must update your subnet and security group resources with the following tag:

  tags = 
{
"karpenter.sh/discovery" =
}

Deploying Karpenter via Helm

If you enable the spot instance before configuring Karpenter, you must check that the service-linked role AWSServiceRoleForEC2Spot is present.

To check if the service linked exists:

aws iam get-role --role-name AWSServiceRoleForAutoSca

To create the service linked if necessary

aws iam create-service-linked-role --aws-service-name spot.amazonaws.com || true

To deploy Karpenter effectively, we use three Helm charts:

Although the Karpenter Helm chart installs the CRDs during the initial installation, it does not update them when upgrading the version. By separating the CRDs into their own chart, we can update both the CRDs and Karpenter independently, ensuring we can upgrade the Karpenter version seamlessly.

Troubleshooting Common Issues

  1. When the two pods of the Karpenter controller start on Fargate, they initially enter a pending state. It can take at least one minute for the two nodes with names starting with “fargate” to appear. Once these nodes appear, the two pods will move to the running state. If the nodes do not appear and the pods remain pending, review the setup of the Fargate profile, ensuring that the associated subnets are private and linked to a NAT Gateway.
  2. If the pods are running but no nodes are created by Karpenter, you can check the events associated with the nodeClaims (CRD added when installing Karpenter). If the event reason is NodeNotFound with the message ‘Node not registered with cluster,’ then check that aws-auth in the config map is correctly configured.
  3. If Karpenter can’t create spot instances and you have an event that says: “The provided credentials do not have permission to create the service-linked role for EC2 Spot Instances,” check that the service-linked role AWSServiceRoleForEC2Spot is present. (See the previous section to get the command to check.)

Conclusion

In this article, we’ve explored how to install Karpenter on an AWS EKS cluster. The deployment options we evaluated, particularly the decision to run the Karpenter controller on AWS Fargate, have greatly simplified our infrastructure management while enhancing security and scalability. We detailed the steps and considerations involved in installing Karpenter, from configuring IAM roles and setting up SQS queues to deploying Karpenter via Helm, including using a separate Helm chart for installing and updating the necessary CRDs.

We also covered troubleshooting common issues that may arise during the deployment process, providing solutions to ensure a successful installation. As we continue to explore and utilize Karpenter, we will share further insights in future articles.

Share on :
Twitter icon
linkedin icon
Tired of fighting your Kubernetes platform?
Qovery provides a unified Kubernetes control plane for cluster provisioning, security, and deployments - giving you an enterprise-grade platform without the DIY overhead.
See it in action

Suggested articles

Kubernetes
8
 minutes
Kubernetes management in 2026: mastering Day-2 ops with agentic control

The cluster coming up is the easy part. What catches teams off guard is what happens six months later: certificates expire without a single alert, node pools run at 40% over-provisioned because nobody revisited the initial resource requests, and a manual kubectl patch applied during a 2am incident is now permanent state. Agentic control planes enforce declared state continuously. Monitoring tools just report the problem.

Mélanie Dallé
Senior Marketing Manager
Kubernetes
6
 minutes
Kubernetes observability at scale: how to cut APM costs without losing visibility

The instinct when setting up Kubernetes observability is to instrument everything and send it all to your APM vendor. That works fine at ten nodes. At a hundred, the bill becomes a board-level conversation. The less obvious problem is the fix most teams reach for: aggressive sampling. That is how intermittent failures affecting 1% of requests disappear from your monitoring entirely.

Mélanie Dallé
Senior Marketing Manager
Kubernetes
 minutes
How to automate environment sleeping and stop paying for idle Kubernetes resources

Scaling your deployments to zero is only half the battle. If your cluster autoscaler does not aggressively bin-pack and terminate the underlying worker nodes, you are still paying for idle metal. True environment sleeping requires tight integration between your ingress layer and your node provisioner to actually realize FinOps savings.

Mélanie Dallé
Senior Marketing Manager
Kubernetes
DevOps
6
 minutes
10 best Kubernetes management tools for enterprise fleets in 2026

The structure, table, tool list, and code blocks are all worth keeping. The main work is fixing AI-isms in the prose, updating the case study to real metrics, correcting the FAQ format, and replacing the CTAs with the proper HTML blocks. The tool descriptions need the "Core strengths / Potential weaknesses" headers made less template-y, and the intro needs a sharper human voice.

Mélanie Dallé
Senior Marketing Manager
DevOps
Kubernetes
Platform Engineering
6
 minutes
10 best Red Hat OpenShift alternatives to reduce licensing costs

For years, Red Hat OpenShift has been the safe choice for heavily regulated, on-premise environments. It operates as a secure fortress. But in the public cloud, that fortress acts as an expensive prison. Paying proprietary per-core licensing fees on top of your standard AWS or GCP compute bill is a redundant "middleware tax." Escaping OpenShift requires decoupling your infrastructure from your developer experience by running standard, vanilla Kubernetes paired with an agentic control plane.

Morgan Perry
Co-founder
AI
Product
3
 minutes
Qovery Skill for AI Agents: Deploy Apps in One Prompt

Use Qovery from Claude Code, OpenCode, Codex, and 20+ AI Coding agents

Romaric Philogène
CEO & Co-founder
Kubernetes
 minutes
Stopping Kubernetes cloud waste: agentic automation for enterprise fleets

Agentic Kubernetes resource reclamation is the practice of using an autonomous control plane to continuously identify, suspend, and delete idle infrastructure across a multi-cloud Kubernetes fleet. It replaces manual cleanup and reactive autoscaling with intent-based policies that act on business state, eliminating the configuration drift and cloud waste typical of unmanaged fleets.

Mélanie Dallé
Senior Marketing Manager
Platform Engineering
Kubernetes
DevOps
10
 minutes
What is Kubernetes? The reality of Day-2 enterprise fleet orchestration

Kubernetes focuses on container orchestration, but the reality on the ground is far less forgiving. Provisioning a single cluster is a trivial Day-1 exercise. The true operational nightmare begins on Day 2. Teams that treat multi-cloud fleets like isolated pets inevitably face crushing YAML configuration drift, runaway AWS bills, and severe scaling bottlenecks.

Morgan Perry
Co-founder

It’s time to change
the way you manage K8s

Turn Kubernetes into your strategic advantage with Qovery, automating the heavy lifting while you stay in control.