Nx Architecture Part-1: Organizing and Structuring a React Project with Nx
We have previously published an article discussing the benefits of using Nx. You can find it here. This article is intended for individuals with experience using Nx. However, if you want to learn how to structure a mid-size or large React application using Nx, this article is for you. The article will be divided into two parts: one will provide an overview of Nx concepts and recommendations based on the official documentation, and the other will present a practical example of how to structure an Nx project with React, based on my experience with multiple Nx + React projects.
Before diving deep into example, we should clarify some concepts
Applications and Libraries
In Nx, applications and libraries are two key concepts. Applications (living under /apps directory) are responsible for routing, configuring dependency injection and connecting libraries. They should not include any components, services, or business logic. Instead, their role is to orchestrate the libraries to build the product you want.
On the other hand, libraries (living under /libs directory) contain the reusable components, services, and business logic that can be shared across multiple applications. They can be organized based on functionality or domain, allowing for better organization, reusability, and code maintainability.
Note that you can now customize those folders https://nx.dev/reference/nx-json#workspace-layout. By separating the concerns of applications and libraries, Nx allows for better modularity and scalability of projects. It enables developers to build applications by composing different libraries and enforce project boundaries to ensure clean separation and control over dependencies.
The 80/20 rule: Note that a typical Nx workspace has many more libs than apps, following an 80/20 approach:
About 80% of the logic is placed in the /libs folder.
About 20% is placed in the /apps folder.
A typical way to conceptualize the application is as "containers" that connect, package, and build functionality implemented in libraries. So pay attention to the organization of the libs directory is really important because it roughly represents 80% of your codebase. The official documentation [1] provides more information on applications and libraries in Nx.
Boundaries and Tags dimensions
In large workspace, it is common to have multiple teams working on different parts of the solution. These projects are often divided into logical domains, with each team focusing on a specific domain. Within each domain, there is usually a clear public API that allows other domains to consume the information.
Defining and enforcing project boundaries are key elements in an Nx workspace. They help organize and maintain code and provide control over dependencies.
Nx allows you to enforce module boundaries using ESlint rules based on tags. By doing so, developers can ensure clean separation between different application parts and prevent unintended dependencies[2].
Tags are basically labels in project.json or package.json files and you can come up with whatever you want but it has to be static string. Beware, tags aren’t folders! You can create tag dimension using semi-colon. Eg. foo:bar foo:baz qux:quux qux:corge ****will give you a foo dimension and a qux dimension (both with multiple values).
It’s important to define tags dimensions to have flexibility and control over communication between projects inside your workspace[3].
util-dates is a utility-type library with a shared visibility scope.
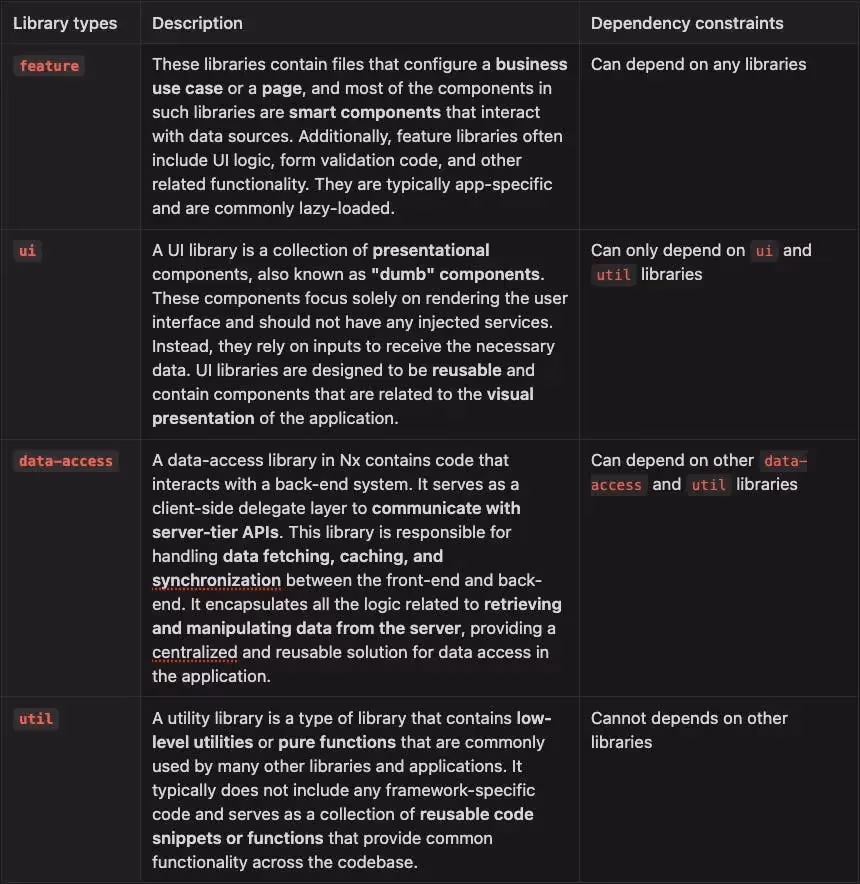
Library types
Within an Nx workspace, you'll encounter various types of libraries. To ensure order and maintainability, Nx suggests limiting the number of library types to a smaller set. Remember that you must document what each type of library means.
For my part, I like to stick with the types given in the documentation[3][5], with some subtleties on the data-access libraries we will see later.
null
*Note: our definition differs slightly from the Nx documentation because it partially excludes the state management from this type. This subject will be addressed in part 2.
Nx also shows some examples where Applications can have a scope:app tag to enforce boundaries on Applications, too.
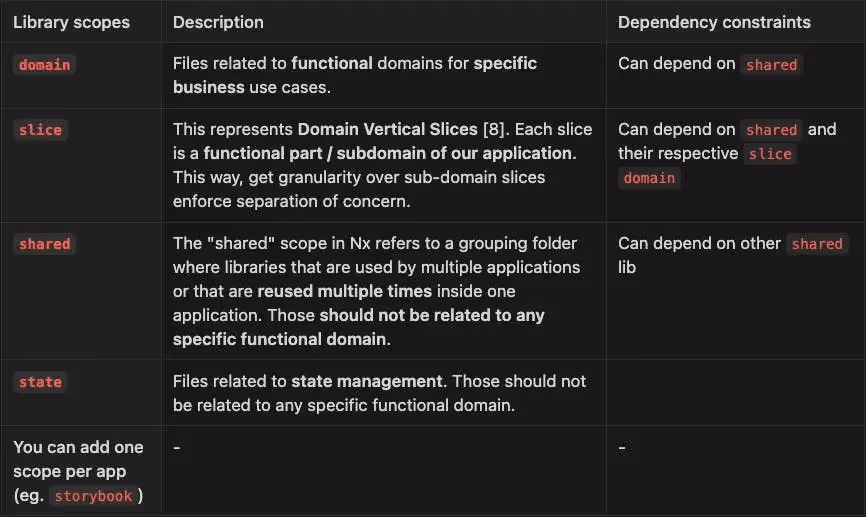
Library scopes
In the context of Nx, libraries can be scoped based on functionality or domain. This means that libraries can be grouped together based on their purpose or the specific aspect of the application they are responsible for. Structuring your application into folders that represent scope will help you define code ownership and boundaries. [4]
null
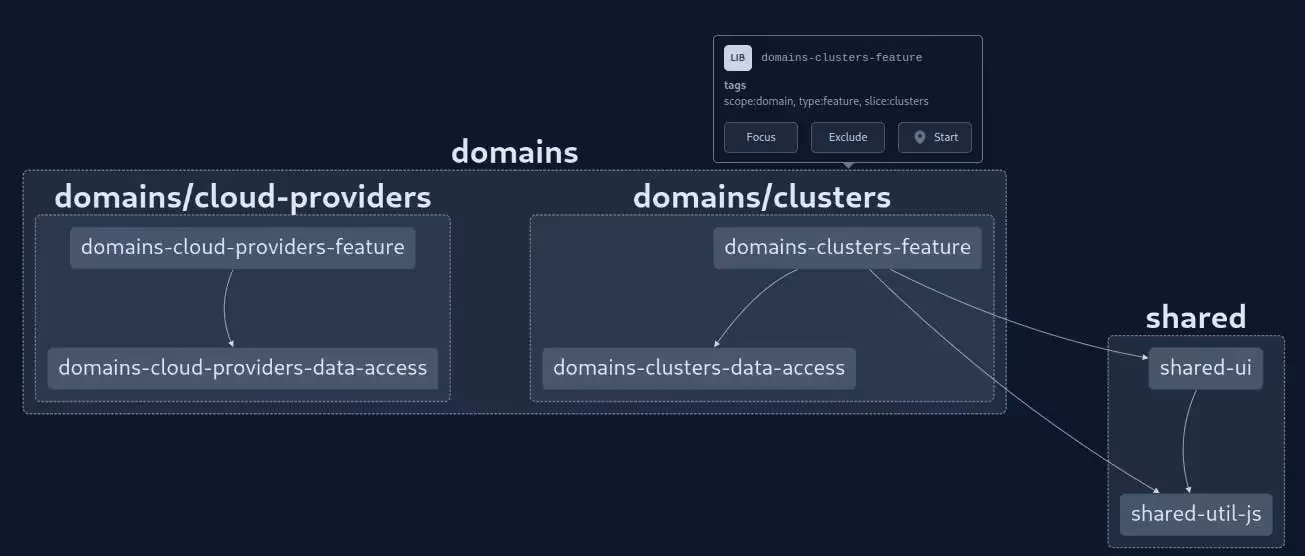
Here is an example of an Nx graph using those concepts:
null
As you can see, domains are split and independent of one another. You can also have shared projects for standard components or utils.
We’ve seen some of advanced architecture concepts in Nx, specifically focusing on structuring and organizing a mid-size/large React application. You can already use to drive your teams workflow and establish boundaries between them.
You will benefit from a better separation of concern and an overview of your workspace's internal dependencies.
Nx provides powerful tools and concepts such as tags dimensions and library types to build a controlled system that works for your case
The second part of the article will provide a practical example of structuring an Nx project with React using tanstack-query and showing boundaries enforcement.
Side note: Opinionated guide
I do want to highlight that the Nx documentation doesn’t give you really strict guidance on how to structure your project, especially on React. There are multiple reasons for that.
First, Nx is not framework or library-oriented, so it tends to be as generic as possible. Nx is not even JS or language-oriented. It is a tool that is completely agnostic and focuses on dependency management. Unfortunately, this also means that documentation rarely goes into detail for complex use cases, and you often feel short on how to structure your app. However, the Nx team is making reasonable efforts with videos and interviews on their YouTube channel and adding AI chat to fill that gap.
In addition, Nx's main target in the JS/TS world used to be Angular. Due to historical reasons and/or community alignment, React is second regarding documentation/blog posts/examples you can glance at on the web. Even so, it's worth noting that the situation has improved.
Remember that no one-size-fits-all solution exists, and your project structure should be tailored to your specific needs and workflows.