Blog
AWS
8
minutes

Guide To AWS Load Balancers

The AWS Elastic Load Balancing (ELB) automatically distributes your incoming application traffic across multiple targets, such as EC2 instances, containers, and IP addresses, in one or more Availability Zones, ultimately increasing the availability and fault tolerance of your applications. In other words, ELB, as its name implies, is responsible for distributing frontend traffic to backend servers in a balanced manner. ELB monitors the health of its registered targets and routes traffic only to the healthy targets. For example, if a system has only one web server, for system applications with high traffic, long response times or no response will often occur. At this time, you will want to increase the specifications of the web server or increase the number of web servers. If there are two web servers, on which server should the traffic come in? At this time, there must be something responsible for receiving and distributing traffic. That something is ELB.
September 26, 2025
Romaric Philogène
CEO & Co-founder
Summary
Twitter icon
linkedin icon
Learn more about our migration from Kubernetes Built-in NLB to AWS Load Balancer

Benefits of Using the AWS Elastic Load Balancing

The major use for an ELB is to ensure the elastic and high availability of your resources. There are four types of forwarding rules that you can assign to a load balancer: HTTP, HTTPS, TCP, and UDP.

Some of the benefits of ELB include the following:

  • High availability and distribution of website traffic to multiple destinations or targets.
  • High security through user authentication and SSL/TLS decryption functions.
  • Handling drastic changes in website traffic without human intervention.
  • Increased visibility of your applications through continuous monitoring and auditing.
  • Hybrid load balancing, which can help with the migration of resources to the cloud.

Types of AWS Load Balancers

As of today, AWS supports four types of load balancers: Classic Load Balancers, Network Load Balancers (NLBs), Application Load Balancers (ALBs), and Gateway Load Balancers (GWLBs). This article will focus on the first three, as their sole purpose is to distribute incoming traffic across multiple targets.

The Classic Load Balancer is a previous-generation load balancer and, currently, is only recommended for scenarios where you still have instances running on an EC2-Classic network; if you do not, then AWS recommends that you use an NLB or an ALB, as the features provided by the Classic Load Balancer can be replaced by either.

Classic Load Balancer

This is the simplest form of load balancer that was originally used for classic EC2 instances. It operates both at the connection level and the request level. The main disadvantage of this type of load balancer is that it does not support some features, such as host-based routing or route-based routing. Once configured, the load balancer distributes the load among the servers regardless of what is on the server, which, in certain situations, can reduce efficiency and performance.

Application Load Balancer

The Application Load Balancer (ALB) is a load balancer at the seventh layer of the OSI model, and it can route the network packet to different backend services based on the content of the network packet. Unlike running an elastic load balancer for each service, an ALB can balance network traffic for multiple backend services. For example, a URL containing "/api" and a URL containing "/signup" will be routed to different backend services.

This type of load balancer is a new generation of load balancer from AWS that provides native support for HTTP/2 and WebSocket protocols. By multiplexing requests over a single connection, HTTP/2 reduces network traffic. WebSocket allows developers to configure persistent TCP connections between client and server while minimizing power consumption.

Compared with the Classic Load Balancer, the ALB supports more features, such as the following:

Network Load Balancer

If the application needs to achieve extreme performance and static IP, AWS recommends that you use a Network Load Balancer (NLB).

The NLB is optimized to handle bursty, unstable traffic patterns and rapidly fluctuating workloads. Providing high throughput, NLB can scale to handle millions of requests per second. So if your workload requirements are to handle bursty workflows at the transport layer or require extreme network performance, then you may consider using an NLB.

In addition, NLB automatically provides a static IP that can be used as the frontend IP of the balancer itself. It is also possible to assign a resilient IP address to each subnet enabled for the load balancer. This allows the NLB to be incorporated into your existing firewall security policy and avoid the problems associated with DNS caching.

How to Configure Application Load Balancers

Next, learn how to create an ALB through the AWS Management Console, a web-based interface.

Decide which two Availability Zones you'll utilize for your EC2 instances before you start. In each of these Availability Zones, configure your virtual private cloud (VPC) with at least one public subnet. The load balancer is configured using these public subnets. You can instead launch your EC2 instances in one of these Availability Zones' other subnets.

In each Availability Zone, start at least one EC2 instance. Make each EC2 instance have a web server installed, such as Apache. Ensure that these instances' security groups enable HTTP access on port 80.

Then complete the following steps.

Select a Load Balancer Type

To create an ALB, complete the following steps:

  1. Open the Amazon EC2 console.
  2. Choose a region on the navigation bar for your load balancer. Be sure to select the same region that you used for your EC2 instances.
  3. Choose Load balancers on the navigation pane under LOAD BALANCING.
  4. Choose "Create load balancer".
  5. Choose "Create for ALB".

Complete Basic Configuration

To configure your cloud load balancer, complete the following steps:

  1. Enter a name for your load balancer in the Load balancer name.
  2. Keep the default values for Scheme and IP address type.
  3. Select the VPC that you used for your EC2 instances under Network mapping, for mappings. Select the Availability Zone for each one that you have used to launch your EC2 instances; then select the public subnet for that Availability Zone.
  4. Keep the default for Listeners, which is a listener that accepts HTTP traffic on port 80.

#Configure a Security Group

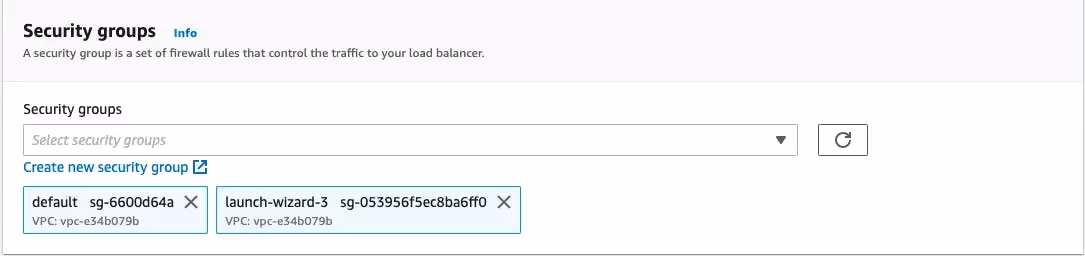
To have ELB configure a security group for your load balancer on your behalf, complete the following steps:

  1. Choose" Create new security group" under the "Security groups section".
  2. Type a name and description for the security group or keep the default name and description. This new security group contains a rule that allows traffic to the load balancer listener port selected on the Configure load balancer page.
Security groups

Configure Your Target Group

Create a target group to use in request routing. The default rule for your listener routes requests to targets registered in that group. The load balancer checks the health of the targets in this target group with the health check settings defined for the target group.

To configure your target group, complete the following steps in the Configure Routing section:

  1. Keep the default New target group for the Target group.
  2. Enter a name for the new target group under Name.
  3. Keep the default target type (Instance), protocol (HTTP), and port (80).
  4. Keep the default settings for Health checks.
  5. Choose Next.
  6. Choose "Create target group".
Instances and Target Group

Register Targets with Your Target Group

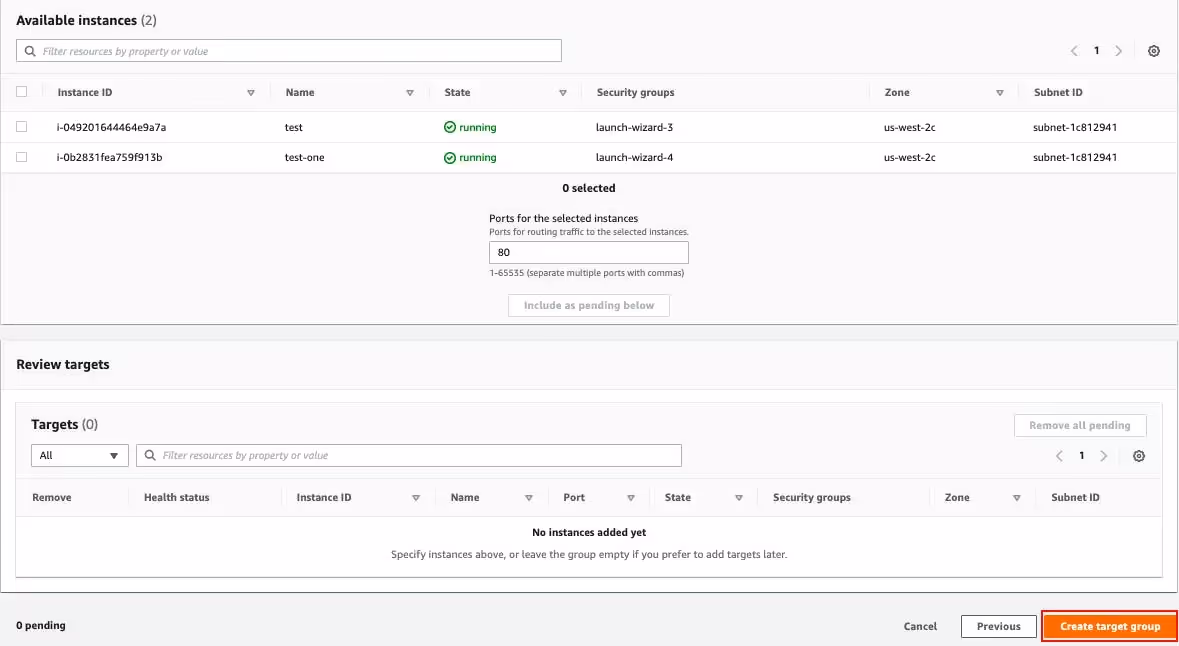
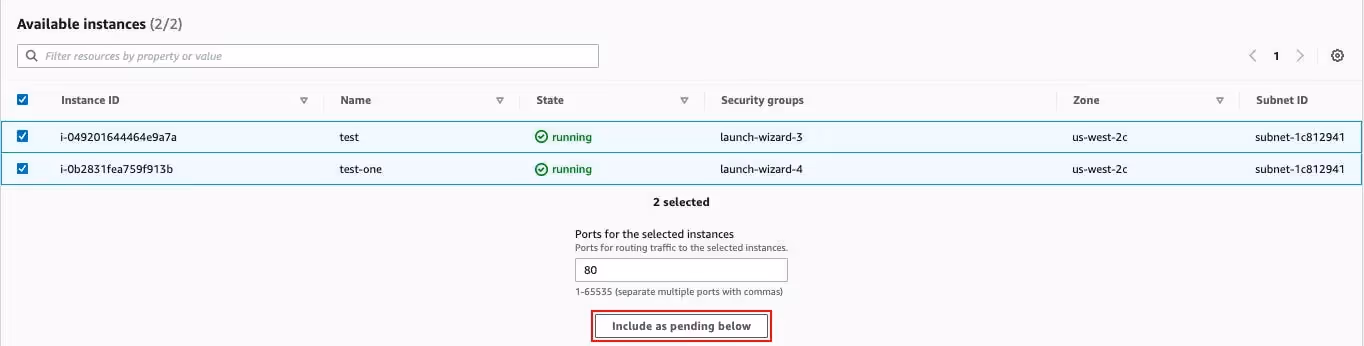
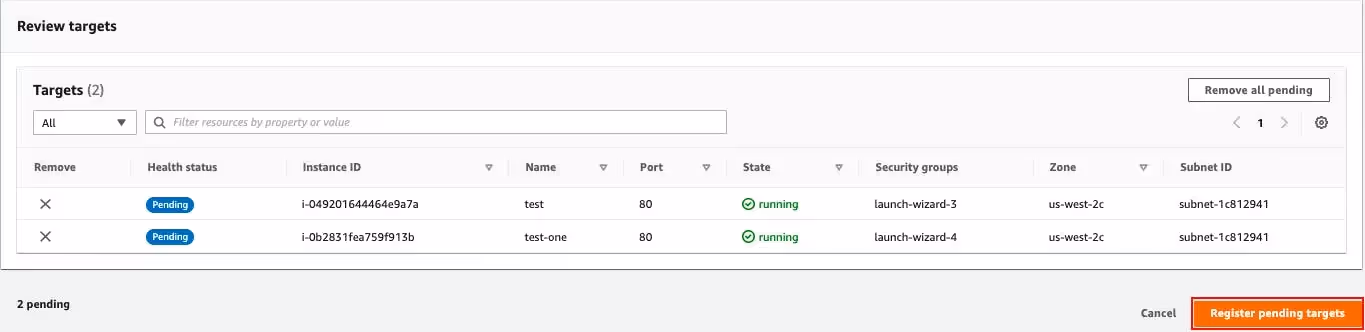
To register your instances with the target group, complete the following steps on the Register Targets page:

  1. Select one or more instances under Instances.
  2. Keep the default port (80) and choose Include as pending below.
  3. Choose Register pending targets when you have finished selecting instances.
Choose available instances
Review targets

Create and Test Your Load Balancer

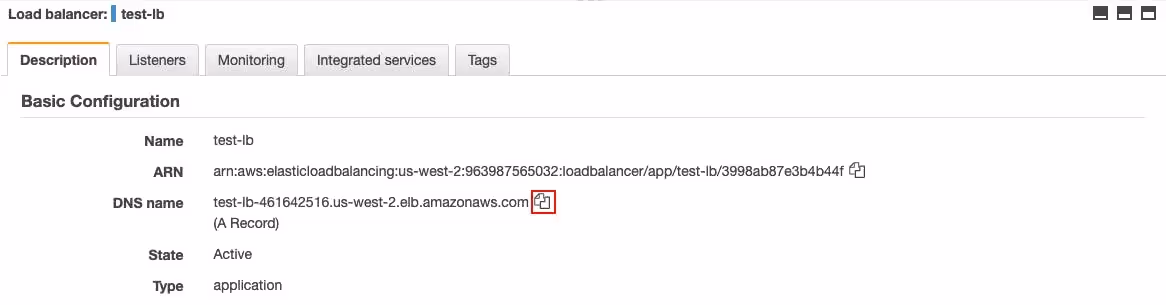
Review the summary of your settings before creating your load balancer. After creating the load balancer, verify that it's sending traffic to your EC2 instances.

To create and test your load balancer, complete the following steps:

  1. Choose "Create load balancer" after the summary section.
  2. Choose "Close" after you are notified that your load balancer was created successfully.
  3. Choose "Target groups" on the navigation pane, under LOAD BALANCING; and then select the newly created target group.
  4. Check the "Targets" tab to verify that your instances are ready. If the status of an instance is initial, it's probably because the instance is still in the process of being registered or it has not passed the minimum number of health checks to be considered healthy. After the status of at least one instance is healthy, you can test your load balancer.
  5. Choose Load balancers on the navigation pane, under LOAD BALANCING.
  6. Select the newly created load balancer.
  7. Copy the DNS name of the load balancer from the Description tab. Paste the DNS name into the address field of an Internet-connected web browser. If everything is working, the browser will display the default page of your server.
Load balancer description
Our page is live

Conclusion

In this article, you learned basic information about the load balancers used in AWS (excluding GWLBs). You also learned to create an ALB with a single EC2 instance.

Some key points to remember are as follows:

  • Load balancers are used for increasing the availability and fault tolerance of your application.
  • Load balancers in AWS come in four flavors: the classic load balancer, ALB, NLB, and GWLB.
  • You should ideally use ALB or NLB since the classic load balancer is now deprecated.
  • NLB can handle bursty workloads and millions of requests per second.
  • ALB has support for path-based or host-based routing and can balance traffic for multiple backend services.

The unique needs of your application use case—such as whether you need end-to-end SSL/TLS encryption or whether you want path-based or host-based routing—will determine the type of load balancer that is best for you.

Share on :
Twitter icon
linkedin icon
Tired of fighting your Kubernetes platform?
Qovery provides a unified Kubernetes control plane for cluster provisioning, security, and deployments - giving you an enterprise-grade platform without the DIY overhead.
See it in action

Suggested articles

Kubernetes
8
 minutes
Kubernetes management in 2026: mastering Day-2 ops with agentic control

The cluster coming up is the easy part. What catches teams off guard is what happens six months later: certificates expire without a single alert, node pools run at 40% over-provisioned because nobody revisited the initial resource requests, and a manual kubectl patch applied during a 2am incident is now permanent state. Agentic control planes enforce declared state continuously. Monitoring tools just report the problem.

Mélanie Dallé
Senior Marketing Manager
Kubernetes
6
 minutes
Kubernetes observability at scale: how to cut APM costs without losing visibility

The instinct when setting up Kubernetes observability is to instrument everything and send it all to your APM vendor. That works fine at ten nodes. At a hundred, the bill becomes a board-level conversation. The less obvious problem is the fix most teams reach for: aggressive sampling. That is how intermittent failures affecting 1% of requests disappear from your monitoring entirely.

Mélanie Dallé
Senior Marketing Manager
Kubernetes
 minutes
How to automate environment sleeping and stop paying for idle Kubernetes resources

Scaling your deployments to zero is only half the battle. If your cluster autoscaler does not aggressively bin-pack and terminate the underlying worker nodes, you are still paying for idle metal. True environment sleeping requires tight integration between your ingress layer and your node provisioner to actually realize FinOps savings.

Mélanie Dallé
Senior Marketing Manager
Kubernetes
DevOps
6
 minutes
10 best Kubernetes management tools for enterprise fleets in 2026

The structure, table, tool list, and code blocks are all worth keeping. The main work is fixing AI-isms in the prose, updating the case study to real metrics, correcting the FAQ format, and replacing the CTAs with the proper HTML blocks. The tool descriptions need the "Core strengths / Potential weaknesses" headers made less template-y, and the intro needs a sharper human voice.

Mélanie Dallé
Senior Marketing Manager
DevOps
Kubernetes
Platform Engineering
6
 minutes
10 best Red Hat OpenShift alternatives to reduce licensing costs

For years, Red Hat OpenShift has been the safe choice for heavily regulated, on-premise environments. It operates as a secure fortress. But in the public cloud, that fortress acts as an expensive prison. Paying proprietary per-core licensing fees on top of your standard AWS or GCP compute bill is a redundant "middleware tax." Escaping OpenShift requires decoupling your infrastructure from your developer experience by running standard, vanilla Kubernetes paired with an agentic control plane.

Morgan Perry
Co-founder
AI
Product
3
 minutes
Qovery Skill for AI Agents: Deploy Apps in One Prompt

Use Qovery from Claude Code, OpenCode, Codex, and 20+ AI Coding agents

Romaric Philogène
CEO & Co-founder
Kubernetes
 minutes
Stopping Kubernetes cloud waste: agentic automation for enterprise fleets

Agentic Kubernetes resource reclamation is the practice of using an autonomous control plane to continuously identify, suspend, and delete idle infrastructure across a multi-cloud Kubernetes fleet. It replaces manual cleanup and reactive autoscaling with intent-based policies that act on business state, eliminating the configuration drift and cloud waste typical of unmanaged fleets.

Mélanie Dallé
Senior Marketing Manager
Platform Engineering
Kubernetes
DevOps
10
 minutes
What is Kubernetes? The reality of Day-2 enterprise fleet orchestration

Kubernetes focuses on container orchestration, but the reality on the ground is far less forgiving. Provisioning a single cluster is a trivial Day-1 exercise. The true operational nightmare begins on Day 2. Teams that treat multi-cloud fleets like isolated pets inevitably face crushing YAML configuration drift, runaway AWS bills, and severe scaling bottlenecks.

Morgan Perry
Co-founder

It’s time to change
the way you manage K8s

Turn Kubernetes into your strategic advantage with Qovery, automating the heavy lifting while you stay in control.