Autoscaling Amazon EKS with Karpenter: A Step-by-Step Guide
Managing resource scaling in EKS clusters can quickly become complex, especially with fluctuating workloads. Traditional autoscaling solutions often require predefined configurations, which can lead to inefficiencies and unnecessary costs. This is where Karpenter comes in-a powerful, open-source project designed to dynamically manage and scale nodes in response to real-time application demands. By automatically provisioning resources exactly when they’re needed, Karpenter offers a more streamlined, efficient approach to scaling. Let's discuss Karpenter’s standout features and benefits, and we'll walk you through a step-by-step guide to deploying it on your EKS cluster.
Karpenter is an open-source, dynamic capacity provisioner for Kubernetes clusters that simplifies and optimizes resource management. As a sophisticated tool, it intelligently provisions and scales nodes based on real-time application demands and ensures efficient use of resources. Karpenter eliminates the need for pre-defined scaling policies, which makes it ideal for dynamic and unpredictable workloads. Let’s go through some of its powerful features in detail.
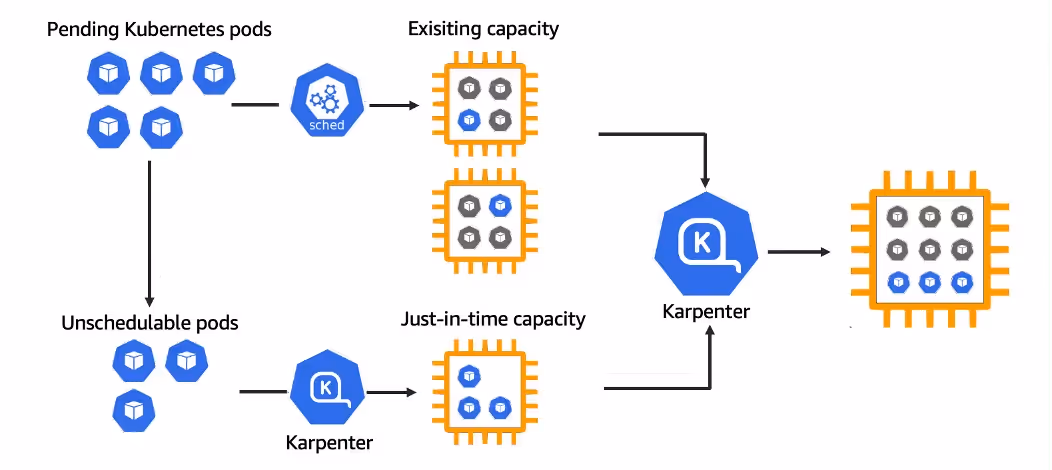
Karpenter dynamically provisions nodes in response to workload requirements, optimizing resource usage and reducing latency. It scales clusters up or down based on actual demand to ensure efficient resource allocation.
Compatibility with Diverse EC2 Instance Types
Karpenter supports a wide range of EC2 instance types, enabling the use of cost-effective Spot Instances. This flexibility allows users to mix and match instances to optimize performance and cost.
Adaptability to Real-Time Workload Demands
Karpenter adjusts to changing workload demands in real-time. This ensures that the applications have the necessary resources when they need them. This adaptability minimizes over-provisioning and under-provisioning, enhancing overall efficiency.
Why Choose Karpenter Over Traditional Autoscaling Solutions?
Karpenter offers several advantages over traditional autoscaling solutions like Cluster Autoscaler and Managed Node Groups, which makes it a superior choice for modern Kubernetes environments. Cluster Autoscaler and Managed Node Groups require pre-defined node groups and scaling policies, which can be inflexible and inefficient for dynamic workloads. In contrast, Karpenter's on-demand scaling approach eliminates the need for predefined configurations, providing greater flexibility.
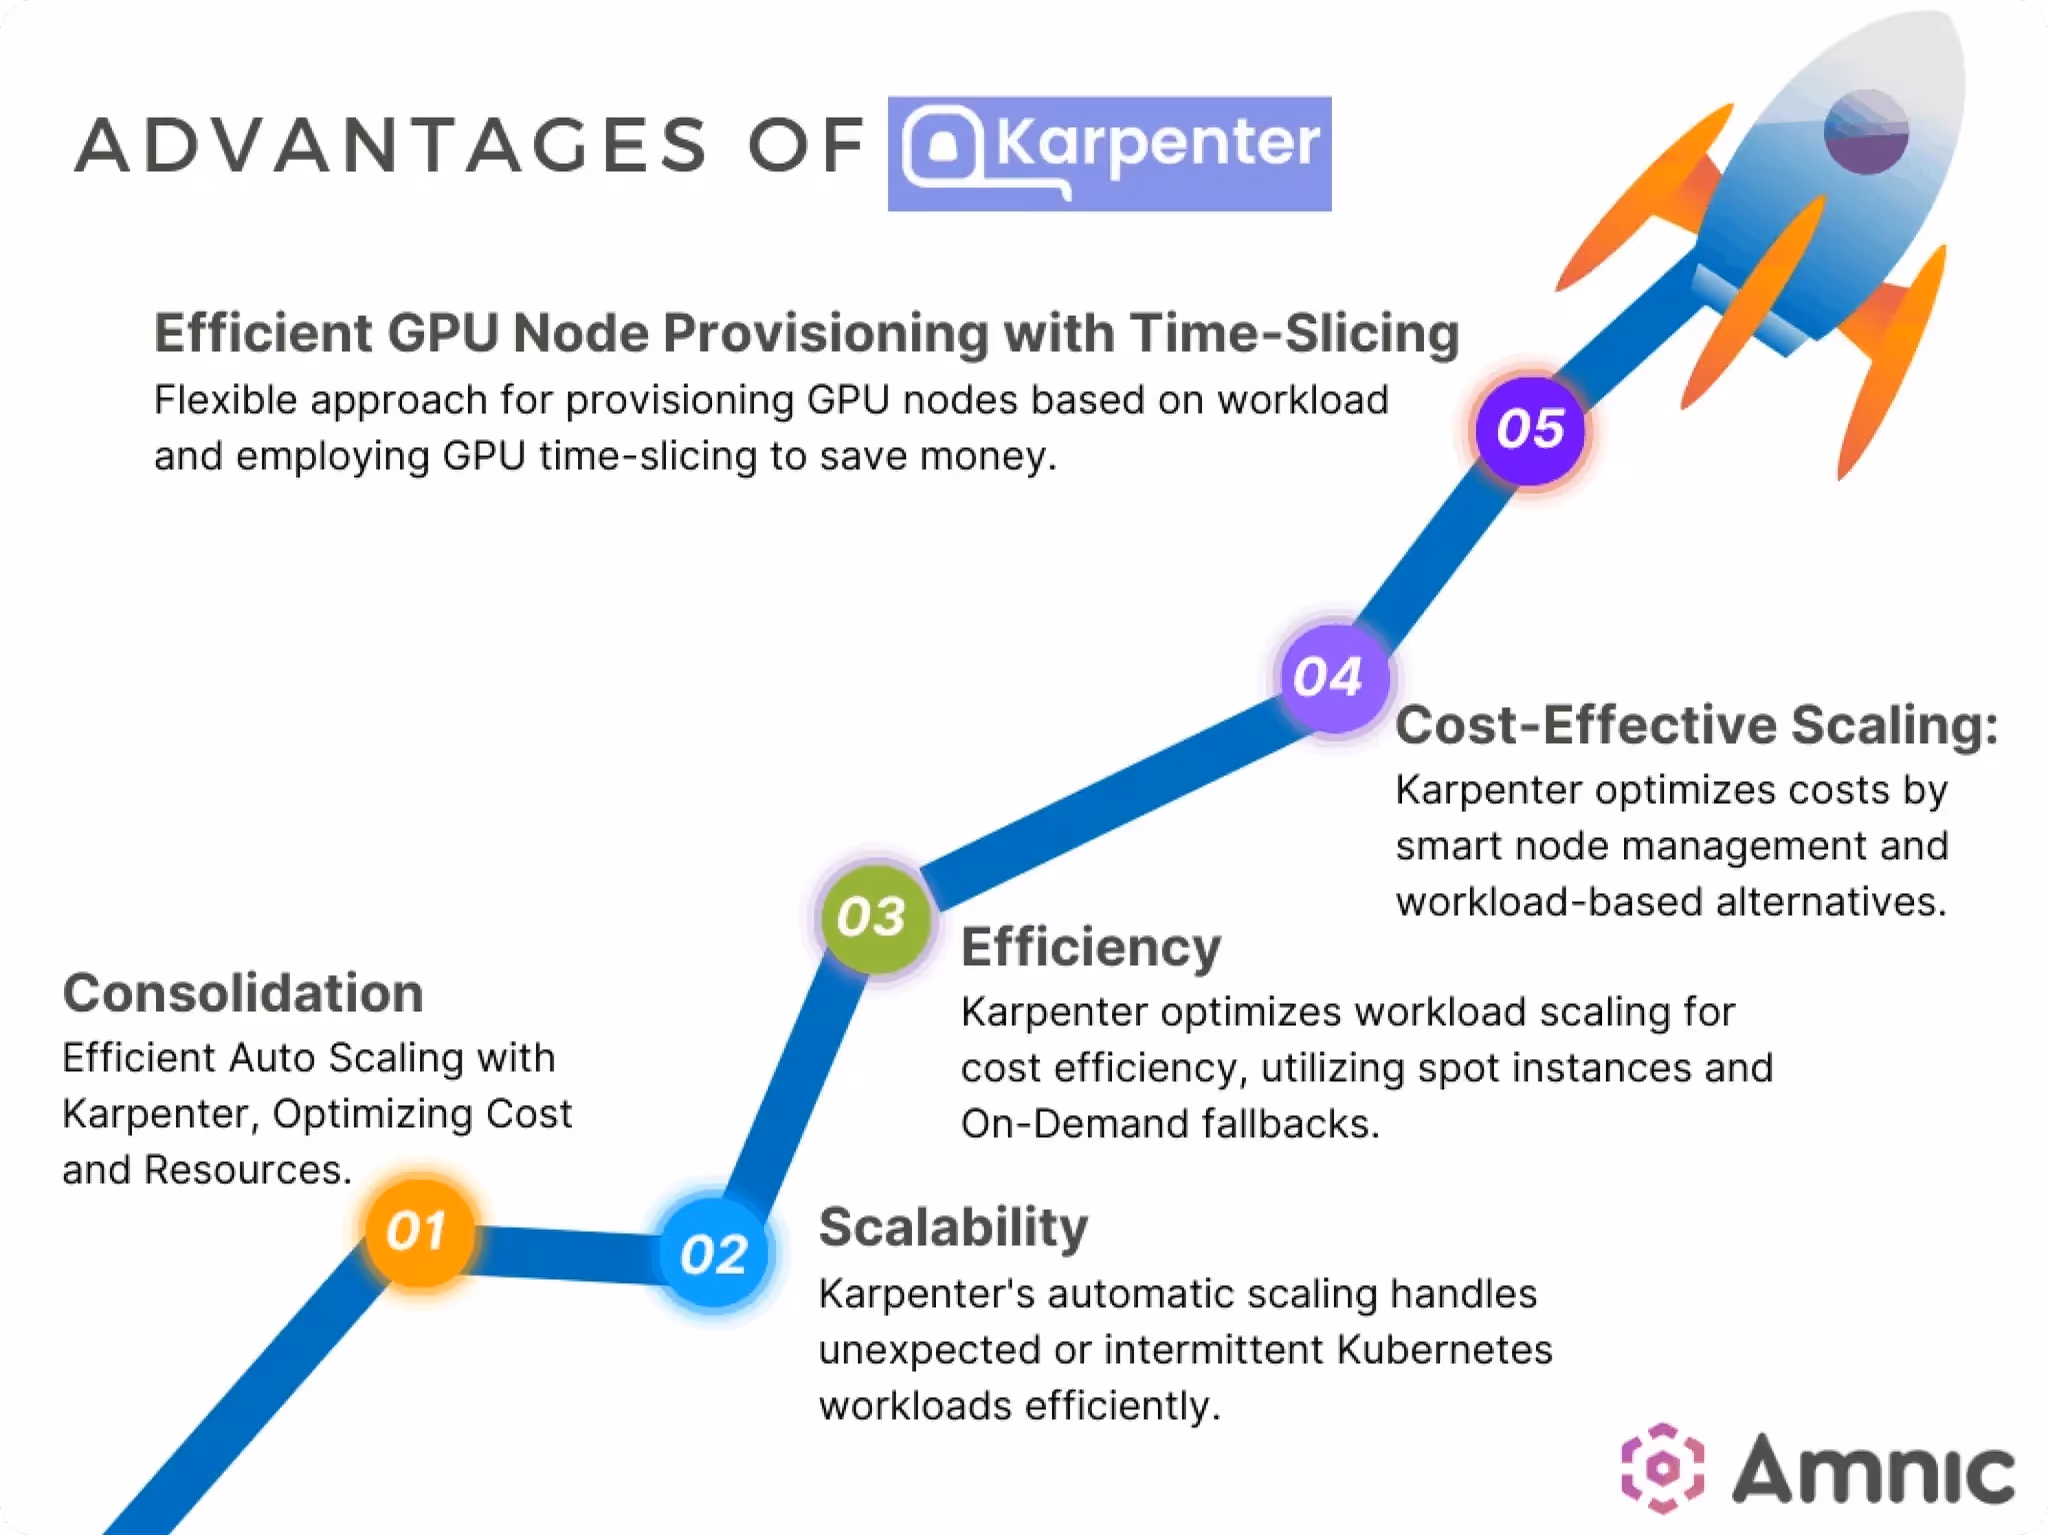
Benefits of Karpenter
No Need for Pre-Defined Node Groups: Karpenter dynamically provisions nodes based on real-time demand, removing the need for predefined node groups. This flexibility simplifies cluster management and improves resource utilization.
Decoupled from Specific EKS Versions, Offering Flexibility: Karpenter operates independently of specific EKS versions, allowing it to be used across different Kubernetes environments without compatibility issues. This decoupling enhances deployment flexibility and simplifies upgrades.
Saving up to 60% on EC2 Costs Compared to Standard Autoscaling Solutions: By using cost-effective EC2 instance types, including Spot Instances, Karpenter significantly reduces infrastructure costs upto 60%. Its intelligent provisioning and scaling capabilities ensure optimal resource utilization, leading to substantial cost savings.
Advantages of Karpenter | Source: https://amnic.com/blogs/unlocking-full-potential-of-aws-with-karpenter-2
Setting Up Karpenter on Amazon EKS
Prerequisites:
Access to an AWS EKS cluster.
Installed and configured tools (e.g., kubectl, helm, AWS CLI).
Installation Steps:
1. Create an IAM Role for Karpenter with Necessary Permissions:
Begin by creating an IAM role that Karpenter will use to interact with your EKS cluster and other AWS services. This role needs permissions for autoscaling, EC2 instance management, and other related tasks.
aws iam create-role --role-name KarpenterRole --assume-role-policy-document file://trust-policy.json
aws iam attach-role-policy --role-name KarpenterRole --policy-arn arn:aws:iam::aws:policy/AmazonEKSClusterPolicy
aws iam attach-role-policy --role-name KarpenterRole --policy-arn arn:aws:iam::aws:policy/AmazonEC2FullAccess
2. Prepare avalues.yaml Configuration File for Helm Installation:
Create a values.yaml file with the necessary configuration settings for Karpenter. This file defines parameters like instance types, scaling policies, and other resource specifications.
Check the status of the Karpenter deployment to ensure it is running correctly and interacting with your EKS cluster.
kubectl get pods -n karpenterkubectl logs -f deployment/karpenter-controller -n karpenter
Configuring Karpenter for Dynamic Provisioning
To set up Karpenter on EKS for dynamic provisioning, a critical step is defining a Provisioner. The Provisioner is a Kubernetes custom resource that allows you to specify how Karpenter should allocate resources in your cluster. With the Provisioner, you can define parameters such as instance types, node architecture, capacity type, and settings for node termination, enabling tailored resource allocation based on your workload needs.
Define a Provisioner for Customized Resource Allocation
Specify Instance Requirements: In your Provisioner configuration, you can list specific EC2 instance types or instance families. This ensures that Karpenter only provisions nodes compatible with your workload. This flexibility allows you to optimize cost and performance by choosing instance types that match your application’s requirements, such as memory, CPU, or GPU capabilities.
Define Architecture: Karpenter supports multiple CPU architectures, such as x86 and ARM (Graviton). You can specify the desired architecture in your Provisioner settings to ensure that nodes are provisioned with compatible architectures for your workloads.
Select Capacity Type: For cost-efficiency, you can specify the capacity type to use either On-Demand or Spot Instances. Spot Instances provide substantial cost savings but come with the risk of interruptions, making them suitable for fault-tolerant applications. By balancing Spot and On-Demand Instances, you can optimize costs without sacrificing reliability.
Include TTL Settings for Unused Nodes: Karpenter allows you to set Time-to-Live (TTL) values for unused nodes. This setting ensures that if a node is no longer needed (for example, if workloads are completed or scaled down), it will be automatically terminated after a specified period, minimizing idle costs and maximizing resource efficiency.
Here’s a sample YAML configuration to define a Provisioner for Karpenter:
apiVersion: karpenter.sh/v1alpha5kind: Provisionermetadata: name: defaultspec: requirements: - key: "node.kubernetes.io/instance-type" operator: In values: ["m5.large", "m5.xlarge"] # Define allowed instance types - key: "kubernetes.io/arch" operator: In values: ["x86_64"] # Define architecture (e.g., x86 or ARM) provider: capacityType: "SPOT" # Specify capacity type (SPOT or ON-DEMAND) ttlSecondsAfterEmpty: 300 # Set TTL for unused nodes (e.g., 5 minutes)
Agents ship fast. Guardrails keep them safe.
Qovery ensures every agent action is scoped, audited, and policy-checked. Start deploying in under 10 minutes.
Qovery is a DevOps automatiob Platform that simplifies application deployment and management on AWS EKS. It automates infrastructure provisioning, scaling, and application deployment so that developers can focus on building applications without worrying about complex backend operations. By integrating Karpenter, Qovery enables seamless, intelligent scaling and resource management so that your applications can run efficiently and cost-effectively.
Benefits of Qovery-Karpenter Integration
1. **Optimized Resource Utilization**
\- **Dynamic Scaling**: Karpenter, when integrated with Qovery, dynamically adjusts resource allocation based on actual application demands. This makes sure you’re only using what you need.
\- **Avoids Over-Provisioning**: Prevents excess resource allocation, so idle resources aren’t sitting unused, saving costs and improving efficiency.
\- **Prevents Under-Provisioning**: Ensures sufficient resources are always available for peak performance, even during high demand, avoiding slowdowns and performance drops.
2. **Cost Savings**
\- **Leverages Spot Instances**: Spot Instances are significantly more affordable than On-Demand Instances, and Karpenter can prioritize these to reduce overall costs. Use spot instances with caution if you are in a production environment and need to use the instances for mission-critical tasks.
\- **Balances with On-Demand Instances**: Qovery and Karpenter together balance Spot and On-Demand Instances based on application tolerance, so you save costs while maintaining reliability at the same time.
\- **Potential 60% Cost Reduction**: By maximizing Spot Instance use, the integration can cut EC2 costs by up to 60%. This makes it ideal for organizations looking to maximize cloud budget efficiency.
3. **Simplified Operations**
\- **Easy Integration**: Qovery automates Karpenter’s setup to minimize the manual input needed to activate and manage autoscaling.
\- **Streamlined Configuration**: Activating Karpenter requires just a few configuration parameters for quick setup without complex adjustments.
\- **Reduced Operational Overhead**: With Karpenter’s scaling functions automated, teams can focus on development and application improvement, rather than on constant infrastructure maintenance.
Quick Steps to Activate Karpenter via Qovery
Access Advanced Settings: Log in to your Qovery console, navigate to your AWS EKS cluster settings, and go to the "Advanced Settings" section.
Enable Karpenter: Set the aws.karpenter.enable parameter to true to activate Karpenter in your cluster.
Optionally Enable Spot Instances: To maximize cost savings, set aws.karpenter.enable_spot to true to allow the use of Spot Instances.
Apply Changes: Save these settings and redeploy your cluster to activate the configurations.
Conclusion
Karpenter empowers you to optimize resource utilization and reduce costs in your EKS clusters by dynamically provisioning nodes based on real-time demand. With Qovery, you can seamlessly integrate Karpenter into your Kubernetes workflow, simplifying the process and maximizing its benefits. By taking advantage of this powerful combination, you can achieve a more efficient and cost-effective EKS environment.
Qovery offers an all-in-one platform that helps startups and growing organizations automate every aspect of their DevOps lifecycle. With Qovery, you can automate infrastructure provisioning, CI/CD pipelines, security checks, and cloud scaling-without the need for deep DevOps expertise.
Morgan co-founded Qovery and leads engineering. He writes about Kubernetes architecture, DevOps best practices, and building resilient infrastructure at scale.
Next step
Agents ship fast. Guardrails keep them safe.
Qovery ensures every agent action is scoped, audited, and policy-checked. Start deploying in under 10 minutes.