Have you ever wondered how much effort goes into providing a seamless authentication process on a platform such as the Qovery console? Needless to say, we do not take security or user experience lightly. That’s why we decided to combine SSO through our users’ Git provider accounts (GitHub, GitLab and Bitbucket) with an external authentication service called Auth0. In order to accommodate our users' need to access the Qovery console through their CI/CD pipelines, we also elected to provide API Token generation for each organization, and relied on Spring Boot security to implement this feature. Let me show you how we did it. But first things first, for improved security, we need to put JSON web token (JWT) authentication and authorization into place. Then, we can dive into the nitty gritty, and effectively create our API token using Spring Boot.
The whole implementation is available here for you to experiment on it as we go: https://github.com/Qovery/spring-boot-api-token.
To make things easier, no external database has been used in the demo project: the persistence is delegated to stub Repositories (see this package).
Implementing JWT Authentication and Authorization
As stated in the RFC 7519, “a JSON Web Token is a compact, URL-safe means of representing claims to be transferred between two parties”. It is composed of 3 parts, separated by a dot:
Let’s first define a simple domain to illustrate the context we had with the Qovery Console.
To simplify the functional part, we can start with only 2 entities:
Organization: represents the scope a User can have access to.
User: represents a registered user. The User contains a list of roles describing access to Organization(s). A role follows the organization:${ORG_ID} rule format.
PYTHON
class Organization(
val id: Int,
val name: String
)
class User(
val username: String,
val encryptedPassword: String,
val roles: Set
)
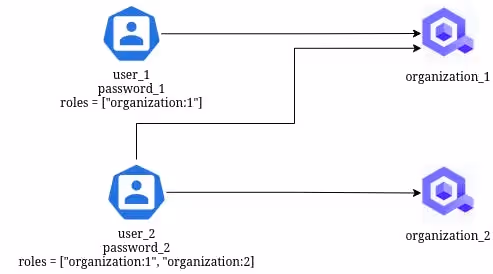
The following Users and Organizations are created when the application starts (see the code):
Users and Organizations created at application launch
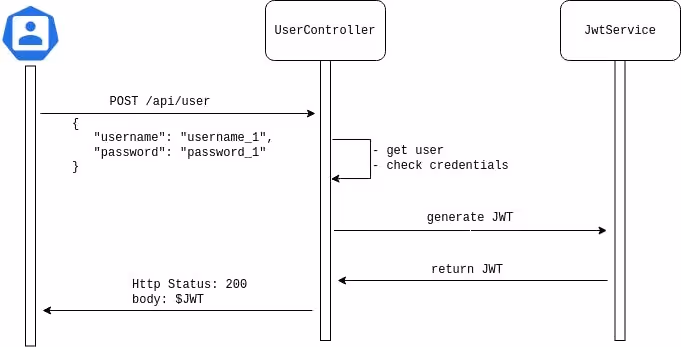
Creating JWT On Demand
On-demand JWT creation flow
We will store the following claims in our JWT:
sub: the User's username.
iat: the JWT creation date.
exp: the JWT expiration date (10 minutes in our case).
roles: the Organizations our User has access to, in the organization:${ORG_ID} format.
Also, our generated JWT must be signed using a private key defined in the application.properties file:
fun createJwt(user: User): String {
val now = Date()
return Jwts.builder()
.setSubject(user.username)
.setIssuedAt(now)
.setExpiration(Date(now.time + 60 * 10 * 1000))
.claim("roles", user.roles)
.signWith(SignatureAlgorithm.HS512, secretKeyByteArray)
.compact()
}
Please note: The java jjwt library is used to manipulate JWT.
A UserController will be used to expose the feature, performing a check on the credentials sent through the body.
Securing Requests
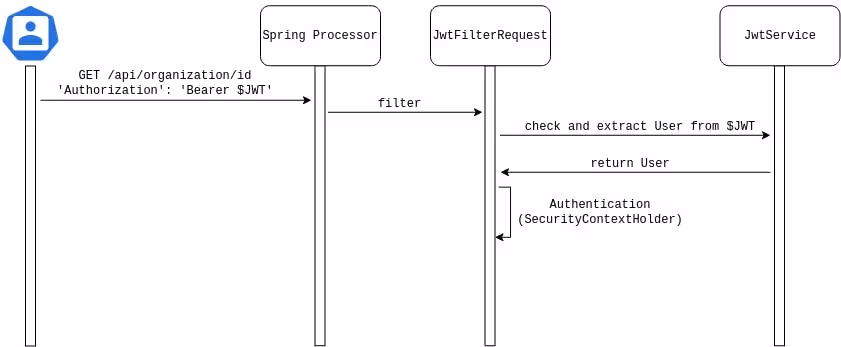
Authentication
JWT authentication implementation flow
Spring security provides 2 useful abstract classes for our needs: WebSecurityConfigurerAdapter and OncePerRequestFilter.
WebSecurityConfigurerAdapter is used to describe how we want to secure our endpoints by overriding the configure(http: HttpSecurity) method. By convention, we name it SecurityConfig.
Our implementation contains the following important parts:
a filter is added to authenticate the request.
we expose publicly the /api/user endpoint used to generate the JWT.
check that the JWT is present in the Authorization request header.
extract the JWT to retrieve the User’s attributes (name and roles).
inject a concrete implementation of Authentication that will be used to retrieve the User and its roles.
override fun doFilterInternal(request: HttpServletRequest, response: HttpServletResponse, filterChain: FilterChain) {
val header = request.getHeader("Authorization")
if (header != null) {
// remove 'Bearer ' prefix
val jwt = header.substring(7)
val user = jwtService.extractUserFromJwt(jwt)
SecurityContextHolder.getContext().authentication = UsernamePasswordAuthenticationToken(user, null, null)
}
filterChain.doFilter(request, response)
}
Please note: A request is considered as authenticated by Spring when the static class SecurityContextHolder contains an instance of Authentication where isAuthenticated() is true.
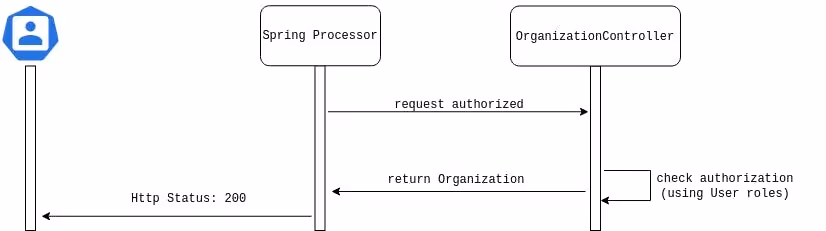
Authorization
JWT authorization implementation flow
Once the global authentication is successful through the JWT validation, we need to ensure that the User has access to the given Organization.
The SecurityContextHolder is used to retrieve our authenticated User as well as its roles. We can then check if the User has access to the given Organization:
if authorized, return the Organization information with a 200 OK.
otherwise, return a 403 FORBIDDEN.
@GetMapping("/api/organization/{id}")
fun getOrganizationById(@PathVariable id: Int): ResponseEntity {
val context = SecurityContextHolder.getContext()
val authenticationToken = context.authentication as UsernamePasswordAuthenticationToken
val user = authenticationToken.principal as User
// check authorization
if (user.hasAccessToOrganization(id).not()) {
return ResponseEntity.status(HttpStatus.FORBIDDEN).build()
}
val organization = organizationRepository.getById(id)
return ResponseEntity.ok(organization)
}
Testing the Current Implementation
We can check that user_1 has access only to organization_1 as stated in the schema of the Domain section. To do so:
Now that the authentication & authorization parts are implemented, we would like to generate a persistent API Token for a specific Organization scope because:
this could be useful to access some Organizations without having to generate a JWT from a specific User, e.g for CI / CD.
the JWT has an expiration date whereas the API Token wouldn’t.
a User can have access to many Organizations whereas an API Token can have access to only one Organization.
a User could revoke an Organization API Token at any moment.
API Token specifications
We wanted to generate an API Token composed only of Base62 characters separated by the _ delimiter.
We decided to make the API Token with 3 parts:
As developers usually need to deal with lots of external tokens, we found it useful to make the API Token identifiable. The first part in our example will be prefix.
Then we chose to generate a random string, easily done using the SecureRandom provided by JDK.
To check our API Token integrity, we added the computed CRC32 of the random string with a secret key. This would avoid requesting the database if the API Token is a wrong one.
API Token Syntax
Finally, the API Token should not be persisted in clear text into the database. Some hashing functions should be used to avoid issues in case of data leak.
Please note: As Base62 characters will never contain the - character, therefore it is easier to just copy/paste the generated API Token: prefix_azertiop_crc32 vs prefix-azertyiop-crc32.
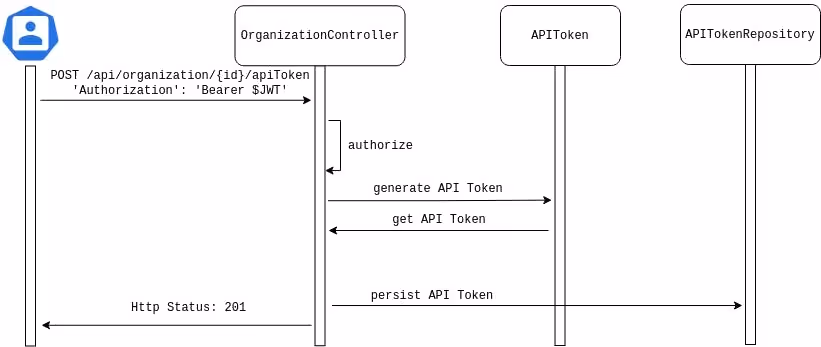
Generating the API Token
API Token generation flow
The generation of our API Token is present in the APIToken class:
val secureRandom = SecureRandom()
val randomString = (1..2).joinToString(separator = "")
{ Base62.encode(secureRandom.nextLong()) }
val crc32 = CRC32().apply {
update(crc32SecretKey.toByteArray())
update(randomString.toByteArray())
}.value
return "prefix_${randomString}_${crc32}"
val apiTokenValue = ApiToken.createToken(crc32SecretKey)
val apiTokenValueHash = ApiToken.hashToken(apiTokenValue)
val apiToken = ApiToken(apiTokenValueHash, "organization:$id")
apiTokenRepository.save(apiToken)
Please note: The commons-codec library provides a useful DigestUtils class to create hashes.
Adding a Request Filter
The API Token will be sent through the Authorization header prefixed by Token .
We need to create a new request filter ApiTokenRequestFilter to add similar checks, as we did with the JWT.
But we also need to verify that the API Token has not been removed: a check in our persistence layer is necessary.
override fun doFilterInternal(request: HttpServletRequest, response: HttpServletResponse, filterChain: FilterChain) {
val header = request.getHeader("Authorization")
if (header != null && header.startsWith("Token ")) {
val apiTokenValue = header.substring(6)
if (ApiToken.isValid(apiTokenValue)) {
// check that the API Token is still present
val apiToken = apiTokenRepository.get(ApiToken.hashToken(apiTokenValue))
if (apiToken != null) {
val fakeUser = User("api-token", "", setOf(apiToken.role))
SecurityContextHolder.getContext().authentication = UsernamePasswordAuthenticationToken(fakeUser, null, null)
}
}
}
}
The User instance is the same structure used by the JWTFilterRequest. This allows us to use the same code already implemented to handle the User roles.
Please note: As we store a API Token hash, we must hash the provided token as well before searching it into our persistence layer.
JWT is a handy solution to manage application security. Not only is it secure and compact, but it is also easy to inspect, thanks to its JSON format (e.g https://jwt.io/). As for Spring Boot Security, it is extremely helpful to implement JWT authentication, as we just need to implement our own Request Filter.
Our generated API Token can now be shared between many Users of the same Organization. There is no need to generate a new JWT! And should a security breach come up, the revoke feature will let us invalidate the API Token. Easy peasy!
Melanie leads content at Qovery. She covers platform engineering trends, Kubernetes operations, FinOps, and the tools that help engineering teams ship faster.
Next step
Agents ship fast. Guardrails keep them safe.
Qovery ensures every agent action is scoped, audited, and policy-checked. Start deploying in under 10 minutes.