Automating Ephemeral Environments with Kubernetes: A Quick Guide
Ephemeral environments are temporary, isolated, but self-contained deployment environments crucial for development and testing within software projects. While I already discussed the basics and benefits of Ephemeral Environments, today I will go through the practical steps of implementing ephemeral environments in your CI/CD pipeline using Kubernetes. I will start with how you can do it with Kubernetes native tools, and how you can automate the ephemeral environments in your CI/CD. I will eventually demonstrate how the same process can be simplified using modern solutions.

Morgan Perry
April 19, 2024 · 7 min read
Morgan Perry
Co-founder of Qovery. Morgan is a Tech entrepreneur with 10 years of experience in the SaaS industry.
See all articlesLet’s start with Kubernetes native tools for an ephemeral setup.
#Using Kubernetes Tools for Ephemeral Setup
Although Kubernetes is primarily a container orchestration tool and does not have all the right ingredients for ephemeral environments, however the closest thing to ephemeral environments in Kubernetes is temporary namespaces. Let’s go through some native Kubernetes tools that can help with ephemeral environments before we proceed to the actual steps for creating temporary namespaces.
- kubectl: This is the command-line tool for Kubernetes. It allows you to run commands against Kubernetes clusters to control and manage resources.
- Helm: A package manager for Kubernetes that simplifies the deployment of applications and services.
- Kustomize: An open-source tool for customizing Kubernetes configurations. It allows developers to maintain different variations of Kubernetes manifests without duplicating efforts.
#Commands for Setting Up and Managing Ephemeral Resources with kubectl
Here's how you can use kubectl to manage ephemeral environments. This includes creating a namespace for the ephemeral environment, deploying resources, and eventually tearing them down.
# Create a new namespace for the ephemeral environment
kubectl create namespace ephemeral-env

# Deploy resources to the namespace (assuming you have a configuration file)
kubectl apply -f <configuration-file.yaml> --namespace ephemeral-env

# List all pods in the ephemeral namespace to verify deployment
kubectl get pods --namespace ephemeral-env

# Delete the ephemeral namespace and all its resources
kubectl delete namespace ephemeral-env
These commands help in setting up a temporary environment and ensuring that changes do not interfere with the main applications running in other namespaces.
#Step-by-Step Ephemeral Environment Configuration
Setting up a Kubernetes ephemeral environment involves several steps, from creating a namespace to deploying and managing the resources. Here's a detailed guide to help you configure one.
#Step 1: Create a Namespace
Start by creating a namespace dedicated to your ephemeral environment. This helps in isolating resources from the rest of your cluster.
kubectl create namespace ephemeral-test t#Step 2: Prepare Kubernetes Manifest Files
You will need a set of Kubernetes manifest files to define your resources (pods, services, etc.). Below is an example of a Kubernetes manifest file to deploy a simple test pod.
Kubernetes Manifest Files for Deploying a Test Pod
Here’s a simple Kubernetes manifest for a test pod:
apiVersion: v1
kind: Pod
metadata:
 name: test-pod
 namespace: ephemeral-test
spec:
 containers:
 - name: test-container
 image: nginx
 ports:
- containerPort: 80#Step 3: Deploy the Pod
Using the manifest file you prepared, deploy the pod into the ephemeral namespace:
kubectl apply -f test-pod.yaml#Step 4: Verify Deployment
Check the status of the pod to ensure it's running correctly:
kubectl get pods --namespace ephemeral-test#Step 5: Clean Up
Once testing is complete, you can clean up the resources to ensure no residual components are left which might incur costs or affect further deployments.
kubectl delete -f test-pod.yaml
kubectl delete namespace ephemeral-test#Automating Ephemeral Environments in CI/CD
#Implementing Automation Using Kubernetes Jobs and CronJobs
In a development workflow, particularly when using Kubernetes, managing the lifecycle of ephemeral environments efficiently is crucial. These environments are temporary, created for testing or staging purposes, and need to be spun up and torn down regularly without manual intervention. Automation within Kubernetes can be achieved using Kubernetes Jobs and CronJobs.
Kubernetes Jobs are ideal for one-off or batch execution tasks that need to run to completion. For ephemeral environments, you can use Jobs to handle tasks like initializing a test database or importing a dataset temporarily needed for a specific test.
CronJobs extend the functionality of Jobs by allowing you to schedule executions at specific times. This is particularly useful for cleaning up ephemeral environments that should only exist for a certain period. For example, a CronJob can be scheduled to delete namespaces or resources that are no longer needed, ensuring resources are efficiently managed and costs are kept in check.
#YAML Configuration for an Automated Cleanup Job in Kubernetes
Here's an example of a YAML configuration for a Kubernetes CronJob that performs cleanup operations nightly at 1 AM server time:
apiVersion: batch/v1beta1
kind: CronJob
metadata:
 name: cleanup-ephemeral-environments
spec:
 schedule: "0 1 * * *" # Run daily at 1 AM
 jobTemplate:
 spec:
 template:
 spec:
 containers:
 - name: cleanup
 image: busybox
 command: ["sh", "-c", "kubectl delete ns --selector=type=ephemeral --older-than=24h"]
 restartPolicy: OnFailure
This CronJob uses the busybox image to execute a shell command that deletes all namespaces labeled as type: ephemeral that have been active for more than 24 hours.
#V. CI/CD Pipeline Integration with Ephemeral Environments
#Integrating Ephemeral Environments into CI/CD Pipelines
Integrating ephemeral environments into CI/CD pipelines enhances the automation and reliability of testing and staging processes. This integration ensures that every new build and deployment can be tested in a clean, isolated environment, mirroring production conditions closely without affecting the actual production environment.
For platforms like GitHub Actions or GitLab CI, the integration process typically involves adding steps in the CI/CD pipeline that dynamically create and destroy Kubernetes namespaces or other resources.
#Configuration Example: CI/CD Pipeline Script to Trigger Ephemeral Environment Creation
Below is an example of how you might configure a pipeline in GitHub Actions to create an ephemeral environment every time a new pull request is made:
name: PR Ephemeral Environment Workflow

on: [pull_request]

jobs:
 setup:
 runs-on: ubuntu-latest
 steps:
 - name: Checkout code
 uses: actions/checkout@v2

 - name: Set up Kubectl
 uses: azure/setup-kubectl@v1

 - name: Create Ephemeral Environment
 run: |
 kubectl create namespace pr-${{ github.event.pull_request.number }}
 kubectl apply -f k8s/configs/ --namespace=pr-${{ github.event.pull_request.number }}

 - name: Notify Slack
 uses: 8398a7/action-slack@v3
 with:
 status: ${{ job.status }}
 fields: repo,commit,author,action,eventName,ref,workflow,job,took
 env:
 SLACK_WEBHOOK_URL: ${{ secrets.SLACK_WEBHOOK_URL }}
This GitHub Actions workflow performs the following actions:
- Checkout code: Pulls the branch associated with the pull request.
- Set up Kubectl: Prepares the kubectl command-line tool in the runner environment.
- Create Ephemeral Environment: Dynamically creates a new Kubernetes namespace based on the pull request number, and deploys the necessary configurations to this namespace.
- Notify Slack: Sends a notification about the job status to a specified Slack channel.
#How Does Qovery Simplify It?
Qovery streamlines the management of Ephemeral Environments in Kubernetes, effectively integrating with CI/CD tools like GitHub Actions to automate both the setup and teardown processes. Below are the simplified steps with options for using both the CLI and the web console of Qovery:
#Step 1: Blueprint Environment Creation
When you create an ephemeral environment in Qovery, you are actually creating an ephemeral namespace in a Kubernetes cluster behind the scenes. Here are the steps:
- Connect to Qovery and Start a Project:
- Command: qovery auth (or use the Qovery web console) - Set Up Blueprint Environment: Configure a blueprint environment in your Qovery project to include applications and databases, such as a Java application and PostgreSQL database.
- Command: qovery environment create --name blueprint --project my-project (or use the Qovery web console)
#Step 2: Automated Container Management
- Build and Push with GitHub Actions: Automate the Docker container build and push it to a container registry such as Amazon ECR using GitHub Actions.
- Command for ECR push: docker push $ECR_REGISTRY/$ECR_REPOSITORY:$IMAGE_TAG - Update Container Configuration in Qovery: Adjust the container settings to align with the specific testing instance, tagged with the GitHub commit SHA.
- Command: qovery container update --tag ${{ github.sha }} (or use the Qovery web console)
When you build and push your Docker images, Qovery uses Kubernetes to orchestrate the deployment of these containers.
#Step 3: Dynamic Environment Creation and Deployment
- Trigger Environment Creation: Use GitHub Actions to automate the cloning of the blueprint environment when a pull request is labeled for E2E testing.
- Command: qovery environment clone --name $new_environment_name (or use the Qovery web console) - Deploy and Verify: Deploy the new environment and update it with the application container. This can be done using Qovery’s CLI or through the web console for enhanced usability.
- Command: qovery environment deploy --watch (or use the Qovery web console)
When you clone an environment or deploy an application, Qovery uses Kubernetes to manage the lifecycle of these containers.
#Step 4: Efficient Teardown Process
- Automated Cleanup: Initiate the cleanup of the ephemeral environment via GitHub Actions, which triggers Qovery to efficiently release resources.
- Command: qovery environment delete --name $new_environment_name --confirm (or use the Qovery web console)
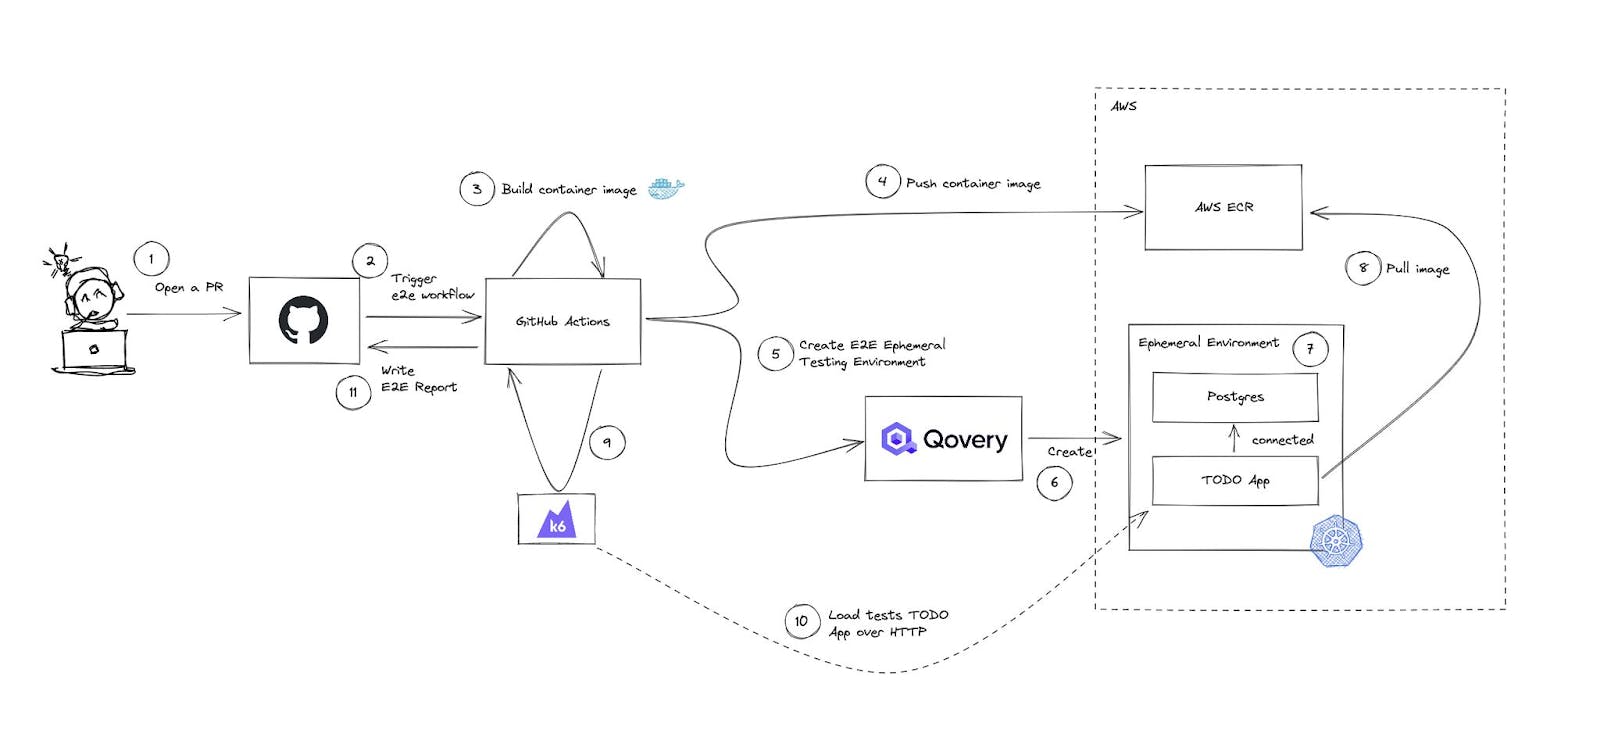
Below illustration demonstrates how you can leverage Qovery in testing ephemeral Environments with GitHub Actions.
#Conclusion
Implementing Ephemeral Environments using Kubernetes represents a significant advancement in streamlining development processes. It ensures that each change is thoroughly tested in an isolated setup that mirrors production environments closely. This guide has walked you through setting up and managing these environments, from basic configurations to integration within CI/CD pipelines. By applying these techniques and potentially leveraging tools like Qovery, developers can achieve more efficient, reliable, and cost-effective software development cycles, ultimately leading to higher-quality software products. You can try Qovery for free!!
Your Favorite DevOps Automation Platform
Qovery is a DevOps Automation Platform Helping 200+ Organizations To Ship Faster and Eliminate DevOps Hiring Needs,
Try it out now!
Your Favorite DevOps Automation Platform
Qovery is a DevOps Automation Platform Helping 200+ Organizations To Ship Faster and Eliminate DevOps Hiring Needs,
Try it out now!