> ## Documentation Index
> Fetch the complete documentation index at: https://www.qovery.com/docs/llms.txt
> Use this file to discover all available pages before exploring further.
# Troubleshooting
> Find solutions to common issues with Qovery
This troubleshooting guide helps you resolve common issues you may encounter while using Qovery. Use the sections below to find solutions quickly.
***
## Service Deployment Issues
Find solutions for the most common deployment errors and issues you may encounter when deploying services on Qovery.
**Symptom:** Your deployment fails with a "connection refused" error during health checks.
**Common Causes:**
1. **Port mismatch** - The port in your Qovery configuration doesn't match the port your application listens on
2. **Localhost binding** - Your application listens on `localhost` (127.0.0.1) instead of all interfaces (0.0.0.0)
**Solutions:**
Check that your Qovery service port matches your application's listening port.
* If your app listens on port 8080, configure port 8080 in Qovery
* Check your application logs to see which port it's actually using
Ensure your application binds to `0.0.0.0` (all interfaces) instead of `localhost`:
**Node.js Example:**
```javascript theme={null}
// ✅ Correct - Binds to all interfaces
app.listen(8080, '0.0.0.0');
// ❌ Wrong - Only binds to localhost
app.listen(8080, 'localhost');
```
**Python Flask Example:**
```python theme={null}
# ✅ Correct
app.run(host='0.0.0.0', port=8080)
# ❌ Wrong
app.run(host='127.0.0.1', port=8080)
```
Most web frameworks default to `localhost` in development. Always explicitly set `0.0.0.0` for containerized environments.
**Symptom:** Deployment fails with "insufficient resources" or pods remain in "Pending" state.
**Cause:** Your cluster doesn't have enough CPU or memory capacity to run your service.
**Solutions:**
Lower the resource requests for your service if they're set too high:
1. Go to your service **Settings** → **Resources**
2. Reduce **CPU** or **Memory** requests
3. Redeploy the service
Start with minimum resources and scale up as needed. Most applications don't need as much as you think!
If your services legitimately need more resources:
1. Go to **Cluster Settings** → **Node Pools**
2. Select larger instance types
3. Update the cluster
**Example:** Upgrade from `t3.medium` (2 vCPU, 4 GB RAM) to `t3.large` (2 vCPU, 8 GB RAM)
Allow your cluster to scale to more nodes:
1. Go to **Cluster Settings** → **Node Pools**
2. Increase **Maximum nodes** count
3. Update the cluster
With Karpenter, this allows automatic scaling to meet demand.
**Symptom:** Your service deploys but immediately crashes or restarts repeatedly.
**Solution:** Debug using the Qovery Shell
Use the Qovery CLI to access your container:
```bash theme={null}
qovery shell
```
This opens an interactive shell inside your running container.
Once inside:
* Check environment variables: `env`
* Test your startup command manually
* Review application configuration files
* Check for missing dependencies
If your app crashes too fast to shell into:
1. **Remove the port temporarily** from service settings (this prevents Kubernetes from restarting it)
2. **Modify your Dockerfile** to use a sleep command:
```dockerfile theme={null}
# Comment out your entrypoint
# ENTRYPOINT ["npm", "start"]
# Add sleep to keep container running
ENTRYPOINT ["sleep", "infinity"]
```
3. Deploy with this change
4. Use `qovery shell` to debug
5. Fix the issue and restore the original entrypoint
Remember to restore your port configuration and entrypoint after debugging!
**Symptom:** SSL certificates aren't being generated for your custom domain.
**Cause:** DNS records are not properly configured for your custom domain.
**Solution:**
Check the Qovery Console for which domain is failing certificate generation. You'll see an error indicator next to the domain.
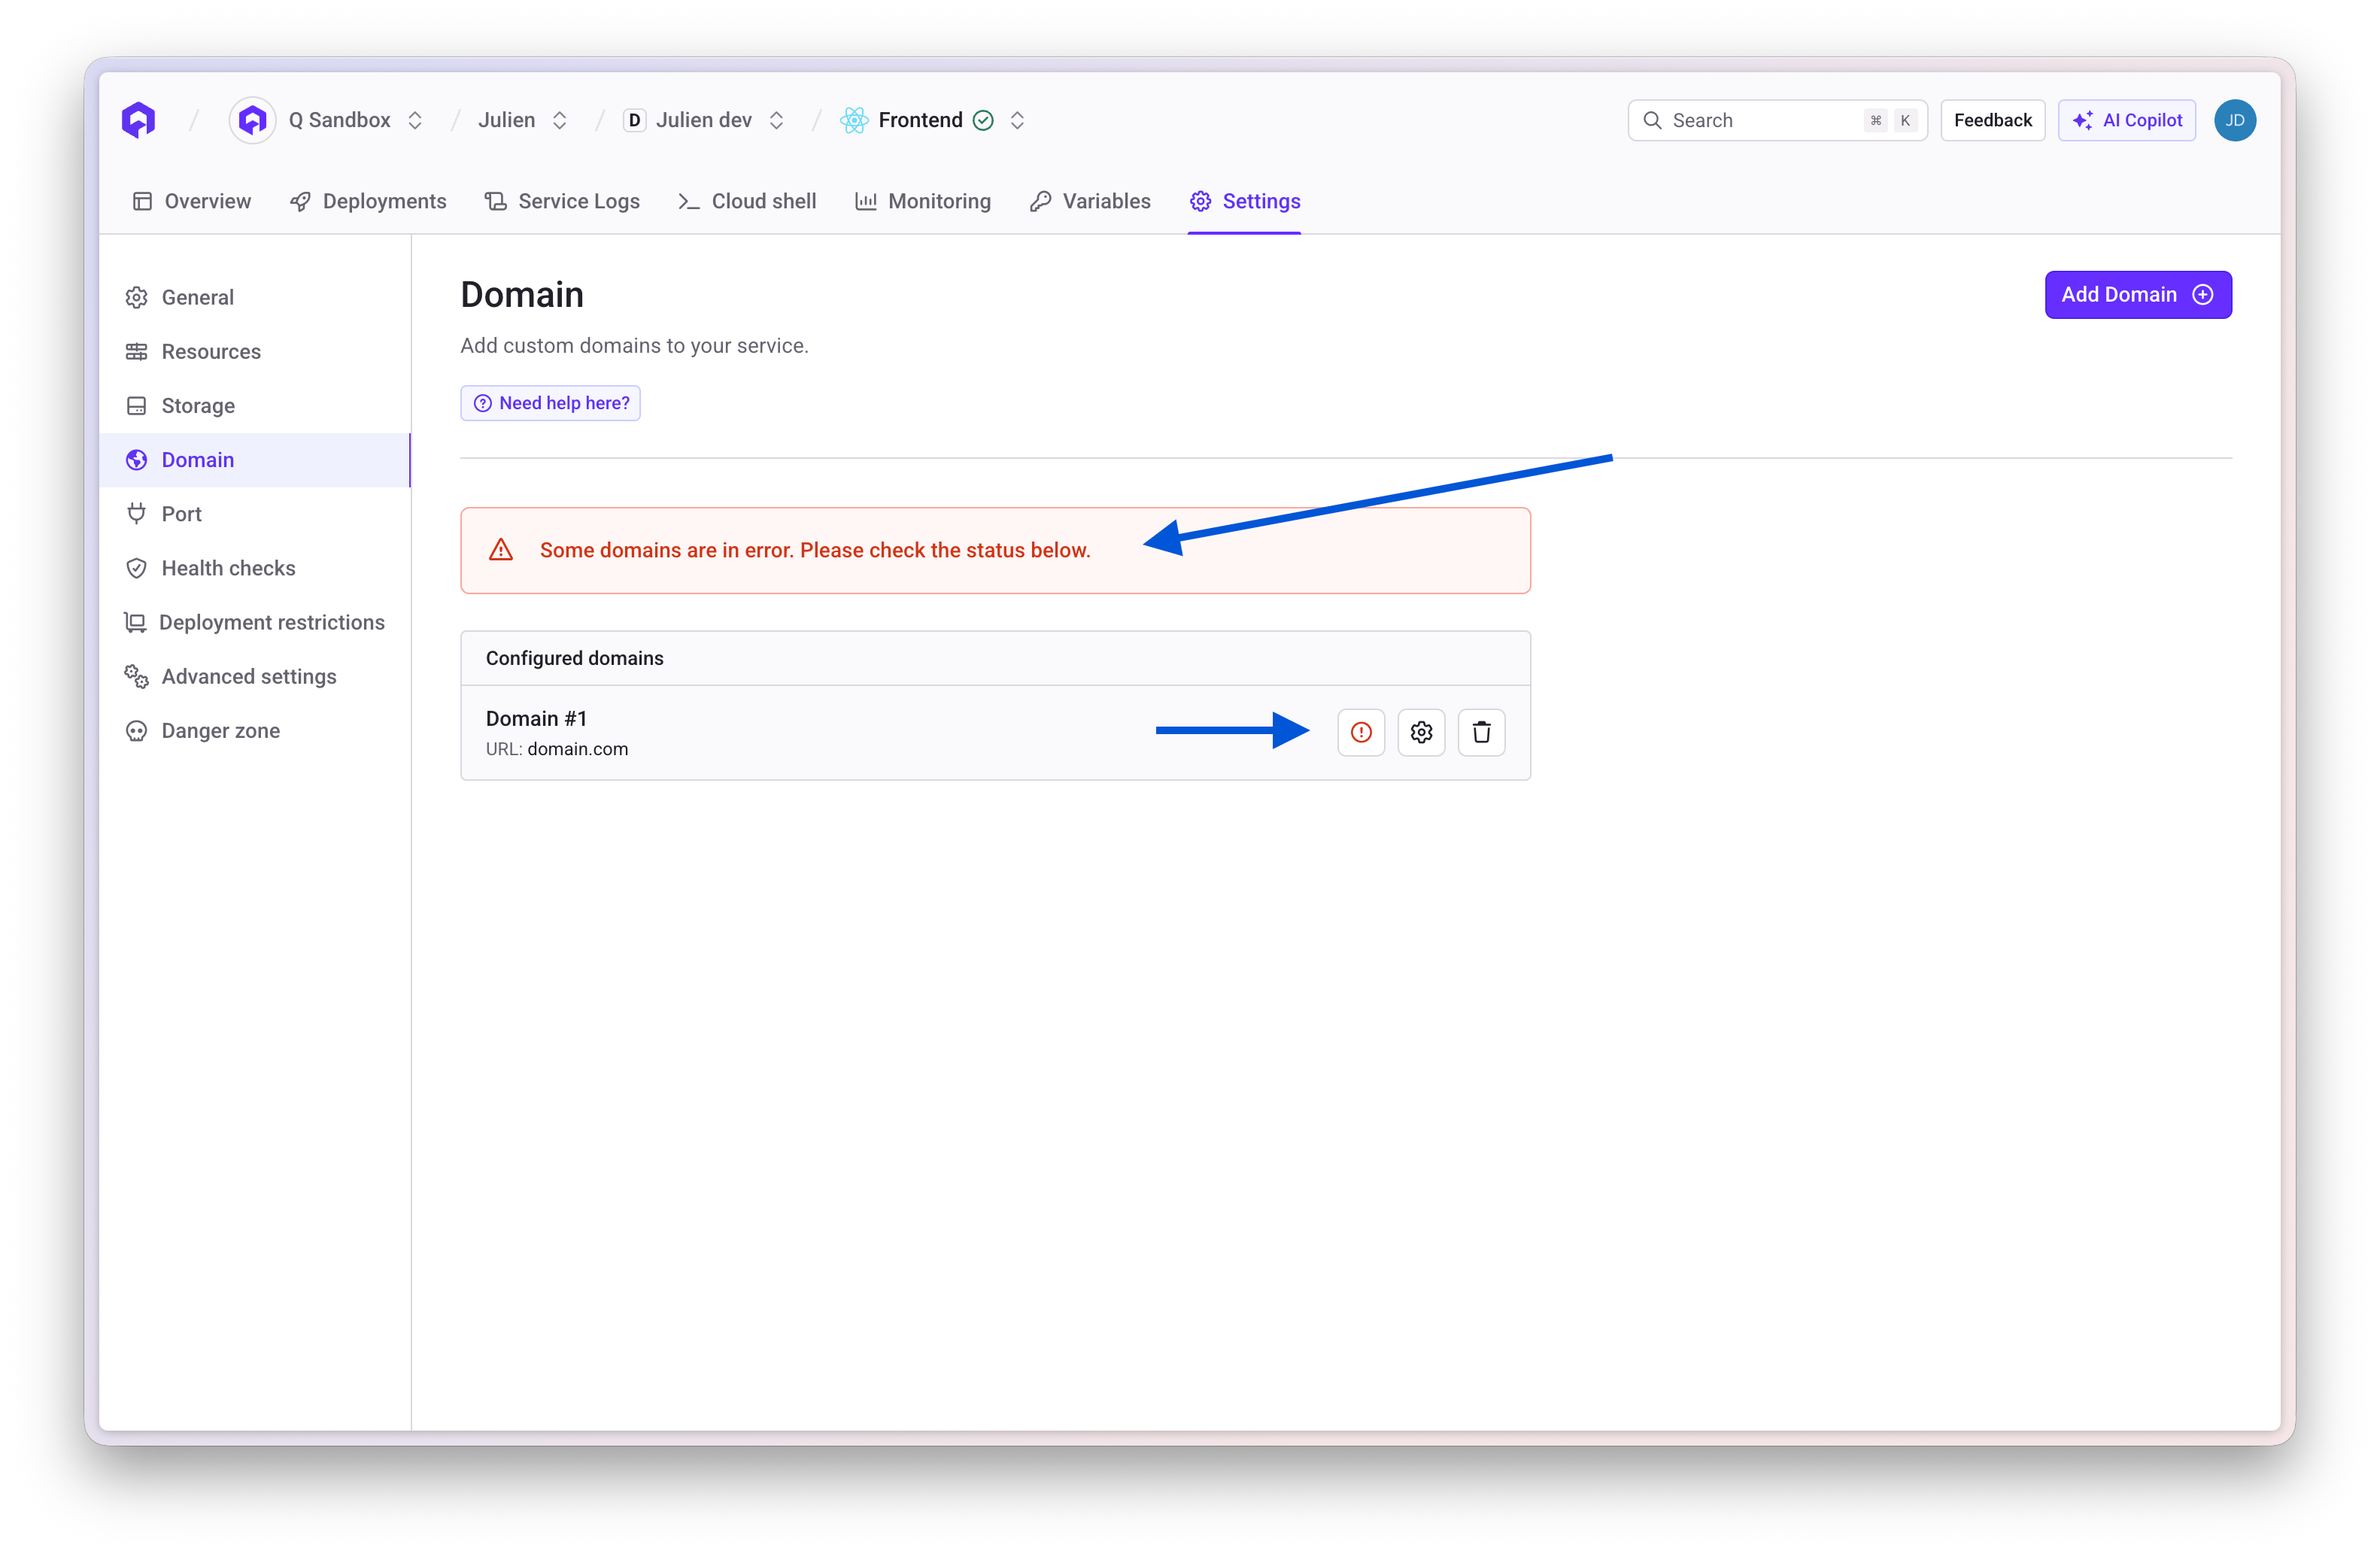 Your domain should have a CNAME record pointing to your Qovery cluster URL.
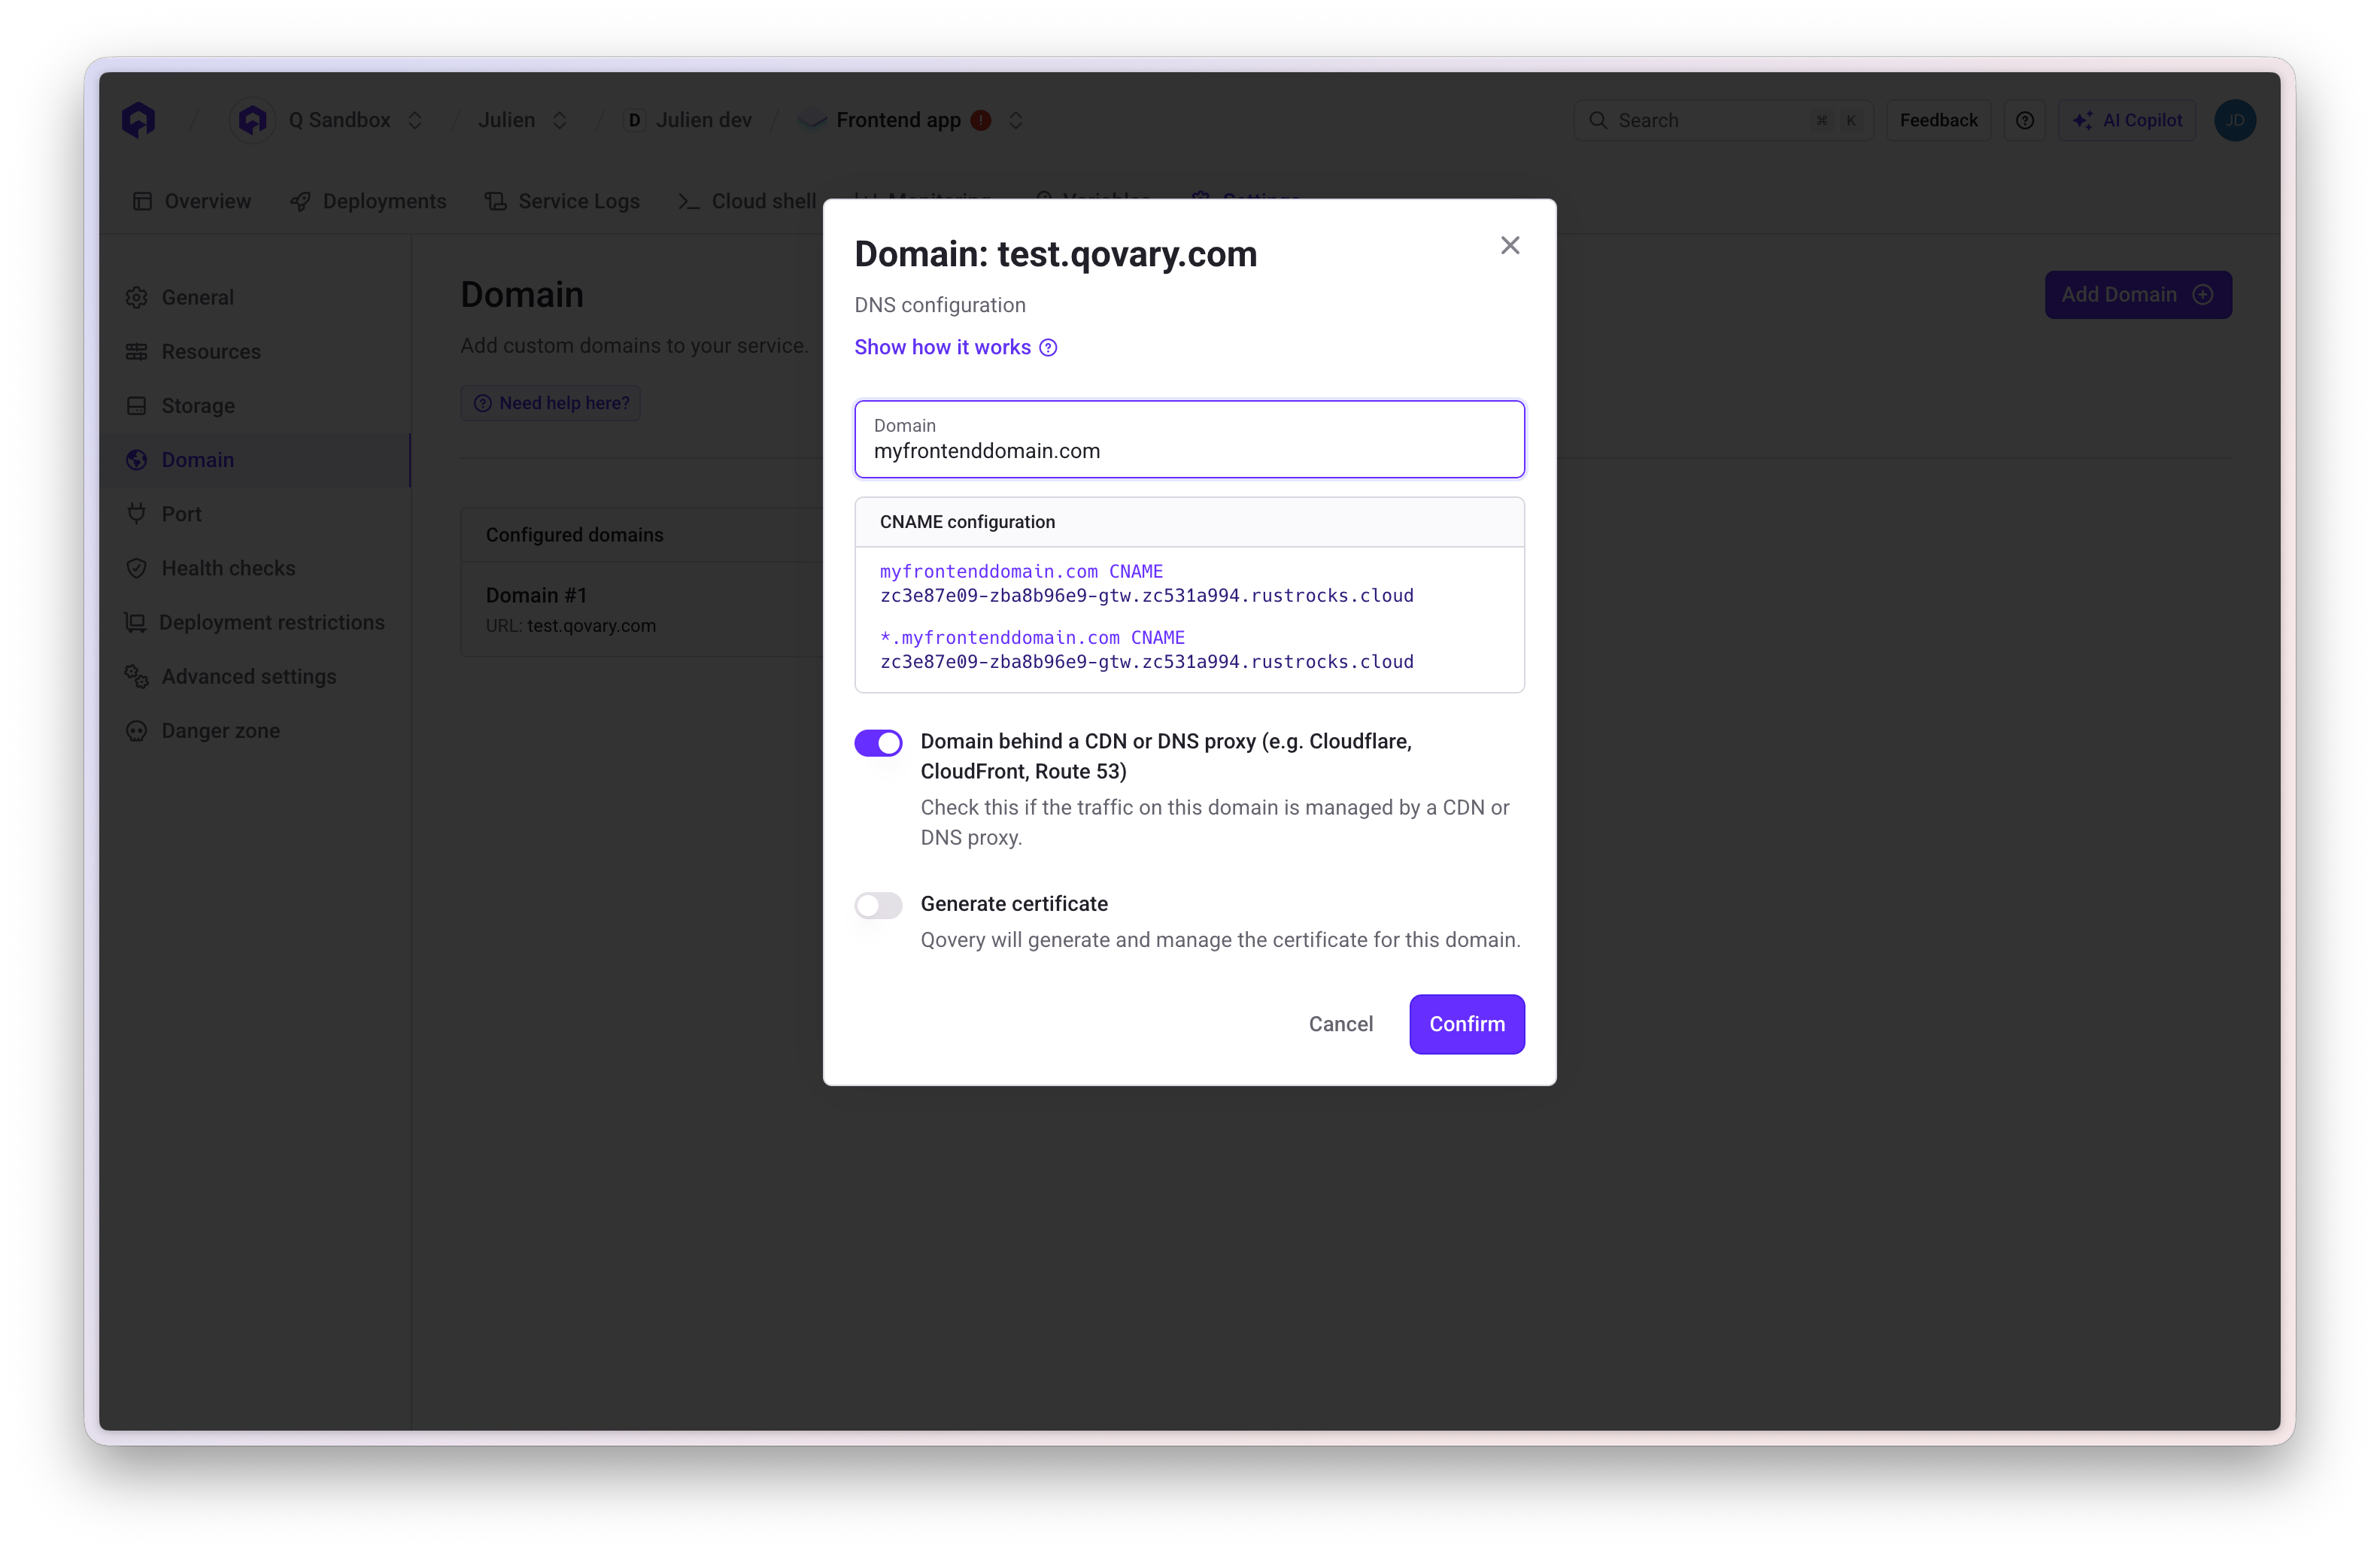 Verify DNS resolution:
```bash theme={null}
dig your-domain.com CNAME
```
You should see a CNAME pointing to your Qovery cluster domain.
1. Update your DNS CNAME record with your domain provider
2. Wait for DNS propagation (can take up to 48 hours, usually minutes)
3. Redeploy your application in Qovery
4. Certificate generation should succeed
DNS changes can take time to propagate. Use [DNS Checker](https://dnschecker.org/) to verify propagation globally.
**Symptom:** Your build fails with a timeout error after 30 minutes.
**Cause:** The default Docker build timeout is 1800 seconds (30 minutes). Complex builds (like compiling large codebases) may exceed this limit.
**Solution:**
1. Go to your service **Settings** → **Advanced Settings**
2. Find the **build.timeout\_max\_sec** parameter
3. Increase the value (e.g., `3600` for 1 hour)
4. Save and redeploy
Consider optimizing your Dockerfile:
* Use multi-stage builds
* Leverage build caching effectively
* Only copy necessary files
* Install dependencies before copying source code
**Example Multi-stage Dockerfile:**
```dockerfile theme={null}
# Build stage
FROM node:18 AS builder
WORKDIR /app
COPY package*.json ./
RUN npm ci
COPY . .
RUN npm run build
# Production stage
FROM node:18-alpine
WORKDIR /app
COPY --from=builder /app/dist ./dist
COPY package*.json ./
RUN npm ci --production
CMD ["node", "dist/index.js"]
```
**Symptom:** Build fails when trying to clone private Git submodules.
**Cause:** Private submodules require authentication, which isn't available during the build.
**Solutions:**
If possible, make your submodule repository public. This is the simplest solution.
Embed basic authentication in your `.gitmodules` file:
```ini theme={null}
[submodule "my-private-module"]
path = my-private-module
url = https://username:token@github.com/org/private-repo.git
```
Be careful not to commit plain-text credentials! Use environment variables or secrets management.
Configure SSH keys in your build:
1. Add your private SSH key as a secret environment variable
2. Configure SSH in your Dockerfile:
```dockerfile theme={null}
RUN mkdir -p ~/.ssh && \
echo "${SSH_PRIVATE_KEY}" > ~/.ssh/id_rsa && \
chmod 600 ~/.ssh/id_rsa && \
ssh-keyscan github.com >> ~/.ssh/known_hosts
```
**Symptom:** Your Lifecycle Job or Cronjob fails to complete successfully.
**Common Causes:**
1. **Code exceptions** - Errors in your application code
2. **Out of memory** - Job exceeds memory limits
3. **Execution timeout** - Job takes longer than configured maximum duration
**Solutions:**
1. Go to your Job service
2. Click **Logs** tab
3. Look for error messages or stack traces
4. Identify the root cause (exception, OOM, timeout)
**For Code Exceptions:**
* Fix the bug in your code
* Redeploy the job
**For Out of Memory:**
* Increase memory allocation in **Settings** → **Resources**
* Optimize your code to use less memory
**For Timeouts:**
* Go to **Settings** → **Max Duration**
* Increase the timeout value
* Or optimize your job to run faster
For long-running jobs, consider breaking them into smaller tasks or using a queue system.
**Symptom:** Database deletion fails with `SnapshotQuotaExceeded` error.
**Cause:** Qovery automatically creates a snapshot before deleting a database. If you've reached your cloud provider's snapshot quota, this fails.
Verify DNS resolution:
```bash theme={null}
dig your-domain.com CNAME
```
You should see a CNAME pointing to your Qovery cluster domain.
1. Update your DNS CNAME record with your domain provider
2. Wait for DNS propagation (can take up to 48 hours, usually minutes)
3. Redeploy your application in Qovery
4. Certificate generation should succeed
DNS changes can take time to propagate. Use [DNS Checker](https://dnschecker.org/) to verify propagation globally.
**Symptom:** Your build fails with a timeout error after 30 minutes.
**Cause:** The default Docker build timeout is 1800 seconds (30 minutes). Complex builds (like compiling large codebases) may exceed this limit.
**Solution:**
1. Go to your service **Settings** → **Advanced Settings**
2. Find the **build.timeout\_max\_sec** parameter
3. Increase the value (e.g., `3600` for 1 hour)
4. Save and redeploy
Consider optimizing your Dockerfile:
* Use multi-stage builds
* Leverage build caching effectively
* Only copy necessary files
* Install dependencies before copying source code
**Example Multi-stage Dockerfile:**
```dockerfile theme={null}
# Build stage
FROM node:18 AS builder
WORKDIR /app
COPY package*.json ./
RUN npm ci
COPY . .
RUN npm run build
# Production stage
FROM node:18-alpine
WORKDIR /app
COPY --from=builder /app/dist ./dist
COPY package*.json ./
RUN npm ci --production
CMD ["node", "dist/index.js"]
```
**Symptom:** Build fails when trying to clone private Git submodules.
**Cause:** Private submodules require authentication, which isn't available during the build.
**Solutions:**
If possible, make your submodule repository public. This is the simplest solution.
Embed basic authentication in your `.gitmodules` file:
```ini theme={null}
[submodule "my-private-module"]
path = my-private-module
url = https://username:token@github.com/org/private-repo.git
```
Be careful not to commit plain-text credentials! Use environment variables or secrets management.
Configure SSH keys in your build:
1. Add your private SSH key as a secret environment variable
2. Configure SSH in your Dockerfile:
```dockerfile theme={null}
RUN mkdir -p ~/.ssh && \
echo "${SSH_PRIVATE_KEY}" > ~/.ssh/id_rsa && \
chmod 600 ~/.ssh/id_rsa && \
ssh-keyscan github.com >> ~/.ssh/known_hosts
```
**Symptom:** Your Lifecycle Job or Cronjob fails to complete successfully.
**Common Causes:**
1. **Code exceptions** - Errors in your application code
2. **Out of memory** - Job exceeds memory limits
3. **Execution timeout** - Job takes longer than configured maximum duration
**Solutions:**
1. Go to your Job service
2. Click **Logs** tab
3. Look for error messages or stack traces
4. Identify the root cause (exception, OOM, timeout)
**For Code Exceptions:**
* Fix the bug in your code
* Redeploy the job
**For Out of Memory:**
* Increase memory allocation in **Settings** → **Resources**
* Optimize your code to use less memory
**For Timeouts:**
* Go to **Settings** → **Max Duration**
* Increase the timeout value
* Or optimize your job to run faster
For long-running jobs, consider breaking them into smaller tasks or using a queue system.
**Symptom:** Database deletion fails with `SnapshotQuotaExceeded` error.
**Cause:** Qovery automatically creates a snapshot before deleting a database. If you've reached your cloud provider's snapshot quota, this fails.
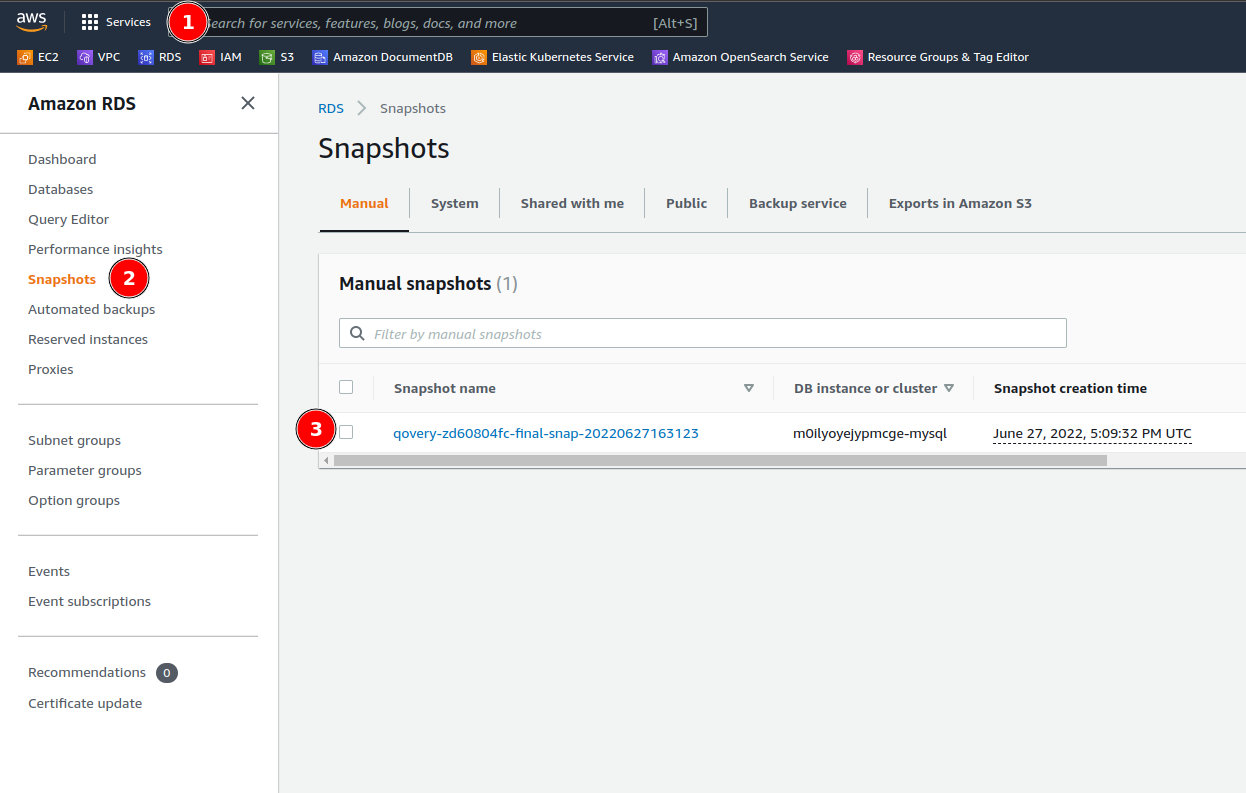 **Solutions:**
Remove obsolete database snapshots from your cloud provider:
**AWS RDS:**
1. Go to [AWS RDS Console](https://console.aws.amazon.com/rds/)
2. Navigate to **Snapshots**
3. Delete old snapshots you no longer need
4. Retry database deletion in Qovery
**Other Providers:**
* GCP Cloud SQL: [Console](https://console.cloud.google.com/sql/)
* Azure Database: [Portal](https://portal.azure.com/)
* Scaleway: [Console](https://console.scaleway.com/)
Contact your cloud provider support to increase your snapshot quota:
* **AWS**: Submit a support ticket for RDS snapshot limit increase
* **GCP**: Request quota increase in IAM console
* **Azure**: Contact support for database backup quota
* **Scaleway**: Open support ticket
Most cloud providers are happy to increase quotas for legitimate use cases.
***
## Service Runtime Issues
Find solutions for common runtime errors and issues you may encounter when operating services on Qovery after successful deployment.
**Symptom:** Your container terminates unexpectedly with exit code 137 or SIGKILL signal.
**Cause:** Your application has exceeded its memory limit. When system resources become constrained, Kubernetes forcibly terminates the container to reclaim memory (Out of Memory Kill - OOMKill).
**How to Identify:**
Check your logs for messages like:
```
Container killed with exit code 137
```
or
```
OOMKilled: true
```
**Solutions:**
1. Go to your service **Settings** → **Resources**
2. Increase the **Memory** limit
3. Start with a 50% increase (e.g., 512MB → 768MB)
4. Redeploy and monitor
Watch your memory usage metrics to find the right allocation. Don't over-allocate unnecessarily!
Before just increasing memory, check if your application has a memory leak:
**Signs of a Memory Leak:**
* Memory usage steadily increases over time
* Container was fine, then started crashing after recent code changes
* Memory never levels off or decreases
**Recent Changes to Review:**
* New dependencies or library updates
* Code changes in recent deployments
* New features that load data into memory
* Caching implementations without expiration
**Common optimization strategies:**
* Clear unused variables and objects
* Implement pagination for large datasets
* Use streaming for file processing
* Add proper cache eviction policies
* Profile your application to find memory-intensive code
**Node.js Example - Memory Profiling:**
```javascript theme={null}
// Check memory usage
console.log(process.memoryUsage());
// Force garbage collection (requires --expose-gc flag)
if (global.gc) {
global.gc();
}
```
**Python Example - Memory Profiling:**
```python theme={null}
import tracemalloc
tracemalloc.start()
# Your code here
snapshot = tracemalloc.take_snapshot()
top_stats = snapshot.statistics('lineno')
for stat in top_stats[:10]:
print(stat)
```
Continuously increasing memory without investigating the root cause will lead to higher costs and may just delay the problem!
**Symptom:** Your application crashes within seconds of starting, making it impossible to connect and debug.
**Challenge:** The container restarts so quickly that you can't use `qovery shell` to investigate.
**Solution:**
1. Go to your service **Settings** → **Ports**
2. Remove or disable the application port
3. Deploy the changes
Removing the port prevents Kubernetes from performing health checks and auto-restarting the container.
Update your Dockerfile to override the entrypoint with a sleep command:
```dockerfile theme={null}
# Comment out your normal entrypoint/CMD
# ENTRYPOINT ["npm", "start"]
# CMD ["python", "app.py"]
# Add sleep to keep container alive
ENTRYPOINT ["sleep", "infinity"]
```
Or for debugging purposes:
```dockerfile theme={null}
# Run a shell instead
ENTRYPOINT ["/bin/sh"]
CMD ["-c", "while true; do sleep 30; done"]
```
Commit and deploy these changes.
Once deployed, use the Qovery CLI to shell into the container:
```bash theme={null}
qovery shell
```
Now your container stays running and you can debug interactively!
Inside the container, you can now:
**Check environment variables:**
```bash theme={null}
env | grep -i app
```
**Test your application manually:**
```bash theme={null}
# Node.js
node server.js
# Python
python app.py
# Go
./app
```
**Check for missing dependencies:**
```bash theme={null}
# Node.js
npm list
# Python
pip list
# Check system packages
which
```
**Review configuration files:**
```bash theme={null}
cat config/app.json
cat .env
```
1. Identify and fix the issue in your code
2. Restore the original Dockerfile entrypoint
3. Re-add the application port
4. Deploy the fixed version
Don't forget to restore your port configuration and original entrypoint! The sleep command is only for debugging.
**Symptom:** When deploying Helm charts, you can't see logs or pod status in the Qovery Console.
**Cause:** Qovery requires specific labels and annotations on your Kubernetes resources to enable log access and pod status visibility.
**Solution:**
Add Qovery-specific macros to your Helm chart templates:
Update your Helm chart's `deployment.yaml`, `service.yaml`, or `job.yaml` to include Qovery macros:
```yaml theme={null}
apiVersion: apps/v1
kind: Deployment
metadata:
name: {{ include "mychart.fullname" . }}
labels:
{{- include "qovery.labels.service" . | nindent 4 }}
annotations:
{{- include "qovery.annotations.service" . | nindent 4 }}
spec:
template:
metadata:
labels:
{{- include "qovery.labels.service" . | nindent 8 }}
annotations:
{{- include "qovery.annotations.service" . | nindent 8 }}
spec:
containers:
- name: app
image: "{{ .Values.image.repository }}:{{ .Values.image.tag }}"
```
Apply these macros to the following Kubernetes resources:
* **Deployments** - For long-running applications
* **StatefulSets** - For stateful applications
* **Jobs** - For one-time tasks
* **CronJobs** - For scheduled tasks
* **Services** - For networking
* **Pods** - If you create standalone pods
Both **labels** and **annotations** are required for full functionality!
If you can't modify the Helm chart directly, override the values:
```yaml theme={null}
# In your Qovery Helm service overrides
deployment:
metadata:
labels:
qovery.com/service-id: "{{ QOVERY_SERVICE_ID }}"
qovery.com/service-type: "{{ QOVERY_SERVICE_TYPE }}"
qovery.com/environment-id: "{{ QOVERY_ENVIRONMENT_ID }}"
annotations:
qovery.com/service-version: "{{ QOVERY_SERVICE_VERSION }}"
```
1. Update your Helm chart with the macros
2. Redeploy the Helm service in Qovery
3. Verify logs are now visible in the Console
4. Check that pod status appears correctly
These labels and annotations allow Qovery to identify and track your Helm-deployed resources within the cluster.
**Symptoms:**
* Application becomes slow or unresponsive
* CPU throttling warnings in logs
* Pods getting OOMKilled even with sufficient memory
**Quick Checks:**
1. **Check CPU metrics** in Qovery Console
2. **Review recent code changes** that might be CPU-intensive
3. **Look for infinite loops** or inefficient algorithms
4. **Check for CPU-intensive operations** running on every request
**Solutions:**
* Optimize hot paths in your code
* Implement caching for expensive operations
* Move heavy processing to background jobs
* Increase CPU allocation if legitimately needed
* Use profiling tools to identify bottlenecks
**Possible Causes:**
* Database connection issues
* External API timeouts
* Insufficient resources
* Inefficient code paths
* Network latency
**Debugging Steps:**
1. Check **application logs** for slow queries or timeouts
2. Review **database connection pools**
3. Monitor **external API response times**
4. Profile your application to find slow endpoints
5. Check **network policies** that might be blocking traffic
***
## Cluster Issues
Find solutions for common errors you might encounter while deploying or updating Qovery clusters.
**Symptom:** When attempting to delete a Qovery cluster, you receive a `DependencyViolation` error.
**Cause:** Resources managed outside of Qovery remain attached to cluster infrastructure elements, preventing deletion.
**Example Error:**
```
DeleteError - Unknown error while performing Terraform command
(terraform destroy -lock=false -no-color -auto-approve), here is the error:
Error: deleting EC2 Subnet (subnet-xxx): operation error EC2: DeleteSubnet,
https response error StatusCode: 400, RequestID: xxx, api error DependencyViolation:
The subnet 'subnet-xxx' has dependencies and cannot be deleted.
```
**Solution:**
Log into your cloud provider console (AWS, GCP, Azure, or Scaleway).
**AWS Example:**
1. Go to [VPC Console](https://console.aws.amazon.com/vpc/)
2. Find the VPC associated with your Qovery cluster
3. Look for the subnet mentioned in the error message
**Solutions:**
Remove obsolete database snapshots from your cloud provider:
**AWS RDS:**
1. Go to [AWS RDS Console](https://console.aws.amazon.com/rds/)
2. Navigate to **Snapshots**
3. Delete old snapshots you no longer need
4. Retry database deletion in Qovery
**Other Providers:**
* GCP Cloud SQL: [Console](https://console.cloud.google.com/sql/)
* Azure Database: [Portal](https://portal.azure.com/)
* Scaleway: [Console](https://console.scaleway.com/)
Contact your cloud provider support to increase your snapshot quota:
* **AWS**: Submit a support ticket for RDS snapshot limit increase
* **GCP**: Request quota increase in IAM console
* **Azure**: Contact support for database backup quota
* **Scaleway**: Open support ticket
Most cloud providers are happy to increase quotas for legitimate use cases.
***
## Service Runtime Issues
Find solutions for common runtime errors and issues you may encounter when operating services on Qovery after successful deployment.
**Symptom:** Your container terminates unexpectedly with exit code 137 or SIGKILL signal.
**Cause:** Your application has exceeded its memory limit. When system resources become constrained, Kubernetes forcibly terminates the container to reclaim memory (Out of Memory Kill - OOMKill).
**How to Identify:**
Check your logs for messages like:
```
Container killed with exit code 137
```
or
```
OOMKilled: true
```
**Solutions:**
1. Go to your service **Settings** → **Resources**
2. Increase the **Memory** limit
3. Start with a 50% increase (e.g., 512MB → 768MB)
4. Redeploy and monitor
Watch your memory usage metrics to find the right allocation. Don't over-allocate unnecessarily!
Before just increasing memory, check if your application has a memory leak:
**Signs of a Memory Leak:**
* Memory usage steadily increases over time
* Container was fine, then started crashing after recent code changes
* Memory never levels off or decreases
**Recent Changes to Review:**
* New dependencies or library updates
* Code changes in recent deployments
* New features that load data into memory
* Caching implementations without expiration
**Common optimization strategies:**
* Clear unused variables and objects
* Implement pagination for large datasets
* Use streaming for file processing
* Add proper cache eviction policies
* Profile your application to find memory-intensive code
**Node.js Example - Memory Profiling:**
```javascript theme={null}
// Check memory usage
console.log(process.memoryUsage());
// Force garbage collection (requires --expose-gc flag)
if (global.gc) {
global.gc();
}
```
**Python Example - Memory Profiling:**
```python theme={null}
import tracemalloc
tracemalloc.start()
# Your code here
snapshot = tracemalloc.take_snapshot()
top_stats = snapshot.statistics('lineno')
for stat in top_stats[:10]:
print(stat)
```
Continuously increasing memory without investigating the root cause will lead to higher costs and may just delay the problem!
**Symptom:** Your application crashes within seconds of starting, making it impossible to connect and debug.
**Challenge:** The container restarts so quickly that you can't use `qovery shell` to investigate.
**Solution:**
1. Go to your service **Settings** → **Ports**
2. Remove or disable the application port
3. Deploy the changes
Removing the port prevents Kubernetes from performing health checks and auto-restarting the container.
Update your Dockerfile to override the entrypoint with a sleep command:
```dockerfile theme={null}
# Comment out your normal entrypoint/CMD
# ENTRYPOINT ["npm", "start"]
# CMD ["python", "app.py"]
# Add sleep to keep container alive
ENTRYPOINT ["sleep", "infinity"]
```
Or for debugging purposes:
```dockerfile theme={null}
# Run a shell instead
ENTRYPOINT ["/bin/sh"]
CMD ["-c", "while true; do sleep 30; done"]
```
Commit and deploy these changes.
Once deployed, use the Qovery CLI to shell into the container:
```bash theme={null}
qovery shell
```
Now your container stays running and you can debug interactively!
Inside the container, you can now:
**Check environment variables:**
```bash theme={null}
env | grep -i app
```
**Test your application manually:**
```bash theme={null}
# Node.js
node server.js
# Python
python app.py
# Go
./app
```
**Check for missing dependencies:**
```bash theme={null}
# Node.js
npm list
# Python
pip list
# Check system packages
which
```
**Review configuration files:**
```bash theme={null}
cat config/app.json
cat .env
```
1. Identify and fix the issue in your code
2. Restore the original Dockerfile entrypoint
3. Re-add the application port
4. Deploy the fixed version
Don't forget to restore your port configuration and original entrypoint! The sleep command is only for debugging.
**Symptom:** When deploying Helm charts, you can't see logs or pod status in the Qovery Console.
**Cause:** Qovery requires specific labels and annotations on your Kubernetes resources to enable log access and pod status visibility.
**Solution:**
Add Qovery-specific macros to your Helm chart templates:
Update your Helm chart's `deployment.yaml`, `service.yaml`, or `job.yaml` to include Qovery macros:
```yaml theme={null}
apiVersion: apps/v1
kind: Deployment
metadata:
name: {{ include "mychart.fullname" . }}
labels:
{{- include "qovery.labels.service" . | nindent 4 }}
annotations:
{{- include "qovery.annotations.service" . | nindent 4 }}
spec:
template:
metadata:
labels:
{{- include "qovery.labels.service" . | nindent 8 }}
annotations:
{{- include "qovery.annotations.service" . | nindent 8 }}
spec:
containers:
- name: app
image: "{{ .Values.image.repository }}:{{ .Values.image.tag }}"
```
Apply these macros to the following Kubernetes resources:
* **Deployments** - For long-running applications
* **StatefulSets** - For stateful applications
* **Jobs** - For one-time tasks
* **CronJobs** - For scheduled tasks
* **Services** - For networking
* **Pods** - If you create standalone pods
Both **labels** and **annotations** are required for full functionality!
If you can't modify the Helm chart directly, override the values:
```yaml theme={null}
# In your Qovery Helm service overrides
deployment:
metadata:
labels:
qovery.com/service-id: "{{ QOVERY_SERVICE_ID }}"
qovery.com/service-type: "{{ QOVERY_SERVICE_TYPE }}"
qovery.com/environment-id: "{{ QOVERY_ENVIRONMENT_ID }}"
annotations:
qovery.com/service-version: "{{ QOVERY_SERVICE_VERSION }}"
```
1. Update your Helm chart with the macros
2. Redeploy the Helm service in Qovery
3. Verify logs are now visible in the Console
4. Check that pod status appears correctly
These labels and annotations allow Qovery to identify and track your Helm-deployed resources within the cluster.
**Symptoms:**
* Application becomes slow or unresponsive
* CPU throttling warnings in logs
* Pods getting OOMKilled even with sufficient memory
**Quick Checks:**
1. **Check CPU metrics** in Qovery Console
2. **Review recent code changes** that might be CPU-intensive
3. **Look for infinite loops** or inefficient algorithms
4. **Check for CPU-intensive operations** running on every request
**Solutions:**
* Optimize hot paths in your code
* Implement caching for expensive operations
* Move heavy processing to background jobs
* Increase CPU allocation if legitimately needed
* Use profiling tools to identify bottlenecks
**Possible Causes:**
* Database connection issues
* External API timeouts
* Insufficient resources
* Inefficient code paths
* Network latency
**Debugging Steps:**
1. Check **application logs** for slow queries or timeouts
2. Review **database connection pools**
3. Monitor **external API response times**
4. Profile your application to find slow endpoints
5. Check **network policies** that might be blocking traffic
***
## Cluster Issues
Find solutions for common errors you might encounter while deploying or updating Qovery clusters.
**Symptom:** When attempting to delete a Qovery cluster, you receive a `DependencyViolation` error.
**Cause:** Resources managed outside of Qovery remain attached to cluster infrastructure elements, preventing deletion.
**Example Error:**
```
DeleteError - Unknown error while performing Terraform command
(terraform destroy -lock=false -no-color -auto-approve), here is the error:
Error: deleting EC2 Subnet (subnet-xxx): operation error EC2: DeleteSubnet,
https response error StatusCode: 400, RequestID: xxx, api error DependencyViolation:
The subnet 'subnet-xxx' has dependencies and cannot be deleted.
```
**Solution:**
Log into your cloud provider console (AWS, GCP, Azure, or Scaleway).
**AWS Example:**
1. Go to [VPC Console](https://console.aws.amazon.com/vpc/)
2. Find the VPC associated with your Qovery cluster
3. Look for the subnet mentioned in the error message
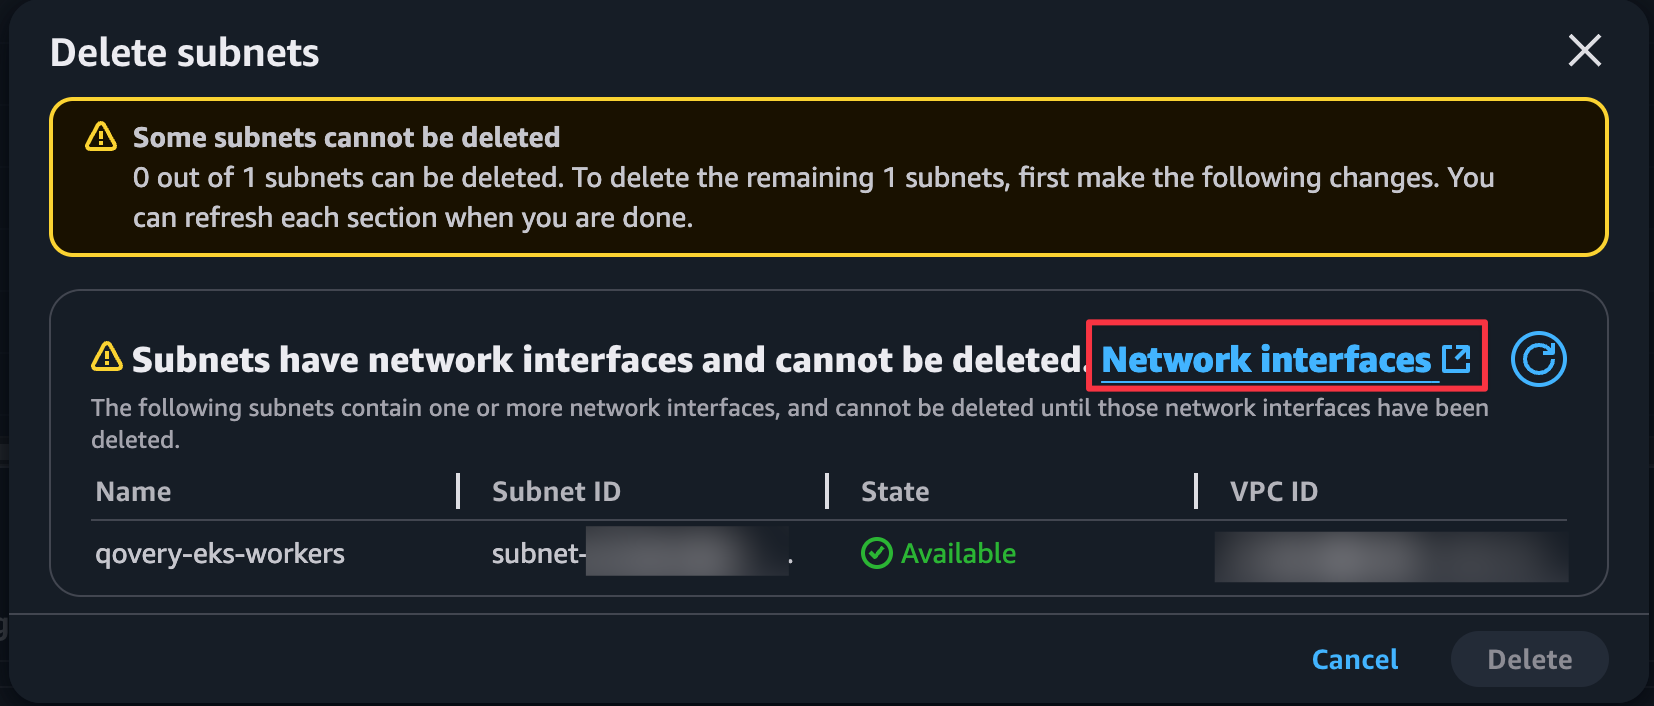 Try to delete the failing resource (subnet, security group, etc.):
1. Select the resource
2. Click **Delete** or **Actions** → **Delete**
3. The cloud provider will show what's blocking the deletion
Review the blocking resources, typically:
* **Network Interfaces** - Check the Type and Description fields
* **NAT Gateways** - May be attached to subnets
* **Load Balancers** - Can block subnet deletion
* **EC2 Instances** - Running or stopped instances
* **Lambda Functions** - With VPC configuration
* **RDS Instances** - In the VPC
Try to delete the failing resource (subnet, security group, etc.):
1. Select the resource
2. Click **Delete** or **Actions** → **Delete**
3. The cloud provider will show what's blocking the deletion
Review the blocking resources, typically:
* **Network Interfaces** - Check the Type and Description fields
* **NAT Gateways** - May be attached to subnets
* **Load Balancers** - Can block subnet deletion
* **EC2 Instances** - Running or stopped instances
* **Lambda Functions** - With VPC configuration
* **RDS Instances** - In the VPC
 Delete any resources that were created outside of Qovery:
Only delete resources you created manually! Don't delete resources managed by other applications.
1. Note down which resources are blocking
2. Delete them from the cloud console
3. Wait for deletion to complete
Return to Qovery and retry the cluster deletion. It should now succeed.
Common culprits: Lambda functions attached to VPC, manually created EC2 instances, or RDS databases not managed by Qovery.
**Scenario:** You no longer have access to the Qovery platform but need to clean up AWS resources.
### Method A: AWS Resource Groups & Tag Editor
1. Log into [AWS Console](https://console.aws.amazon.com/)
2. Go to **Resource Groups & Tag Editor** service
3. Click **Create Resource Group**
Delete any resources that were created outside of Qovery:
Only delete resources you created manually! Don't delete resources managed by other applications.
1. Note down which resources are blocking
2. Delete them from the cloud console
3. Wait for deletion to complete
Return to Qovery and retry the cluster deletion. It should now succeed.
Common culprits: Lambda functions attached to VPC, manually created EC2 instances, or RDS databases not managed by Qovery.
**Scenario:** You no longer have access to the Qovery platform but need to clean up AWS resources.
### Method A: AWS Resource Groups & Tag Editor
1. Log into [AWS Console](https://console.aws.amazon.com/)
2. Go to **Resource Groups & Tag Editor** service
3. Click **Create Resource Group**
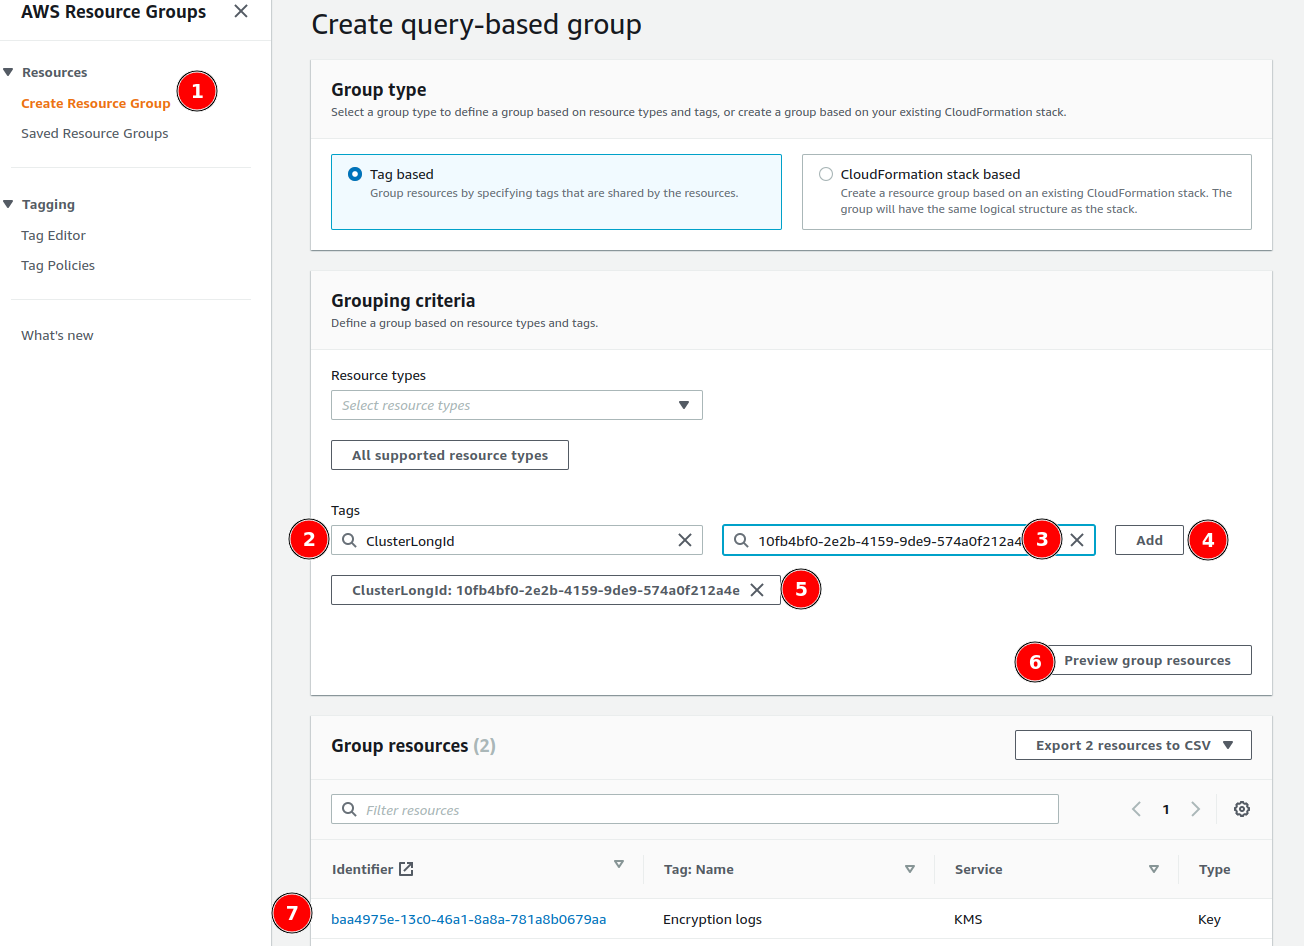 1. Choose **Tag based** group type
2. Add tag filter:
* **Tag key**: `ClusterLongId`
* **Tag value**: Your Qovery cluster ID (found in cluster settings or URL)
3. Click **Preview group resources**
1. Review all resources tagged with your cluster ID
2. Note the resource types (VPC, EC2, RDS, etc.)
3. Delete resources in this order:
* EC2 instances
* Load balancers
* RDS databases
* NAT gateways
* Internet gateways
* Route tables
* Subnets
* Security groups
* VPC (last)
### Method B: AWS CLI Script
Use this bash script to list all resources in a VPC by ID:
```bash theme={null}
#!/bin/bash
# Set your VPC ID
VPC_ID="vpc-xxxxxxxxx"
echo "=== Resources in VPC: $VPC_ID ==="
# EC2 Instances
echo -e "\n=== EC2 Instances ==="
aws ec2 describe-instances \
--filters "Name=vpc-id,Values=$VPC_ID" \
--query "Reservations[].Instances[].[InstanceId,Tags[?Key=='Name'].Value|[0],State.Name]" \
--output table
# Subnets
echo -e "\n=== Subnets ==="
aws ec2 describe-subnets \
--filters "Name=vpc-id,Values=$VPC_ID" \
--query "Subnets[].[SubnetId,CidrBlock,AvailabilityZone]" \
--output table
# Security Groups
echo -e "\n=== Security Groups ==="
aws ec2 describe-security-groups \
--filters "Name=vpc-id,Values=$VPC_ID" \
--query "SecurityGroups[].[GroupId,GroupName]" \
--output table
# NAT Gateways
echo -e "\n=== NAT Gateways ==="
aws ec2 describe-nat-gateways \
--filter "Name=vpc-id,Values=$VPC_ID" \
--query "NatGateways[].[NatGatewayId,State]" \
--output table
# Internet Gateways
echo -e "\n=== Internet Gateways ==="
aws ec2 describe-internet-gateways \
--filters "Name=attachment.vpc-id,Values=$VPC_ID" \
--query "InternetGateways[].[InternetGatewayId]" \
--output table
# Route Tables
echo -e "\n=== Route Tables ==="
aws ec2 describe-route-tables \
--filters "Name=vpc-id,Values=$VPC_ID" \
--query "RouteTables[].[RouteTableId,Associations[0].Main]" \
--output table
# Load Balancers (ALB/NLB)
echo -e "\n=== Load Balancers (ALB/NLB) ==="
aws elbv2 describe-load-balancers \
--query "LoadBalancers[?VpcId=='$VPC_ID'].[LoadBalancerName,LoadBalancerArn,Type]" \
--output table
# Network Interfaces
echo -e "\n=== Network Interfaces ==="
aws ec2 describe-network-interfaces \
--filters "Name=vpc-id,Values=$VPC_ID" \
--query "NetworkInterfaces[].[NetworkInterfaceId,Description,Status]" \
--output table
# VPC Endpoints
echo -e "\n=== VPC Endpoints ==="
aws ec2 describe-vpc-endpoints \
--filters "Name=vpc-id,Values=$VPC_ID" \
--query "VpcEndpoints[].[VpcEndpointId,ServiceName,State]" \
--output table
```
**Usage:**
```bash theme={null}
chmod +x list-vpc-resources.sh
./list-vpc-resources.sh
```
Always double-check you're deleting the correct resources! Deleting production resources by mistake can cause downtime.
**Symptom:** You receive one of these errors:
```
"This account is currently blocked by your cloud provider"
```
or
```
"This AWS account is currently blocked and not recognized as a valid account"
```
**Common Causes:**
1. **Billing Issues**
* Outstanding payment
* Credit card expired
* Payment method declined
2. **Free Tier Restrictions**
* Attempting to deploy in regions not supported by free tier
* Exceeding free tier limits
3. **Account Compliance Violations**
* Terms of service violations
* Abuse reports
* Security issues
**Solution:**
Qovery cannot resolve account-level blocks. You must contact your cloud provider directly:
* **AWS**: [Contact AWS Support](https://support.console.aws.amazon.com/)
* **GCP**: [Contact Google Cloud Support](https://cloud.google.com/support)
* **Azure**: [Open Azure Support Ticket](https://portal.azure.com/#blade/Microsoft_Azure_Support/HelpAndSupportBlade)
* **Scaleway**: [Open Support Ticket](https://console.scaleway.com/support/tickets)
1. Check your billing dashboard
2. Ensure payment method is valid
3. Resolve any outstanding payments
Review your account status page for:
* Active incidents
* Service health issues
* Account restrictions
Once your cloud provider resolves the block:
1. Wait 5-10 minutes for changes to propagate
2. Retry your cluster operation in Qovery
Account blocks are typically resolved quickly once you contact your cloud provider. Most issues are billing-related and easy to fix.
**Symptom:** Cluster creation fails with a permissions error related to AWS SQS when using Karpenter.
**Error Message:**
```
Permissions issue. Check your AWS permissions to ensure you have
the necessary authorizations for this action.
```
**Cause:** The IAM credentials provided don't have necessary SQS permissions for Karpenter's interruption handling.
**Solution:**
1. Check the [official Qovery IAM policy](https://www.qovery.com/docs/files/qovery-iam-aws.json)
2. Compare with your current IAM user/role permissions
3. Ensure all SQS permissions are included:
```json theme={null}
{
"Effect": "Allow",
"Action": [
"sqs:CreateQueue",
"sqs:DeleteQueue",
"sqs:GetQueueAttributes",
"sqs:SetQueueAttributes",
"sqs:TagQueue"
],
"Resource": "arn:aws:sqs:*:*:qovery*"
}
```
If you're using AWS Organizations, Service Control Policies (SCPs) may be blocking permissions:
1. Go to [AWS Policy Simulator](https://policysim.aws.amazon.com/)
2. Select your IAM user or role
3. Choose **SQS** service
4. Test these actions:
* `CreateQueue`
* `DeleteQueue`
* `GetQueueAttributes`
* `SetQueueAttributes`
* `TagQueue`
5. For resource, use: `arn:aws:sqs:::qovery*`
**Scenario 1: Permissions Allowed (with SCPs enabled)**
1. Choose **Tag based** group type
2. Add tag filter:
* **Tag key**: `ClusterLongId`
* **Tag value**: Your Qovery cluster ID (found in cluster settings or URL)
3. Click **Preview group resources**
1. Review all resources tagged with your cluster ID
2. Note the resource types (VPC, EC2, RDS, etc.)
3. Delete resources in this order:
* EC2 instances
* Load balancers
* RDS databases
* NAT gateways
* Internet gateways
* Route tables
* Subnets
* Security groups
* VPC (last)
### Method B: AWS CLI Script
Use this bash script to list all resources in a VPC by ID:
```bash theme={null}
#!/bin/bash
# Set your VPC ID
VPC_ID="vpc-xxxxxxxxx"
echo "=== Resources in VPC: $VPC_ID ==="
# EC2 Instances
echo -e "\n=== EC2 Instances ==="
aws ec2 describe-instances \
--filters "Name=vpc-id,Values=$VPC_ID" \
--query "Reservations[].Instances[].[InstanceId,Tags[?Key=='Name'].Value|[0],State.Name]" \
--output table
# Subnets
echo -e "\n=== Subnets ==="
aws ec2 describe-subnets \
--filters "Name=vpc-id,Values=$VPC_ID" \
--query "Subnets[].[SubnetId,CidrBlock,AvailabilityZone]" \
--output table
# Security Groups
echo -e "\n=== Security Groups ==="
aws ec2 describe-security-groups \
--filters "Name=vpc-id,Values=$VPC_ID" \
--query "SecurityGroups[].[GroupId,GroupName]" \
--output table
# NAT Gateways
echo -e "\n=== NAT Gateways ==="
aws ec2 describe-nat-gateways \
--filter "Name=vpc-id,Values=$VPC_ID" \
--query "NatGateways[].[NatGatewayId,State]" \
--output table
# Internet Gateways
echo -e "\n=== Internet Gateways ==="
aws ec2 describe-internet-gateways \
--filters "Name=attachment.vpc-id,Values=$VPC_ID" \
--query "InternetGateways[].[InternetGatewayId]" \
--output table
# Route Tables
echo -e "\n=== Route Tables ==="
aws ec2 describe-route-tables \
--filters "Name=vpc-id,Values=$VPC_ID" \
--query "RouteTables[].[RouteTableId,Associations[0].Main]" \
--output table
# Load Balancers (ALB/NLB)
echo -e "\n=== Load Balancers (ALB/NLB) ==="
aws elbv2 describe-load-balancers \
--query "LoadBalancers[?VpcId=='$VPC_ID'].[LoadBalancerName,LoadBalancerArn,Type]" \
--output table
# Network Interfaces
echo -e "\n=== Network Interfaces ==="
aws ec2 describe-network-interfaces \
--filters "Name=vpc-id,Values=$VPC_ID" \
--query "NetworkInterfaces[].[NetworkInterfaceId,Description,Status]" \
--output table
# VPC Endpoints
echo -e "\n=== VPC Endpoints ==="
aws ec2 describe-vpc-endpoints \
--filters "Name=vpc-id,Values=$VPC_ID" \
--query "VpcEndpoints[].[VpcEndpointId,ServiceName,State]" \
--output table
```
**Usage:**
```bash theme={null}
chmod +x list-vpc-resources.sh
./list-vpc-resources.sh
```
Always double-check you're deleting the correct resources! Deleting production resources by mistake can cause downtime.
**Symptom:** You receive one of these errors:
```
"This account is currently blocked by your cloud provider"
```
or
```
"This AWS account is currently blocked and not recognized as a valid account"
```
**Common Causes:**
1. **Billing Issues**
* Outstanding payment
* Credit card expired
* Payment method declined
2. **Free Tier Restrictions**
* Attempting to deploy in regions not supported by free tier
* Exceeding free tier limits
3. **Account Compliance Violations**
* Terms of service violations
* Abuse reports
* Security issues
**Solution:**
Qovery cannot resolve account-level blocks. You must contact your cloud provider directly:
* **AWS**: [Contact AWS Support](https://support.console.aws.amazon.com/)
* **GCP**: [Contact Google Cloud Support](https://cloud.google.com/support)
* **Azure**: [Open Azure Support Ticket](https://portal.azure.com/#blade/Microsoft_Azure_Support/HelpAndSupportBlade)
* **Scaleway**: [Open Support Ticket](https://console.scaleway.com/support/tickets)
1. Check your billing dashboard
2. Ensure payment method is valid
3. Resolve any outstanding payments
Review your account status page for:
* Active incidents
* Service health issues
* Account restrictions
Once your cloud provider resolves the block:
1. Wait 5-10 minutes for changes to propagate
2. Retry your cluster operation in Qovery
Account blocks are typically resolved quickly once you contact your cloud provider. Most issues are billing-related and easy to fix.
**Symptom:** Cluster creation fails with a permissions error related to AWS SQS when using Karpenter.
**Error Message:**
```
Permissions issue. Check your AWS permissions to ensure you have
the necessary authorizations for this action.
```
**Cause:** The IAM credentials provided don't have necessary SQS permissions for Karpenter's interruption handling.
**Solution:**
1. Check the [official Qovery IAM policy](https://www.qovery.com/docs/files/qovery-iam-aws.json)
2. Compare with your current IAM user/role permissions
3. Ensure all SQS permissions are included:
```json theme={null}
{
"Effect": "Allow",
"Action": [
"sqs:CreateQueue",
"sqs:DeleteQueue",
"sqs:GetQueueAttributes",
"sqs:SetQueueAttributes",
"sqs:TagQueue"
],
"Resource": "arn:aws:sqs:*:*:qovery*"
}
```
If you're using AWS Organizations, Service Control Policies (SCPs) may be blocking permissions:
1. Go to [AWS Policy Simulator](https://policysim.aws.amazon.com/)
2. Select your IAM user or role
3. Choose **SQS** service
4. Test these actions:
* `CreateQueue`
* `DeleteQueue`
* `GetQueueAttributes`
* `SetQueueAttributes`
* `TagQueue`
5. For resource, use: `arn:aws:sqs:::qovery*`
**Scenario 1: Permissions Allowed (with SCPs enabled)**
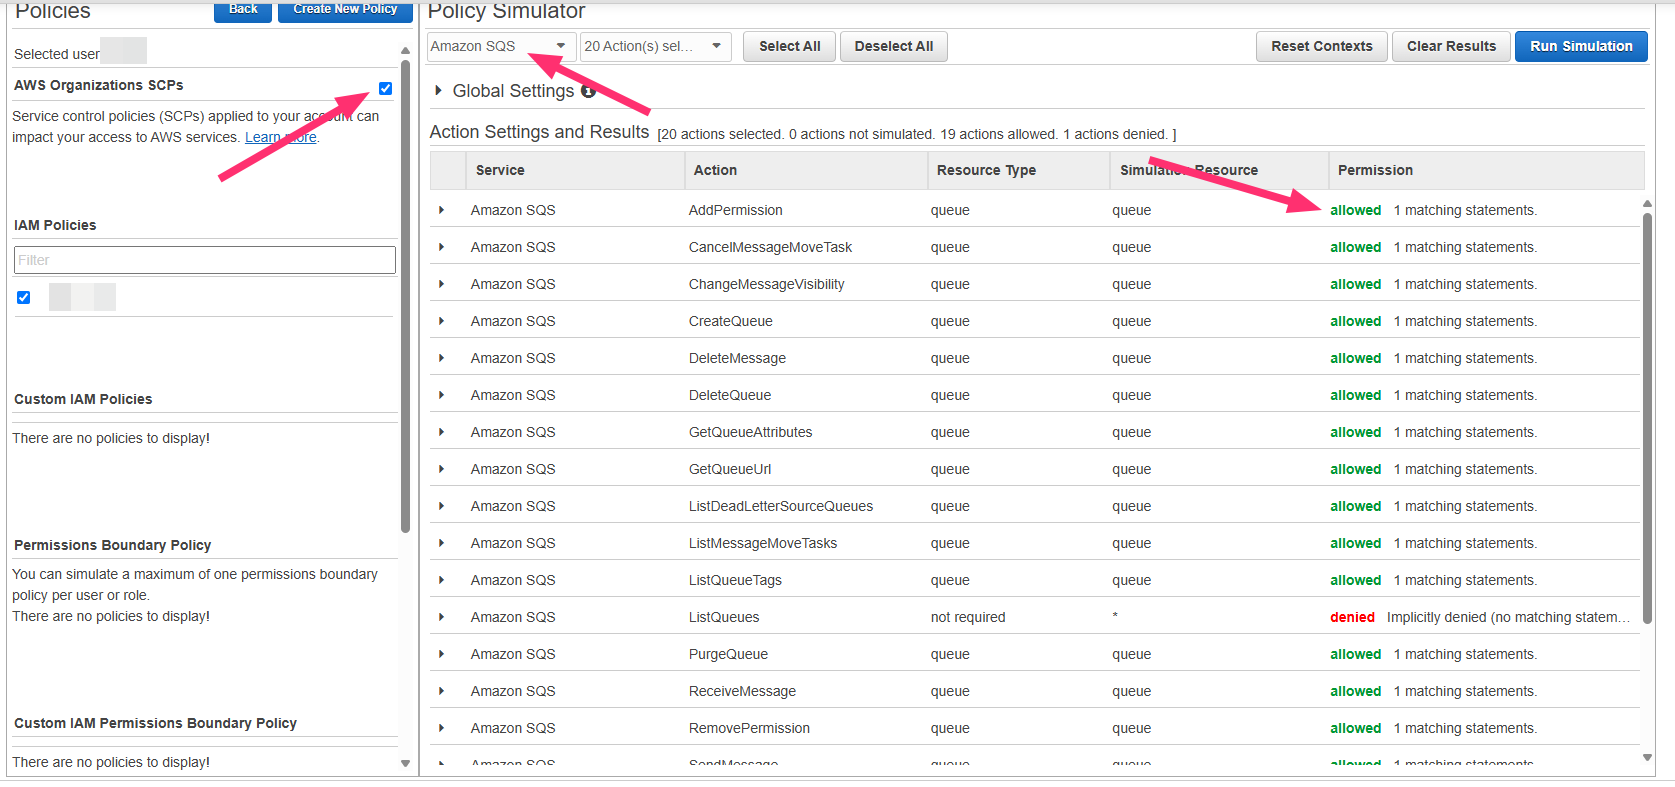 If permissions show as allowed with SCPs:
* [Contact Qovery Support](/docs/getting-started/useful-resources/help-and-support)
* Provide cluster ID and error logs
**Scenario 2: Permissions Denied (with SCPs enabled but allowed when disabled)**
If permissions show as allowed with SCPs:
* [Contact Qovery Support](/docs/getting-started/useful-resources/help-and-support)
* Provide cluster ID and error logs
**Scenario 2: Permissions Denied (with SCPs enabled but allowed when disabled)**
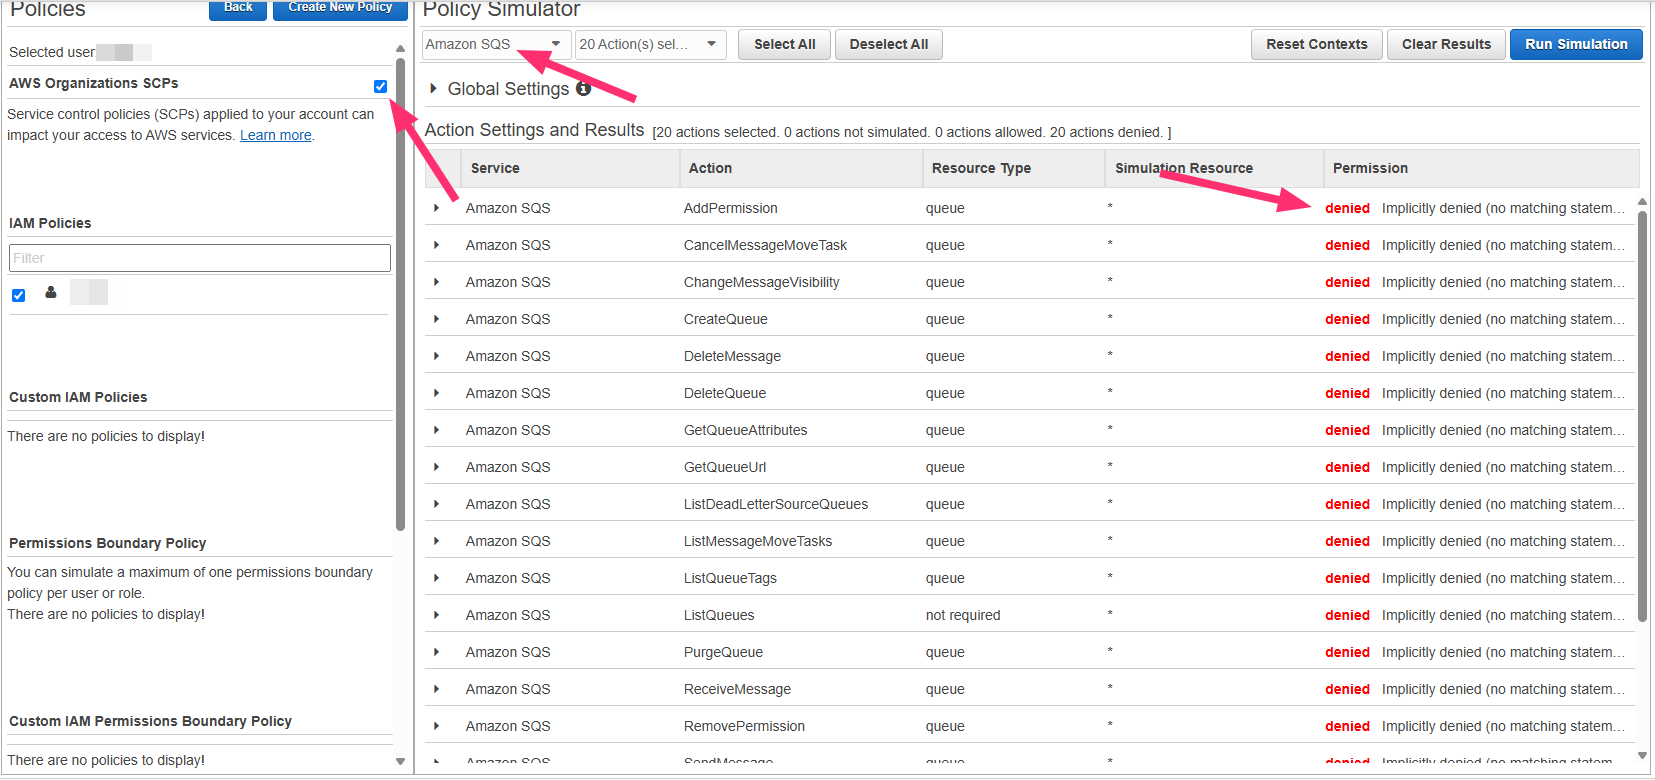 If denied with SCPs but allowed without:
* SCP is blocking Qovery access
* Contact your AWS administrator
* Request SQS permissions for Qovery resources
If using static credentials:
1. Go to [IAM Console](https://console.aws.amazon.com/iam/)
2. Find your Qovery IAM user
3. Update attached policies to include SQS permissions
4. Retry cluster creation
If using STS Assume Role:
1. Update the CloudFormation stack
2. Add missing SQS permissions to the role
3. Wait for stack update to complete
4. Retry cluster creation
Karpenter uses SQS to handle EC2 spot instance interruption notifications. Without these permissions, the cluster cannot properly handle node lifecycle events.
**Symptoms:**
* Cluster shows "Deploying" for more than 45 minutes
* No progress in deployment logs
**Possible Causes:**
* AWS service quotas exceeded
* Region capacity issues
* Network connectivity problems
* Invalid cluster configuration
**Solutions:**
1. **Check Cluster Logs**:
* Go to **Cluster Settings** → **Logs**
* Look for specific error messages
2. **Verify Service Quotas**:
* Check AWS Service Quotas for EC2, VPC, ELB
* Request increases if needed
3. **Try Different Region**:
* Some regions may have capacity issues
* Try deploying to an alternative region
4. **Contact Support**:
* If issue persists > 1 hour, contact support
* Provide cluster ID and deployment logs
***
## Need More Help?
If you don't find what you need in this troubleshooting guide, we're here to help:
View all support options
Browse the complete documentation
Read updates and announcements from the Qovery team
## Quick Links
* **[Service Logs](/docs/configuration/deployment/logs)** - Learn how to access and analyze service logs
* **[Deployment Statuses](/docs/configuration/deployment/statuses)** - Understand deployment status indicators
* **[Cluster Configuration](/docs/configuration/clusters)** - Configure your cluster settings
* **[Advanced Settings](/docs/configuration/service-advanced-settings)** - Fine-tune service configurations
If denied with SCPs but allowed without:
* SCP is blocking Qovery access
* Contact your AWS administrator
* Request SQS permissions for Qovery resources
If using static credentials:
1. Go to [IAM Console](https://console.aws.amazon.com/iam/)
2. Find your Qovery IAM user
3. Update attached policies to include SQS permissions
4. Retry cluster creation
If using STS Assume Role:
1. Update the CloudFormation stack
2. Add missing SQS permissions to the role
3. Wait for stack update to complete
4. Retry cluster creation
Karpenter uses SQS to handle EC2 spot instance interruption notifications. Without these permissions, the cluster cannot properly handle node lifecycle events.
**Symptoms:**
* Cluster shows "Deploying" for more than 45 minutes
* No progress in deployment logs
**Possible Causes:**
* AWS service quotas exceeded
* Region capacity issues
* Network connectivity problems
* Invalid cluster configuration
**Solutions:**
1. **Check Cluster Logs**:
* Go to **Cluster Settings** → **Logs**
* Look for specific error messages
2. **Verify Service Quotas**:
* Check AWS Service Quotas for EC2, VPC, ELB
* Request increases if needed
3. **Try Different Region**:
* Some regions may have capacity issues
* Try deploying to an alternative region
4. **Contact Support**:
* If issue persists > 1 hour, contact support
* Provide cluster ID and deployment logs
***
## Need More Help?
If you don't find what you need in this troubleshooting guide, we're here to help:
View all support options
Browse the complete documentation
Read updates and announcements from the Qovery team
## Quick Links
* **[Service Logs](/docs/configuration/deployment/logs)** - Learn how to access and analyze service logs
* **[Deployment Statuses](/docs/configuration/deployment/statuses)** - Understand deployment status indicators
* **[Cluster Configuration](/docs/configuration/clusters)** - Configure your cluster settings
* **[Advanced Settings](/docs/configuration/service-advanced-settings)** - Fine-tune service configurations