> ## Documentation Index
> Fetch the complete documentation index at: https://www.qovery.com/docs/llms.txt
> Use this file to discover all available pages before exploring further.
# Install Qovery on GCP
> Complete guide to installing Qovery on Google Cloud Platform with GKE Autopilot
Install Qovery on your GCP account and deploy a fully managed Kubernetes cluster (GKE Autopilot) in less than 20 minutes.
## Overview
Qovery simplifies Google Kubernetes Engine (GKE) management by:
* Automating GKE Autopilot cluster creation and configuration
* Managing networking, load balancers, and DNS
* Providing built-in monitoring and logging
* Handling rolling updates and automatic scaling
* Securing your infrastructure with best practices
Qovery creates and manages your GKE Autopilot cluster automatically
Best practices for security, networking, and reliability
Pay only for what you use with GKE Autopilot's pod-based billing
Automatic workload-based scaling built into Autopilot
## Prerequisites
Before you begin, ensure you have:
**GCP Account**: Active Google Cloud account with billing enabled
**GCP Project**: A project created with billing linked
**Qovery Account**: Free account at [console.qovery.com](https://console.qovery.com/signup)
**Quotas**: Minimum 4 CPUs and 8 GB memory available in your quotas
### Required GCP Quotas
Verify you have sufficient quotas in your target region:
* **CPUs (all regions)**: At least 4 vCPUs
* **In-use IP addresses**: At least 5-10 addresses
* **Persistent Disk SSD**: At least 100 GB
Check your quotas at: [console.cloud.google.com/iam-admin/quotas](https://console.cloud.google.com/iam-admin/quotas)
If you don't have enough quota, request an increase through the GCP Console. Quota increases are usually approved within minutes for established accounts.
## Step 1: Create GCP Credentials
Qovery needs credentials to manage resources in your GCP project. Choose your preferred method:
**Most secure method** - Uses short-lived access tokens generated through GCP Workload Identity Federation (WIF). No downloadable service account JSON key is created or stored.
This mode is recommended if your organization disables service account key creation with `constraints/iam.disableServiceAccountKeyCreation`.
**What the setup configures**:
* A GCP service account used by Qovery to manage your GKE resources
* The Qovery custom IAM role, created or updated and bound to this service account
* A Workload Identity Pool
* An AWS Workload Identity Provider that trusts the Qovery AWS deployer identity used by q-core
* A service account impersonation binding (`roles/iam.workloadIdentityUser`)
* An organization policy entry allowing this service account to receive 4 hour access tokens
With this setup, Qovery does not receive a JSON private key. Instead, q-core exchanges the configured Qovery AWS deployer identity for a temporary GCP access token, then uses that token to create, update, or delete your GKE cluster.
### Required Permissions
The account running the setup script must have enough permissions to configure both the GCP project and the GCP organization.
At the project level, it must be able to:
* enable GCP services;
* create or reuse a service account;
* create or update the Qovery custom IAM role and bind it to this service account;
* create or update a Workload Identity Pool and Provider;
* add `roles/iam.workloadIdentityUser` on the service account.
At the organization level, it must be able to update organization policies. Qovery requires 4 hour temporary tokens for GKE operations, so the script configures:
`constraints/iam.allowServiceAccountCredentialLifetimeExtension`
for the Qovery service account.
For this last step, the account needs the `Organization Policy Administrator` role (`roles/orgpolicy.policyAdmin`) on the GCP organization, or an organization administrator must run this step for you.
### Prepare Your GCP Project
1. Go to [Google Cloud Console](https://console.cloud.google.com)
2. Either create a new project or select an existing one
3. Ensure billing is enabled for the project
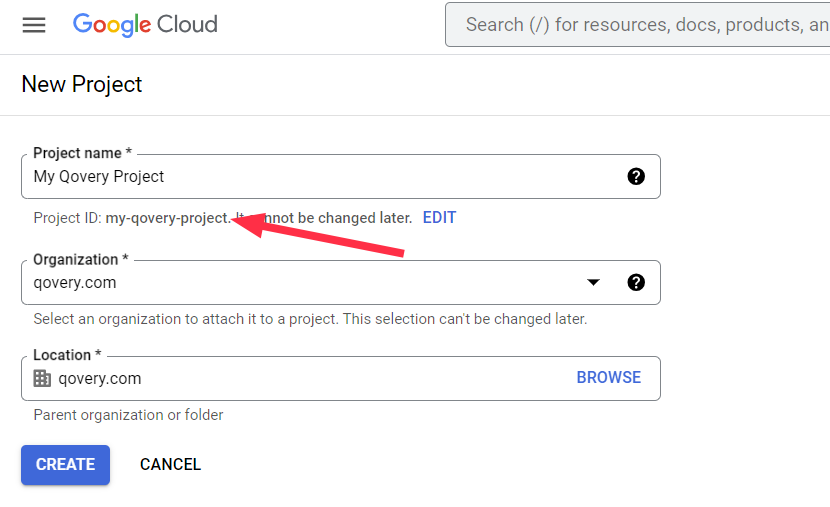 Use a dedicated project for Qovery to keep resources organized and costs trackable.
Copy your **Project ID** (not the project name) from the project selector.
Example: `my-company-production-123456`
### Generate the Workload Identity Federation Setup Command
1. Go to [Qovery Console](https://console.qovery.com)
2. Go to **Clusters** tab
3. Click **Create Cluster**
4. Select **GCP** as the cloud provider
Select **Workload Identity Federation** as the credential method.
Qovery will generate a setup command for your GCP project. The command contains only your GCP setup values. The Qovery AWS account and principal to trust are embedded in the setup script, but no Qovery secret is embedded.
Copy the generated command to your clipboard.
The command will look like:
```bash theme={null}
curl https://setup.qovery.com/create_credentials_gcp_wif.sh | bash -s -- \
YOUR_PROJECT_ID \
YOUR_SERVICE_ACCOUNT_NAME
```
The setup script creates or reuses the GCP service account named `YOUR_SERVICE_ACCOUNT_NAME`. Always provide this service account name explicitly.
Qovery requires 4 hour temporary tokens for GKE operations. The setup script uses default Qovery resource names, resolves the GCP organization ID from `YOUR_PROJECT_ID`, and configures `constraints/iam.allowServiceAccountCredentialLifetimeExtension` for the Qovery service account.
If your project is not directly attached to an organization, or if the script cannot resolve it, rerun the command with the organization ID as the last argument.
### Run the Workload Identity Federation Setup Script
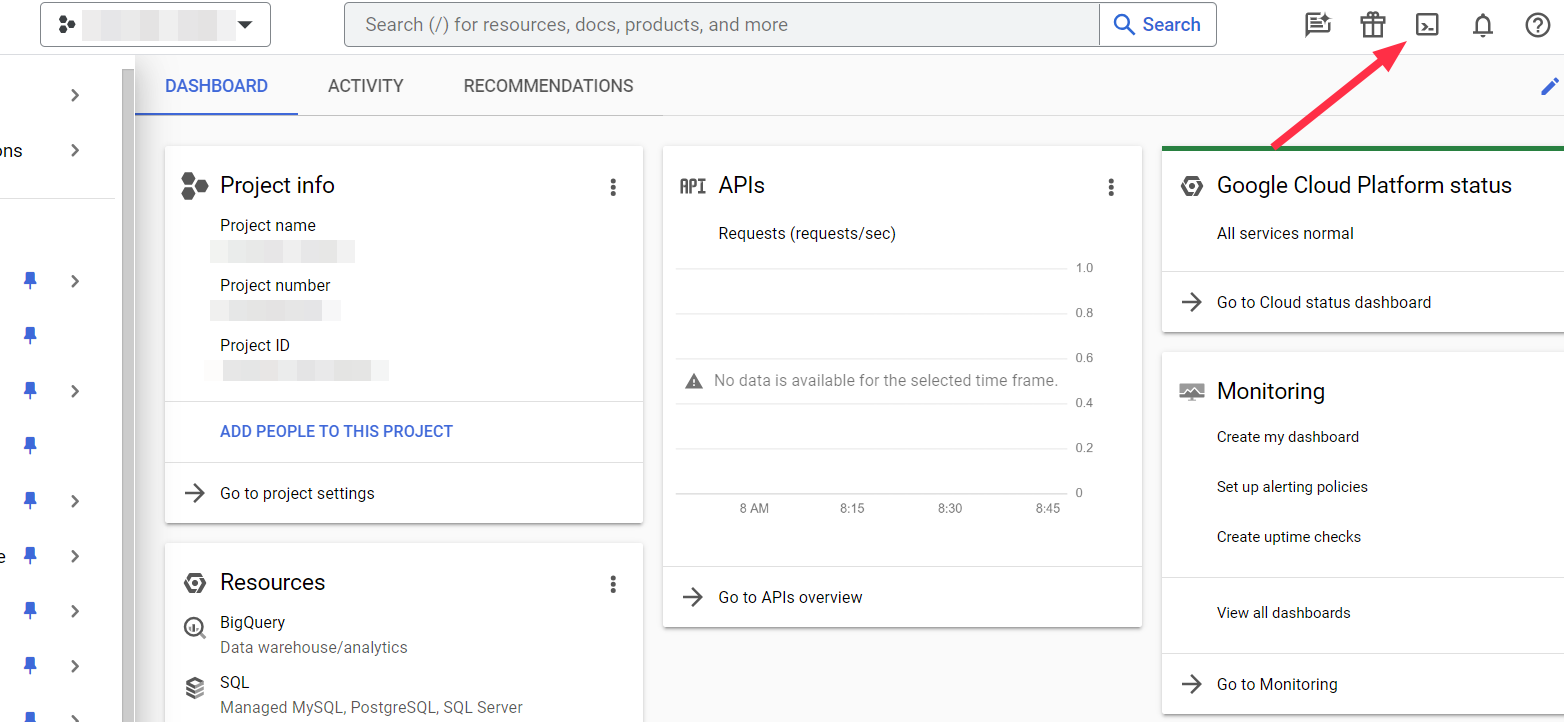
1. In Google Cloud Console, click the **Cloud Shell** icon in the top-right
2. Wait for Cloud Shell to initialize
3. Ensure you're in the correct project: `gcloud config get-value project`
Use a dedicated project for Qovery to keep resources organized and costs trackable.
Copy your **Project ID** (not the project name) from the project selector.
Example: `my-company-production-123456`
### Generate the Workload Identity Federation Setup Command
1. Go to [Qovery Console](https://console.qovery.com)
2. Go to **Clusters** tab
3. Click **Create Cluster**
4. Select **GCP** as the cloud provider
Select **Workload Identity Federation** as the credential method.
Qovery will generate a setup command for your GCP project. The command contains only your GCP setup values. The Qovery AWS account and principal to trust are embedded in the setup script, but no Qovery secret is embedded.
Copy the generated command to your clipboard.
The command will look like:
```bash theme={null}
curl https://setup.qovery.com/create_credentials_gcp_wif.sh | bash -s -- \
YOUR_PROJECT_ID \
YOUR_SERVICE_ACCOUNT_NAME
```
The setup script creates or reuses the GCP service account named `YOUR_SERVICE_ACCOUNT_NAME`. Always provide this service account name explicitly.
Qovery requires 4 hour temporary tokens for GKE operations. The setup script uses default Qovery resource names, resolves the GCP organization ID from `YOUR_PROJECT_ID`, and configures `constraints/iam.allowServiceAccountCredentialLifetimeExtension` for the Qovery service account.
If your project is not directly attached to an organization, or if the script cannot resolve it, rerun the command with the organization ID as the last argument.
### Run the Workload Identity Federation Setup Script
1. In Google Cloud Console, click the **Cloud Shell** icon in the top-right
2. Wait for Cloud Shell to initialize
3. Ensure you're in the correct project: `gcloud config get-value project`
 1. Paste the command from Qovery into Cloud Shell
2. Press **Enter**
3. The script will:
* Enable required GCP APIs
* Create or reuse the Qovery service account
* Create or update the Qovery custom IAM role
* Bind the Qovery custom IAM role to the service account
* Create or reuse the Workload Identity Pool
* Create or update the AWS Workload Identity Provider
* Allow the Qovery AWS identity to impersonate the GCP service account
* Allow this service account to receive 4 hour access tokens
**Example output:**
```bash theme={null}
Operations completed.
Store these values in Qovery:
service_account_email=my-qovery-sa@my-company-production-123456.iam.gserviceaccount.com
workload_identity_provider_resource=projects/123456789012/locations/global/workloadIdentityPools/qovery-wif-pool/providers/qovery-aws
No JSON service account key was created.
```
Return to Qovery Console and paste the values returned by the script:
* **Service account email**
* **Workload Identity provider resource**
Qovery will verify the configuration and save the credentials.
By default, GCP service account impersonation access tokens are limited to **1 hour**.
Qovery requires a **4 hour** token lifetime for GKE operations, similar to the AWS EKS STS flow. To allow this, your GCP organization must allow the Qovery service account through `constraints/iam.allowServiceAccountCredentialLifetimeExtension`.
If this policy is not configured, Workload Identity Federation credentials cannot be used for Qovery-managed GKE.
You can revoke Qovery's access at any time by removing the `roles/iam.workloadIdentityUser` binding from the service account or deleting the Workload Identity Provider.
Service account JSON keys are long-lived private keys. If they leak, they remain valid until you rotate or delete them.
With Workload Identity Federation, Qovery receives short-lived access tokens only. No customer private key is downloaded, uploaded, or stored in Qovery.
The Qovery service account still needs the same GCP permissions required to manage GKE, Compute, networking, Cloud Storage, Artifact Registry, and Cloud Run resources.
The same Workload Identity Federation credentials can also be used for GCP Artifact Registry in Qovery, as long as this service account has the required Artifact Registry permissions.
For a detailed breakdown of every permission and why it is needed, see the [GCP IAM Permissions Reference](/docs/getting-started/security-and-compliance/gcp-iam-permissions).
Yes. Pass the existing service account name as `YOUR_SERVICE_ACCOUNT_NAME`. The script will reuse it, bind the Qovery custom role to it, allow the Qovery AWS deployer identity to impersonate it through `roles/iam.workloadIdentityUser`, and allow 4 hour access tokens for this service account.
Yes. Service account JSON keys remain supported for existing installations and organizations that allow service account key creation.
However, Workload Identity Federation is recommended for new GCP credentials.
**Legacy method** - Creates a downloadable service account JSON key and uploads it to Qovery.
Workload Identity Federation is recommended for new GCP credentials. Use JSON keys only if your organization allows service account key creation and you cannot use WIF yet.
### Prepare Your GCP Project
1. Go to [Google Cloud Console](https://console.cloud.google.com)
2. Either create a new project or select an existing one
3. Ensure billing is enabled for the project
Use a dedicated project for Qovery to keep resources organized and costs trackable.
Copy your **Project ID** (not the project name) from the project selector.
Example: `my-company-production-123456`
You'll need this Project ID in the next steps.
### Generate Installation Command
1. Go to [Qovery Console](https://console.qovery.com)
2. Go to **Clusters** tab
3. Click **Create Cluster**
4. Select **GCP** as the cloud provider
1. Enter your **Project ID**
2. Click **Next**
Qovery will generate a secure installation command for you.
Copy the generated command to your clipboard.
The command will look like:
```bash theme={null}
curl https://setup.qovery.com/create_credentials_gcp.sh | bash -s -- YOUR_PROJECT_ID qovery_role qovery-service-account
```
This script creates a service account with minimal required permissions.
If you enable **static egress IPs** for GCP NAT Gateway, the role must also include `compute.addresses.create`, `compute.addresses.get`, `compute.addresses.list`, and `compute.addresses.delete`.
Typical Terraform failure when missing: `Required 'compute.addresses.create' permission ... forbidden`.
### Run Installation Script
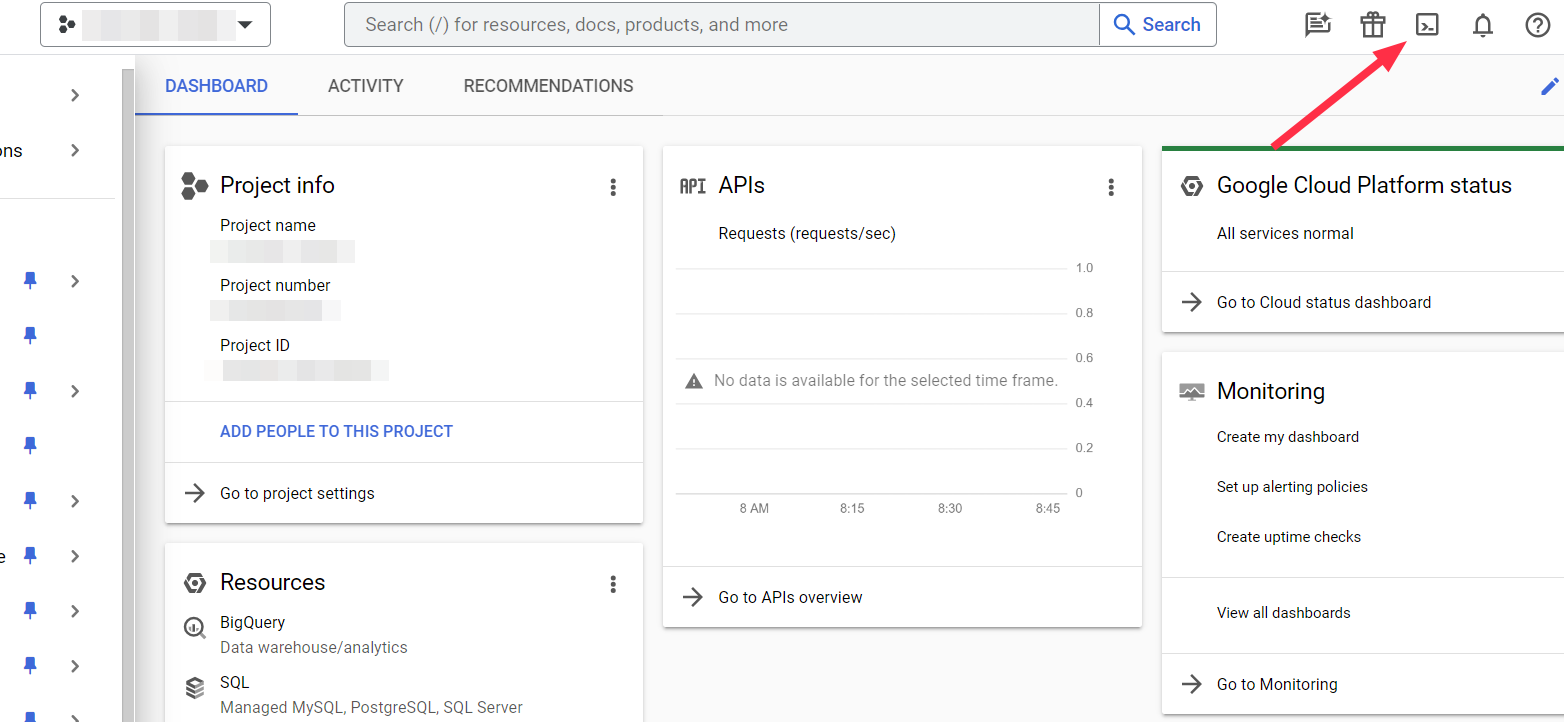
1. In Google Cloud Console, click the **Cloud Shell** icon (terminal icon) in the top-right
2. Wait for Cloud Shell to initialize
3. Ensure you're in the correct project: `gcloud config get-value project`
1. Paste the command from Qovery into Cloud Shell
2. Press **Enter**
3. The script will:
* Enable required GCP APIs (Container, Compute, Artifact Registry, Storage, Cloud Resource Manager, Cloud Run)
* Create a service account named `qovery-service-account`
* Assign necessary IAM roles
* Generate and download a JSON key file (`key.json`)
1. Paste the command from Qovery into Cloud Shell
2. Press **Enter**
3. The script will:
* Enable required GCP APIs
* Create or reuse the Qovery service account
* Create or update the Qovery custom IAM role
* Bind the Qovery custom IAM role to the service account
* Create or reuse the Workload Identity Pool
* Create or update the AWS Workload Identity Provider
* Allow the Qovery AWS identity to impersonate the GCP service account
* Allow this service account to receive 4 hour access tokens
**Example output:**
```bash theme={null}
Operations completed.
Store these values in Qovery:
service_account_email=my-qovery-sa@my-company-production-123456.iam.gserviceaccount.com
workload_identity_provider_resource=projects/123456789012/locations/global/workloadIdentityPools/qovery-wif-pool/providers/qovery-aws
No JSON service account key was created.
```
Return to Qovery Console and paste the values returned by the script:
* **Service account email**
* **Workload Identity provider resource**
Qovery will verify the configuration and save the credentials.
By default, GCP service account impersonation access tokens are limited to **1 hour**.
Qovery requires a **4 hour** token lifetime for GKE operations, similar to the AWS EKS STS flow. To allow this, your GCP organization must allow the Qovery service account through `constraints/iam.allowServiceAccountCredentialLifetimeExtension`.
If this policy is not configured, Workload Identity Federation credentials cannot be used for Qovery-managed GKE.
You can revoke Qovery's access at any time by removing the `roles/iam.workloadIdentityUser` binding from the service account or deleting the Workload Identity Provider.
Service account JSON keys are long-lived private keys. If they leak, they remain valid until you rotate or delete them.
With Workload Identity Federation, Qovery receives short-lived access tokens only. No customer private key is downloaded, uploaded, or stored in Qovery.
The Qovery service account still needs the same GCP permissions required to manage GKE, Compute, networking, Cloud Storage, Artifact Registry, and Cloud Run resources.
The same Workload Identity Federation credentials can also be used for GCP Artifact Registry in Qovery, as long as this service account has the required Artifact Registry permissions.
For a detailed breakdown of every permission and why it is needed, see the [GCP IAM Permissions Reference](/docs/getting-started/security-and-compliance/gcp-iam-permissions).
Yes. Pass the existing service account name as `YOUR_SERVICE_ACCOUNT_NAME`. The script will reuse it, bind the Qovery custom role to it, allow the Qovery AWS deployer identity to impersonate it through `roles/iam.workloadIdentityUser`, and allow 4 hour access tokens for this service account.
Yes. Service account JSON keys remain supported for existing installations and organizations that allow service account key creation.
However, Workload Identity Federation is recommended for new GCP credentials.
**Legacy method** - Creates a downloadable service account JSON key and uploads it to Qovery.
Workload Identity Federation is recommended for new GCP credentials. Use JSON keys only if your organization allows service account key creation and you cannot use WIF yet.
### Prepare Your GCP Project
1. Go to [Google Cloud Console](https://console.cloud.google.com)
2. Either create a new project or select an existing one
3. Ensure billing is enabled for the project
Use a dedicated project for Qovery to keep resources organized and costs trackable.
Copy your **Project ID** (not the project name) from the project selector.
Example: `my-company-production-123456`
You'll need this Project ID in the next steps.
### Generate Installation Command
1. Go to [Qovery Console](https://console.qovery.com)
2. Go to **Clusters** tab
3. Click **Create Cluster**
4. Select **GCP** as the cloud provider
1. Enter your **Project ID**
2. Click **Next**
Qovery will generate a secure installation command for you.
Copy the generated command to your clipboard.
The command will look like:
```bash theme={null}
curl https://setup.qovery.com/create_credentials_gcp.sh | bash -s -- YOUR_PROJECT_ID qovery_role qovery-service-account
```
This script creates a service account with minimal required permissions.
If you enable **static egress IPs** for GCP NAT Gateway, the role must also include `compute.addresses.create`, `compute.addresses.get`, `compute.addresses.list`, and `compute.addresses.delete`.
Typical Terraform failure when missing: `Required 'compute.addresses.create' permission ... forbidden`.
### Run Installation Script
1. In Google Cloud Console, click the **Cloud Shell** icon (terminal icon) in the top-right
2. Wait for Cloud Shell to initialize
3. Ensure you're in the correct project: `gcloud config get-value project`
1. Paste the command from Qovery into Cloud Shell
2. Press **Enter**
3. The script will:
* Enable required GCP APIs (Container, Compute, Artifact Registry, Storage, Cloud Resource Manager, Cloud Run)
* Create a service account named `qovery-service-account`
* Assign necessary IAM roles
* Generate and download a JSON key file (`key.json`)
 **Example output:**
```bash theme={null}
Activating services APIs
Operation "operations/acf.p2-..." finished successfully.
...
Creating service account qovery-service-account
Created service account [qovery-service-account].
...
created key [abc123...] of type [json] as [key.json]
✓ Credentials configured successfully
```
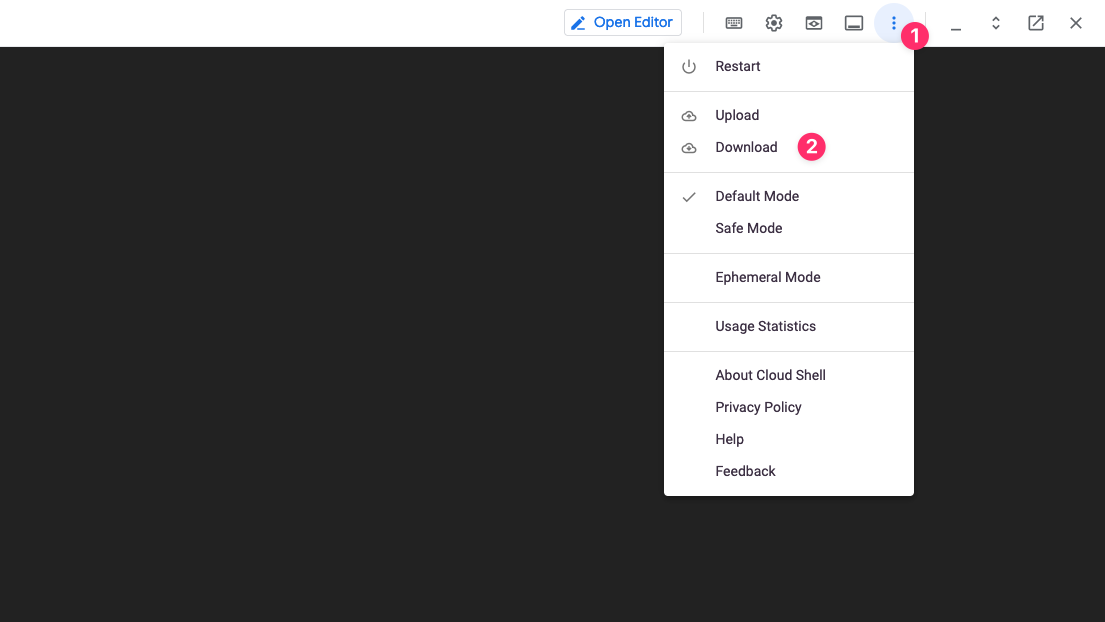
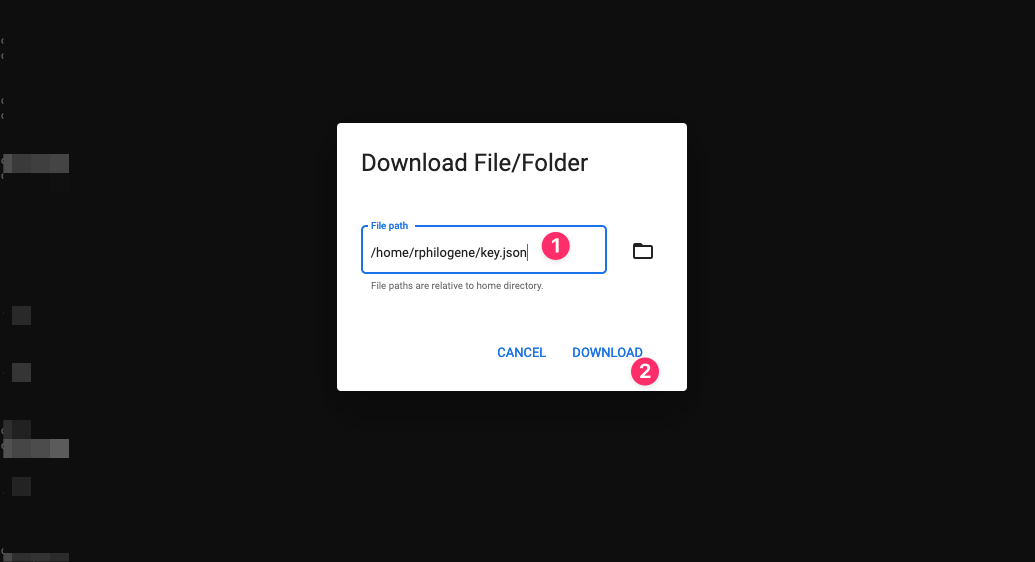
1. In Cloud Shell, click the **More** menu (three dots)
2. Select **Download**
3. Enter the file path: `key.json`
4. Save the file securely
**Example output:**
```bash theme={null}
Activating services APIs
Operation "operations/acf.p2-..." finished successfully.
...
Creating service account qovery-service-account
Created service account [qovery-service-account].
...
created key [abc123...] of type [json] as [key.json]
✓ Credentials configured successfully
```
1. In Cloud Shell, click the **More** menu (three dots)
2. Select **Download**
3. Enter the file path: `key.json`
4. Save the file securely
 **Keep this JSON key file secure!** It provides access to your GCP project. Never commit it to version control.
1. Return to Qovery Console
2. Upload the `key.json` file when prompted
3. Qovery will verify the credentials
**Keep this JSON key file secure!** It provides access to your GCP project. Never commit it to version control.
1. Return to Qovery Console
2. Upload the `key.json` file when prompted
3. Qovery will verify the credentials
 You can reuse these credentials for multiple clusters in the same GCP project.
Qovery requires these GCP permissions to manage your infrastructure:
* **Compute Engine**: Create and manage VMs, networks, and load balancers
* **Kubernetes Engine**: Create and manage GKE clusters
* **VPC Networking**: Configure networks, subnets, and firewall rules
* **Service Accounts**: Manage service identities for workloads
* **Cloud Storage**: Store Terraform state and logs
* **Artifact Registry**: Store container images
* **Cloud Run**: Manage serverless deployments (optional)
If static egress IPs are enabled on NAT Gateway, your role also needs `compute.addresses.*` permissions to reserve external IPs.
The installation script automatically assigns the minimum required roles to the service account.
Yes! You can create a service account manually with custom permissions.
However, ensure it has all the roles required for managing GKE, Compute
Engine, and networking resources. Contact support for the minimal permissions
list.
To rotate GCP credentials:
1. In GCP Console, go to **IAM & Admin** → **Service Accounts**
2. Find the `qovery-service-account`
3. Click **Keys** → **Add Key** → **Create new key**
4. Choose **JSON** format and download
5. Update credentials in Qovery Console
6. Wait 24 hours, then delete the old key in GCP
## Step 2: Configure Your Cluster
Now configure your GKE Autopilot cluster settings in the Qovery console.
### Basic Configuration
Choose a descriptive name for your cluster:
* `production-gke`
* `staging-gcp`
* `dev-gke-uscentral1`
Use naming conventions that indicate environment and region for easier management.
Choose a GCP region closest to your users:
**North America:**
* `us-central1` - Iowa
* `us-east1` - South Carolina
* `us-east4` - Virginia
* `us-west1` - Oregon
* `us-west2` - Los Angeles
* `us-west3` - Salt Lake City
* `us-west4` - Las Vegas
**Europe:**
* `europe-west1` - Belgium
* `europe-west2` - London
* `europe-west3` - Frankfurt
* `europe-west4` - Netherlands
* `europe-west6` - Zurich
* `europe-north1` - Finland
**Asia Pacific:**
* `asia-southeast1` - Singapore
* `asia-east1` - Taiwan
* `asia-northeast1` - Tokyo
* `asia-south1` - Mumbai
* `australia-southeast1` - Sydney
Choose a region that complies with your data residency requirements and offers the lowest latency to your users.
Select the GCP credentials you created in Step 1.
If you need to create new credentials, click **Add new credentials** and repeat Step 1.
### GKE Autopilot Configuration
GKE Autopilot automatically manages your cluster's infrastructure, including node provisioning, scaling, and maintenance.
**What is GKE Autopilot?**
GKE Autopilot is Google's fully managed Kubernetes offering where:
* Google manages all nodes, node pools, and infrastructure
* You pay only for the resources your pods request (pod-based billing)
* Automatic scaling based on workload demands
* Built-in security and compliance best practices
* Regional clusters by default (high availability)
**Compute Classes:**
Autopilot automatically provisions the right machine types for your workloads:
* **General Purpose (default)**: E2 machines for standard workloads
* **Balanced**: Higher CPU/memory capacity for demanding applications
* **Scale-Out**: Optimized for high-throughput, scale-out workloads
* **Accelerator**: GPU-enabled for ML/AI workloads
You don't need to select machine types manually - Autopilot handles this automatically based on your pod resource requests.
Autopilot supports both x86\_64 and ARM (Tau) architectures. Specify your architecture preference in pod annotations if needed.
### Networking Configuration
Qovery automatically configures GCP networking:
**What's Created:**
* Virtual Private Cloud (VPC) with custom subnet ranges
* Cloud NAT for outbound internet connectivity
* Cloud Router for dynamic routing
* Static external IP addresses
* Firewall rules for security
* Load balancers for ingress traffic
**Qovery-Managed VPC (Default):**
Qovery creates a dedicated VPC for your cluster with optimal configuration.
**Existing VPC:**
Deploy into your own VPC to connect with existing GCP resources.
**Static IP:**
Enable static IP addresses at cluster creation (only available with Qovery-managed VPC).
**VPC Peering:**
Configure VPC peering after deployment to connect to databases, Cloud SQL, or other services.
## Step 3: Deploy Your Cluster
Review all your cluster settings:
* Cluster name
* GCP project
* Region
* Networking options
Click **Create and Deploy**
You can start configuring applications immediately! The cluster will be available once deployment completes.
Watch the deployment progress in the Qovery console.
**Timeline:**
* **0-5 min**: Enabling GCP APIs and creating service accounts
* **5-10 min**: Provisioning VPC, subnets, and networking
* **10-15 min**: Creating GKE Autopilot control plane
* **15-20 min**: Installing Qovery components (ingress, monitoring, etc.)
**Status indicators:**
* 🟡 **Creating**: Infrastructure provisioning in progress
* 🟢 **Running**: Cluster is ready to use
* 🔴 **Error**: Check logs for troubleshooting
Once complete, your cluster will appear in the cluster list with status **Running**.
## What Gets Created
Qovery automatically provisions these GCP resources:
* **GKE Autopilot Cluster**: Fully managed Kubernetes cluster
* **Virtual Private Cloud**: Isolated network for your cluster
* **Subnets**: Public and private subnets with IP ranges
* **Cloud NAT**: Outbound internet connectivity
* **Cloud Router**: Dynamic routing for VPC
* **Firewall Rules**: Security rules for traffic control
* **Cloud Load Balancing**: HTTP(S) and TCP/UDP load balancing
* **External IP Addresses**: Static IPs for ingress (optional)
* **Cloud DNS**: Automatic domain management
* **Service Networking**: Private service connections
* **Autopilot-Managed Nodes**: Automatically provisioned and scaled
* **Persistent Disks**: SSD storage for applications
* **Container Registry**: Artifact Registry for container images
* **Compute Classes**: E2, N2, C3 machines based on workload needs
* **NGINX Ingress Controller**: HTTP/HTTPS routing
* **Cert-Manager**: Automatic SSL/TLS certificates
* **Qovery Agent**: Cluster management and monitoring
* **Metrics Server**: Resource usage metrics
* **DNS Management**: Automatic domain configuration
## Post-Installation Steps
Once your cluster is running:
Follow the [Deploy Your First App](/docs/guides/getting-started/deploy-your-first-application) guide
Set up your own domain instead of the default Qovery domain
Configure [Cloud Monitoring](/docs/integrations/observability/overview) or [Datadog](/docs/integrations/observability/datadog)
Set up backup policies for persistent data
## Troubleshooting
**Error**: "Failed to create service account" or "Permission denied"
**Solutions:**
* Verify you have Owner or Editor role in the GCP project
* Check that billing is enabled for the project
* Ensure the project ID is correct (use project ID, not project name)
* Try running the script again - API enablement can take a few minutes
**Issue**: Cluster stuck in "Creating" state for over 30 minutes
**Solutions:**
* Check GCP quotas for your project (vCPUs, IPs, disks)
* Verify the selected region has GKE availability
* Check [GCP Status Dashboard](https://status.cloud.google.com) for outages
* Contact Qovery support if issue persists
**Error**: "Quota exceeded" or "ZONE\_RESOURCE\_POOL\_EXHAUSTED"
**Solutions:**
1. Check your quotas: [console.cloud.google.com/iam-admin/quotas](https://console.cloud.google.com/iam-admin/quotas)
2. Request quota increase (usually approved instantly for established accounts)
3. Try a different region with more available capacity
4. Reduce your workload's resource requests
**Common quota limits:**
* CPUs (all regions)
* In-use IP addresses
* Persistent Disk SSD (GB)
* NVIDIA GPUs (if using accelerators)
**Error**: "API not enabled" or "Service \[...] is not enabled"
**Solutions:**
* The installation script should enable all required APIs
* Manually enable missing APIs in [API Library](https://console.cloud.google.com/apis/library)
* Required APIs:
* Kubernetes Engine API
* Compute Engine API
* Artifact Registry API
* Cloud Storage API
* Cloud Resource Manager API
* Cloud Run API
**Issue**: Applications can't access external services or databases
**Solutions:**
* Verify Cloud NAT is properly configured
* Check firewall rules in VPC settings
* Ensure VPC peering is set up correctly (if using existing VPC)
* Test connectivity from a pod: `kubectl run -it debug --image=nicolaka/netshoot --rm`
## Advanced Configuration
### VPC Peering
Connect your GKE cluster to existing GCP resources:
1. Navigate to VPC Network Peering in GCP Console
2. Create peering connection from Qovery VPC to your VPC
3. Configure firewall rules for traffic
4. Update routes if necessary
5. Test connectivity
### Using Existing VPC
Deploy Qovery into your own VPC:
When using an existing VPC, ensure it has:
* Sufficient IP address ranges for pods and services
* Proper subnet configuration
* Cloud NAT configured for internet access
* Required firewall rules
You can also enable **Private nodes** during cluster creation to remove public IPs from GKE nodes and route node traffic through your gateway. This setting cannot be changed after the cluster is created.
### Spot Pods (Preemptible VMs)
Save up to 91% on compute costs:
1. Add node selector to your deployments:
```yaml theme={null}
nodeSelector:
"cloud.google.com/gke-spot": true
```
2. Ensure your application handles interruptions gracefully
3. Use for stateless, fault-tolerant workloads only
Spot Pods can be terminated with 30 seconds notice. Not recommended for production databases or stateful services.
## Best Practices
Enable Spot Pods for dev/staging and fault-tolerant workloads to save up to 91%
Set accurate resource requests - Autopilot bills based on requests, not usage
Configure Cloud Monitoring or third-party observability from day one
Use Workload Identity and Kubernetes RBAC for access control
GKE Autopilot auto-updates, but test your apps with new Kubernetes versions
Implement automated backups for persistent data and configurations
## Next Steps
Complete step-by-step deployment guide
Set up team access control
Automate deployments with GitHub Actions or GitLab CI
Configure monitoring and alerting
## Additional Resources
* [GKE Autopilot Documentation](https://cloud.google.com/kubernetes-engine/docs/concepts/autopilot-overview)
* [GCP Pricing Calculator](https://cloud.google.com/products/calculator)
* [GCP Free Tier](https://cloud.google.com/free)
* [Qovery Status Page](https://status.qovery.com)
* [Qovery Kubernetes Changelog](https://www.qovery.com/changelog---kubernetes) - Kubernetes cluster related updates
You can reuse these credentials for multiple clusters in the same GCP project.
Qovery requires these GCP permissions to manage your infrastructure:
* **Compute Engine**: Create and manage VMs, networks, and load balancers
* **Kubernetes Engine**: Create and manage GKE clusters
* **VPC Networking**: Configure networks, subnets, and firewall rules
* **Service Accounts**: Manage service identities for workloads
* **Cloud Storage**: Store Terraform state and logs
* **Artifact Registry**: Store container images
* **Cloud Run**: Manage serverless deployments (optional)
If static egress IPs are enabled on NAT Gateway, your role also needs `compute.addresses.*` permissions to reserve external IPs.
The installation script automatically assigns the minimum required roles to the service account.
Yes! You can create a service account manually with custom permissions.
However, ensure it has all the roles required for managing GKE, Compute
Engine, and networking resources. Contact support for the minimal permissions
list.
To rotate GCP credentials:
1. In GCP Console, go to **IAM & Admin** → **Service Accounts**
2. Find the `qovery-service-account`
3. Click **Keys** → **Add Key** → **Create new key**
4. Choose **JSON** format and download
5. Update credentials in Qovery Console
6. Wait 24 hours, then delete the old key in GCP
## Step 2: Configure Your Cluster
Now configure your GKE Autopilot cluster settings in the Qovery console.
### Basic Configuration
Choose a descriptive name for your cluster:
* `production-gke`
* `staging-gcp`
* `dev-gke-uscentral1`
Use naming conventions that indicate environment and region for easier management.
Choose a GCP region closest to your users:
**North America:**
* `us-central1` - Iowa
* `us-east1` - South Carolina
* `us-east4` - Virginia
* `us-west1` - Oregon
* `us-west2` - Los Angeles
* `us-west3` - Salt Lake City
* `us-west4` - Las Vegas
**Europe:**
* `europe-west1` - Belgium
* `europe-west2` - London
* `europe-west3` - Frankfurt
* `europe-west4` - Netherlands
* `europe-west6` - Zurich
* `europe-north1` - Finland
**Asia Pacific:**
* `asia-southeast1` - Singapore
* `asia-east1` - Taiwan
* `asia-northeast1` - Tokyo
* `asia-south1` - Mumbai
* `australia-southeast1` - Sydney
Choose a region that complies with your data residency requirements and offers the lowest latency to your users.
Select the GCP credentials you created in Step 1.
If you need to create new credentials, click **Add new credentials** and repeat Step 1.
### GKE Autopilot Configuration
GKE Autopilot automatically manages your cluster's infrastructure, including node provisioning, scaling, and maintenance.
**What is GKE Autopilot?**
GKE Autopilot is Google's fully managed Kubernetes offering where:
* Google manages all nodes, node pools, and infrastructure
* You pay only for the resources your pods request (pod-based billing)
* Automatic scaling based on workload demands
* Built-in security and compliance best practices
* Regional clusters by default (high availability)
**Compute Classes:**
Autopilot automatically provisions the right machine types for your workloads:
* **General Purpose (default)**: E2 machines for standard workloads
* **Balanced**: Higher CPU/memory capacity for demanding applications
* **Scale-Out**: Optimized for high-throughput, scale-out workloads
* **Accelerator**: GPU-enabled for ML/AI workloads
You don't need to select machine types manually - Autopilot handles this automatically based on your pod resource requests.
Autopilot supports both x86\_64 and ARM (Tau) architectures. Specify your architecture preference in pod annotations if needed.
### Networking Configuration
Qovery automatically configures GCP networking:
**What's Created:**
* Virtual Private Cloud (VPC) with custom subnet ranges
* Cloud NAT for outbound internet connectivity
* Cloud Router for dynamic routing
* Static external IP addresses
* Firewall rules for security
* Load balancers for ingress traffic
**Qovery-Managed VPC (Default):**
Qovery creates a dedicated VPC for your cluster with optimal configuration.
**Existing VPC:**
Deploy into your own VPC to connect with existing GCP resources.
**Static IP:**
Enable static IP addresses at cluster creation (only available with Qovery-managed VPC).
**VPC Peering:**
Configure VPC peering after deployment to connect to databases, Cloud SQL, or other services.
## Step 3: Deploy Your Cluster
Review all your cluster settings:
* Cluster name
* GCP project
* Region
* Networking options
Click **Create and Deploy**
You can start configuring applications immediately! The cluster will be available once deployment completes.
Watch the deployment progress in the Qovery console.
**Timeline:**
* **0-5 min**: Enabling GCP APIs and creating service accounts
* **5-10 min**: Provisioning VPC, subnets, and networking
* **10-15 min**: Creating GKE Autopilot control plane
* **15-20 min**: Installing Qovery components (ingress, monitoring, etc.)
**Status indicators:**
* 🟡 **Creating**: Infrastructure provisioning in progress
* 🟢 **Running**: Cluster is ready to use
* 🔴 **Error**: Check logs for troubleshooting
Once complete, your cluster will appear in the cluster list with status **Running**.
## What Gets Created
Qovery automatically provisions these GCP resources:
* **GKE Autopilot Cluster**: Fully managed Kubernetes cluster
* **Virtual Private Cloud**: Isolated network for your cluster
* **Subnets**: Public and private subnets with IP ranges
* **Cloud NAT**: Outbound internet connectivity
* **Cloud Router**: Dynamic routing for VPC
* **Firewall Rules**: Security rules for traffic control
* **Cloud Load Balancing**: HTTP(S) and TCP/UDP load balancing
* **External IP Addresses**: Static IPs for ingress (optional)
* **Cloud DNS**: Automatic domain management
* **Service Networking**: Private service connections
* **Autopilot-Managed Nodes**: Automatically provisioned and scaled
* **Persistent Disks**: SSD storage for applications
* **Container Registry**: Artifact Registry for container images
* **Compute Classes**: E2, N2, C3 machines based on workload needs
* **NGINX Ingress Controller**: HTTP/HTTPS routing
* **Cert-Manager**: Automatic SSL/TLS certificates
* **Qovery Agent**: Cluster management and monitoring
* **Metrics Server**: Resource usage metrics
* **DNS Management**: Automatic domain configuration
## Post-Installation Steps
Once your cluster is running:
Follow the [Deploy Your First App](/docs/guides/getting-started/deploy-your-first-application) guide
Set up your own domain instead of the default Qovery domain
Configure [Cloud Monitoring](/docs/integrations/observability/overview) or [Datadog](/docs/integrations/observability/datadog)
Set up backup policies for persistent data
## Troubleshooting
**Error**: "Failed to create service account" or "Permission denied"
**Solutions:**
* Verify you have Owner or Editor role in the GCP project
* Check that billing is enabled for the project
* Ensure the project ID is correct (use project ID, not project name)
* Try running the script again - API enablement can take a few minutes
**Issue**: Cluster stuck in "Creating" state for over 30 minutes
**Solutions:**
* Check GCP quotas for your project (vCPUs, IPs, disks)
* Verify the selected region has GKE availability
* Check [GCP Status Dashboard](https://status.cloud.google.com) for outages
* Contact Qovery support if issue persists
**Error**: "Quota exceeded" or "ZONE\_RESOURCE\_POOL\_EXHAUSTED"
**Solutions:**
1. Check your quotas: [console.cloud.google.com/iam-admin/quotas](https://console.cloud.google.com/iam-admin/quotas)
2. Request quota increase (usually approved instantly for established accounts)
3. Try a different region with more available capacity
4. Reduce your workload's resource requests
**Common quota limits:**
* CPUs (all regions)
* In-use IP addresses
* Persistent Disk SSD (GB)
* NVIDIA GPUs (if using accelerators)
**Error**: "API not enabled" or "Service \[...] is not enabled"
**Solutions:**
* The installation script should enable all required APIs
* Manually enable missing APIs in [API Library](https://console.cloud.google.com/apis/library)
* Required APIs:
* Kubernetes Engine API
* Compute Engine API
* Artifact Registry API
* Cloud Storage API
* Cloud Resource Manager API
* Cloud Run API
**Issue**: Applications can't access external services or databases
**Solutions:**
* Verify Cloud NAT is properly configured
* Check firewall rules in VPC settings
* Ensure VPC peering is set up correctly (if using existing VPC)
* Test connectivity from a pod: `kubectl run -it debug --image=nicolaka/netshoot --rm`
## Advanced Configuration
### VPC Peering
Connect your GKE cluster to existing GCP resources:
1. Navigate to VPC Network Peering in GCP Console
2. Create peering connection from Qovery VPC to your VPC
3. Configure firewall rules for traffic
4. Update routes if necessary
5. Test connectivity
### Using Existing VPC
Deploy Qovery into your own VPC:
When using an existing VPC, ensure it has:
* Sufficient IP address ranges for pods and services
* Proper subnet configuration
* Cloud NAT configured for internet access
* Required firewall rules
You can also enable **Private nodes** during cluster creation to remove public IPs from GKE nodes and route node traffic through your gateway. This setting cannot be changed after the cluster is created.
### Spot Pods (Preemptible VMs)
Save up to 91% on compute costs:
1. Add node selector to your deployments:
```yaml theme={null}
nodeSelector:
"cloud.google.com/gke-spot": true
```
2. Ensure your application handles interruptions gracefully
3. Use for stateless, fault-tolerant workloads only
Spot Pods can be terminated with 30 seconds notice. Not recommended for production databases or stateful services.
## Best Practices
Enable Spot Pods for dev/staging and fault-tolerant workloads to save up to 91%
Set accurate resource requests - Autopilot bills based on requests, not usage
Configure Cloud Monitoring or third-party observability from day one
Use Workload Identity and Kubernetes RBAC for access control
GKE Autopilot auto-updates, but test your apps with new Kubernetes versions
Implement automated backups for persistent data and configurations
## Next Steps
Complete step-by-step deployment guide
Set up team access control
Automate deployments with GitHub Actions or GitLab CI
Configure monitoring and alerting
## Additional Resources
* [GKE Autopilot Documentation](https://cloud.google.com/kubernetes-engine/docs/concepts/autopilot-overview)
* [GCP Pricing Calculator](https://cloud.google.com/products/calculator)
* [GCP Free Tier](https://cloud.google.com/free)
* [Qovery Status Page](https://status.qovery.com)
* [Qovery Kubernetes Changelog](https://www.qovery.com/changelog---kubernetes) - Kubernetes cluster related updates