> ## Documentation Index
> Fetch the complete documentation index at: https://www.qovery.com/docs/llms.txt
> Use this file to discover all available pages before exploring further.
# Install Qovery on AWS
> Create your first Kubernetes cluster on AWS in under 30 minutes
Get your first production-ready Kubernetes cluster running on AWS. This guide walks you through the entire setup from connecting AWS to deploying your cluster.
Already have a Kubernetes cluster? See the [BYOK guide](/docs/getting-started/installation/kubernetes) instead.
## What You'll Get
* ✅ Production-ready EKS cluster in \~30 minutes
* ✅ **Karpenter auto-scaling** - Save up to 60% on AWS costs
* ✅ Automatic load balancing with SSL certificates
* ✅ Spot instance support for cost optimization
* ✅ Monitoring and logging built-in
* ✅ Ready to deploy your applications
### About Karpenter
Qovery uses [Karpenter](https://karpenter.sh/) for intelligent node provisioning, which automatically selects the most cost-effective EC2 instances for your workloads:
**Key Benefits**:
* **Cost optimization** through spot instances and consolidation
* **Fast scaling** - Provisions nodes in seconds (vs minutes with traditional auto-scaling)
* **Smart instance selection** - Picks the best from your allowed instance types
* **Workload consolidation** - Packs pods efficiently to minimize node count
**How It Works**: During setup, you **select multiple instance types** (e.g., t3.medium, t3.large, m5.xlarge, m6i.large). Karpenter then automatically chooses the best option based on:
* Your application resource requirements
* Spot vs on-demand availability
* Cost optimization across your selected instance types
* Current capacity and pricing
**More instance types = better optimization!** Select a variety of instance types (t3, m5, m6i families) to give Karpenter maximum flexibility for cost and availability optimization.
## Prerequisites
You have a [Qovery account](https://console.qovery.com/signup)
You have an [AWS account](https://aws.amazon.com)
You can access the AWS Console
No AWS expertise required - we'll guide you through everything!
***
## Quick Demo
Watch this walkthrough to see the entire cluster creation process:
***
## Create Your Cluster
Follow these steps to create your first Qovery cluster on AWS:
1. Log into [Qovery Console](https://console.qovery.com)
2. Go to **Organization Settings** → **Clusters**
3. Click **Create Cluster**
4. Select **AWS** as your cloud provider
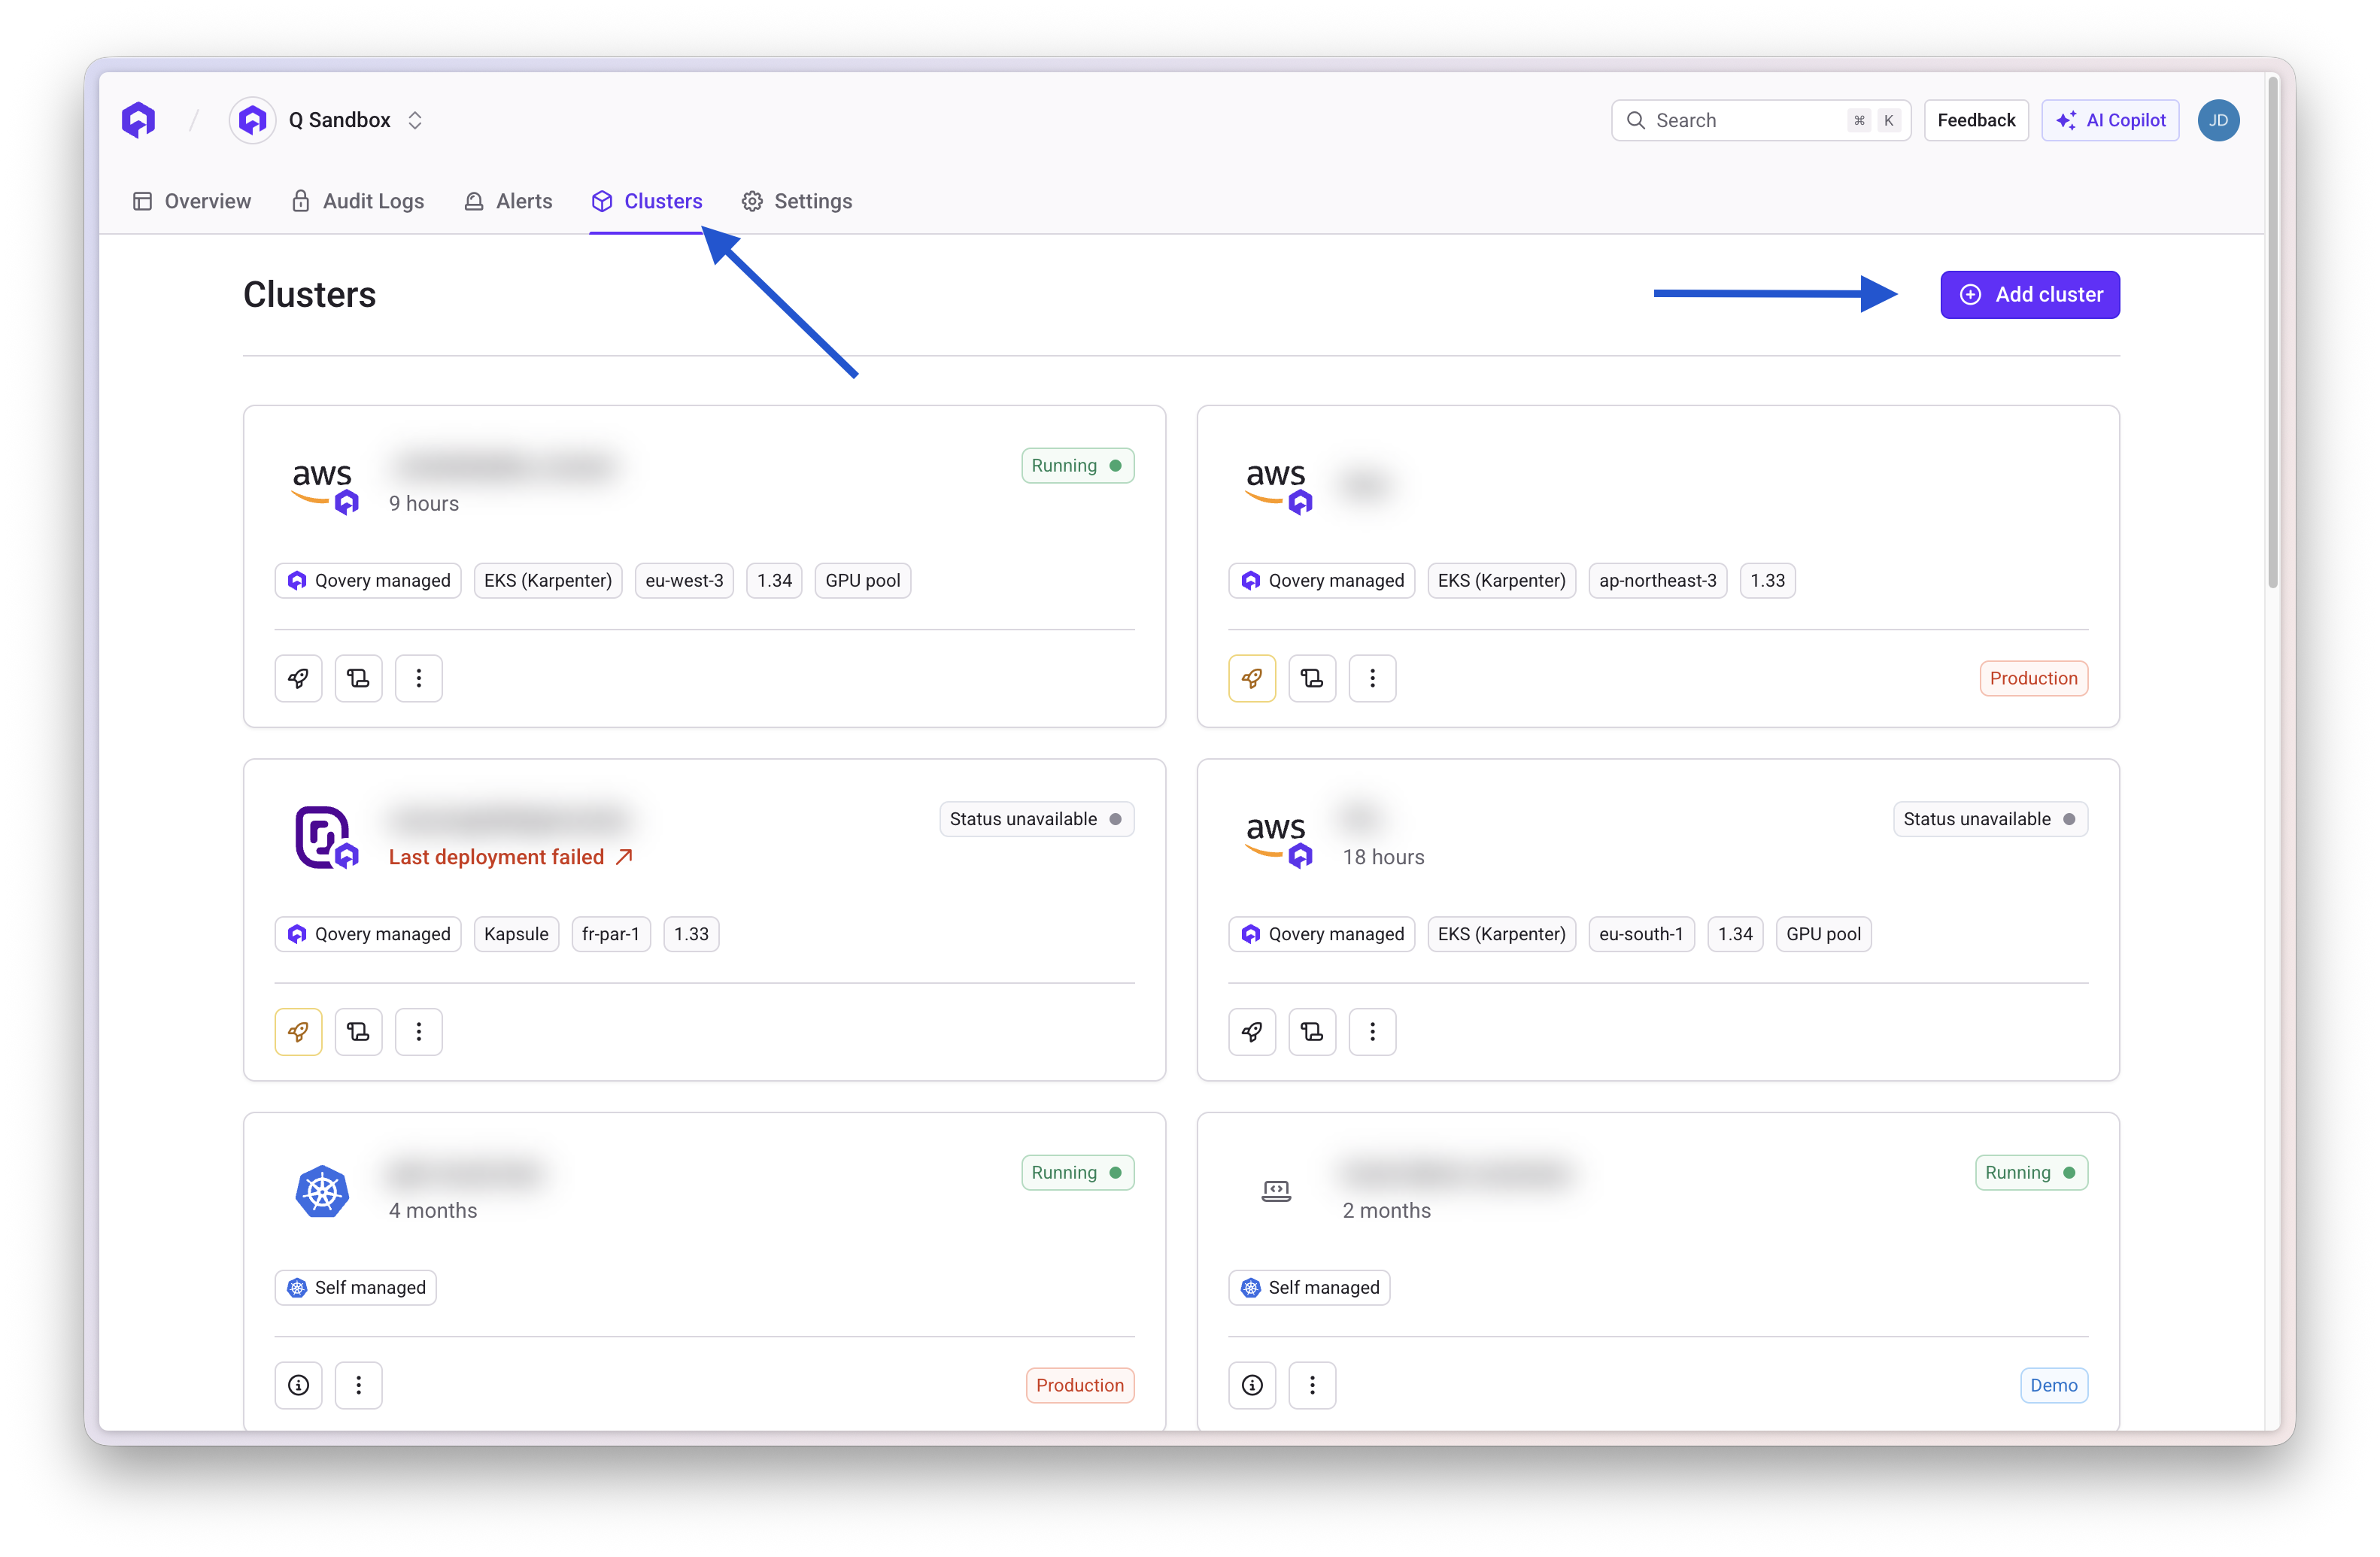 * **Cluster name**: Choose a name like `production` or `my-first-cluster` - **Region**: Select the AWS region closest to your users (e.g., `us-east-1`)
Choose how to connect your AWS account to Qovery:
**Most secure method** - Uses temporary credentials that auto-rotate. No access keys to manage.
**What gets created**: A CloudFormation stack creates an IAM role with this policy:
```json theme={null}
{
"Version": "2012-10-17",
"Statement": [
{
"Effect": "Allow",
"Action": [
"application-autoscaling:*",
"autoscaling:*",
"cloudtrail:LookupEvents",
"cloudwatch:*",
"dynamodb:*",
"ec2:*",
"ecr:*",
"ecs:*",
"eks:*",
"elasticache:*",
"elasticloadbalancing:*",
"es:AddTags",
"es:CreateElasticsearchDomain",
"es:DeleteElasticsearchDomain",
"es:DescribeElasticsearchDomain",
"es:ListTags",
"es:RemoveTags",
"events:DeleteRule",
"events:DescribeRule",
"events:ListRuleNamesByTarget",
"events:ListTagsForResource",
"events:ListTargetsByRule",
"events:PutRule",
"events:PutTargets",
"events:RemoveTargets",
"events:TagResource",
"events:UntagResource",
"iam:*",
"kms:*",
"logs:*",
"organizations:DescribeAccount",
"organizations:DescribeOrganization",
"organizations:DescribeOrganizationalUnit",
"organizations:DescribePolicy",
"organizations:ListChildren",
"organizations:ListParents",
"organizations:ListPolicies",
"organizations:ListPoliciesForTarget",
"organizations:ListRoots",
"organizations:ListTargetsForPolicy",
"rds:*",
"s3:ListAllMyBuckets",
"servicequotas:GetServiceQuota",
"tag:GetResources"
],
"Resource": "*"
},
{
"Action": [
"s3:*",
"sqs:*"
],
"Effect": "Allow",
"Resource": [
"arn:aws:s3:::qovery*",
"arn:aws:s3:::qovery*/*",
"arn:aws:sqs:*:*:qovery*",
"arn:aws:sqs:*:*:qovery*/*"
]
}
]
}
```
**Setup Steps**:
1. **Open CloudFormation**: Click this link to create the IAM role
* [Launch CloudFormation Stack](https://console.aws.amazon.com/cloudformation/home?#/stacks/quickcreate?templateURL=https%3A%2F%2Fcloudformation-qovery-role-creation.s3.amazonaws.com%2Ftemplate.json\&stackName=qovery-role-creation)
* This opens AWS CloudFormation in a new tab (login to AWS if needed)
2. **In AWS CloudFormation Console**:
* Click **Next** (template is pre-filled with Qovery's requirements)
* Stack name: Keep default `qovery-iam-role` or customize
* Click **Next** (skip stack options)
* Click **Next** again (skip tags)
* ✅ **Important**: Check **"I acknowledge that AWS CloudFormation might create IAM resources"**
* Click **Create stack**
3. **Wait for completion** (\~1 minute):
* Status changes: `CREATE_IN_PROGRESS` → `CREATE_COMPLETE`
* Refresh page if needed
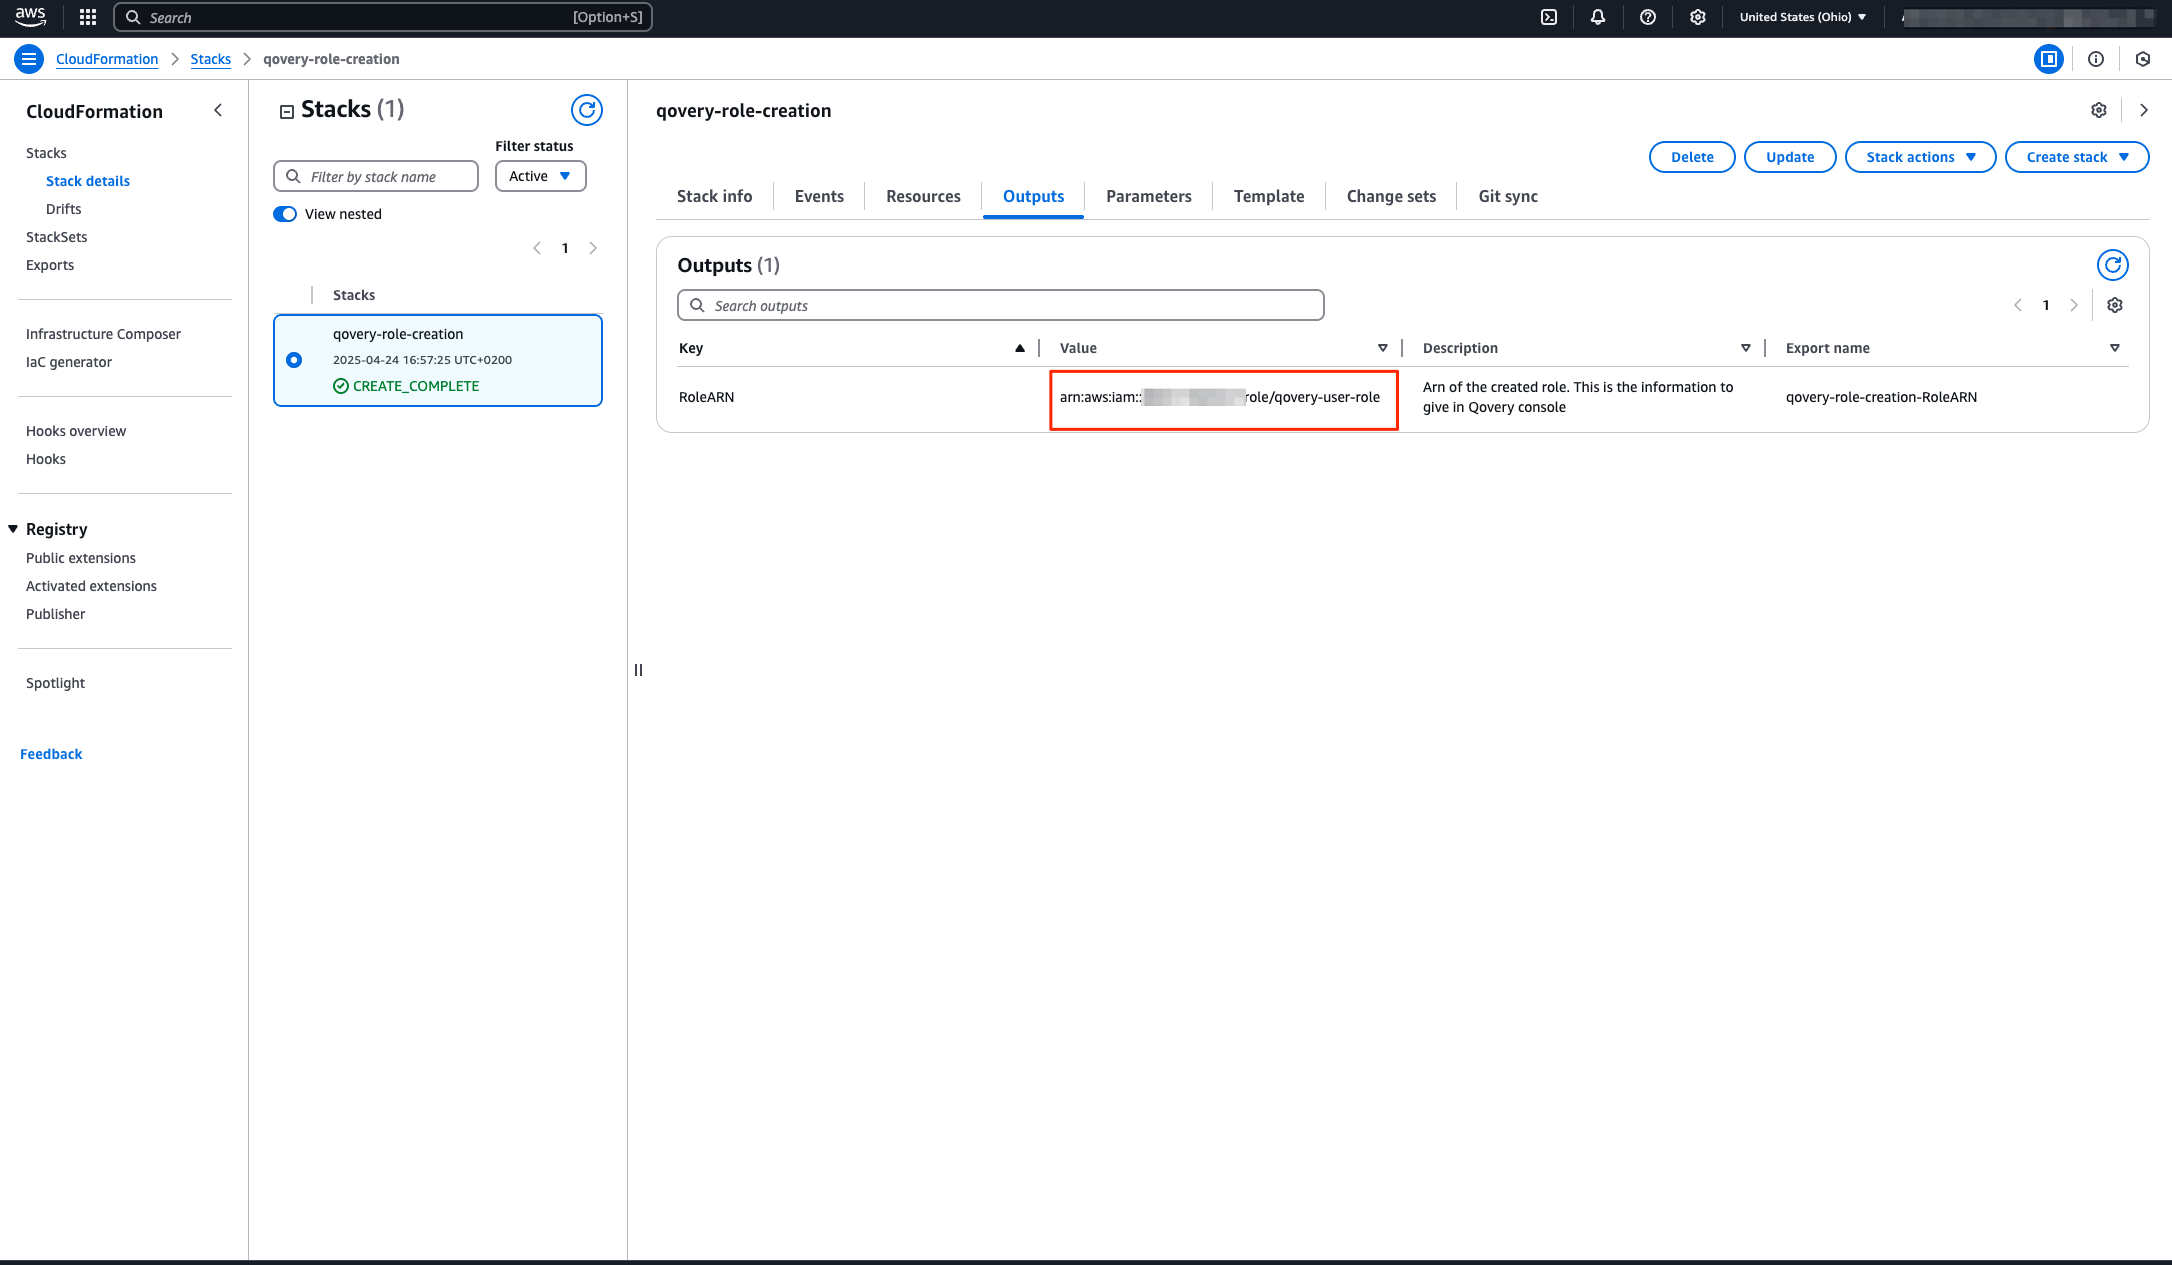
4. **Get the Role ARN**:
* Click on the **Outputs** tab
* Find **RoleArn** key
* Copy the value (looks like: `arn:aws:iam::123456789012:role/qovery-role`)
* **Cluster name**: Choose a name like `production` or `my-first-cluster` - **Region**: Select the AWS region closest to your users (e.g., `us-east-1`)
Choose how to connect your AWS account to Qovery:
**Most secure method** - Uses temporary credentials that auto-rotate. No access keys to manage.
**What gets created**: A CloudFormation stack creates an IAM role with this policy:
```json theme={null}
{
"Version": "2012-10-17",
"Statement": [
{
"Effect": "Allow",
"Action": [
"application-autoscaling:*",
"autoscaling:*",
"cloudtrail:LookupEvents",
"cloudwatch:*",
"dynamodb:*",
"ec2:*",
"ecr:*",
"ecs:*",
"eks:*",
"elasticache:*",
"elasticloadbalancing:*",
"es:AddTags",
"es:CreateElasticsearchDomain",
"es:DeleteElasticsearchDomain",
"es:DescribeElasticsearchDomain",
"es:ListTags",
"es:RemoveTags",
"events:DeleteRule",
"events:DescribeRule",
"events:ListRuleNamesByTarget",
"events:ListTagsForResource",
"events:ListTargetsByRule",
"events:PutRule",
"events:PutTargets",
"events:RemoveTargets",
"events:TagResource",
"events:UntagResource",
"iam:*",
"kms:*",
"logs:*",
"organizations:DescribeAccount",
"organizations:DescribeOrganization",
"organizations:DescribeOrganizationalUnit",
"organizations:DescribePolicy",
"organizations:ListChildren",
"organizations:ListParents",
"organizations:ListPolicies",
"organizations:ListPoliciesForTarget",
"organizations:ListRoots",
"organizations:ListTargetsForPolicy",
"rds:*",
"s3:ListAllMyBuckets",
"servicequotas:GetServiceQuota",
"tag:GetResources"
],
"Resource": "*"
},
{
"Action": [
"s3:*",
"sqs:*"
],
"Effect": "Allow",
"Resource": [
"arn:aws:s3:::qovery*",
"arn:aws:s3:::qovery*/*",
"arn:aws:sqs:*:*:qovery*",
"arn:aws:sqs:*:*:qovery*/*"
]
}
]
}
```
**Setup Steps**:
1. **Open CloudFormation**: Click this link to create the IAM role
* [Launch CloudFormation Stack](https://console.aws.amazon.com/cloudformation/home?#/stacks/quickcreate?templateURL=https%3A%2F%2Fcloudformation-qovery-role-creation.s3.amazonaws.com%2Ftemplate.json\&stackName=qovery-role-creation)
* This opens AWS CloudFormation in a new tab (login to AWS if needed)
2. **In AWS CloudFormation Console**:
* Click **Next** (template is pre-filled with Qovery's requirements)
* Stack name: Keep default `qovery-iam-role` or customize
* Click **Next** (skip stack options)
* Click **Next** again (skip tags)
* ✅ **Important**: Check **"I acknowledge that AWS CloudFormation might create IAM resources"**
* Click **Create stack**
3. **Wait for completion** (\~1 minute):
* Status changes: `CREATE_IN_PROGRESS` → `CREATE_COMPLETE`
* Refresh page if needed
4. **Get the Role ARN**:
* Click on the **Outputs** tab
* Find **RoleArn** key
* Copy the value (looks like: `arn:aws:iam::123456789012:role/qovery-role`)
 5. **Complete in Qovery**:
* Back in Qovery, paste the **Role ARN**
* Give it a name like `AWS Production`
* Click **Save**
5. **Complete in Qovery**:
* Back in Qovery, paste the **Role ARN**
* Give it a name like `AWS Production`
* Click **Save**
 **Why this is recommended**: The IAM role uses AWS STS (Security Token Service) to generate temporary credentials that automatically rotate. Qovery never has access to long-lived credentials, and you can revoke access instantly by deleting the CloudFormation stack.
Qovery requires these AWS permissions to manage your infrastructure:
* **EC2**: Create VPCs, subnets, security groups, and instances
* **EKS**: Create and manage Kubernetes clusters
* **IAM**: Create service roles for EKS and EC2
* **ELB**: Create load balancers for your applications
* **S3**: Store Terraform state and logs
* **CloudWatch**: Collect logs and metrics
For a detailed breakdown of every permission and why it's needed, see the [AWS IAM Permissions Reference](/docs/getting-started/security-and-compliance/aws-iam-permissions).
Yes! For production environments, you can create a custom IAM policy with minimum required permissions. Contact support for the minimal policy template.
**Alternative method** - Uses AWS Access Keys (requires manual rotation every 90 days).
**Security Note**: Static credentials are long-lived and more exposed to leaks. For production, we strongly recommend STS Assume Role which provides short-lived, automatically refreshed credentials with granular access control.
**Setup Steps**:
1. **Connect to AWS Console**:
* Go to [AWS Console](https://console.aws.amazon.com)
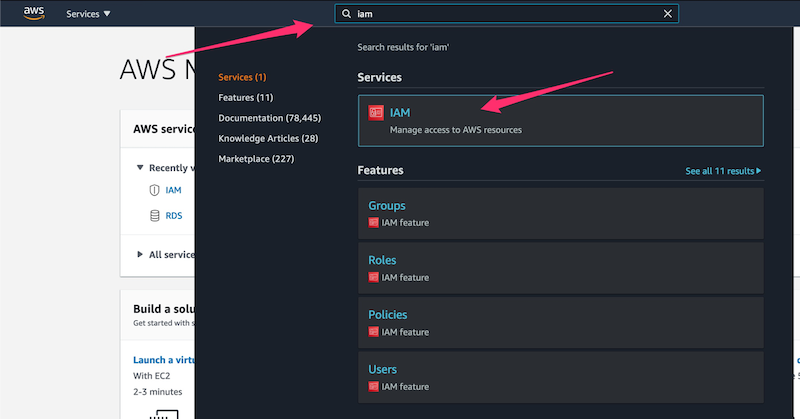
2. **Navigate to IAM**:
* Go to **IAM** service
**Why this is recommended**: The IAM role uses AWS STS (Security Token Service) to generate temporary credentials that automatically rotate. Qovery never has access to long-lived credentials, and you can revoke access instantly by deleting the CloudFormation stack.
Qovery requires these AWS permissions to manage your infrastructure:
* **EC2**: Create VPCs, subnets, security groups, and instances
* **EKS**: Create and manage Kubernetes clusters
* **IAM**: Create service roles for EKS and EC2
* **ELB**: Create load balancers for your applications
* **S3**: Store Terraform state and logs
* **CloudWatch**: Collect logs and metrics
For a detailed breakdown of every permission and why it's needed, see the [AWS IAM Permissions Reference](/docs/getting-started/security-and-compliance/aws-iam-permissions).
Yes! For production environments, you can create a custom IAM policy with minimum required permissions. Contact support for the minimal policy template.
**Alternative method** - Uses AWS Access Keys (requires manual rotation every 90 days).
**Security Note**: Static credentials are long-lived and more exposed to leaks. For production, we strongly recommend STS Assume Role which provides short-lived, automatically refreshed credentials with granular access control.
**Setup Steps**:
1. **Connect to AWS Console**:
* Go to [AWS Console](https://console.aws.amazon.com)
2. **Navigate to IAM**:
* Go to **IAM** service
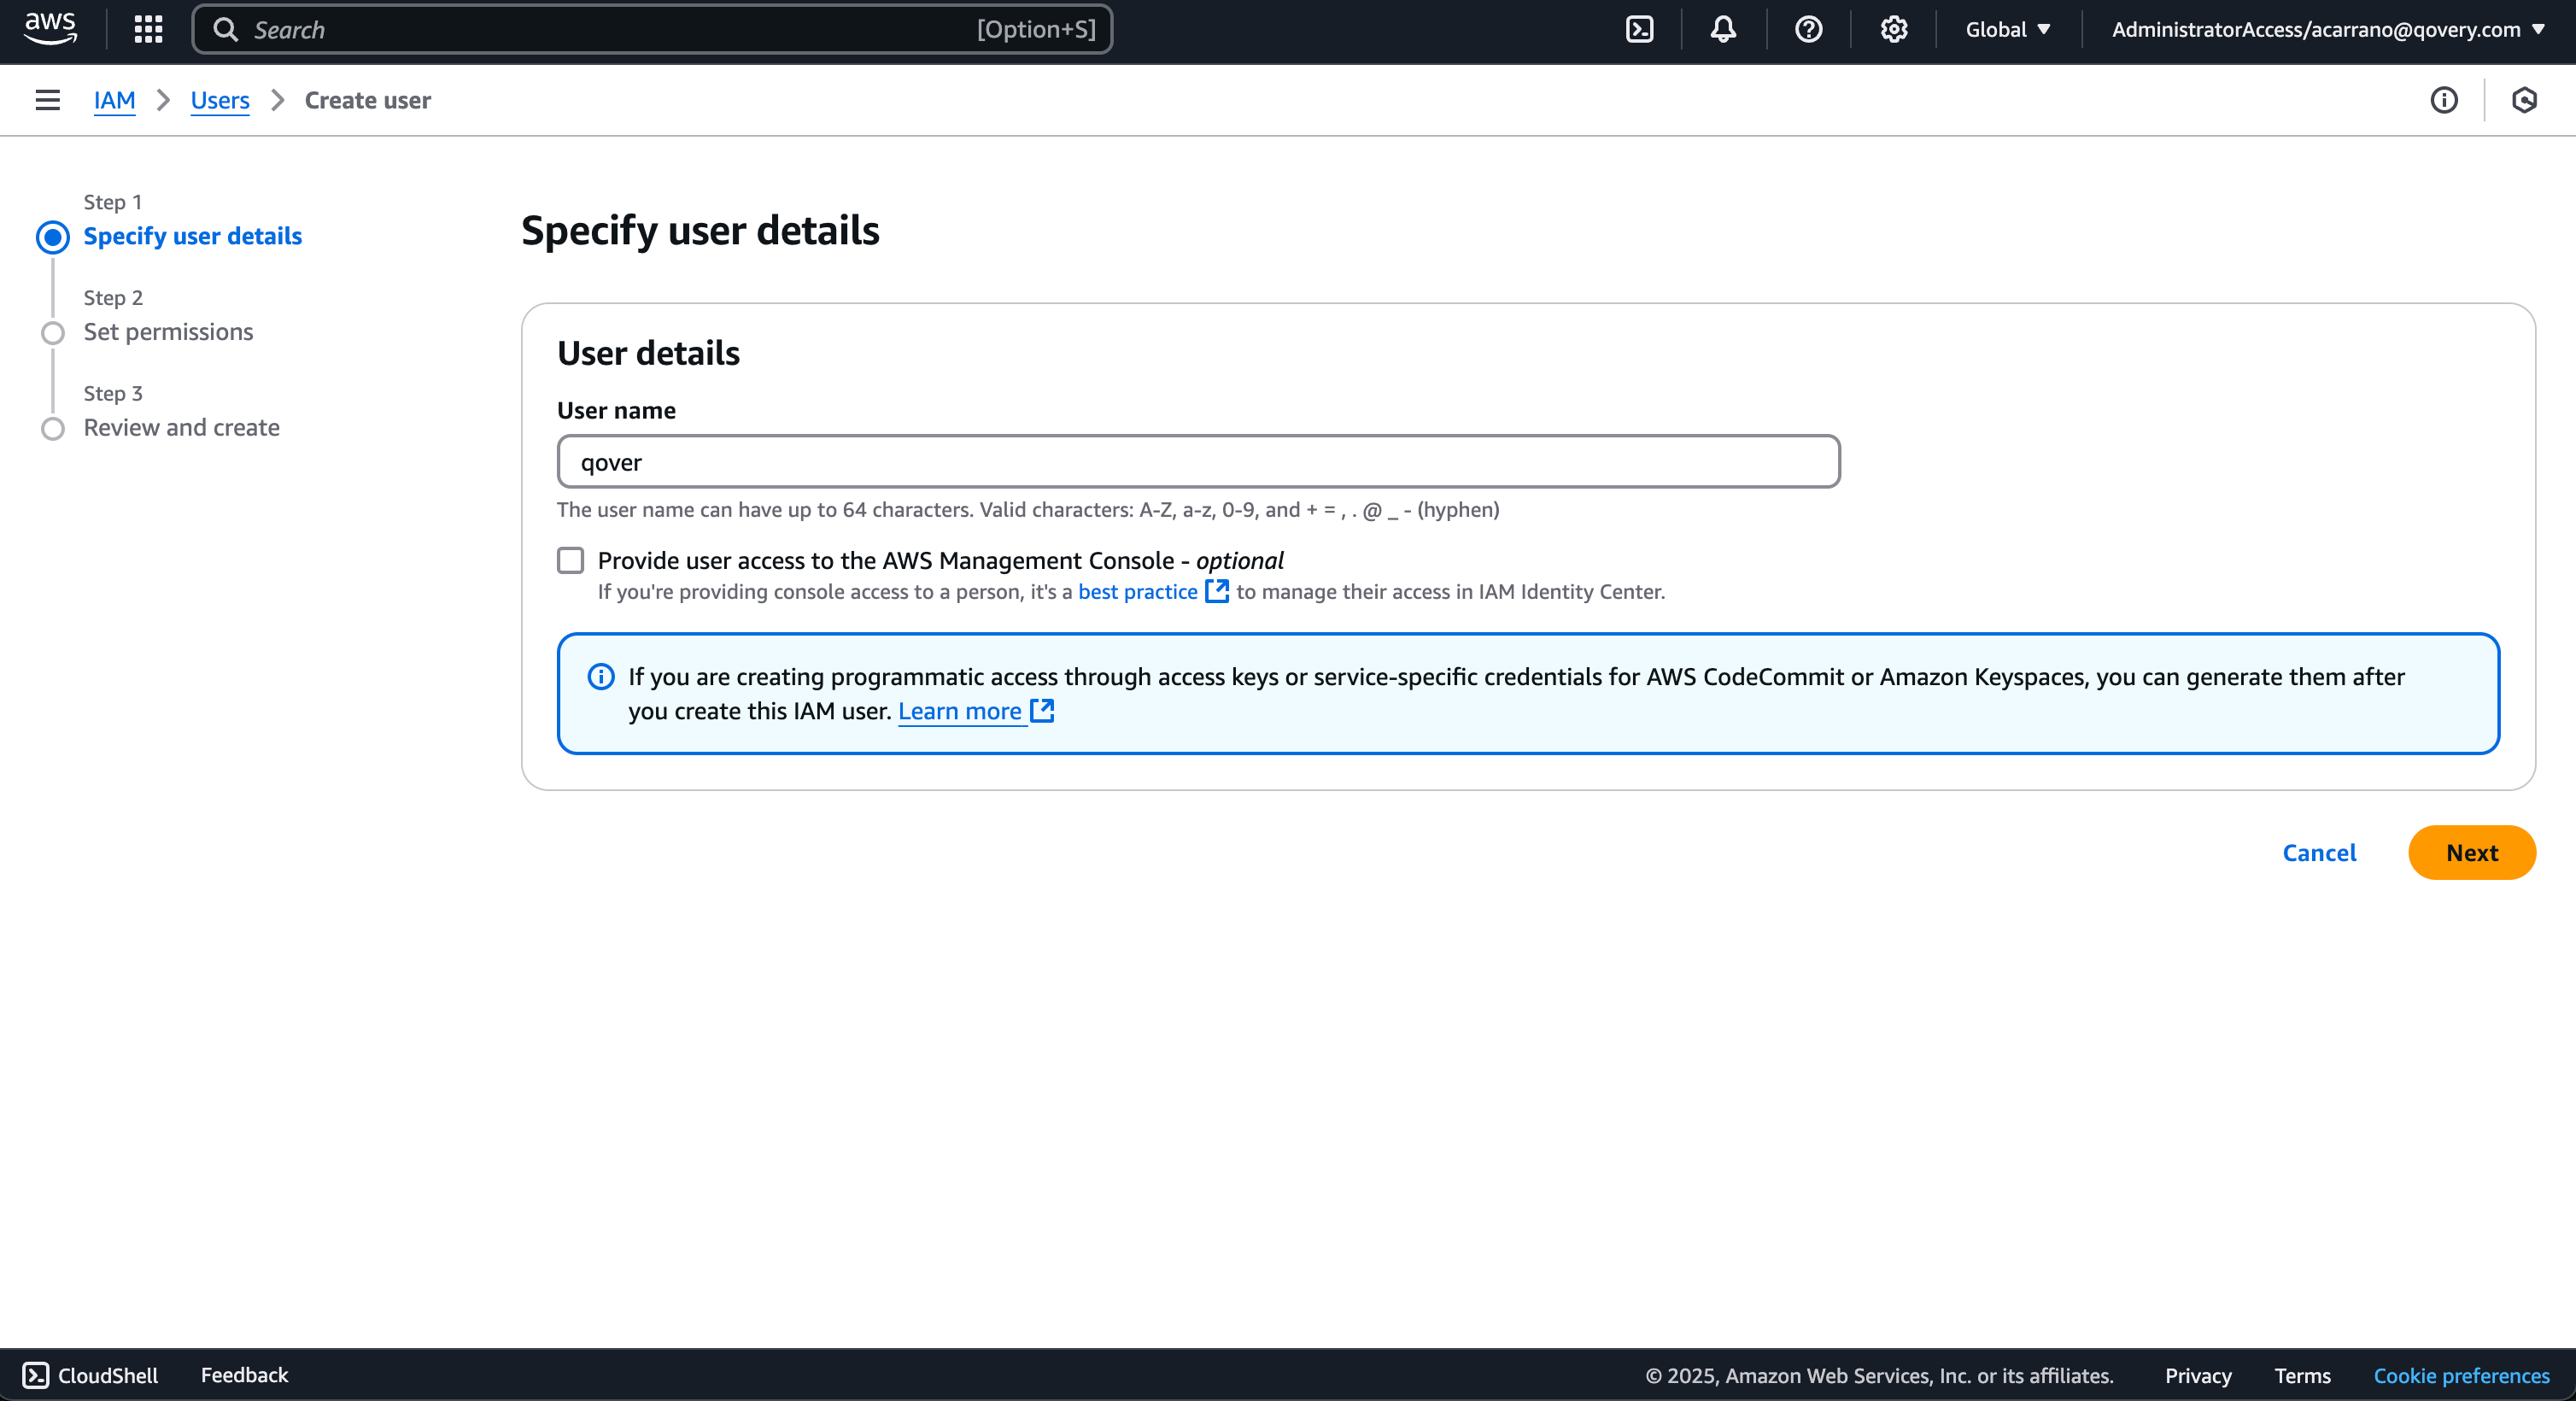
 3. **Create IAM User**:
* Create one IAM user called `qovery`
3. **Create IAM User**:
* Create one IAM user called `qovery`
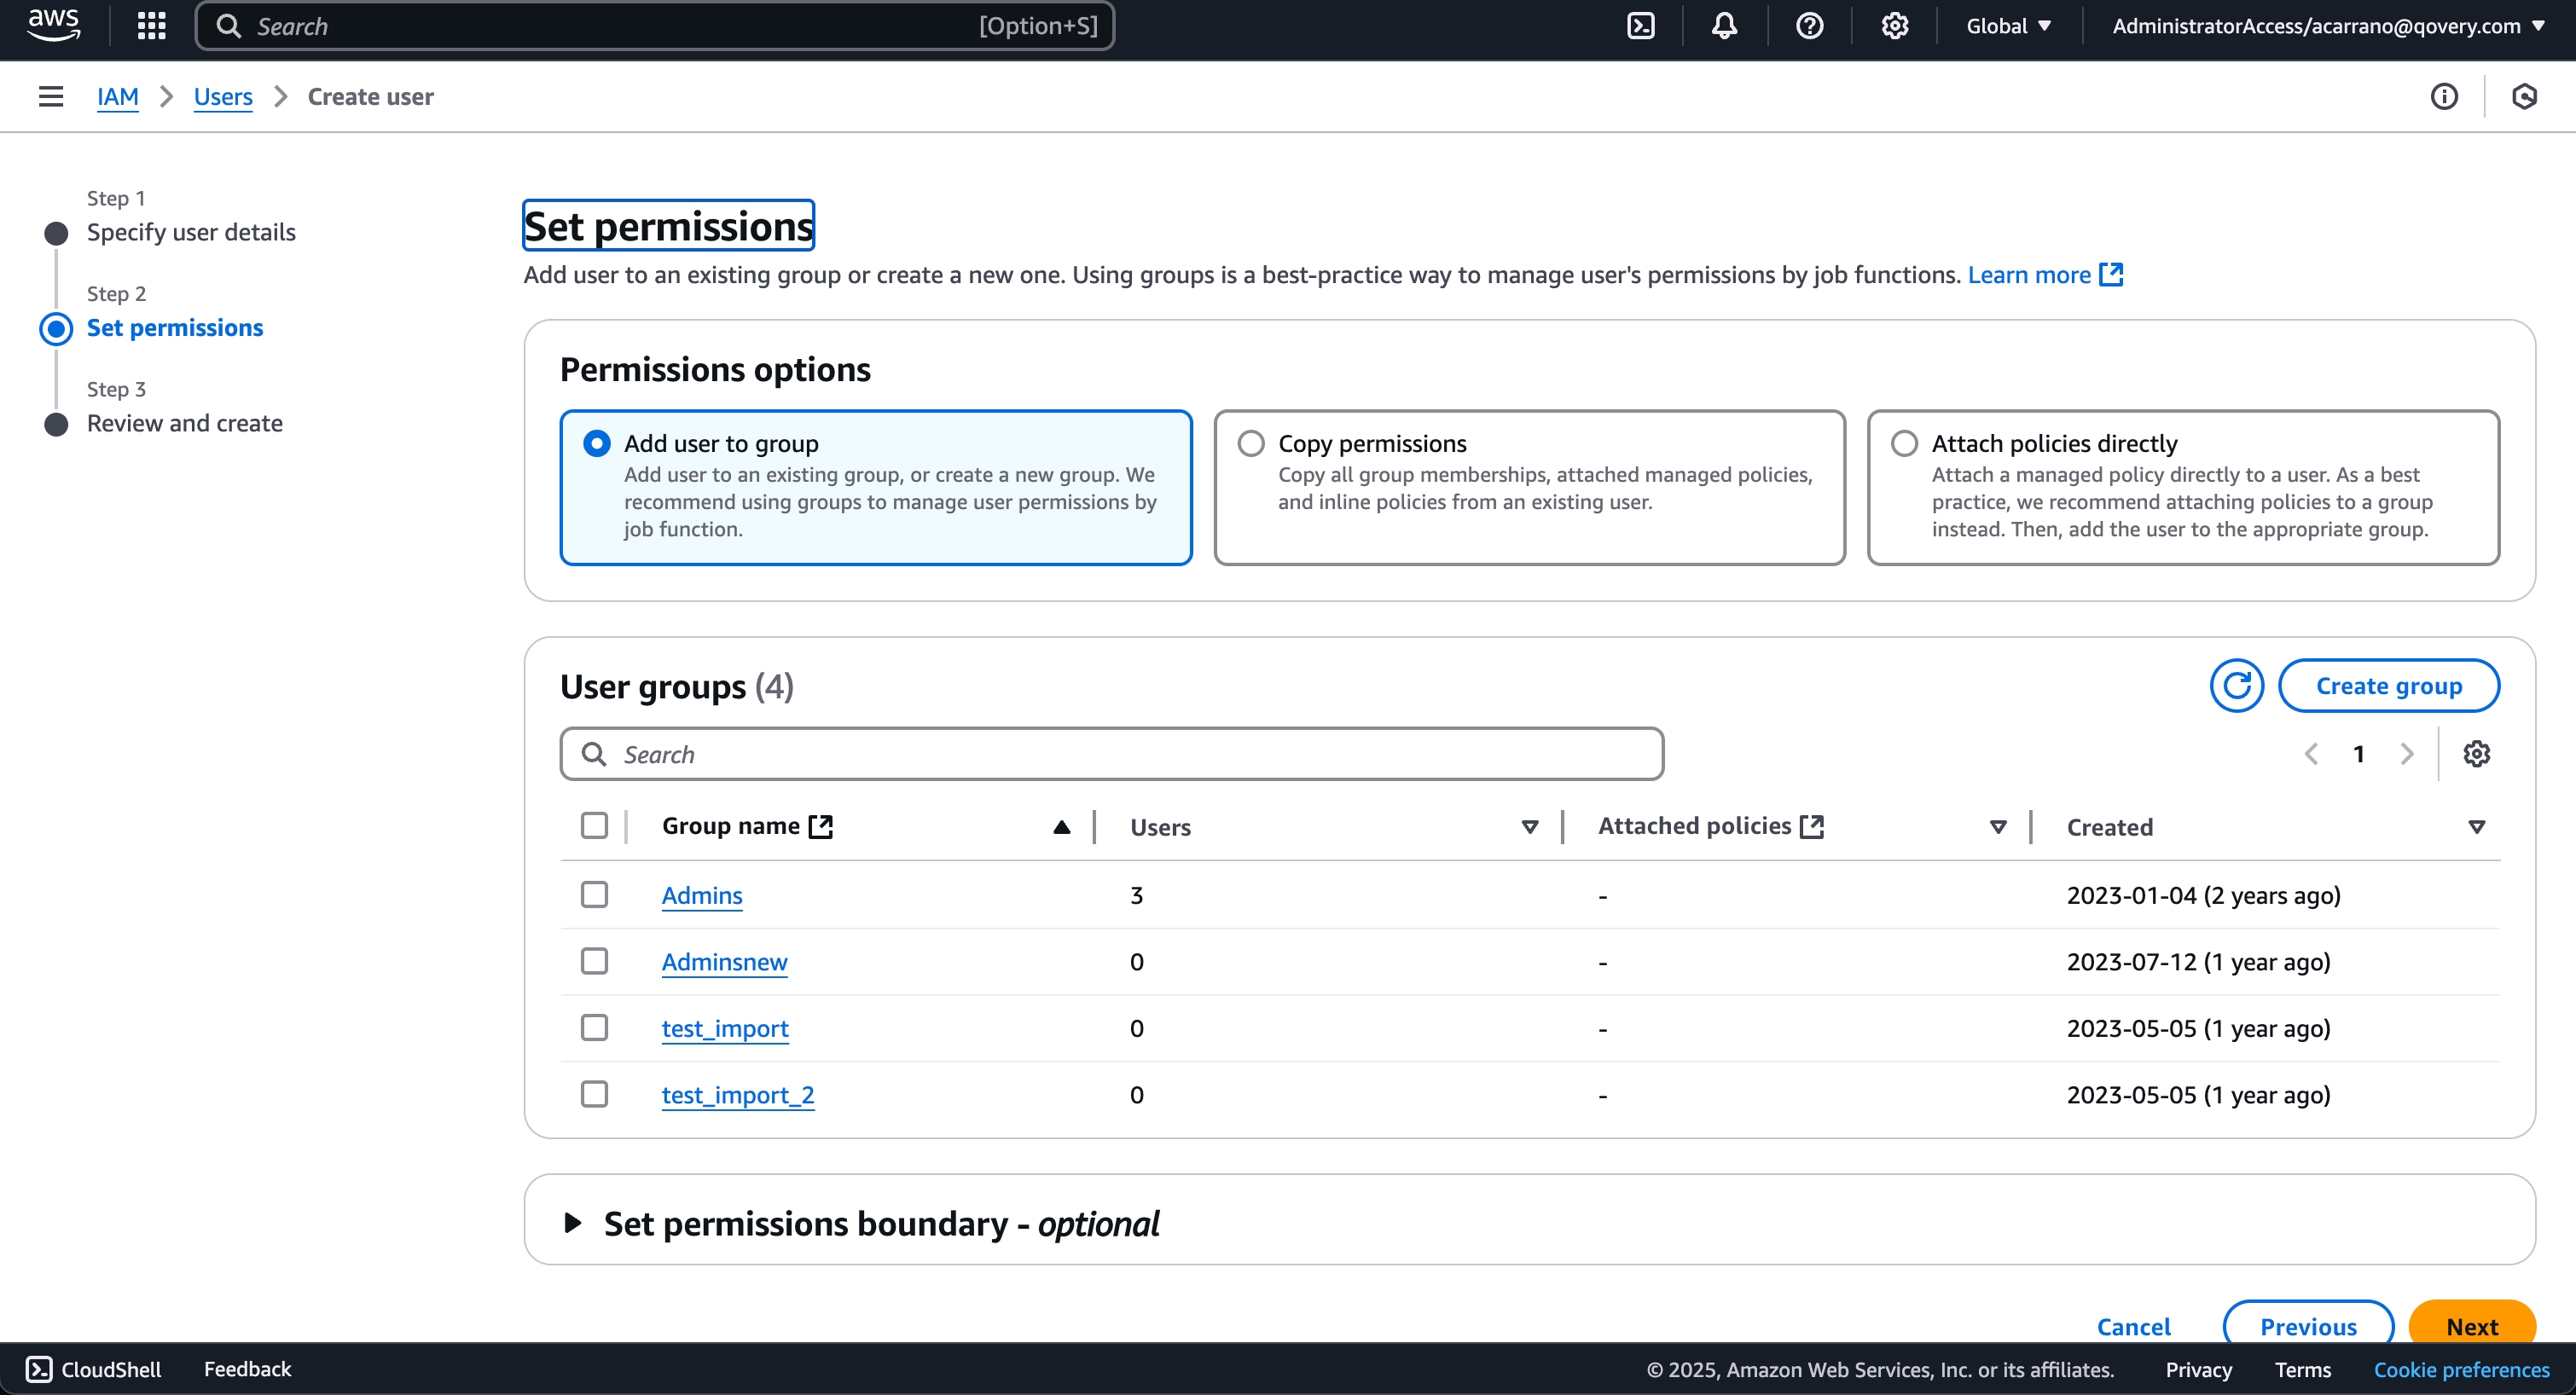
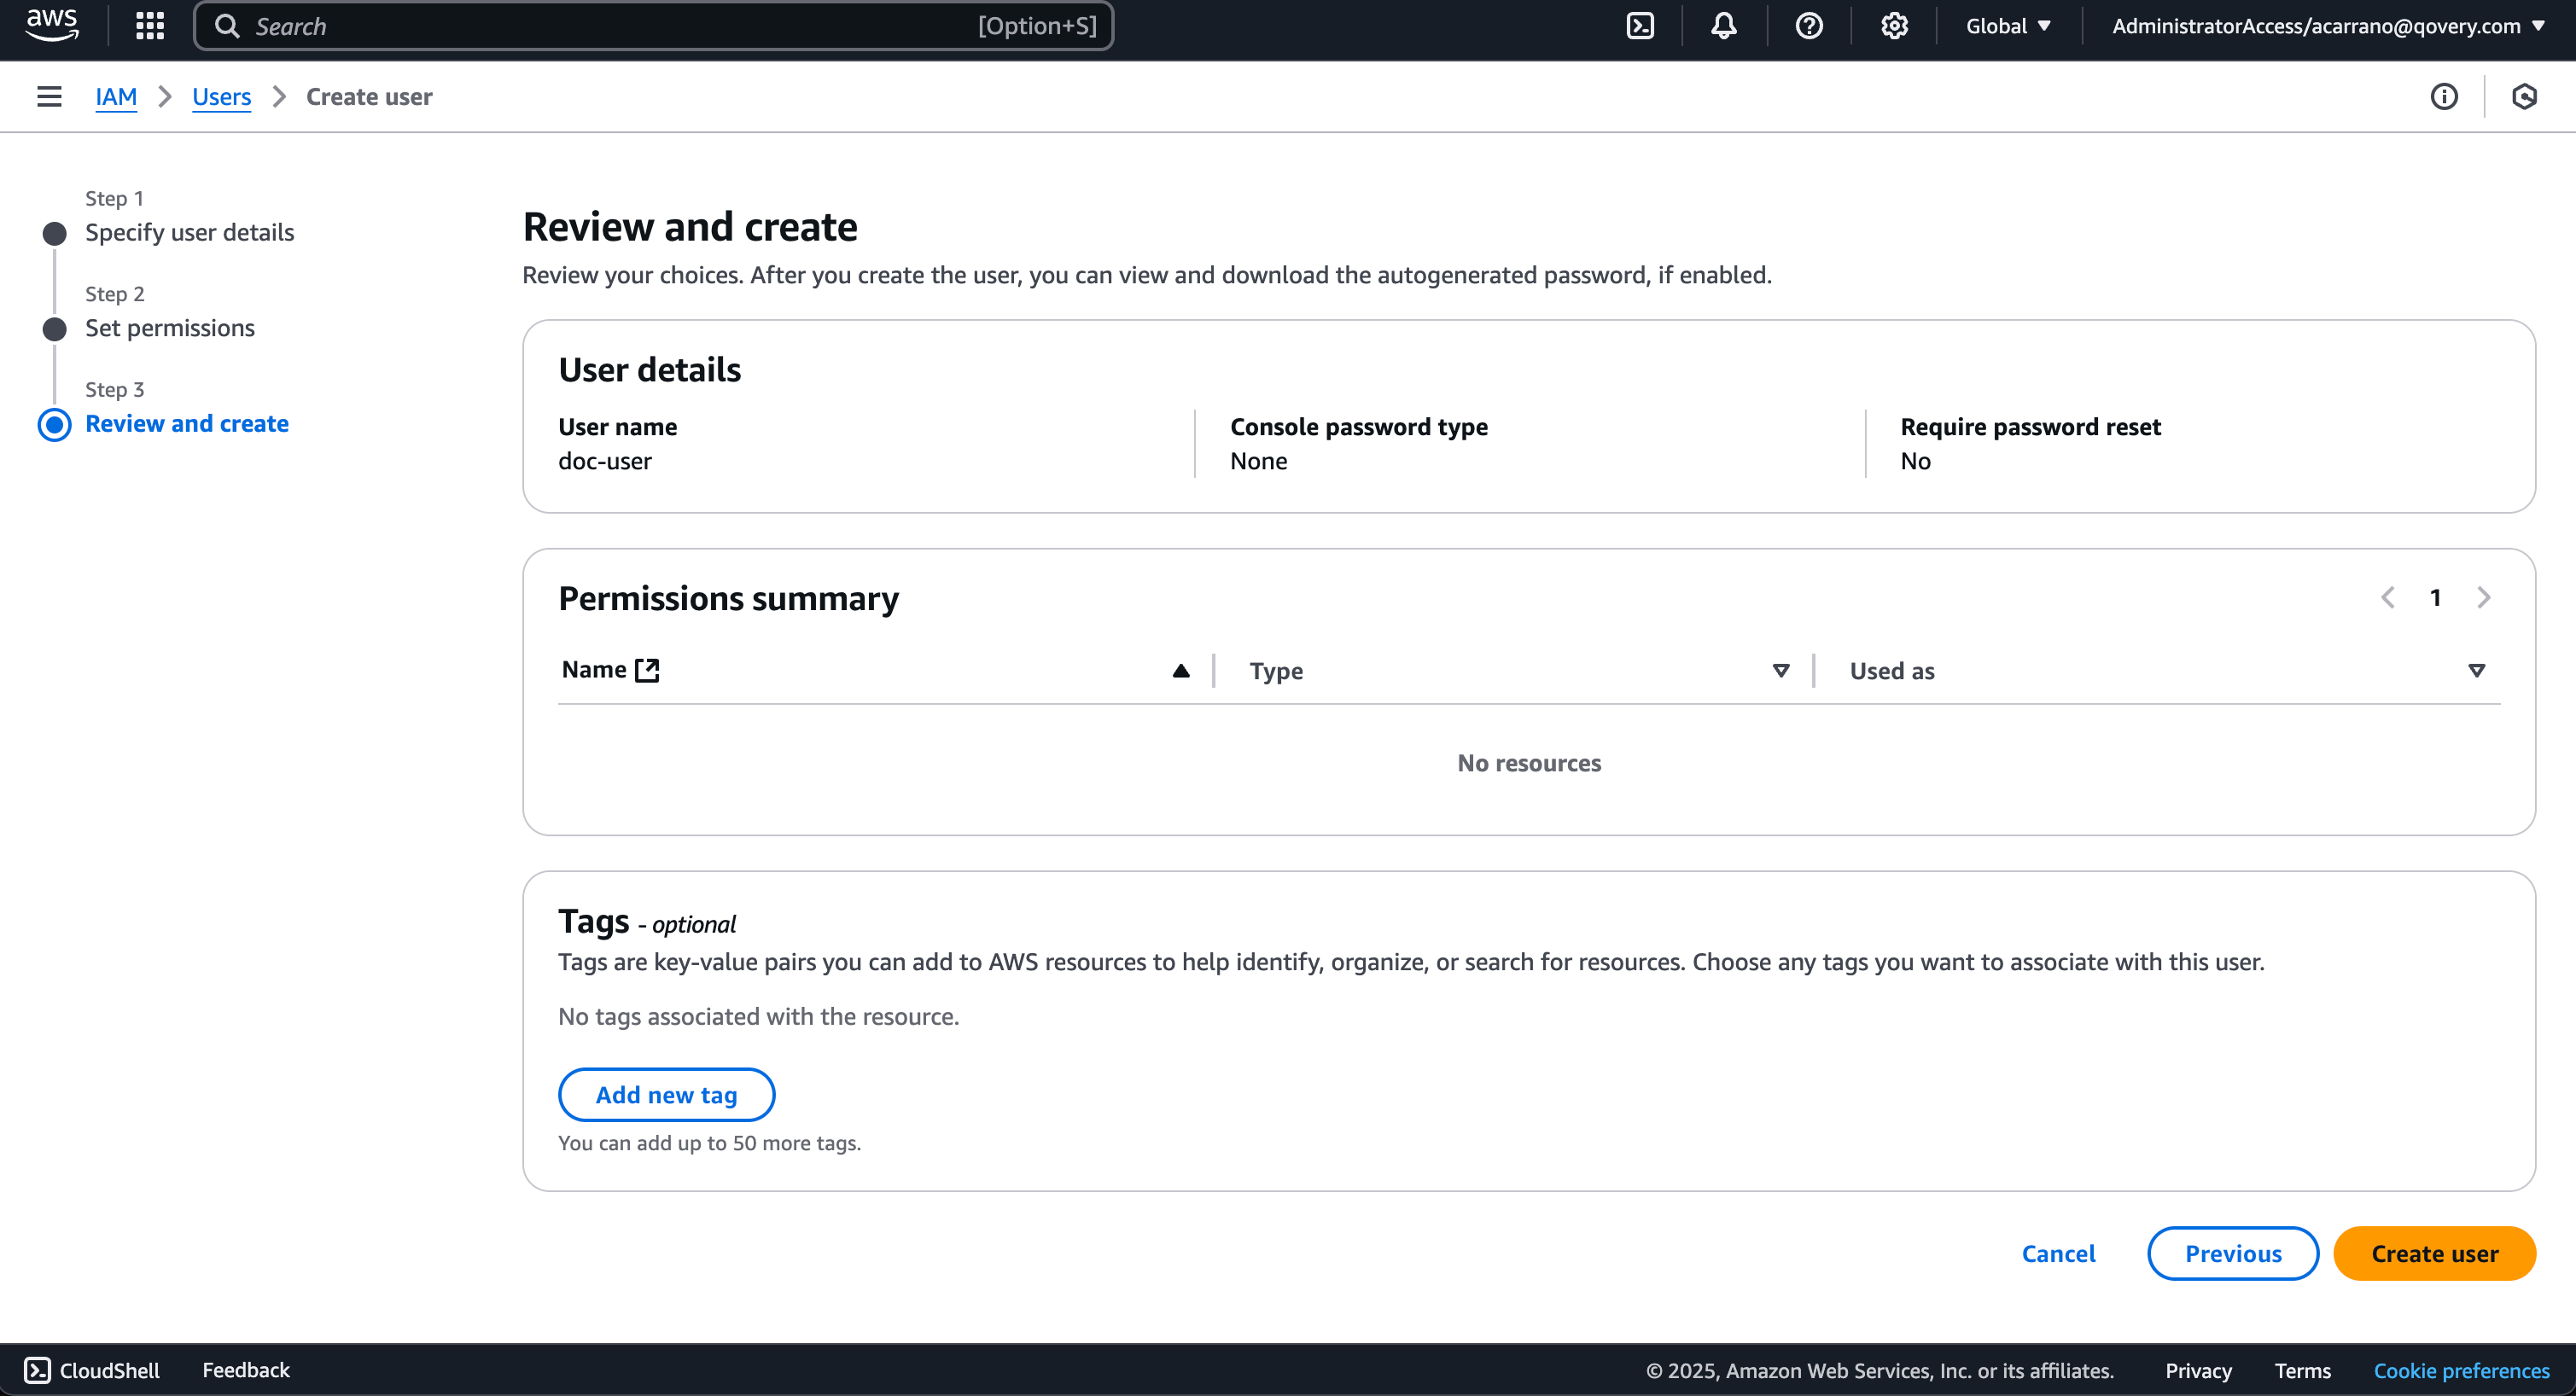 4. **Setup IAM Permissions**:
* Apply the required [IAM permissions](https://www.qovery.com/docs/files/qovery-iam-aws.json) to the `qovery` user
**Download**: [IAM permissions JSON](https://www.qovery.com/docs/files/qovery-iam-aws.json)
Or copy the policy from below:
```json theme={null}
{
"Version": "2012-10-17",
"Statement": [
{
"Effect": "Allow",
"Action": [
"application-autoscaling:*",
"autoscaling:*",
"cloudtrail:LookupEvents",
"cloudwatch:*",
"dynamodb:*",
"ec2:*",
"ecr:*",
"ecs:*",
"eks:*",
"elasticache:*",
"elasticloadbalancing:*",
"es:AddTags",
"es:CreateElasticsearchDomain",
"es:DeleteElasticsearchDomain",
"es:DescribeElasticsearchDomain",
"es:ListTags",
"es:RemoveTags",
"events:DeleteRule",
"events:DescribeRule",
"events:ListRuleNamesByTarget",
"events:ListTagsForResource",
"events:ListTargetsByRule",
"events:PutRule",
"events:PutTargets",
"events:RemoveTargets",
"events:TagResource",
"events:UntagResource",
"iam:*",
"kms:*",
"logs:*",
"organizations:DescribeAccount",
"organizations:DescribeOrganization",
"organizations:DescribeOrganizationalUnit",
"organizations:DescribePolicy",
"organizations:ListChildren",
"organizations:ListParents",
"organizations:ListPolicies",
"organizations:ListPoliciesForTarget",
"organizations:ListRoots",
"organizations:ListTargetsForPolicy",
"rds:*",
"s3:ListAllMyBuckets",
"servicequotas:GetServiceQuota",
"tag:GetResources"
],
"Resource": "*"
},
{
"Action": [
"s3:*",
"sqs:*"
],
"Effect": "Allow",
"Resource": [
"arn:aws:s3:::qovery*",
"arn:aws:s3:::qovery*/*",
"arn:aws:sqs:*:*:qovery*",
"arn:aws:sqs:*:*:qovery*/*"
]
}
]
}
```
**Follow the steps in AWS console to create AWS credentials with required IAM permissions:**
4. **Setup IAM Permissions**:
* Apply the required [IAM permissions](https://www.qovery.com/docs/files/qovery-iam-aws.json) to the `qovery` user
**Download**: [IAM permissions JSON](https://www.qovery.com/docs/files/qovery-iam-aws.json)
Or copy the policy from below:
```json theme={null}
{
"Version": "2012-10-17",
"Statement": [
{
"Effect": "Allow",
"Action": [
"application-autoscaling:*",
"autoscaling:*",
"cloudtrail:LookupEvents",
"cloudwatch:*",
"dynamodb:*",
"ec2:*",
"ecr:*",
"ecs:*",
"eks:*",
"elasticache:*",
"elasticloadbalancing:*",
"es:AddTags",
"es:CreateElasticsearchDomain",
"es:DeleteElasticsearchDomain",
"es:DescribeElasticsearchDomain",
"es:ListTags",
"es:RemoveTags",
"events:DeleteRule",
"events:DescribeRule",
"events:ListRuleNamesByTarget",
"events:ListTagsForResource",
"events:ListTargetsByRule",
"events:PutRule",
"events:PutTargets",
"events:RemoveTargets",
"events:TagResource",
"events:UntagResource",
"iam:*",
"kms:*",
"logs:*",
"organizations:DescribeAccount",
"organizations:DescribeOrganization",
"organizations:DescribeOrganizationalUnit",
"organizations:DescribePolicy",
"organizations:ListChildren",
"organizations:ListParents",
"organizations:ListPolicies",
"organizations:ListPoliciesForTarget",
"organizations:ListRoots",
"organizations:ListTargetsForPolicy",
"rds:*",
"s3:ListAllMyBuckets",
"servicequotas:GetServiceQuota",
"tag:GetResources"
],
"Resource": "*"
},
{
"Action": [
"s3:*",
"sqs:*"
],
"Effect": "Allow",
"Resource": [
"arn:aws:s3:::qovery*",
"arn:aws:s3:::qovery*/*",
"arn:aws:sqs:*:*:qovery*",
"arn:aws:sqs:*:*:qovery*/*"
]
}
]
}
```
**Follow the steps in AWS console to create AWS credentials with required IAM permissions:**
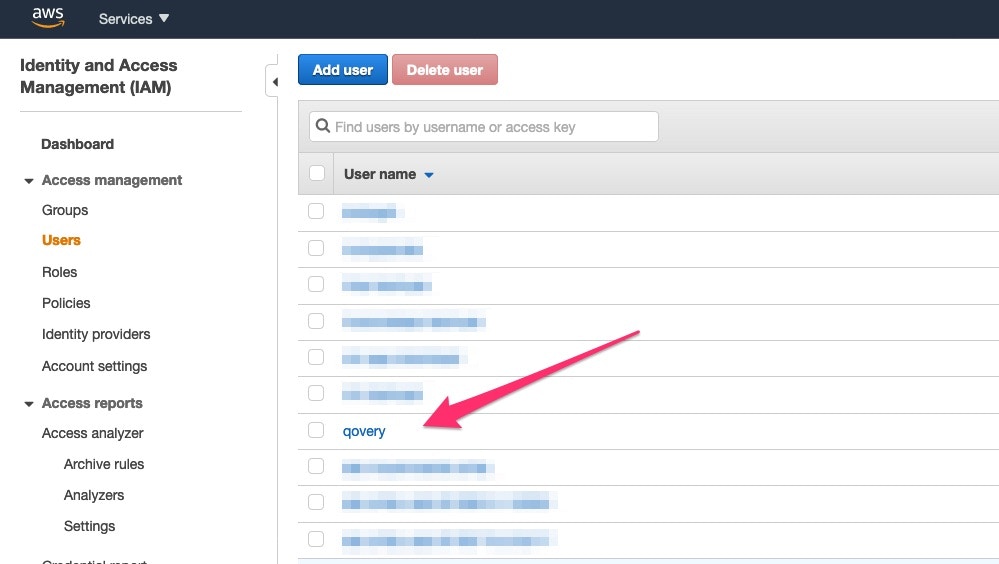
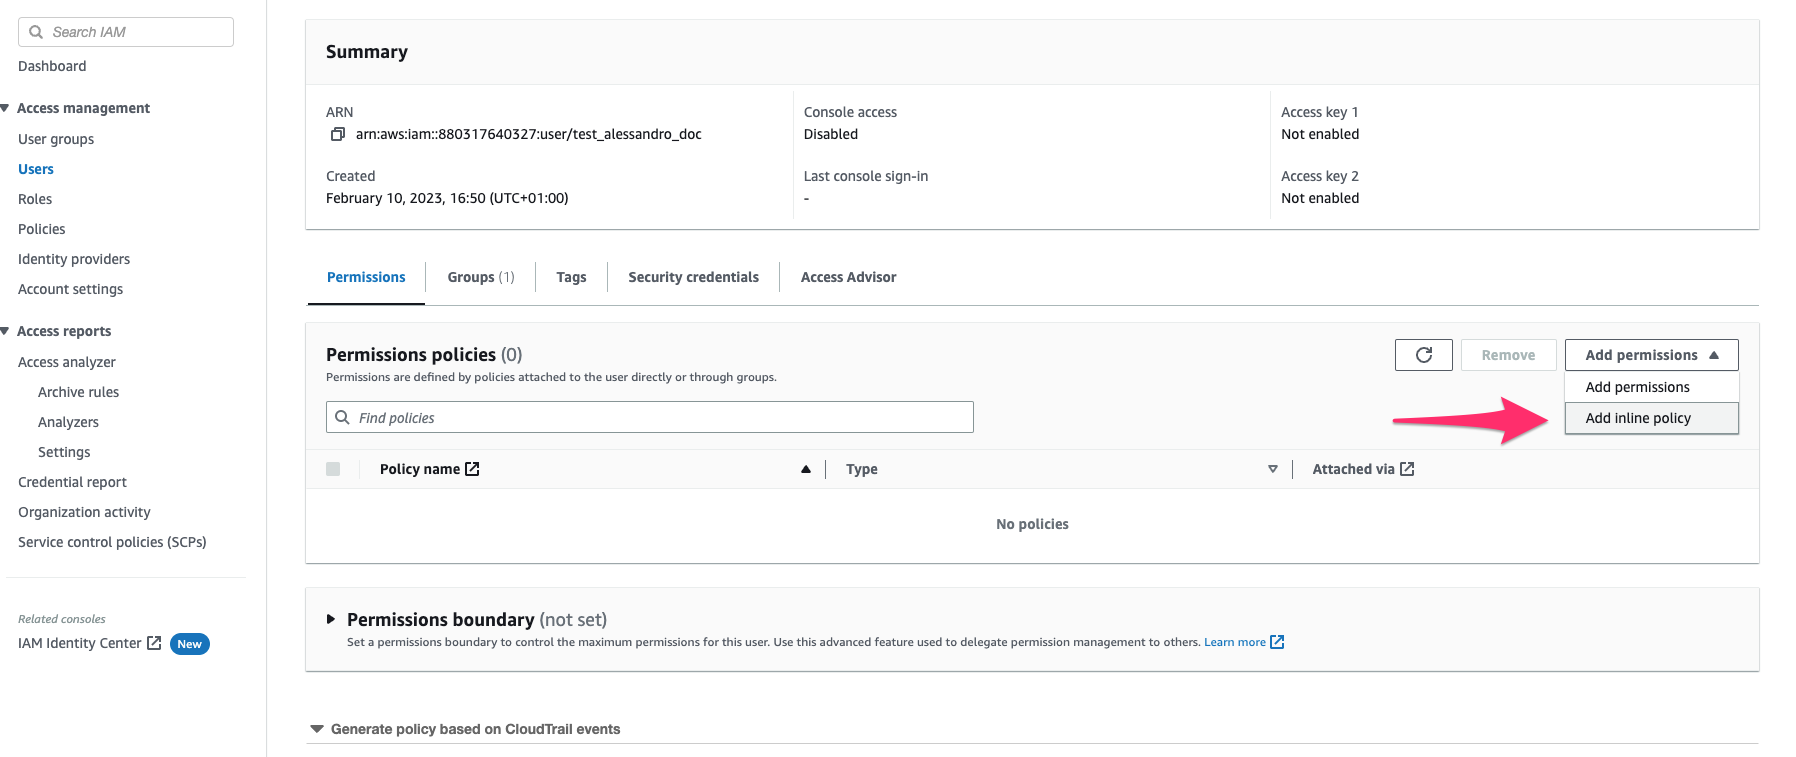
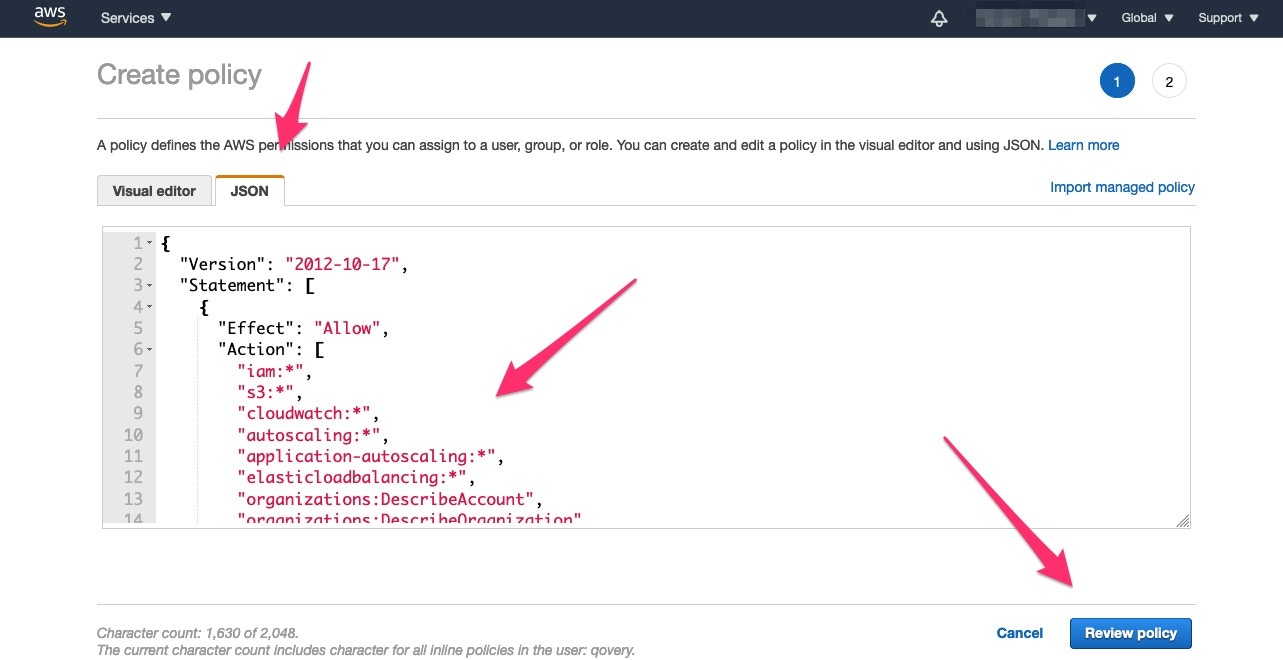
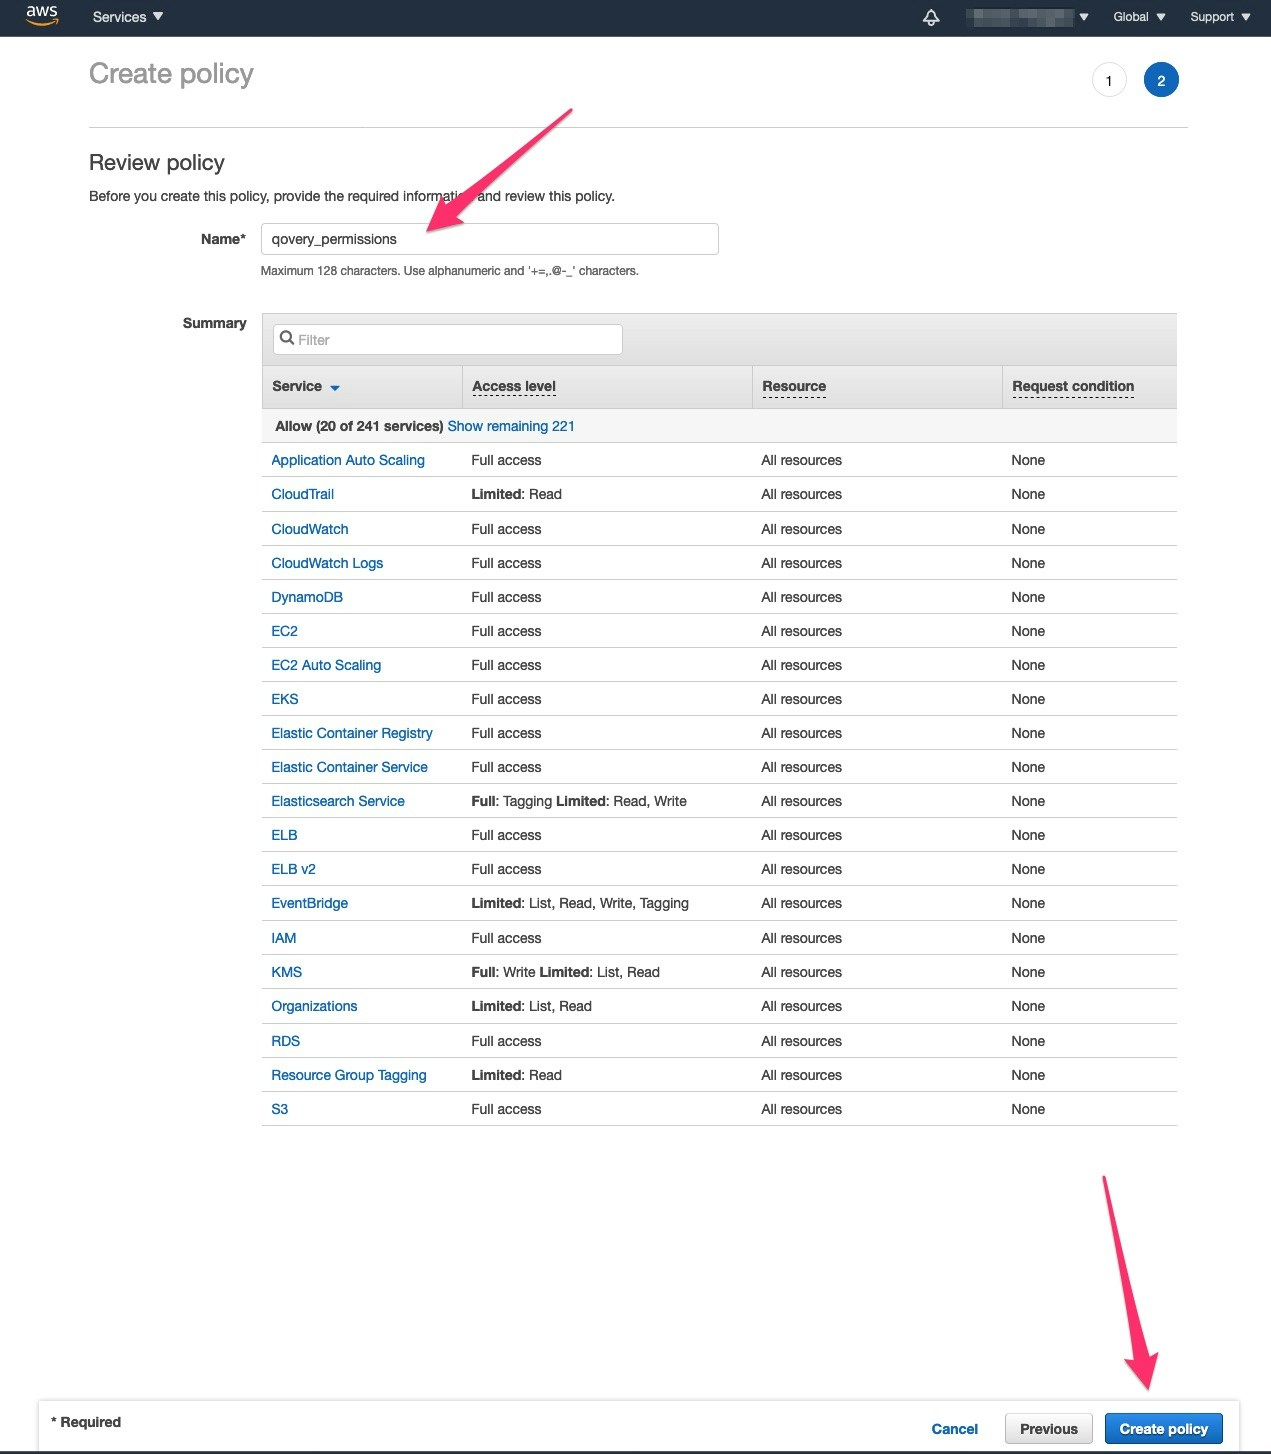 5. **Create Access Keys**:
* Go to the **Security Credentials** tab of the `qovery` user
* Click **Create access key**
5. **Create Access Keys**:
* Go to the **Security Credentials** tab of the `qovery` user
* Click **Create access key**
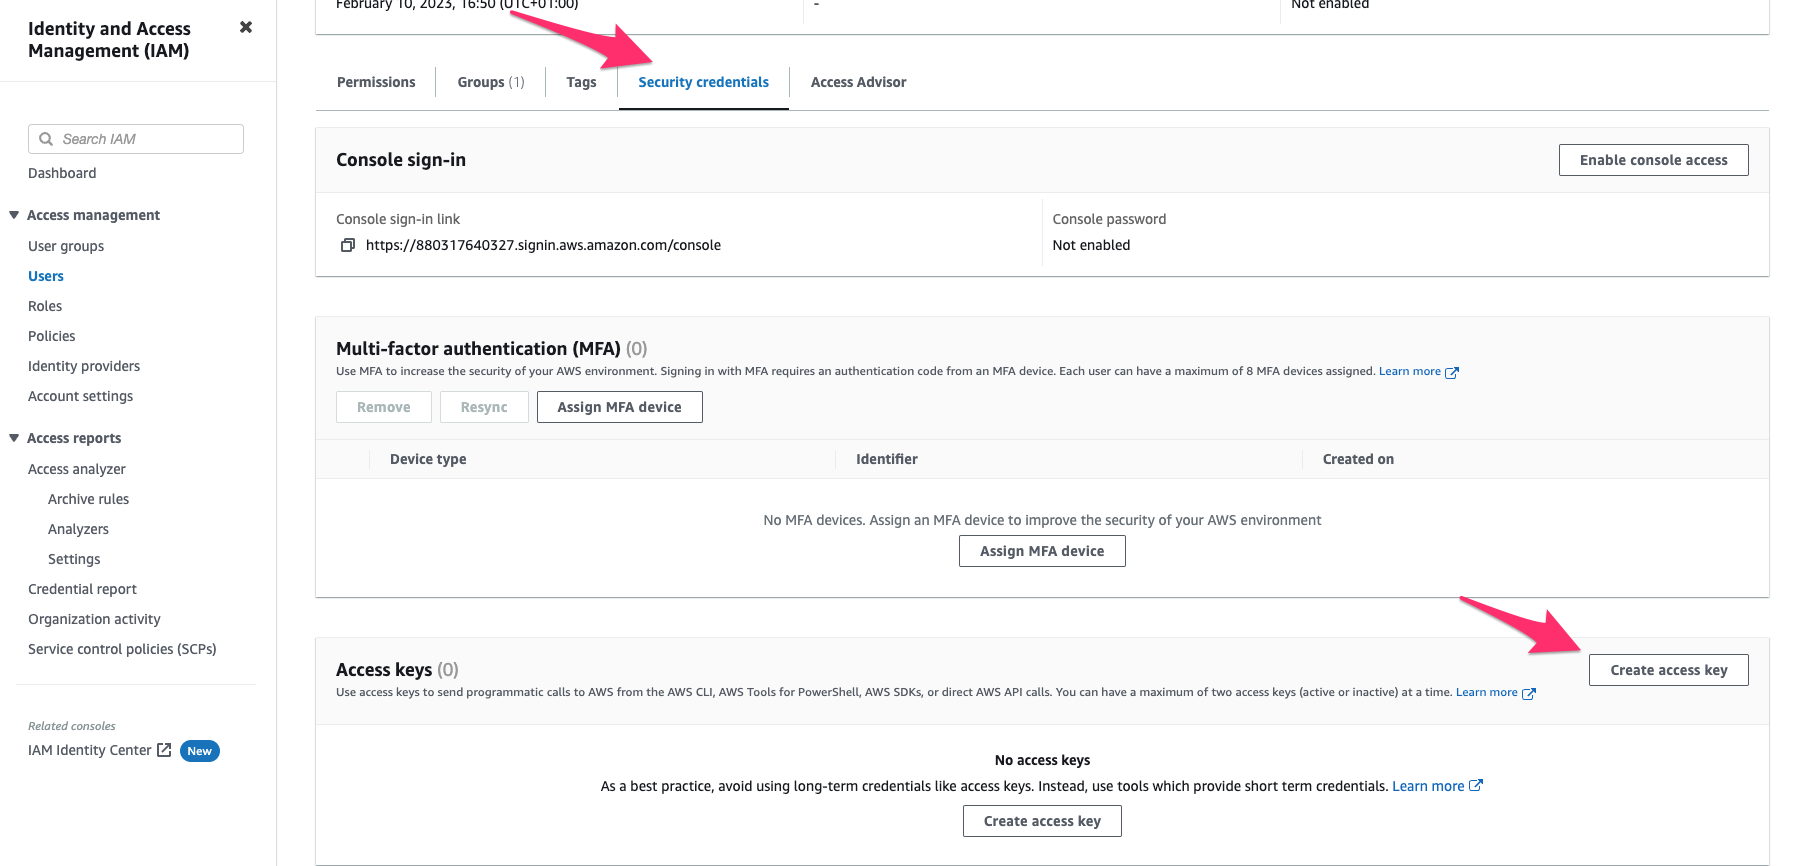
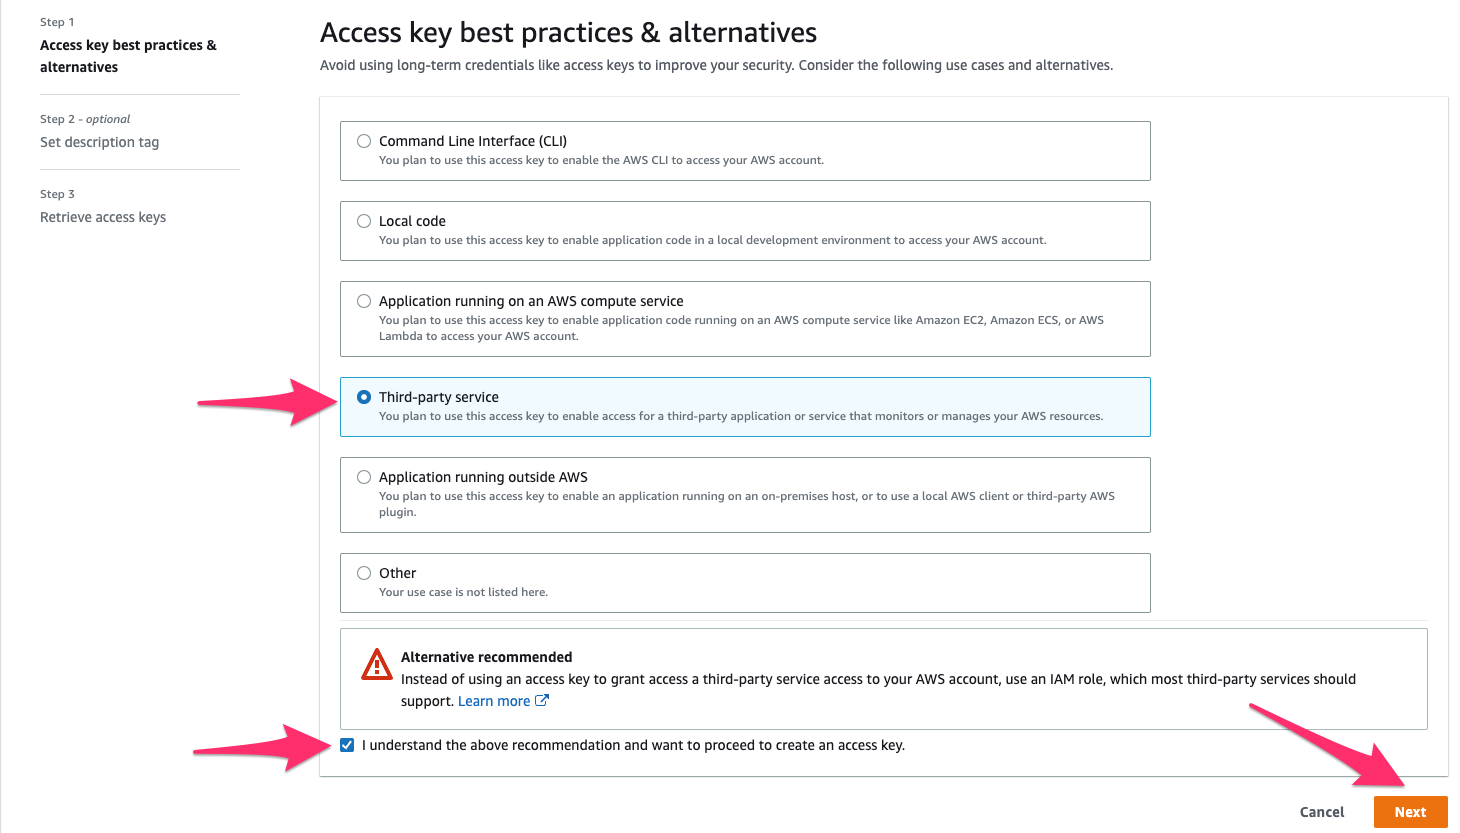
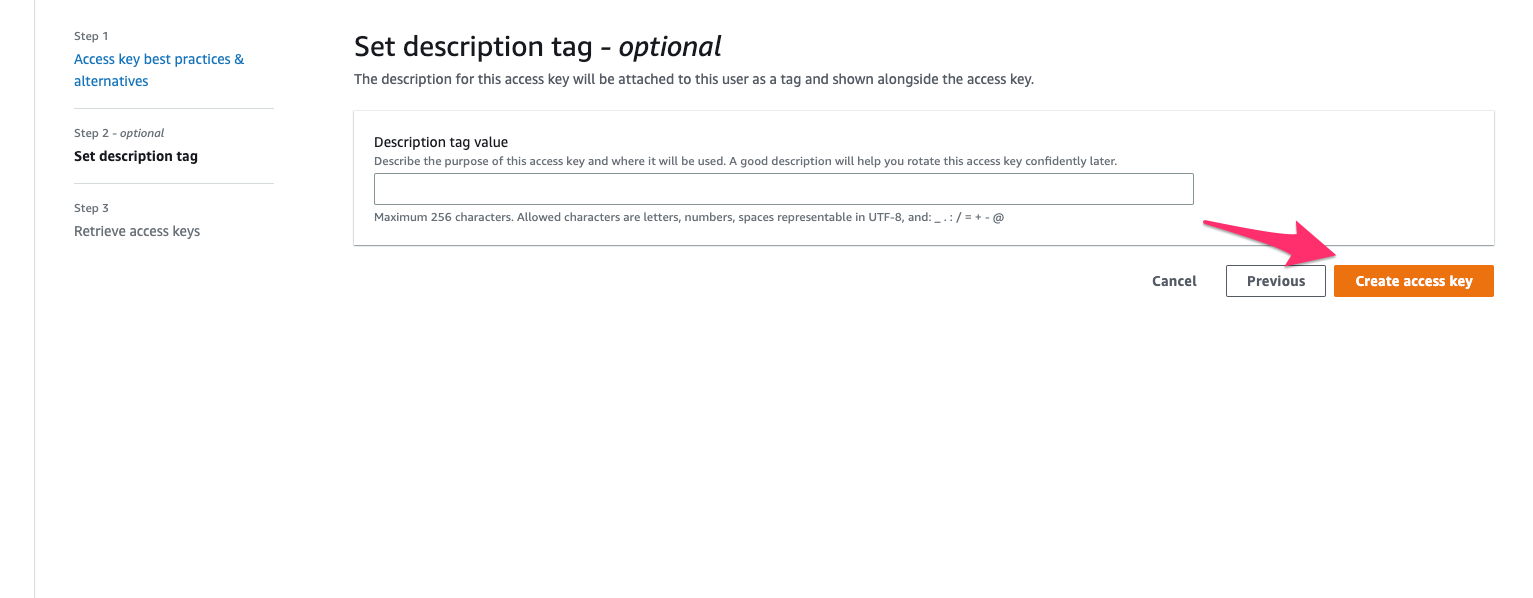 * Save the **Access Key ID** and **Secret Access Key**
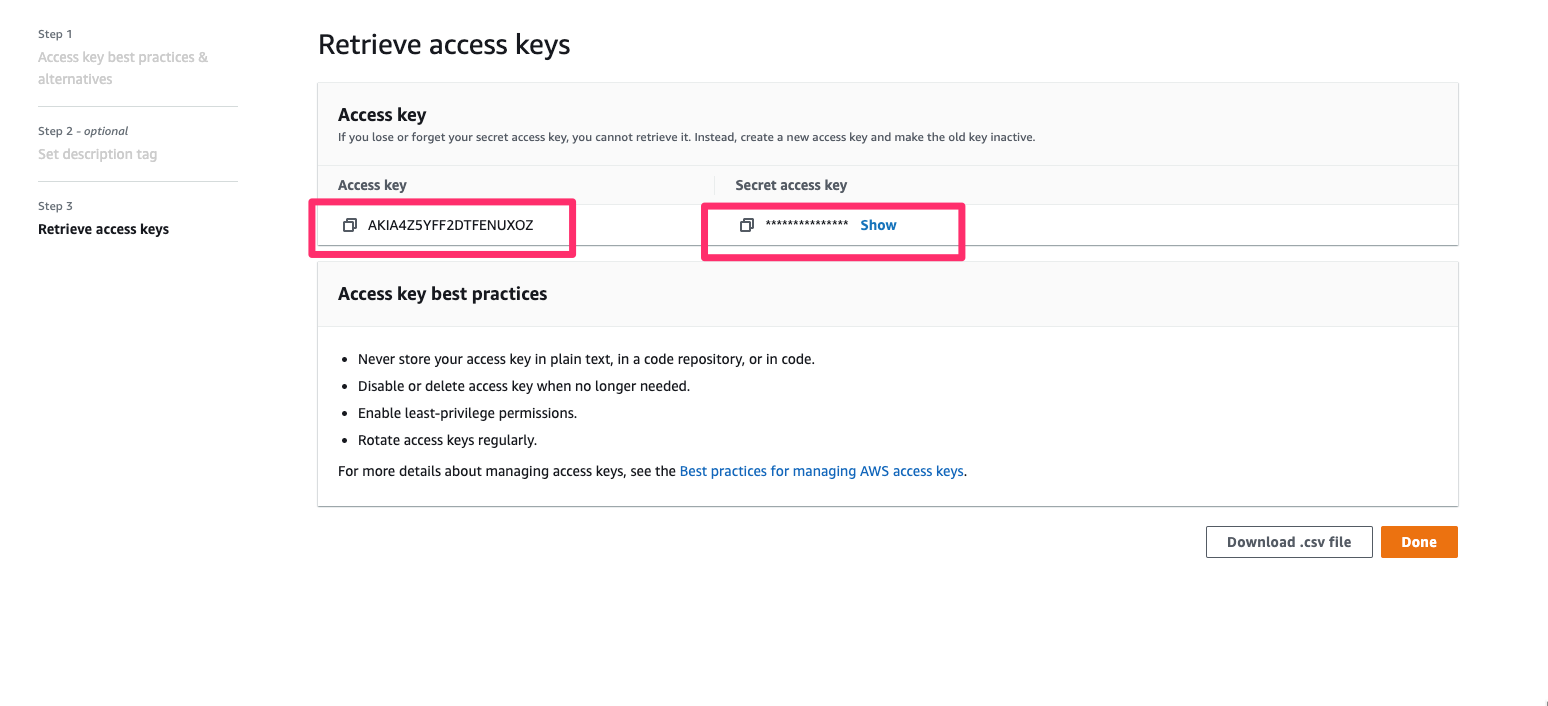 **Well done!** You now have your AWS `access key id` and `secret access key` and your permissions are set up.
In the `Features` step, select the features you want to enable on your cluster.
If you want to manage the network layer of your cluster by yourself, you can switch VPC mode to `Deploy on my existing VPC` to use your own VPC instead of the one provided by Qovery.
These options can only be configured during cluster creation and cannot be modified later.
### Static IP
By default, when your cluster is created, its worker nodes are allocated public IP addresses, which are used for external communication. For improved security and control, the **Static IP** feature allows you to ensure that outbound traffic from your cluster uses specific IP addresses.
Here is what will be deployed on your cluster:
* Nat Gateways
* Elastic IPs
* Private subnets
Once set up, here is the procedure to find your static IP addresses on `AWS`:
* On your AWS account, select the VPC service.
* On the left menu, you'll find Elastic IP addresses. Once on it, in the Allocated IPv4 address column, you'll have your public IPs.
If you work in a sensitive business area such as financial technology, enabling the **Static IP** feature can help fulfil the security requirements of some of the external services you use, therefore making it easier for you to get whitelisted by them.
This feature has been activated by default. Since February 1, 2024, AWS charge public IPv4 Addresses. Disabling it may cost you more, depending on the number of nodes in your cluster. Check this [link](https://aws.amazon.com/blogs/aws/new-aws-public-ipv4-address-charge-public-ip-insights/) for more information.
### Custom VPC Subnet
Virtual Private Cloud (VPC) peering allows you to set up a connection between your Qovery VPC and another VPC on your AWS account. This way, you can access resources stored on your AWS VPC directly from your Qovery applications.
A VPC can only be used if it has at least one range of IP addresses called a **subnet**. When you create a cluster, Qovery automatically picks a default subnet for it. However, to perform VPC peering, you may want to define which specific VPC subnet you want to use, so that you can avoid any conflicting settings. To do so, you can enable the **Custom VPC Subnet** feature on your cluster. For more information on how to set up VPC peering, [see our dedicated tutorial](/docs/configuration/integrations/aws/vpc-peering).
### Use Existing VPC
You have to specify the `VPC id` and ensure that in your VPC settings you have enabled the `DNS hostnames`.
Then you have to specify the different subnets ids:
**EKS**:
The EKS subnets are mandatory, you have to specify at least **one subnet id per zone** and ensure you have enabled the **auto-assign public IPv4 address** setting on your subnets.
You'll also need to set up the following labels on your subnets:
* On public subnets: add a label `kubernetes.io/role/elb` with the value `1` to allow the ALB controller to run on this subnet.
* On private subnets: add a label `kubernetes.io/role/internal-elb` with the value `1` to allow the ALB controller to run on this subnet.
* On all subnets: add a label `kubernetes.io/cluster/` with the value `shared` to allow the ALB controller to run on this subnet.
**Managed databases**:
This section is exclusively for enabling managed databases (container databases will be enabled by default).
Depending on the managed databases you want to you use (**MongoDB**, **RDS:MySQL/PostgreSQL** and **Redis**), specify at least one subnet id per zone.
**Select instance types** that Karpenter can choose from for your workloads.
Karpenter automatically picks the **best instance type** from your selections based on:
* Pod resource requirements (CPU/memory)
* Current spot availability and pricing
* Cost optimization
* Workload constraints
**More instance types = better optimization and flexibility!**
**How to Select:** You can filter and select instances by:
* **Instance Family**: t3, t3a, m5, m6i, c5, c6i, r5, r6i, etc.
* **Size**: medium, large, xlarge, 2xlarge, etc.
* **Architecture**: x86\_64 or ARM (Graviton - t4g, m6g, c6g)
* **Generation**: Latest generations (m6i, m7i, c6i, c7i) are more cost-effective
**Tips for Selection:**
* **Start broad**: Select multiple families and sizes
* **Mix families**: Combine general purpose (t3, m5), compute (c5), memory (r5)
* **Include multiple sizes**: Give Karpenter flexibility to bin-pack efficiently
* **Consider Graviton**: ARM-based instances offer better price/performance
Enable **spot instances** for cost optimization. Karpenter handles interruptions gracefully and automatically falls back to on-demand if needed.
Avoid selecting only one or two instance types as this limits Karpenter's ability to optimize for cost and availability. Aim for 10-20 instance types.
You can adjust these selections later in cluster settings!
Review your settings and click **Create and Deploy**
Your cluster will now be created automatically!
***
When you create a cluster, Qovery automatically provisions a complete, production-ready infrastructure:
### Network Architecture
* ✅ **Dedicated VPC** - Multi-AZ VPC isolating your infrastructure
* ✅ **Subnets & Routing** - Public/private subnets across 3 availability zones with routing tables
* ✅ **Internet Gateway** - For outbound container connectivity
* ✅ **Network Load Balancer** - Redirects HTTPS traffic to Nginx Ingress
* ✅ **NAT Gateways (Optional)** - With Elastic IPs for static outbound addresses
* ✅ **Database Networks** - Dedicated security groups and subnets for:
* RDS (relational databases)
* DocumentDB (document storage)
* ElastiCache (cache layers)
### Kubernetes Infrastructure
* ✅ **EKS Cluster** - Multi-AZ, latest stable Kubernetes version
* ✅ **Managed Worker Nodes** - AWS-managed EC2 instances with Karpenter
* ✅ **Security Groups** - Dual authentication for EKS remote access (TLS + IAM authenticator)
* ✅ **IAM Components**:
* EBS CSI driver access for persistent volumes
* IAM User Sync for Kubernetes authentication
* Cluster Autoscaler permissions
* EKS CNI and EC2 Container Registry policies
### Installed Components
* ✅ **Karpenter** - Intelligent auto-scaling for cost optimization
* ✅ **AWS Load Balancer Controller** - Automatic ingress management
* ✅ **EBS CSI Driver** - Persistent volume support
* ✅ **Metrics Server** - Resource monitoring
* ✅ **Qovery Agent** - Observability and management
### Storage & Logging
* ✅ **KMS-Encrypted S3 Buckets** - For:
* Application logs
* Kubeconfig storage (versioned, private)
* ✅ **CloudWatch Log Groups** - Cluster diagnostics and logging
### Karpenter Auto-Scaling
Qovery uses [Karpenter](https://karpenter.sh/) for intelligent node provisioning, which can **save up to 60% on AWS costs**:
**How Karpenter Works**:
* Automatically provisions optimal EC2 instances based on your workload requirements
* Scales nodes up within seconds when pods need resources
* Consolidates workloads onto fewer nodes to reduce costs
* Handles spot instance interruptions gracefully
**Default Configuration**:
* **Stable Node Pool**: For Qovery system components (single instance, on-demand)
* **Default Node Pool**: For your applications (auto-scaling, mixed on-demand/spot)
* **Optional GPU Node Pool**: For ML/AI workloads (if enabled)
**Instance Type Selection**: Karpenter can provision from a wide range of instance types:
* **General Purpose**: t3, m5, m6i, m6g (Graviton ARM)
* **Compute Optimized**: c5, c6i, c6g (Graviton ARM)
* **Memory Optimized**: r5, r6i, r6g (Graviton ARM)
* **GPU Instances**: g4dn, g5 (if GPU node pool enabled)
**Cost Optimization with Spot Instances**:
* Enable spot instances for significant cost reduction
* Karpenter automatically handles spot interruptions
* Mix of spot and on-demand for reliability
You can configure Karpenter settings after cluster creation in **Cluster Settings** → **Node Pools**. Learn more in the [Cluster Configuration](/docs/configuration/clusters) guide.
***
## Wait for Cluster to Be Ready
**Cluster creation takes 20-30 minutes.** Here's what's happening:
| Step | Time | What's Being Created |
| -------------------- | --------- | ----------------------------- |
| 1. Networking | 3-5 min | VPC, subnets, security groups |
| 2. EKS Control Plane | 10-15 min | Kubernetes master nodes |
| 3. Worker Nodes | 5-10 min | EC2 instances for your apps |
| 4. Qovery Components | 3-5 min | Ingress, monitoring, logging |
**You'll receive an email when your cluster is ready!** Feel free to close this page.
**While you wait:**
* ☕ Grab a coffee
* 📖 Learn about [deploying your first app](/docs/guides/getting-started/deploy-your-first-application)
* 👥 [Invite your team](/docs/configuration/organization/members-rbac)
* 🔗 [Connect Git](/docs/integrations/git-providers/overview)
***
## Next: Deploy Your First Application
Once your cluster shows **Ready** status:
Step-by-step guide to deploy from Git
Add PostgreSQL, MySQL, MongoDB, or Redis
Use your own domain name
Add team members with permissions
***
## Troubleshooting
**Most common causes:**
* AWS account doesn't have permissions to create IAM roles
* AWS region doesn't support EKS
**Solution**: Make sure you're logged in as AWS admin or have IAM permissions.
1. Go to AWS CloudFormation console
2. Find your stack (status should be CREATE\_COMPLETE)
3. Click the **Outputs** tab
4. Copy the value next to "RoleArn"
If your cluster stays in "Creating" status for more than 45 minutes:
* Check AWS service quotas (especially EC2 instances)
* Try a different AWS region
* [Contact support](/docs/getting-started/useful-resources/help-and-support)
**For STS Assume Role**:
* Verify CloudFormation stack created successfully
* Check RoleArn is copied correctly (starts with `arn:aws:iam::`)
* Ensure AWS account has permissions to create IAM roles
**For Static Credentials**:
* Verify IAM user has AdministratorAccess policy
* Check Access Key ID and Secret Access Key are correct
* Ensure keys are not disabled or expired
## Additional Resources
* [AWS EKS Documentation](https://docs.aws.amazon.com/eks/latest/userguide/)
* [AWS Pricing Calculator](https://calculator.aws/pricing/2/home)
* [Qovery Status Page](https://status.qovery.com)
* [Qovery Kubernetes Changelog](https://www.qovery.com/changelog---kubernetes) - Kubernetes cluster related updates
**Well done!** You now have your AWS `access key id` and `secret access key` and your permissions are set up.
In the `Features` step, select the features you want to enable on your cluster.
If you want to manage the network layer of your cluster by yourself, you can switch VPC mode to `Deploy on my existing VPC` to use your own VPC instead of the one provided by Qovery.
These options can only be configured during cluster creation and cannot be modified later.
### Static IP
By default, when your cluster is created, its worker nodes are allocated public IP addresses, which are used for external communication. For improved security and control, the **Static IP** feature allows you to ensure that outbound traffic from your cluster uses specific IP addresses.
Here is what will be deployed on your cluster:
* Nat Gateways
* Elastic IPs
* Private subnets
Once set up, here is the procedure to find your static IP addresses on `AWS`:
* On your AWS account, select the VPC service.
* On the left menu, you'll find Elastic IP addresses. Once on it, in the Allocated IPv4 address column, you'll have your public IPs.
If you work in a sensitive business area such as financial technology, enabling the **Static IP** feature can help fulfil the security requirements of some of the external services you use, therefore making it easier for you to get whitelisted by them.
This feature has been activated by default. Since February 1, 2024, AWS charge public IPv4 Addresses. Disabling it may cost you more, depending on the number of nodes in your cluster. Check this [link](https://aws.amazon.com/blogs/aws/new-aws-public-ipv4-address-charge-public-ip-insights/) for more information.
### Custom VPC Subnet
Virtual Private Cloud (VPC) peering allows you to set up a connection between your Qovery VPC and another VPC on your AWS account. This way, you can access resources stored on your AWS VPC directly from your Qovery applications.
A VPC can only be used if it has at least one range of IP addresses called a **subnet**. When you create a cluster, Qovery automatically picks a default subnet for it. However, to perform VPC peering, you may want to define which specific VPC subnet you want to use, so that you can avoid any conflicting settings. To do so, you can enable the **Custom VPC Subnet** feature on your cluster. For more information on how to set up VPC peering, [see our dedicated tutorial](/docs/configuration/integrations/aws/vpc-peering).
### Use Existing VPC
You have to specify the `VPC id` and ensure that in your VPC settings you have enabled the `DNS hostnames`.
Then you have to specify the different subnets ids:
**EKS**:
The EKS subnets are mandatory, you have to specify at least **one subnet id per zone** and ensure you have enabled the **auto-assign public IPv4 address** setting on your subnets.
You'll also need to set up the following labels on your subnets:
* On public subnets: add a label `kubernetes.io/role/elb` with the value `1` to allow the ALB controller to run on this subnet.
* On private subnets: add a label `kubernetes.io/role/internal-elb` with the value `1` to allow the ALB controller to run on this subnet.
* On all subnets: add a label `kubernetes.io/cluster/` with the value `shared` to allow the ALB controller to run on this subnet.
**Managed databases**:
This section is exclusively for enabling managed databases (container databases will be enabled by default).
Depending on the managed databases you want to you use (**MongoDB**, **RDS:MySQL/PostgreSQL** and **Redis**), specify at least one subnet id per zone.
**Select instance types** that Karpenter can choose from for your workloads.
Karpenter automatically picks the **best instance type** from your selections based on:
* Pod resource requirements (CPU/memory)
* Current spot availability and pricing
* Cost optimization
* Workload constraints
**More instance types = better optimization and flexibility!**
**How to Select:** You can filter and select instances by:
* **Instance Family**: t3, t3a, m5, m6i, c5, c6i, r5, r6i, etc.
* **Size**: medium, large, xlarge, 2xlarge, etc.
* **Architecture**: x86\_64 or ARM (Graviton - t4g, m6g, c6g)
* **Generation**: Latest generations (m6i, m7i, c6i, c7i) are more cost-effective
**Tips for Selection:**
* **Start broad**: Select multiple families and sizes
* **Mix families**: Combine general purpose (t3, m5), compute (c5), memory (r5)
* **Include multiple sizes**: Give Karpenter flexibility to bin-pack efficiently
* **Consider Graviton**: ARM-based instances offer better price/performance
Enable **spot instances** for cost optimization. Karpenter handles interruptions gracefully and automatically falls back to on-demand if needed.
Avoid selecting only one or two instance types as this limits Karpenter's ability to optimize for cost and availability. Aim for 10-20 instance types.
You can adjust these selections later in cluster settings!
Review your settings and click **Create and Deploy**
Your cluster will now be created automatically!
***
When you create a cluster, Qovery automatically provisions a complete, production-ready infrastructure:
### Network Architecture
* ✅ **Dedicated VPC** - Multi-AZ VPC isolating your infrastructure
* ✅ **Subnets & Routing** - Public/private subnets across 3 availability zones with routing tables
* ✅ **Internet Gateway** - For outbound container connectivity
* ✅ **Network Load Balancer** - Redirects HTTPS traffic to Nginx Ingress
* ✅ **NAT Gateways (Optional)** - With Elastic IPs for static outbound addresses
* ✅ **Database Networks** - Dedicated security groups and subnets for:
* RDS (relational databases)
* DocumentDB (document storage)
* ElastiCache (cache layers)
### Kubernetes Infrastructure
* ✅ **EKS Cluster** - Multi-AZ, latest stable Kubernetes version
* ✅ **Managed Worker Nodes** - AWS-managed EC2 instances with Karpenter
* ✅ **Security Groups** - Dual authentication for EKS remote access (TLS + IAM authenticator)
* ✅ **IAM Components**:
* EBS CSI driver access for persistent volumes
* IAM User Sync for Kubernetes authentication
* Cluster Autoscaler permissions
* EKS CNI and EC2 Container Registry policies
### Installed Components
* ✅ **Karpenter** - Intelligent auto-scaling for cost optimization
* ✅ **AWS Load Balancer Controller** - Automatic ingress management
* ✅ **EBS CSI Driver** - Persistent volume support
* ✅ **Metrics Server** - Resource monitoring
* ✅ **Qovery Agent** - Observability and management
### Storage & Logging
* ✅ **KMS-Encrypted S3 Buckets** - For:
* Application logs
* Kubeconfig storage (versioned, private)
* ✅ **CloudWatch Log Groups** - Cluster diagnostics and logging
### Karpenter Auto-Scaling
Qovery uses [Karpenter](https://karpenter.sh/) for intelligent node provisioning, which can **save up to 60% on AWS costs**:
**How Karpenter Works**:
* Automatically provisions optimal EC2 instances based on your workload requirements
* Scales nodes up within seconds when pods need resources
* Consolidates workloads onto fewer nodes to reduce costs
* Handles spot instance interruptions gracefully
**Default Configuration**:
* **Stable Node Pool**: For Qovery system components (single instance, on-demand)
* **Default Node Pool**: For your applications (auto-scaling, mixed on-demand/spot)
* **Optional GPU Node Pool**: For ML/AI workloads (if enabled)
**Instance Type Selection**: Karpenter can provision from a wide range of instance types:
* **General Purpose**: t3, m5, m6i, m6g (Graviton ARM)
* **Compute Optimized**: c5, c6i, c6g (Graviton ARM)
* **Memory Optimized**: r5, r6i, r6g (Graviton ARM)
* **GPU Instances**: g4dn, g5 (if GPU node pool enabled)
**Cost Optimization with Spot Instances**:
* Enable spot instances for significant cost reduction
* Karpenter automatically handles spot interruptions
* Mix of spot and on-demand for reliability
You can configure Karpenter settings after cluster creation in **Cluster Settings** → **Node Pools**. Learn more in the [Cluster Configuration](/docs/configuration/clusters) guide.
***
## Wait for Cluster to Be Ready
**Cluster creation takes 20-30 minutes.** Here's what's happening:
| Step | Time | What's Being Created |
| -------------------- | --------- | ----------------------------- |
| 1. Networking | 3-5 min | VPC, subnets, security groups |
| 2. EKS Control Plane | 10-15 min | Kubernetes master nodes |
| 3. Worker Nodes | 5-10 min | EC2 instances for your apps |
| 4. Qovery Components | 3-5 min | Ingress, monitoring, logging |
**You'll receive an email when your cluster is ready!** Feel free to close this page.
**While you wait:**
* ☕ Grab a coffee
* 📖 Learn about [deploying your first app](/docs/guides/getting-started/deploy-your-first-application)
* 👥 [Invite your team](/docs/configuration/organization/members-rbac)
* 🔗 [Connect Git](/docs/integrations/git-providers/overview)
***
## Next: Deploy Your First Application
Once your cluster shows **Ready** status:
Step-by-step guide to deploy from Git
Add PostgreSQL, MySQL, MongoDB, or Redis
Use your own domain name
Add team members with permissions
***
## Troubleshooting
**Most common causes:**
* AWS account doesn't have permissions to create IAM roles
* AWS region doesn't support EKS
**Solution**: Make sure you're logged in as AWS admin or have IAM permissions.
1. Go to AWS CloudFormation console
2. Find your stack (status should be CREATE\_COMPLETE)
3. Click the **Outputs** tab
4. Copy the value next to "RoleArn"
If your cluster stays in "Creating" status for more than 45 minutes:
* Check AWS service quotas (especially EC2 instances)
* Try a different AWS region
* [Contact support](/docs/getting-started/useful-resources/help-and-support)
**For STS Assume Role**:
* Verify CloudFormation stack created successfully
* Check RoleArn is copied correctly (starts with `arn:aws:iam::`)
* Ensure AWS account has permissions to create IAM roles
**For Static Credentials**:
* Verify IAM user has AdministratorAccess policy
* Check Access Key ID and Secret Access Key are correct
* Ensure keys are not disabled or expired
## Additional Resources
* [AWS EKS Documentation](https://docs.aws.amazon.com/eks/latest/userguide/)
* [AWS Pricing Calculator](https://calculator.aws/pricing/2/home)
* [Qovery Status Page](https://status.qovery.com)
* [Qovery Kubernetes Changelog](https://www.qovery.com/changelog---kubernetes) - Kubernetes cluster related updates