> ## Documentation Index
> Fetch the complete documentation index at: https://www.qovery.com/docs/llms.txt
> Use this file to discover all available pages before exploring further.
# Deploy Your First Application
> Quick guide to deploying your first application on Qovery
Deploy a containerized application on Qovery in minutes. Choose your deployment source based on your needs: build from Git, deploy pre-built containers, or use Helm charts.
## Prerequisites
Before deploying your first application, ensure you have:
Qovery account - [Sign up here](https://console.qovery.com/signup)
Kubernetes cluster - [Install a cluster](/docs/installation/aws) or [connect your own](/docs/configuration/integrations/kubernetes/byok)
**Depending on your deployment source:**
* **Git Repository**: GitHub, GitLab, or Bitbucket repository with a Dockerfile
* **Container Registry**: Pre-built Docker image in a registry (Docker Hub, ECR, GCR, etc.)
* **Helm Chart**: Packaged Helm application ([See Helm documentation](/docs/configuration/helm))
This guide covers Git Repository and Container Registry deployments. For Helm charts, see the [Helm Configuration Guide](/docs/configuration/helm).
## Step 1: Create a Project
[Projects](/docs/configuration/project) organize your applications and environments.
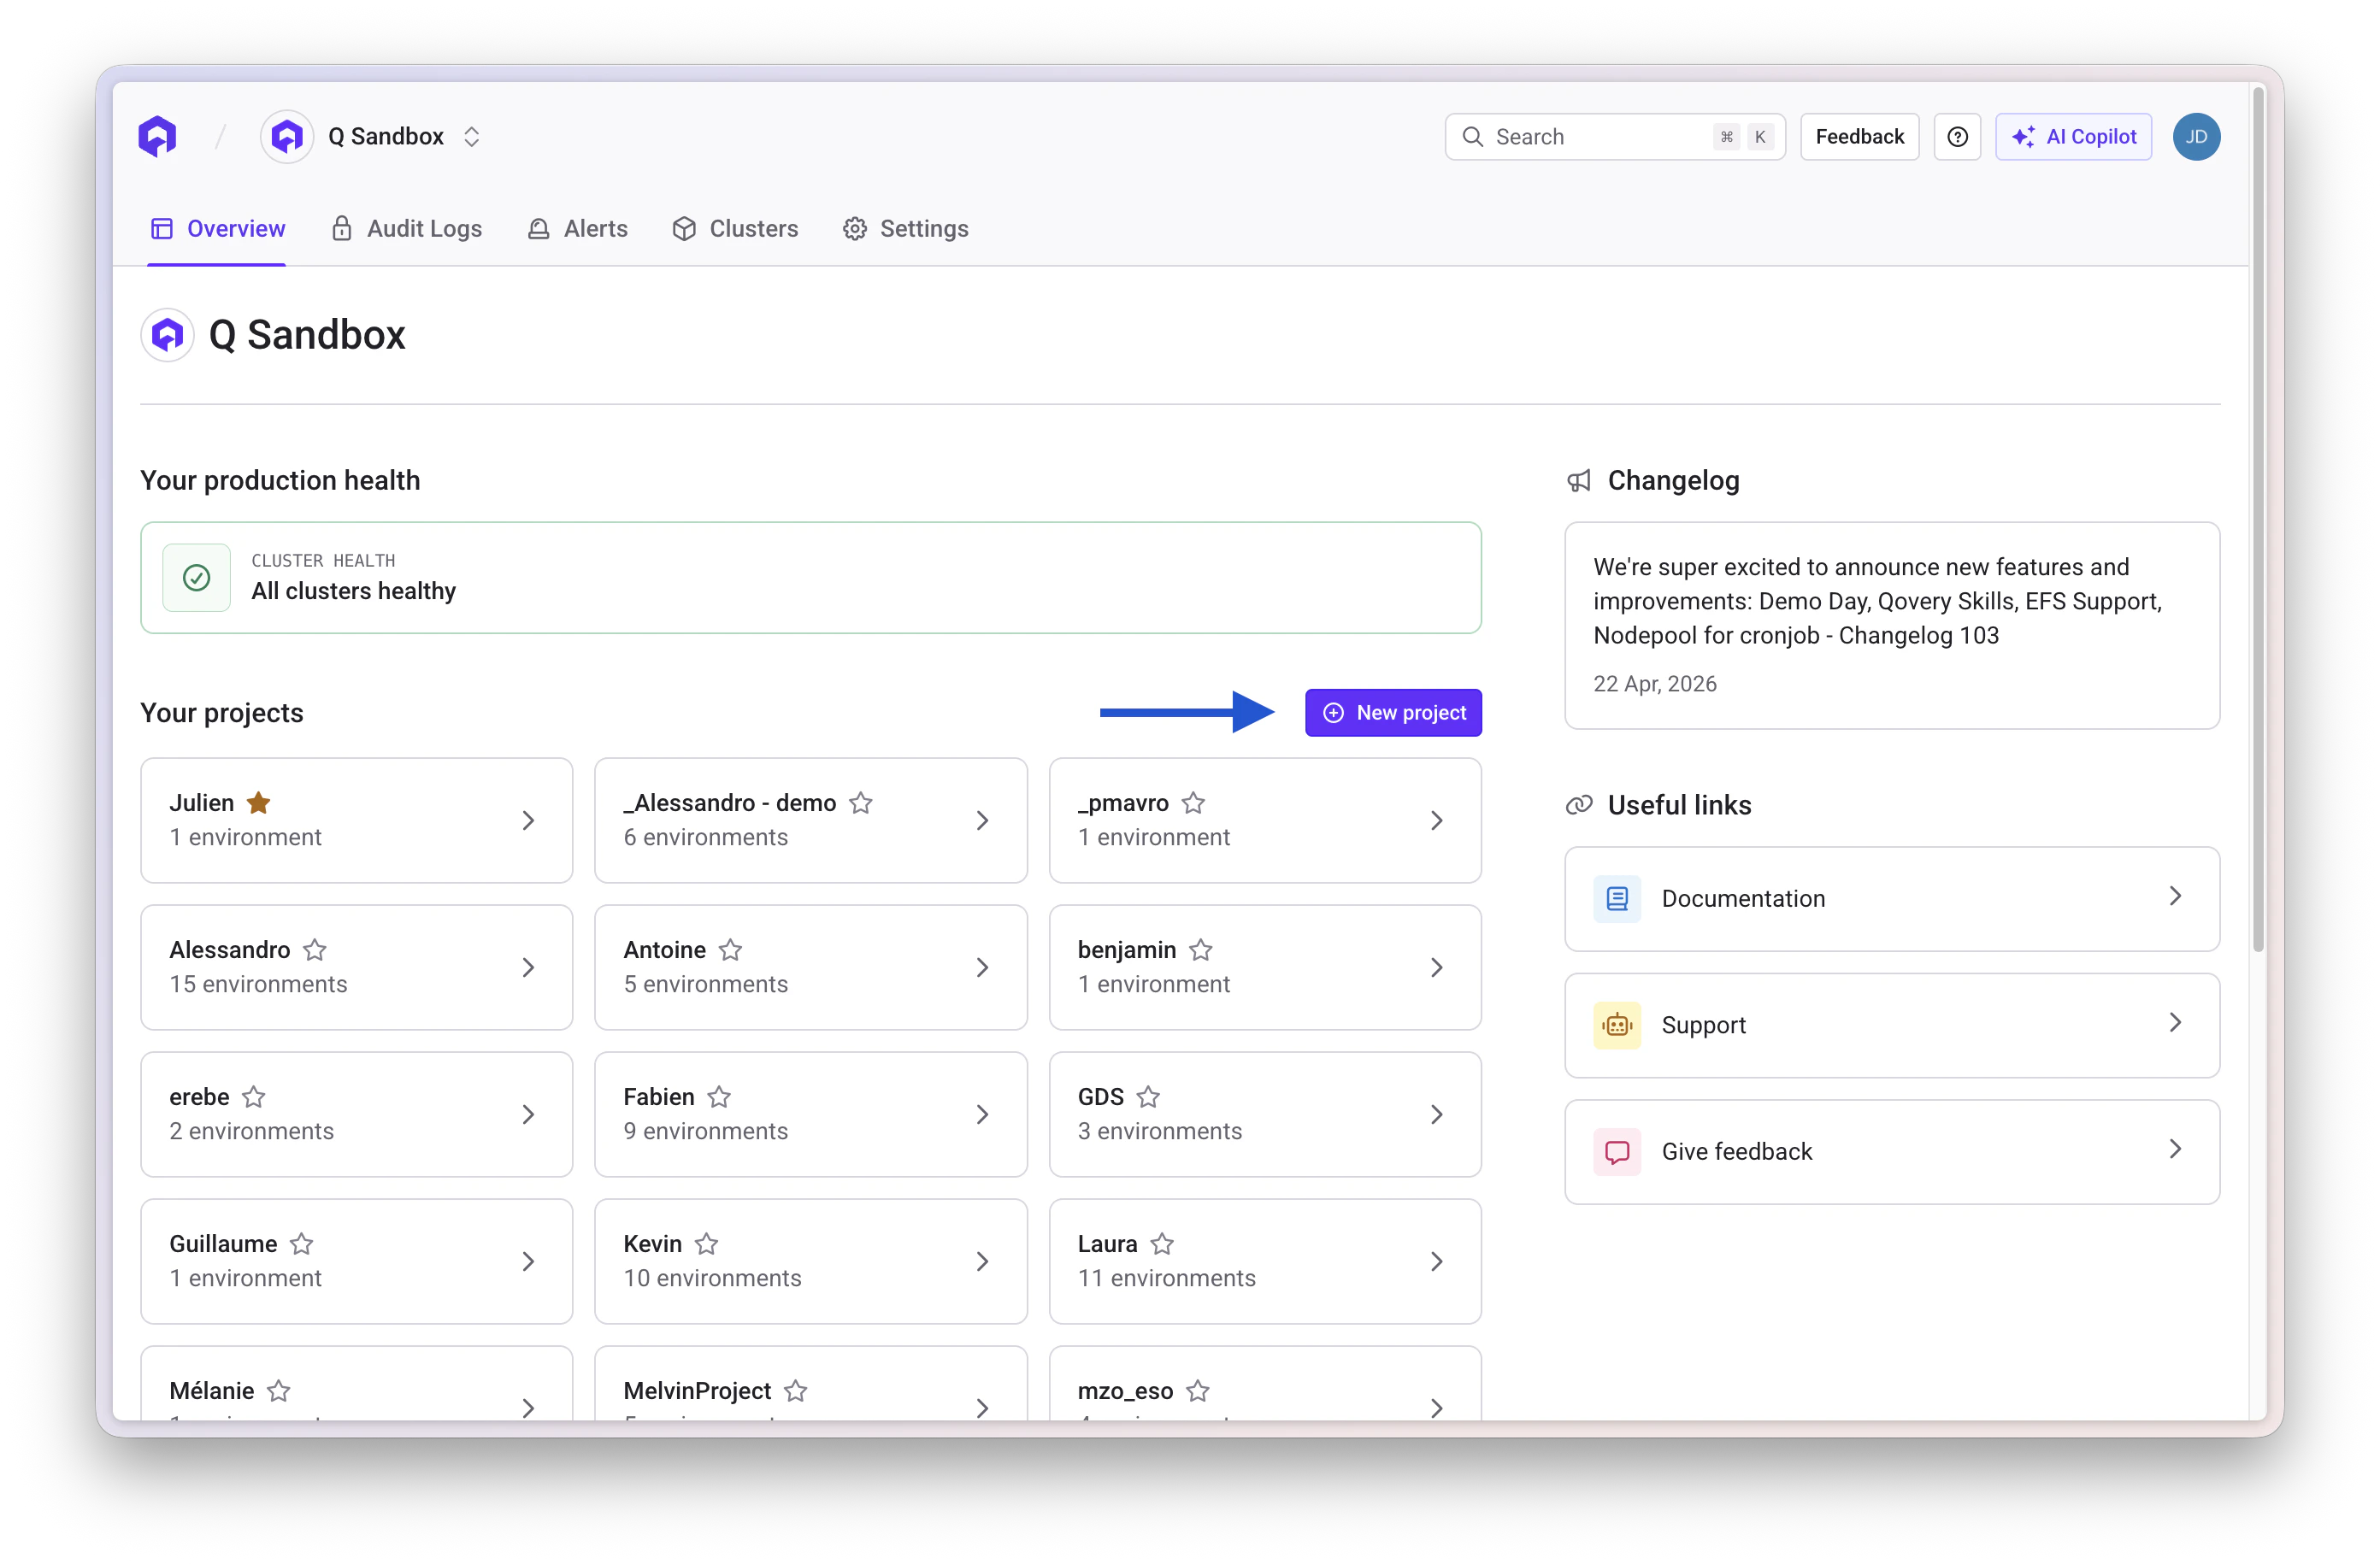
1. Go to [Qovery Console](https://console.qovery.com) and open your organization overview
2. Click the **New Project** button
3. Enter a project name (e.g., "My First Project")
4. Click **Create**
 ## Step 2: Create an Environment
[Environments](/docs/configuration/environment) represent deployment stages (production, staging, development).
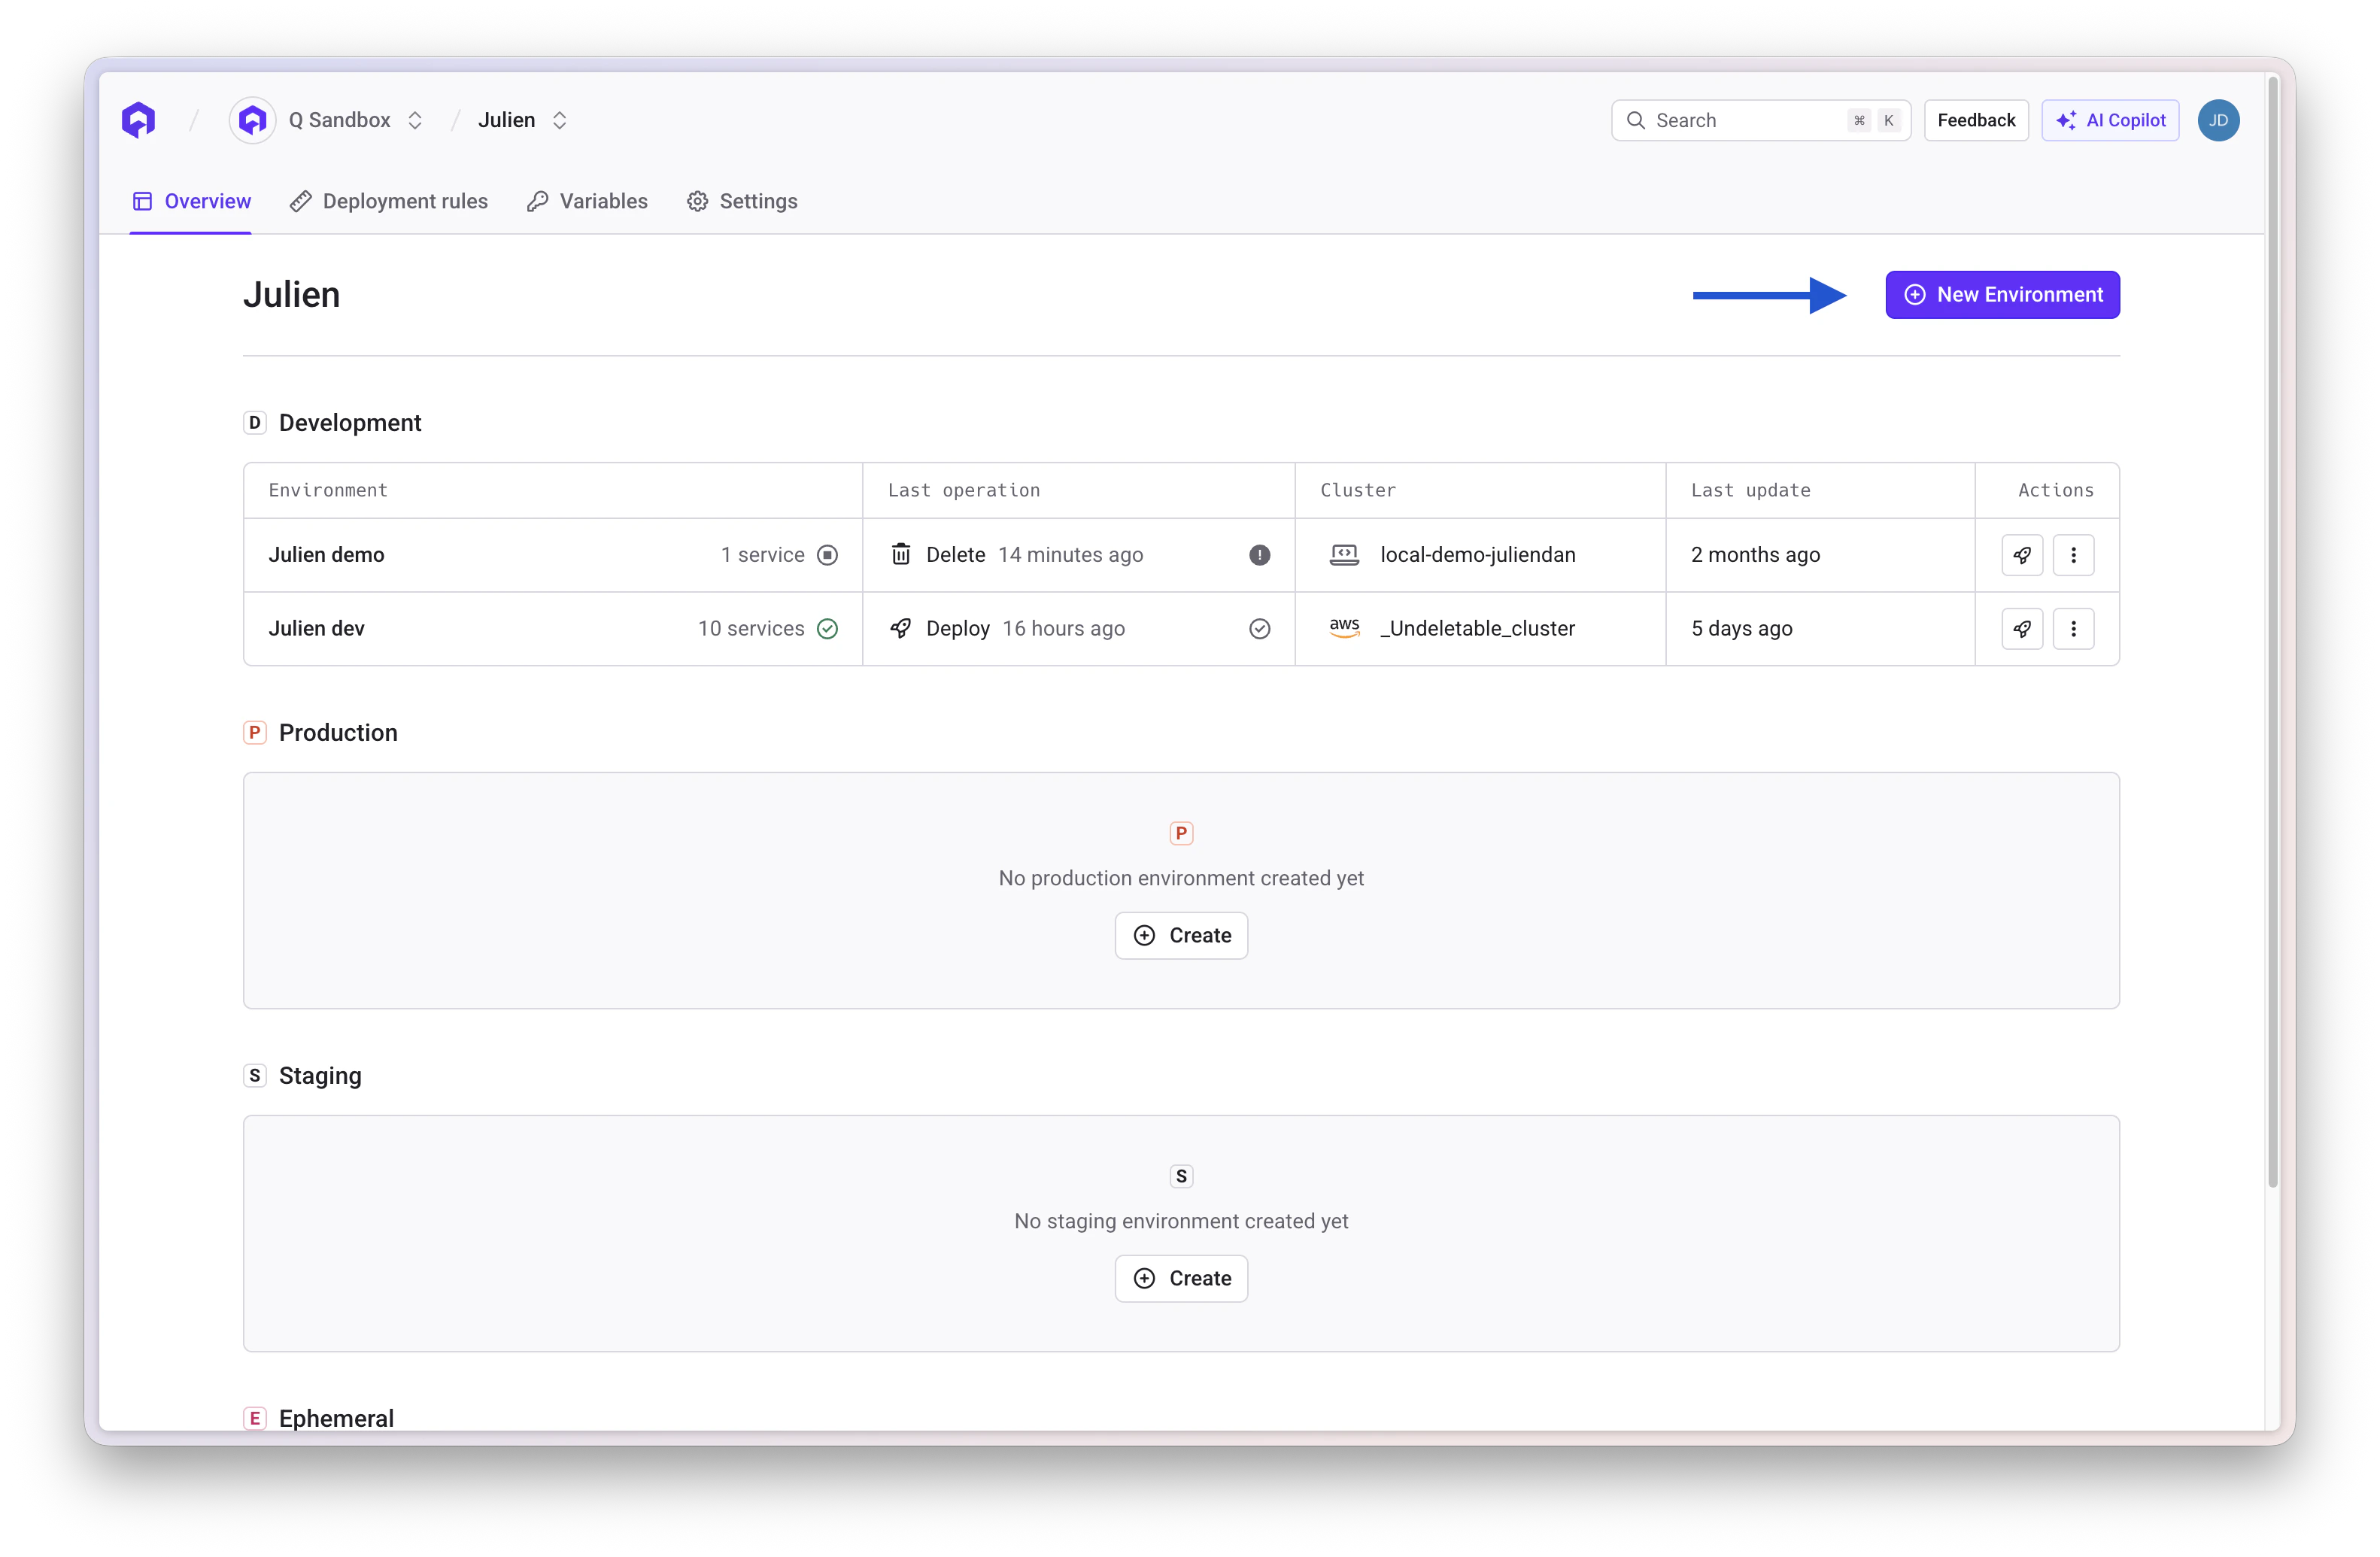
1. Open your project
2. Click **Create Environment**
3. Enter an environment name (e.g., "production")
4. Select the environment type (PRODUCTION, STAGING, or DEVELOPMENT)
5. Select the cluster where you want to deploy
6. Click **Create**
## Step 2: Create an Environment
[Environments](/docs/configuration/environment) represent deployment stages (production, staging, development).
1. Open your project
2. Click **Create Environment**
3. Enter an environment name (e.g., "production")
4. Select the environment type (PRODUCTION, STAGING, or DEVELOPMENT)
5. Select the cluster where you want to deploy
6. Click **Create**
 ## Step 3: Choose Your Deployment Source
Qovery supports multiple deployment sources. Choose the one that fits your workflow:
**Best for:** Building your application from source code
**Requirements:**
* Git repository (GitHub, GitLab, or Bitbucket)
* Dockerfile in your repository
Qovery will clone your repo, build the Docker image, and deploy it automatically.
### Create Your Application
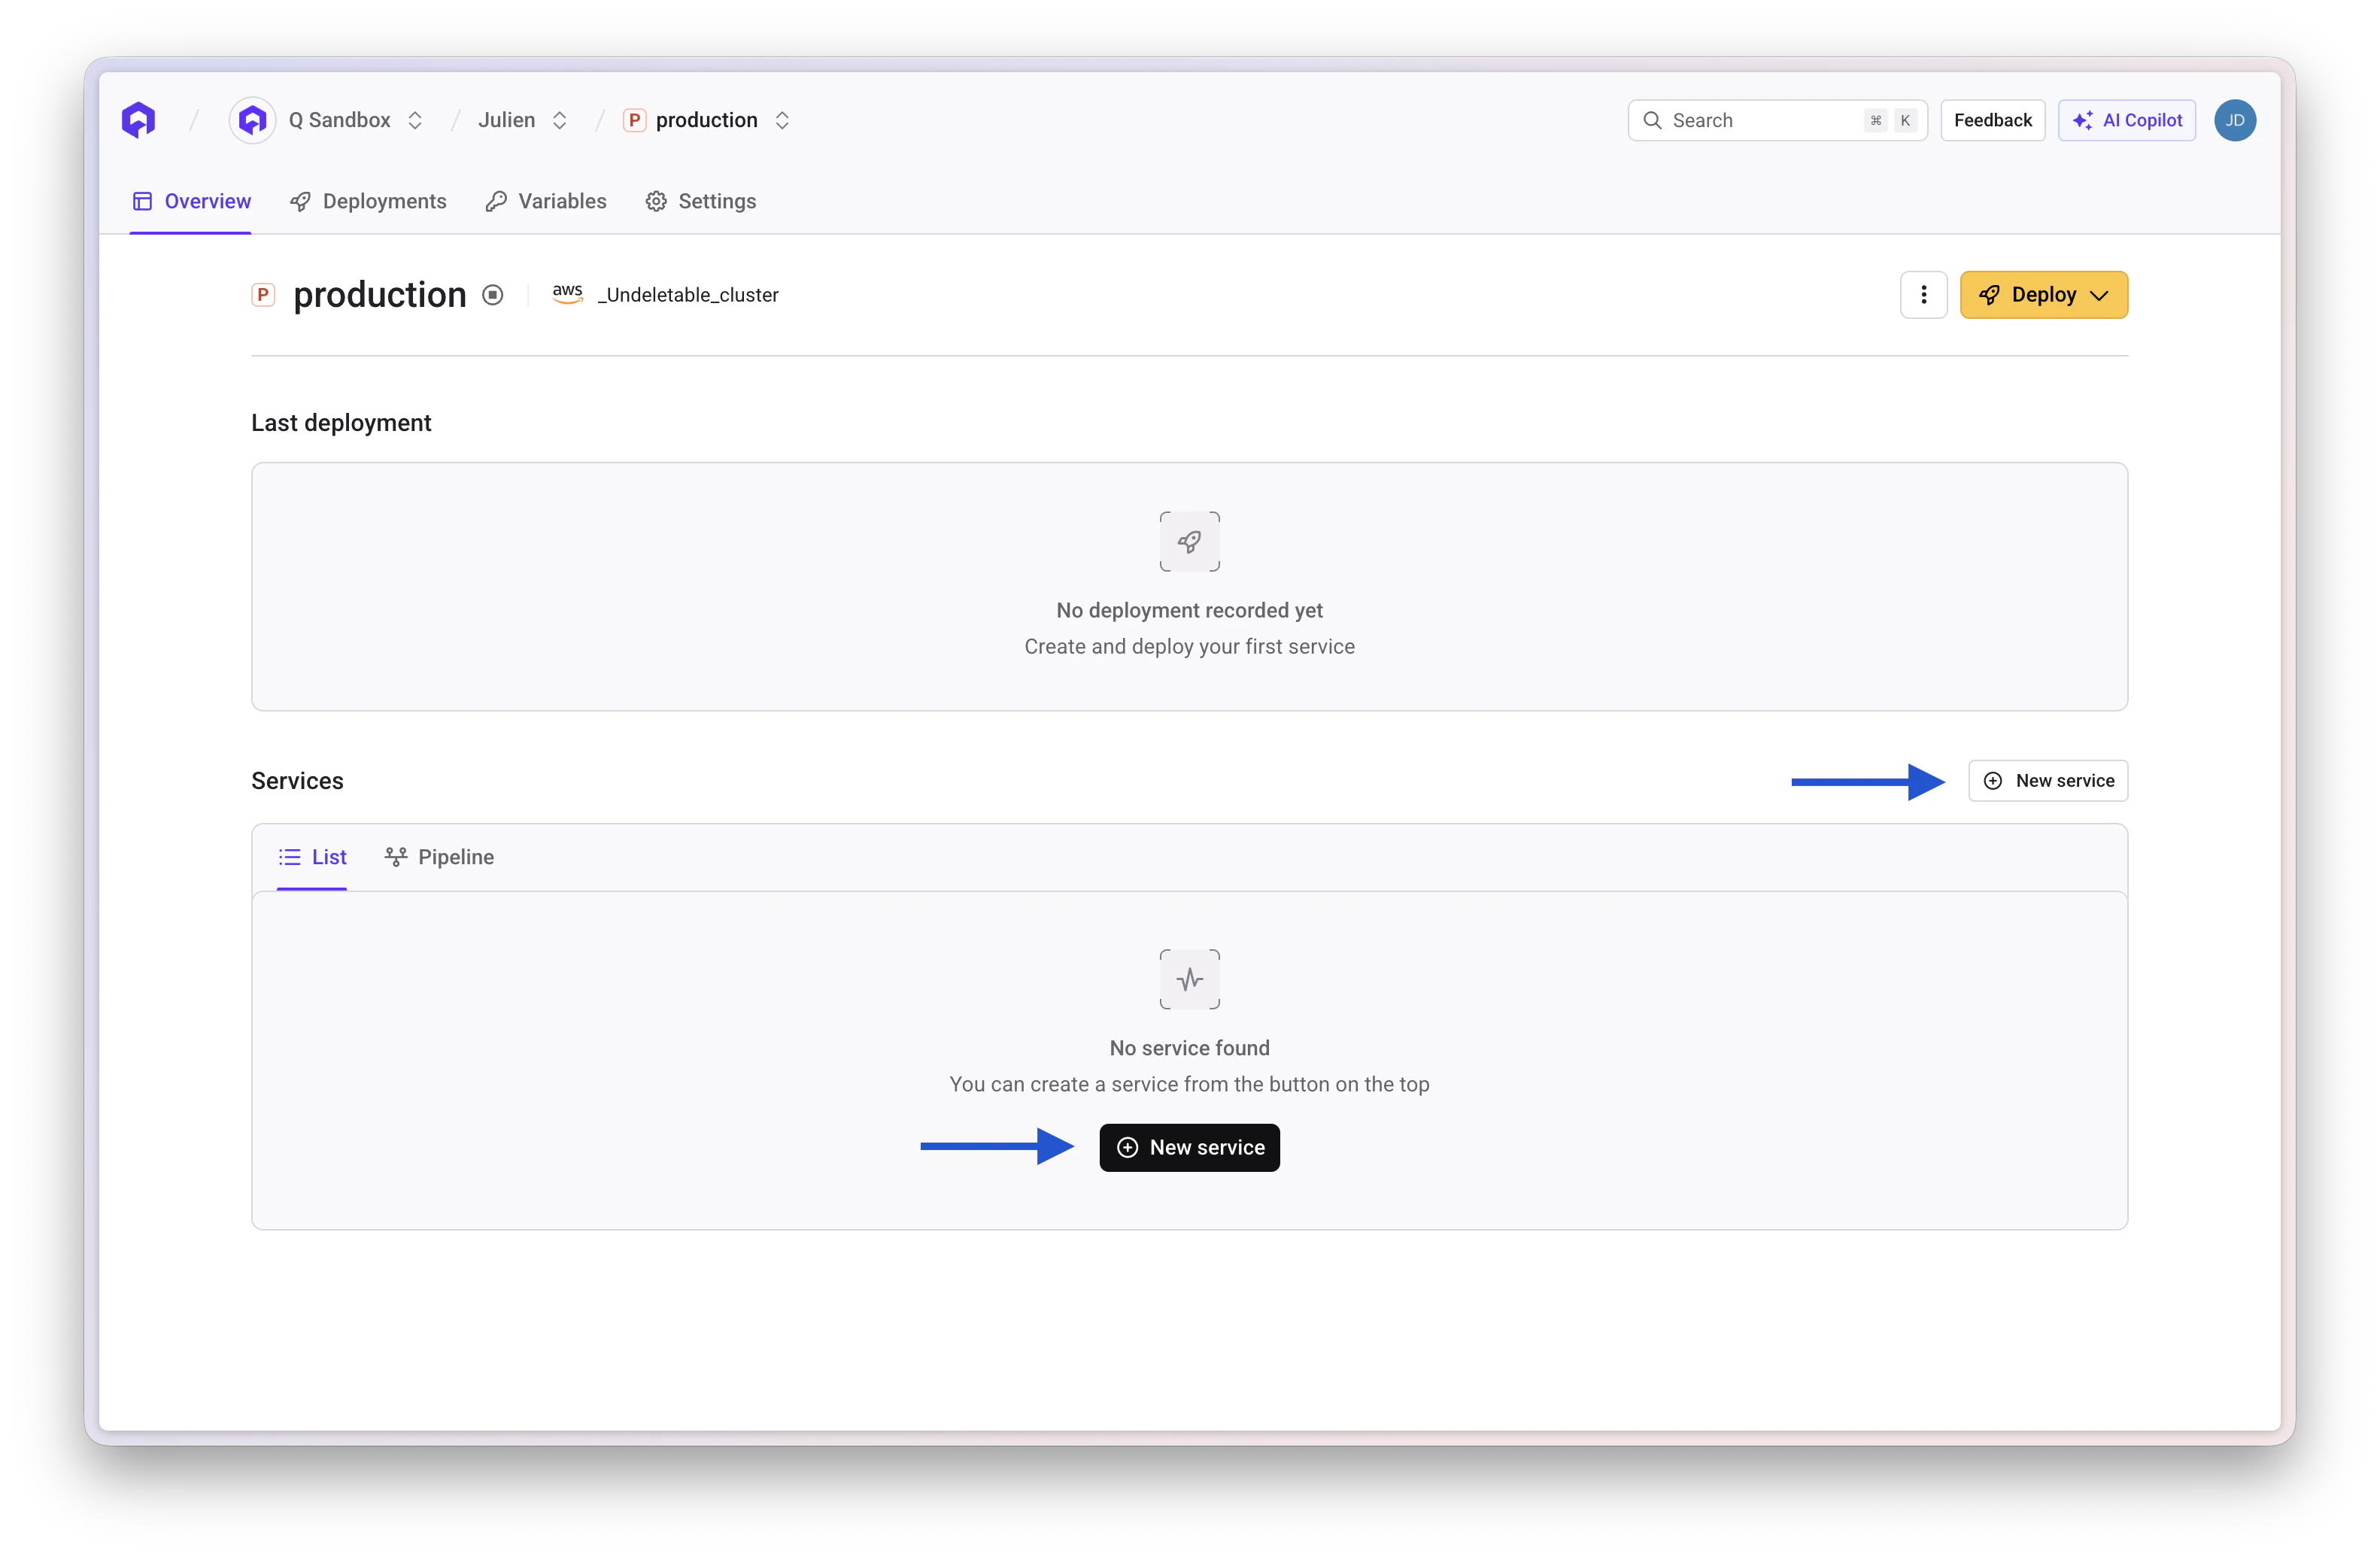
In your environment, click **New Service** → **Create application**
## Step 3: Choose Your Deployment Source
Qovery supports multiple deployment sources. Choose the one that fits your workflow:
**Best for:** Building your application from source code
**Requirements:**
* Git repository (GitHub, GitLab, or Bitbucket)
* Dockerfile in your repository
Qovery will clone your repo, build the Docker image, and deploy it automatically.
### Create Your Application
In your environment, click **New Service** → **Create application**
 * **Application Name**: Enter a name (e.g., "my-api")
* **Application Source**: Select **Git Repository**
* **Git Provider**: Select your provider (GitHub, GitLab, Bitbucket)
* **Repository**: Choose your repository
* **Branch**: Select the branch to deploy (e.g., `main`, `develop`)
* **Root Application Path**: Leave blank if Dockerfile is at root, or specify subfolder
**First time?** You'll need to authorize Qovery to access your Git provider. See [Git Repository Access](/docs/configuration/organization/git-repository-access).
**Dockerfile Required**: Qovery needs a Dockerfile to build your application. Place it at the root or specify the path.
Set compute resources:
* **vCPU**: Default 500m (0.5 core)
* **RAM**: Default 512 MB
* **Instances**: Min and max for auto-scaling (default: 1-1)
Start with defaults and scale based on actual usage.
If your app serves HTTP/gRPC traffic:
* **Port**: The port your app listens on (e.g., 8080, 3000)
* **Protocol**: HTTPS, gRPC, TCP, or UDP
* **Publicly Accessible**: Enable to expose via internet
* **External Port**: 443 for HTTPS
Your app must listen on `0.0.0.0:$PORT`, not `localhost:$PORT`.
Improve reliability with health checks:
* **Liveness Probe**: Checks if container is alive (restarts container if failing)
* **Readiness Probe**: Checks if container is ready for traffic (prevents routing traffic until passing)
These probes ensure Kubernetes only routes traffic to healthy containers and automatically restarts failed ones.
Recommended: Add `/health` or `/healthz` endpoint to your app.
Add configuration as needed:
* API keys (mark as secret)
* Configuration values
* Feature flags
You can add these later in application settings.
* Click **Create and Deploy** to build and deploy immediately
* Or **Create** to configure more before deploying
**Best for:** Deploying pre-built Docker images
**Requirements:**
* Docker image already built and pushed to a registry
* Registry connected to Qovery (Docker Hub, ECR, GCR, ACR, etc.)
Use this when you build images in your own CI/CD pipeline or want to deploy third-party images.
### Deploy Pre-built Image
In your environment, click **New Service** → **Create application**
* **Application Name**: Enter a name (e.g., "my-api")
* **Application Source**: Select **Container Registry**
* **Registry**: Choose your connected registry
* **Image Name**: Enter the full image name (e.g., `myapp/api`)
* **Image Tag**: Enter a specific tag (e.g., `v1.0.0`, `sha-abc123`)
**Avoid generic tags like `latest`, `dev`, or `master`**. Use specific version tags or commit SHAs for reliable deployments.
**First time?** Connect your registry first: [Container Registry Setup](/docs/configuration/organization/container-registry)
Override the image's default entrypoint if needed:
* Custom command
* Custom arguments
Leave blank to use the image's default CMD/ENTRYPOINT.
Set compute resources:
* **vCPU**: Default 500m (0.5 core)
* **RAM**: Default 512 MB
* **Instances**: Min and max for auto-scaling (default: 1-1)
If your app serves HTTP/gRPC traffic:
* **Port**: The port your app listens on
* **Protocol**: HTTPS, gRPC, TCP, or UDP
* **Publicly Accessible**: Enable to expose via internet
* **External Port**: 443 for HTTPS
Set up health monitoring:
* **Liveness Probe**: HTTP, TCP, or exec checks (restarts container if failing)
* **Readiness Probe**: When to route traffic (prevents routing traffic until passing)
These probes ensure Kubernetes only routes traffic to healthy containers and automatically restarts failed ones.
Add runtime configuration:
* API endpoints
* Feature toggles
* Secrets (encrypted)
* Click **Create and Deploy** to deploy immediately
* Or **Create** to configure more before deploying
**Using Helm?** Qovery also supports deploying Helm charts for packaged applications. See the [Helm Configuration Guide](/docs/configuration/helm) for detailed instructions.
## Monitor Your Deployment
Watch your application come to life:
Click on your application to see:
* **Build logs**: Container image creation
* **Deployment logs**: Kubernetes deployment status
* **Application logs**: Your app's output
* **Application Name**: Enter a name (e.g., "my-api")
* **Application Source**: Select **Git Repository**
* **Git Provider**: Select your provider (GitHub, GitLab, Bitbucket)
* **Repository**: Choose your repository
* **Branch**: Select the branch to deploy (e.g., `main`, `develop`)
* **Root Application Path**: Leave blank if Dockerfile is at root, or specify subfolder
**First time?** You'll need to authorize Qovery to access your Git provider. See [Git Repository Access](/docs/configuration/organization/git-repository-access).
**Dockerfile Required**: Qovery needs a Dockerfile to build your application. Place it at the root or specify the path.
Set compute resources:
* **vCPU**: Default 500m (0.5 core)
* **RAM**: Default 512 MB
* **Instances**: Min and max for auto-scaling (default: 1-1)
Start with defaults and scale based on actual usage.
If your app serves HTTP/gRPC traffic:
* **Port**: The port your app listens on (e.g., 8080, 3000)
* **Protocol**: HTTPS, gRPC, TCP, or UDP
* **Publicly Accessible**: Enable to expose via internet
* **External Port**: 443 for HTTPS
Your app must listen on `0.0.0.0:$PORT`, not `localhost:$PORT`.
Improve reliability with health checks:
* **Liveness Probe**: Checks if container is alive (restarts container if failing)
* **Readiness Probe**: Checks if container is ready for traffic (prevents routing traffic until passing)
These probes ensure Kubernetes only routes traffic to healthy containers and automatically restarts failed ones.
Recommended: Add `/health` or `/healthz` endpoint to your app.
Add configuration as needed:
* API keys (mark as secret)
* Configuration values
* Feature flags
You can add these later in application settings.
* Click **Create and Deploy** to build and deploy immediately
* Or **Create** to configure more before deploying
**Best for:** Deploying pre-built Docker images
**Requirements:**
* Docker image already built and pushed to a registry
* Registry connected to Qovery (Docker Hub, ECR, GCR, ACR, etc.)
Use this when you build images in your own CI/CD pipeline or want to deploy third-party images.
### Deploy Pre-built Image
In your environment, click **New Service** → **Create application**
* **Application Name**: Enter a name (e.g., "my-api")
* **Application Source**: Select **Container Registry**
* **Registry**: Choose your connected registry
* **Image Name**: Enter the full image name (e.g., `myapp/api`)
* **Image Tag**: Enter a specific tag (e.g., `v1.0.0`, `sha-abc123`)
**Avoid generic tags like `latest`, `dev`, or `master`**. Use specific version tags or commit SHAs for reliable deployments.
**First time?** Connect your registry first: [Container Registry Setup](/docs/configuration/organization/container-registry)
Override the image's default entrypoint if needed:
* Custom command
* Custom arguments
Leave blank to use the image's default CMD/ENTRYPOINT.
Set compute resources:
* **vCPU**: Default 500m (0.5 core)
* **RAM**: Default 512 MB
* **Instances**: Min and max for auto-scaling (default: 1-1)
If your app serves HTTP/gRPC traffic:
* **Port**: The port your app listens on
* **Protocol**: HTTPS, gRPC, TCP, or UDP
* **Publicly Accessible**: Enable to expose via internet
* **External Port**: 443 for HTTPS
Set up health monitoring:
* **Liveness Probe**: HTTP, TCP, or exec checks (restarts container if failing)
* **Readiness Probe**: When to route traffic (prevents routing traffic until passing)
These probes ensure Kubernetes only routes traffic to healthy containers and automatically restarts failed ones.
Add runtime configuration:
* API endpoints
* Feature toggles
* Secrets (encrypted)
* Click **Create and Deploy** to deploy immediately
* Or **Create** to configure more before deploying
**Using Helm?** Qovery also supports deploying Helm charts for packaged applications. See the [Helm Configuration Guide](/docs/configuration/helm) for detailed instructions.
## Monitor Your Deployment
Watch your application come to life:
Click on your application to see:
* **Build logs**: Container image creation
* **Deployment logs**: Kubernetes deployment status
* **Application logs**: Your app's output
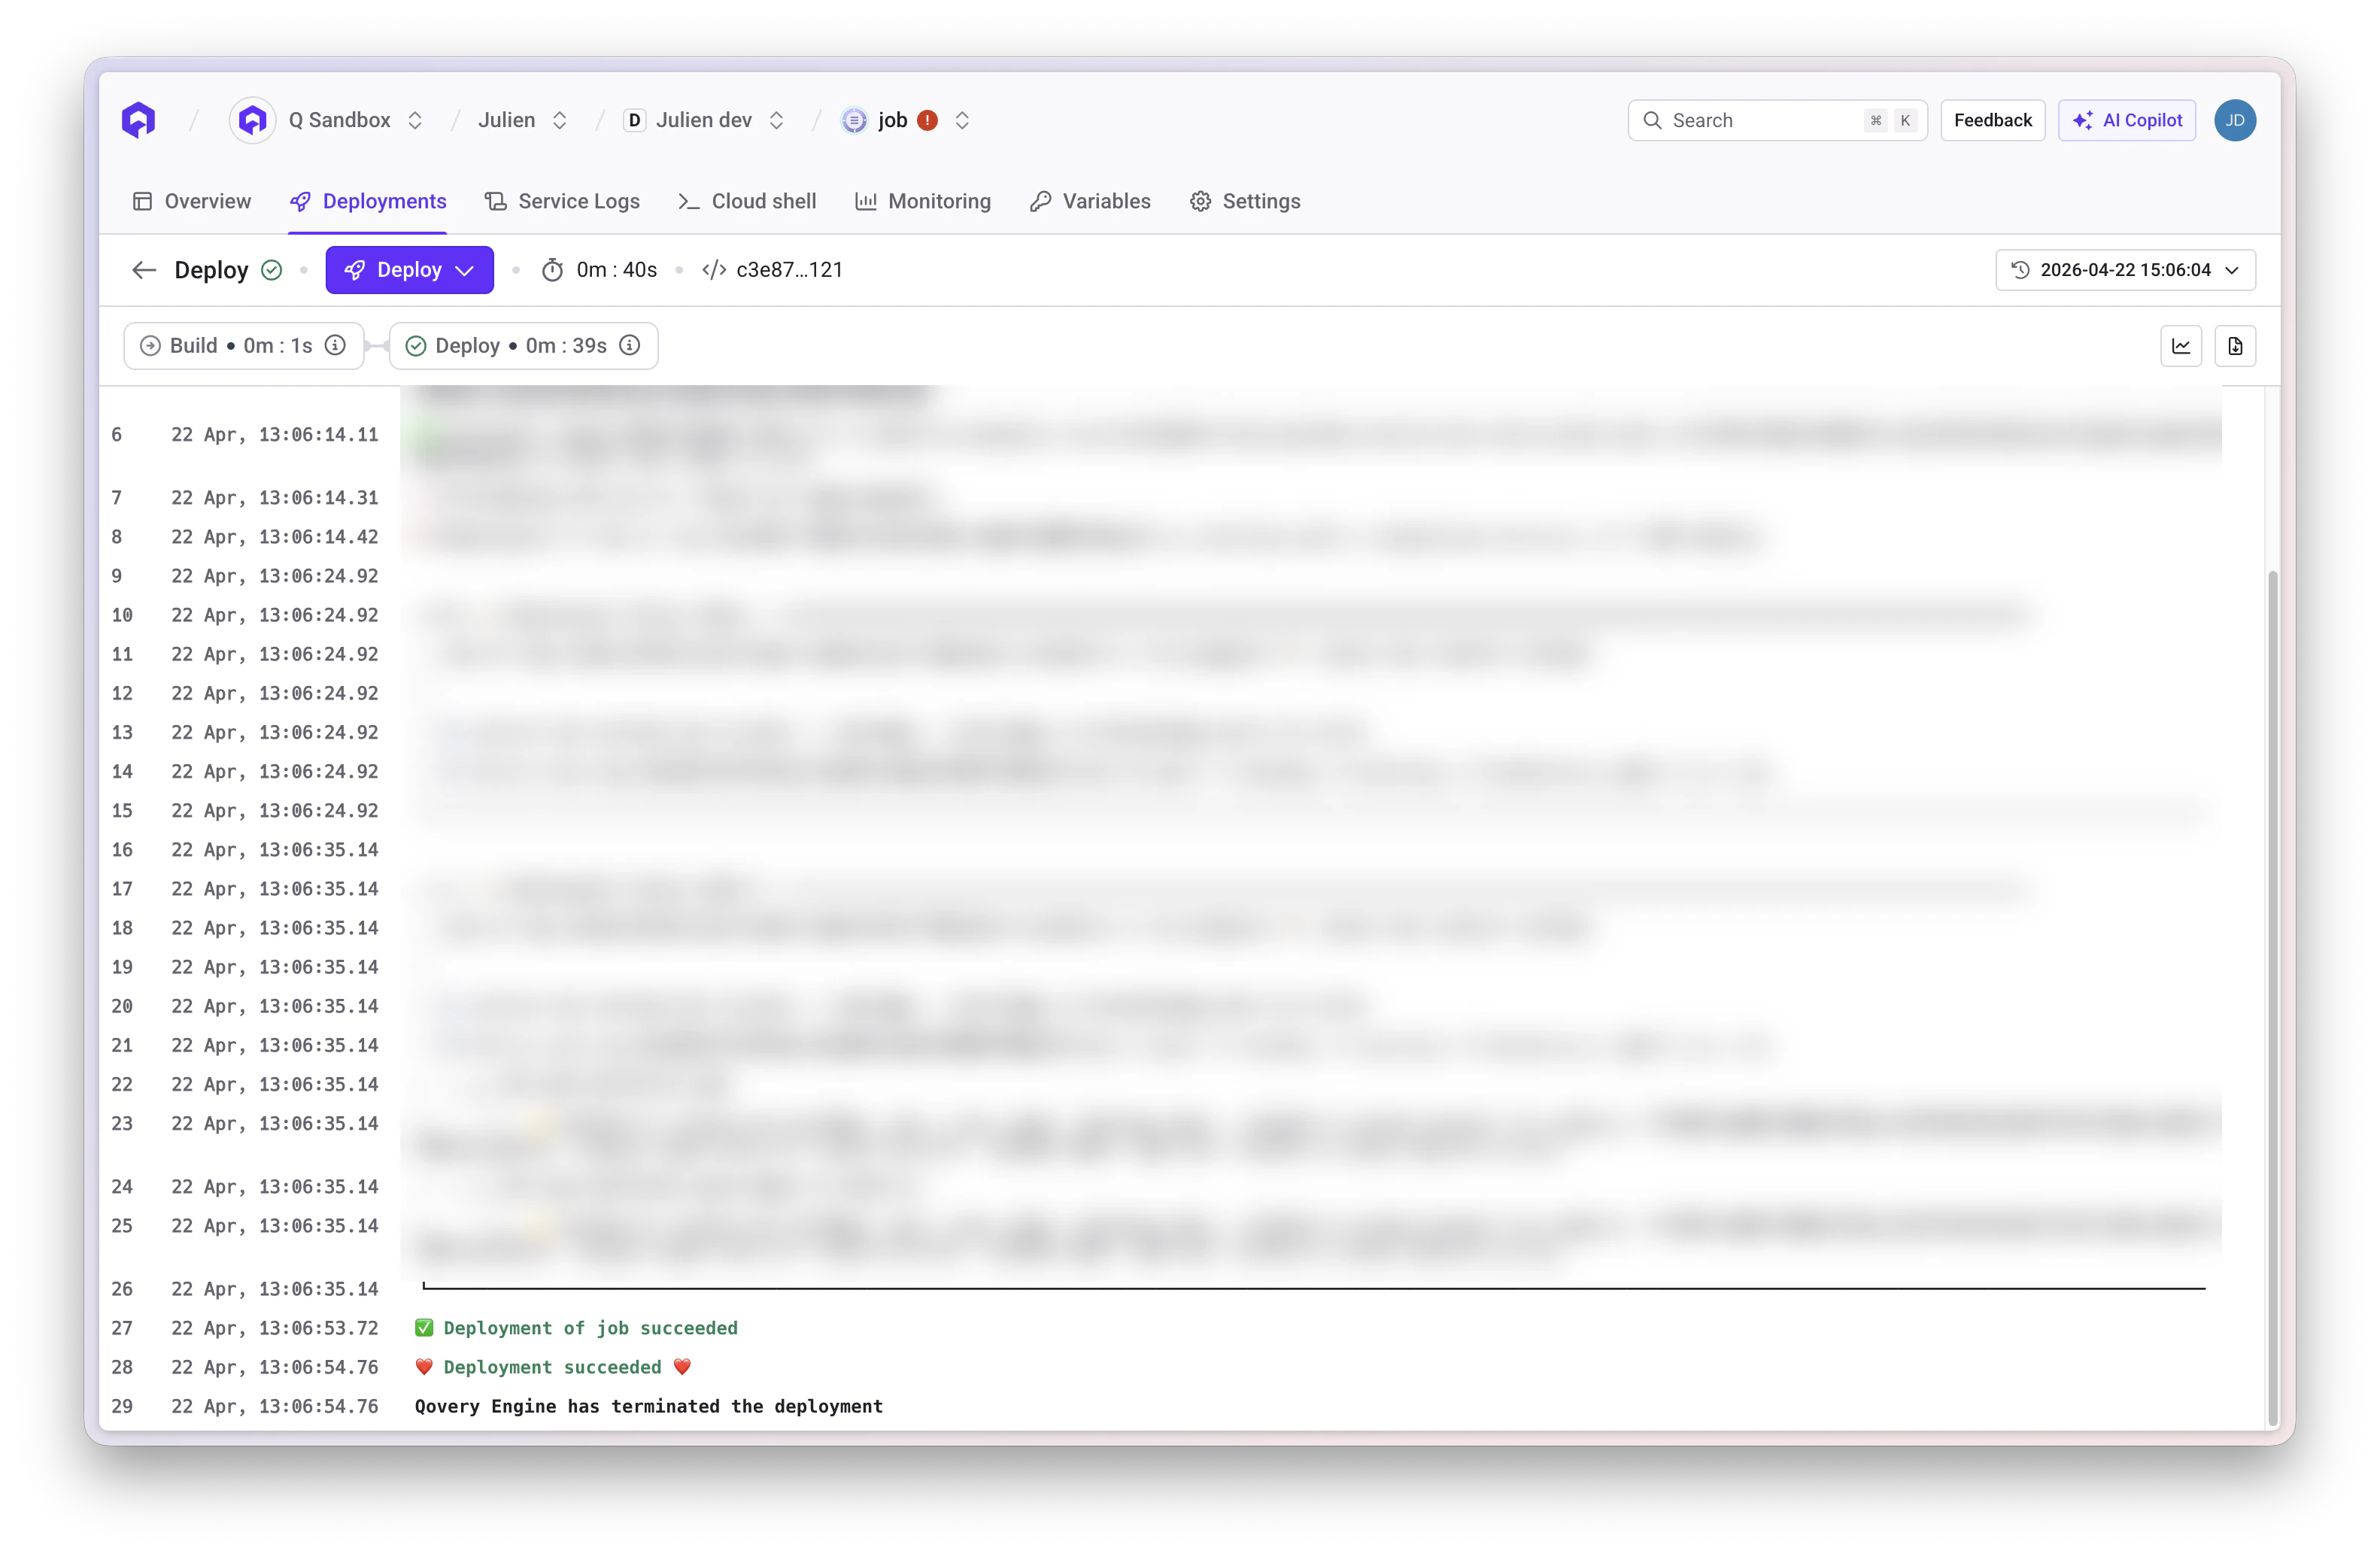 Deployment typically takes 2-5 minutes.
Status progression: `Building` → `Deploying` → `Running`
Deployment typically takes 2-5 minutes.
Status progression: `Building` → `Deploying` → `Running`
 Once running, click the application URL to view your live app!
The URL format: `https://your-app-xxx.qovery.io`
## What Happened Behind the Scenes
When deploying from Git, Qovery automatically:
1. ✅ Cloned your Git repository
2. ✅ Built a Docker image using your Dockerfile
3. ✅ Pushed the image to container registry (ECR, GCR, etc.)
4. ✅ Created Kubernetes deployment, service, and ingress
5. ✅ Configured automatic HTTPS with Let's Encrypt
6. ✅ Started health checks and monitoring
7. ✅ Made your app accessible via `https://your-app-xxx.qovery.io`
Qovery handles the entire build and deployment pipeline for you!
When deploying from a container registry, Qovery automatically:
1. ✅ Pulled your pre-built Docker image from the registry
2. ✅ Created Kubernetes deployment with your specified image
3. ✅ Configured networking and load balancing
4. ✅ Set up automatic HTTPS with Let's Encrypt
5. ✅ Started health checks and monitoring
6. ✅ Made your app accessible via `https://your-app-xxx.qovery.io`
No build step needed - your image is deployed directly to Kubernetes!
## Troubleshooting
**Common causes**:
* Missing or invalid Dockerfile
* Build dependencies not installed
* Syntax errors in Dockerfile
* Insufficient build resources
**Solutions**:
* Check build logs for specific errors
* Verify Dockerfile builds locally: `docker build .`
* Ensure all dependencies are in package files
* Contact Qovery support to increase build resources if needed
**Common causes**:
* Registry not connected to Qovery
* Image name or tag incorrect
* Authentication issues
* Image doesn't exist
**Solutions**:
* Verify registry is connected: [Container Registry Setup](/docs/configuration/organization/container-registry)
* Check image name matches exactly (case-sensitive)
* Use specific tags, not `latest`
* Verify image exists in your registry
**Check**:
* Application logs for error messages
* Environment variables are set correctly
* Port configuration matches your app (Git: check Dockerfile EXPOSE)
* Resource limits (CPU/memory) are sufficient
* Health check endpoints are accessible
**Check**:
* "Publicly Accessible" is enabled
* App listens on `0.0.0.0:$PORT` not `localhost:$PORT`
* Health checks are passing (if configured)
* Wait 2-3 minutes for DNS propagation
* Check firewall rules if using custom domains
**Solutions**:
* Ensure Dockerfile exists at repository root
* If in subdirectory, set "Root Application Path"
* Check filename is exactly `Dockerfile` (case-sensitive)
* Verify branch contains the Dockerfile
## Next Steps
Connect PostgreSQL, MySQL, Redis, or MongoDB
Deploy packaged Helm applications
Use your own domain name
Manage secrets and configuration
Enable automatic deployments from Git
Connect Docker Hub, ECR, GCR, and more
## Quick Tips
**Start Small**: Begin with minimal resources (500m CPU, 512MB RAM) and scale based on actual usage.
**Use Health Checks**: Configure `/health` or `/healthz` endpoints in your app for better reliability.
**Enable Auto Deploy**: For development environments, enable auto-deploy to automatically deploy on Git push.
**Check Logs First**: When troubleshooting, always check application logs - they contain valuable debugging information.
Once running, click the application URL to view your live app!
The URL format: `https://your-app-xxx.qovery.io`
## What Happened Behind the Scenes
When deploying from Git, Qovery automatically:
1. ✅ Cloned your Git repository
2. ✅ Built a Docker image using your Dockerfile
3. ✅ Pushed the image to container registry (ECR, GCR, etc.)
4. ✅ Created Kubernetes deployment, service, and ingress
5. ✅ Configured automatic HTTPS with Let's Encrypt
6. ✅ Started health checks and monitoring
7. ✅ Made your app accessible via `https://your-app-xxx.qovery.io`
Qovery handles the entire build and deployment pipeline for you!
When deploying from a container registry, Qovery automatically:
1. ✅ Pulled your pre-built Docker image from the registry
2. ✅ Created Kubernetes deployment with your specified image
3. ✅ Configured networking and load balancing
4. ✅ Set up automatic HTTPS with Let's Encrypt
5. ✅ Started health checks and monitoring
6. ✅ Made your app accessible via `https://your-app-xxx.qovery.io`
No build step needed - your image is deployed directly to Kubernetes!
## Troubleshooting
**Common causes**:
* Missing or invalid Dockerfile
* Build dependencies not installed
* Syntax errors in Dockerfile
* Insufficient build resources
**Solutions**:
* Check build logs for specific errors
* Verify Dockerfile builds locally: `docker build .`
* Ensure all dependencies are in package files
* Contact Qovery support to increase build resources if needed
**Common causes**:
* Registry not connected to Qovery
* Image name or tag incorrect
* Authentication issues
* Image doesn't exist
**Solutions**:
* Verify registry is connected: [Container Registry Setup](/docs/configuration/organization/container-registry)
* Check image name matches exactly (case-sensitive)
* Use specific tags, not `latest`
* Verify image exists in your registry
**Check**:
* Application logs for error messages
* Environment variables are set correctly
* Port configuration matches your app (Git: check Dockerfile EXPOSE)
* Resource limits (CPU/memory) are sufficient
* Health check endpoints are accessible
**Check**:
* "Publicly Accessible" is enabled
* App listens on `0.0.0.0:$PORT` not `localhost:$PORT`
* Health checks are passing (if configured)
* Wait 2-3 minutes for DNS propagation
* Check firewall rules if using custom domains
**Solutions**:
* Ensure Dockerfile exists at repository root
* If in subdirectory, set "Root Application Path"
* Check filename is exactly `Dockerfile` (case-sensitive)
* Verify branch contains the Dockerfile
## Next Steps
Connect PostgreSQL, MySQL, Redis, or MongoDB
Deploy packaged Helm applications
Use your own domain name
Manage secrets and configuration
Enable automatic deployments from Git
Connect Docker Hub, ECR, GCR, and more
## Quick Tips
**Start Small**: Begin with minimal resources (500m CPU, 512MB RAM) and scale based on actual usage.
**Use Health Checks**: Configure `/health` or `/healthz` endpoints in your app for better reliability.
**Enable Auto Deploy**: For development environments, enable auto-deploy to automatically deploy on Git push.
**Check Logs First**: When troubleshooting, always check application logs - they contain valuable debugging information.