> ## Documentation Index
> Fetch the complete documentation index at: https://www.qovery.com/docs/llms.txt
> Use this file to discover all available pages before exploring further.
# Use AWS IAM Roles with Qovery
> Grant AWS IAM permissions to applications without managing credentials
This tutorial demonstrates how to grant AWS IAM permissions to applications, containers, or jobs deployed through Qovery, using IRSA (IAM Roles for Service Accounts). This approach eliminates credential management by automatically rotating tokens through AWS's identity service.
Everything deploys through Qovery services from the [create\_service\_account](https://github.com/Qovery/create_service_account) repository:
1. A **Terraform service** creates the IAM role (and the OIDC identity provider if needed)
2. A **Helm service** creates the Kubernetes ServiceAccount annotated with the role ARN
3. Your application picks up the ServiceAccount through the **Service account** advanced setting
The Terraform outputs flow into the Helm values automatically, so nothing is hardcoded. If you prefer to create the IAM resources by hand, the manual AWS Console path is kept as an alternative in step 2.
## Prerequisites
* A Qovery cluster running on AWS EKS
* Basic knowledge of AWS IAM and Kubernetes
* AWS credentials allowed to manage IAM (for the Terraform service or the Console)
## Step 1: Create an Application Requiring S3 Permissions
First, deploy a simple Debian container that will need S3 access:
* Deploy a Debian container with 1 instance and 128MB memory
* You can also use existing applications, containers, or jobs
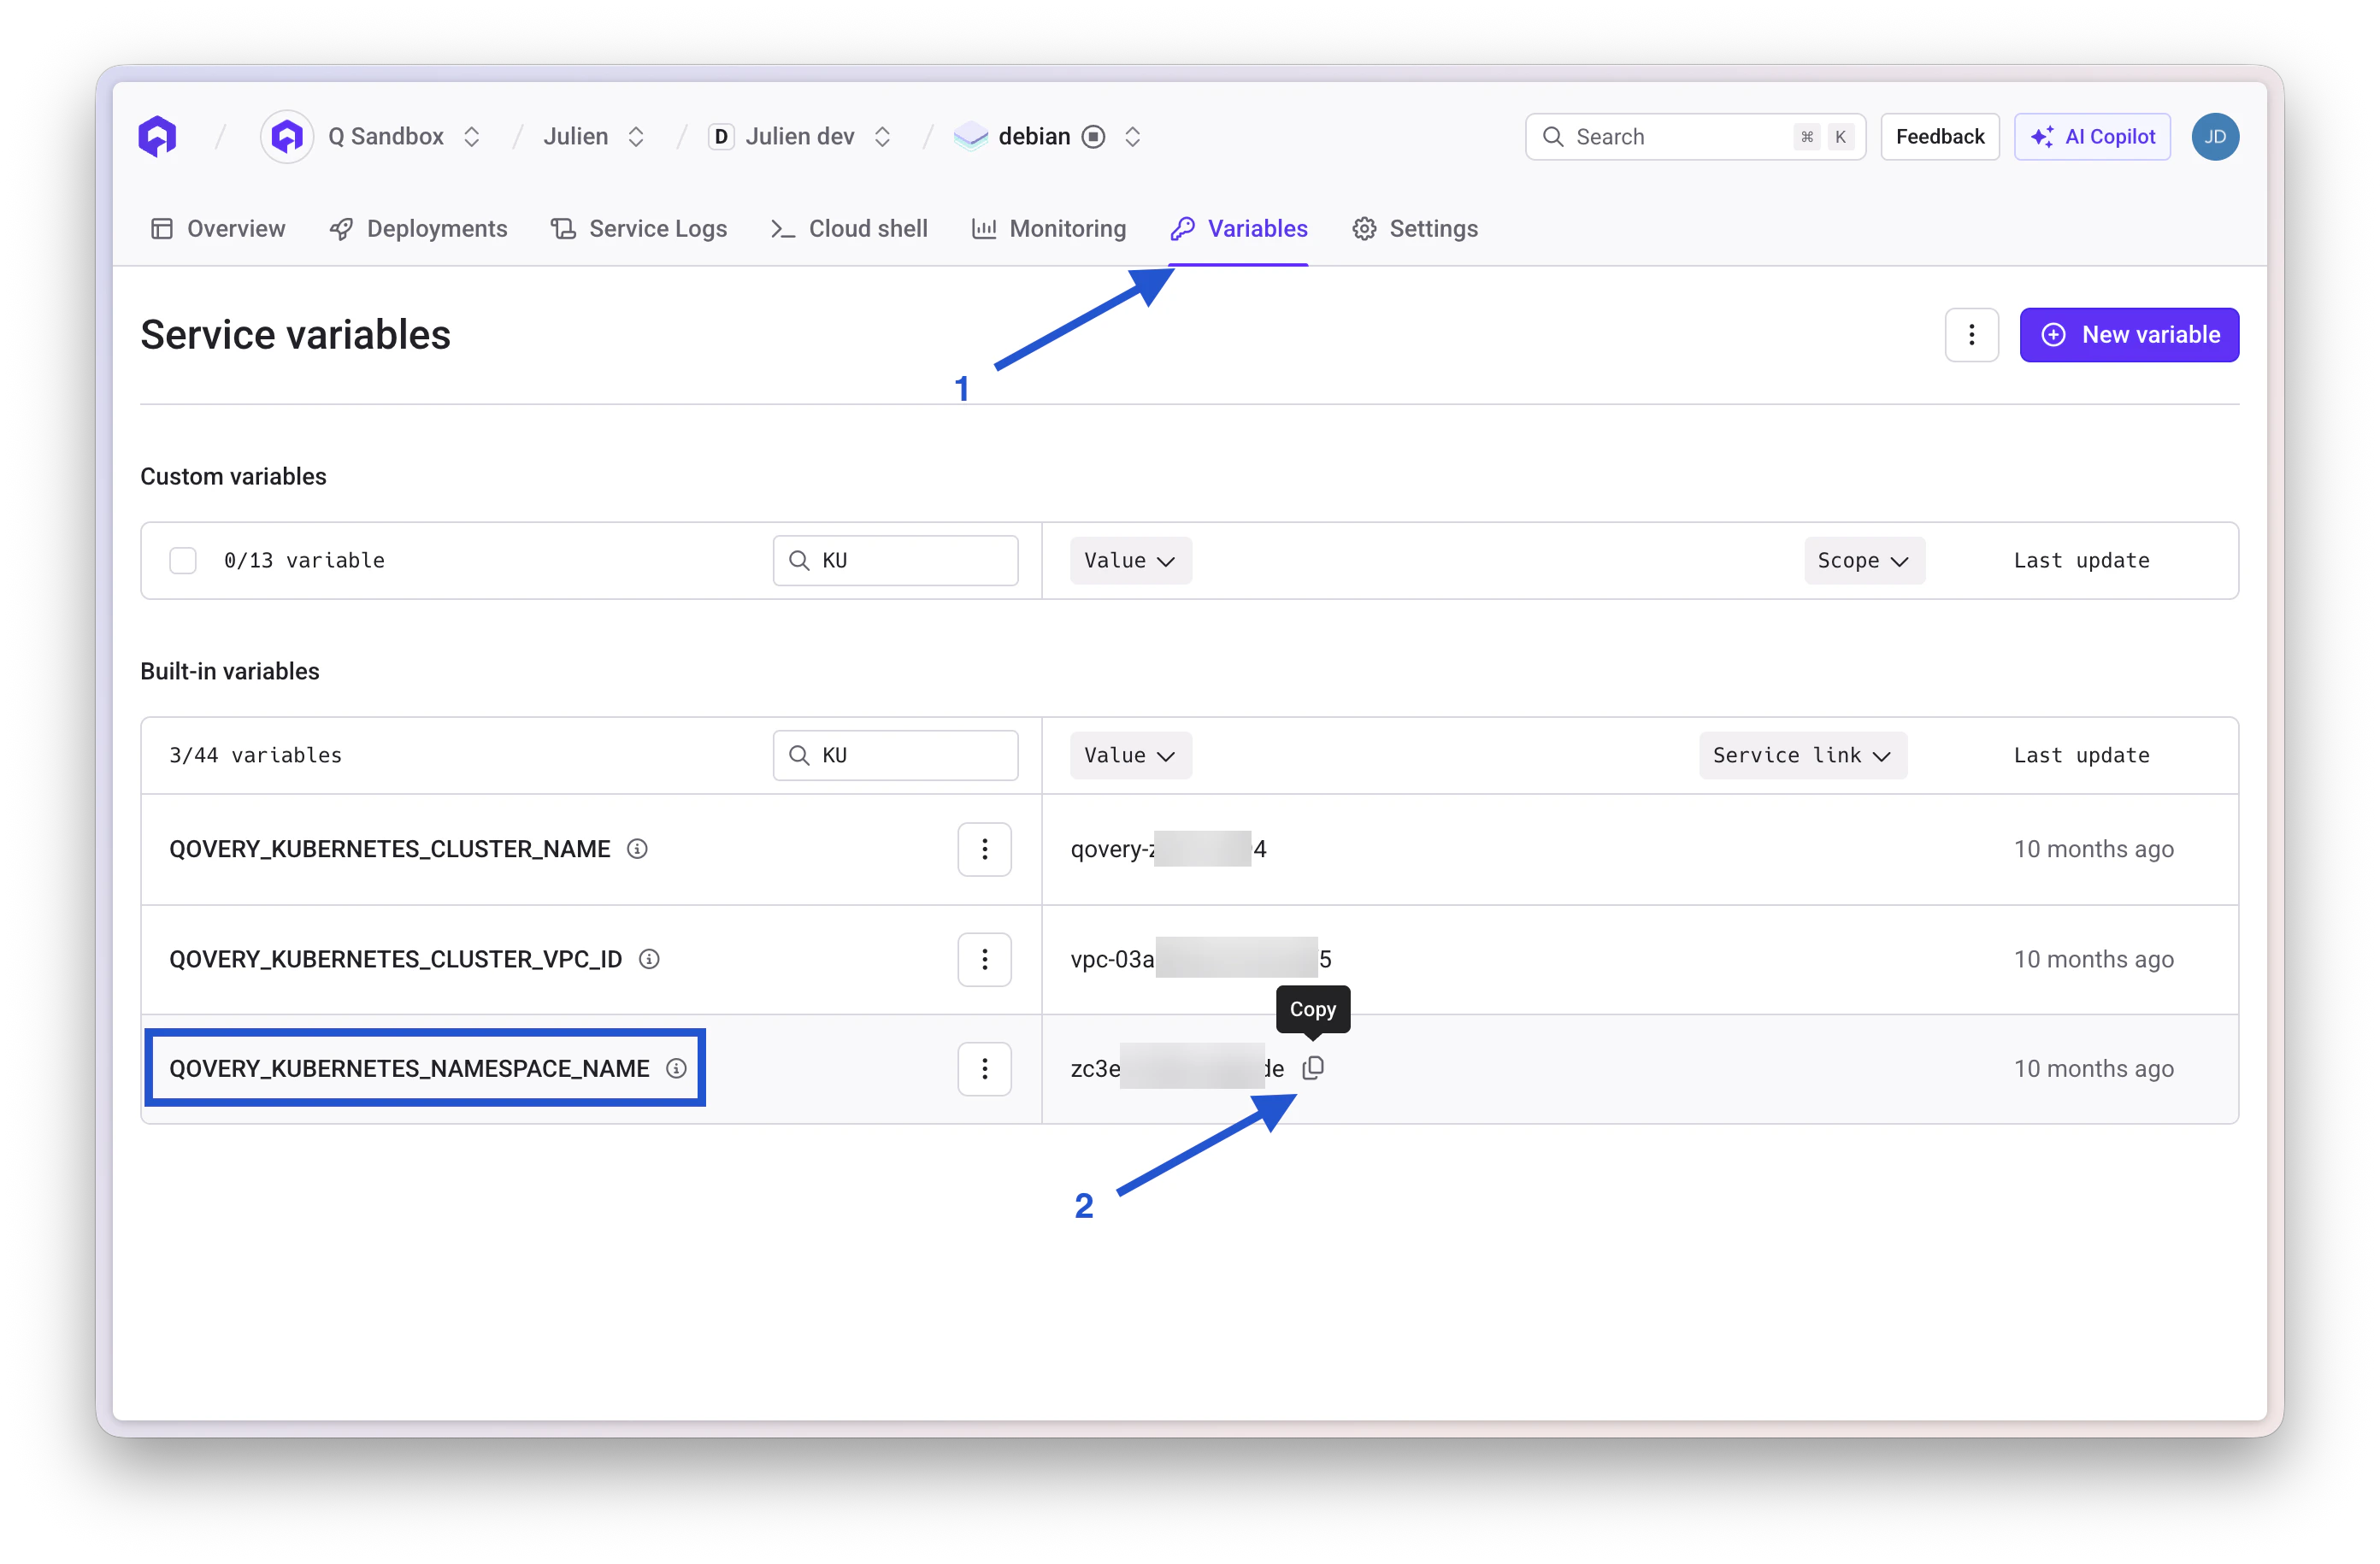
### Get Kubernetes Namespace Name
1. Access your container variables and locate `QOVERY_KUBERNETES_NAMESPACE_NAME`
2. This value represents the namespace where the container runs
 ***
## Step 2: Create the OIDC Provider and IAM Role
Add a **Terraform service** to the same environment:
* Source: Git repository `https://github.com/Qovery/create_service_account`
* Root path: `terraform/`
Set these variables on the service:
| Variable | Value |
| ------------------------------------------------------------ | -------------------------------------------------------------------------------------------------------------------------------------------------- |
| `TF_VAR_cluster_name` | Alias of the built-in `QOVERY_KUBERNETES_CLUSTER_NAME` |
| `TF_VAR_role_name` | Name for the IAM role, e.g. `my-s3-role` |
| `TF_VAR_service_account_name` | ServiceAccount name, e.g. `my-app-sa` |
| `TF_VAR_policy_arns` | e.g. `["arn:aws:iam::aws:policy/AmazonS3ReadOnlyAccess"]` |
| `TF_VAR_namespace` | Alias of `QOVERY_KUBERNETES_NAMESPACE_NAME` to scope the role to this environment, or empty for a cluster-scoped role (required for Preview/Clone) |
| `TF_VAR_create_oidc_provider` | `true` the first time, if the cluster's OIDC provider is not registered in IAM yet |
| `AWS_ACCESS_KEY_ID` / `AWS_SECRET_ACCESS_KEY` / `AWS_REGION` | Credentials allowed to manage IAM (mark the secret as such) |
Deploy the service. The module creates the trust policy for you (namespace-scoped `StringEquals`, or cluster-scoped `StringLike` on `system:serviceaccount:z*:` when `TF_VAR_namespace` is empty).
The module outputs `role_arn`. Qovery exposes it to the environment as a variable named `QOVERY_OUTPUT_TERRAFORM__ROLE_ARN`; check the exact name in your environment variables after the first deployment. You will reference it in step 3.
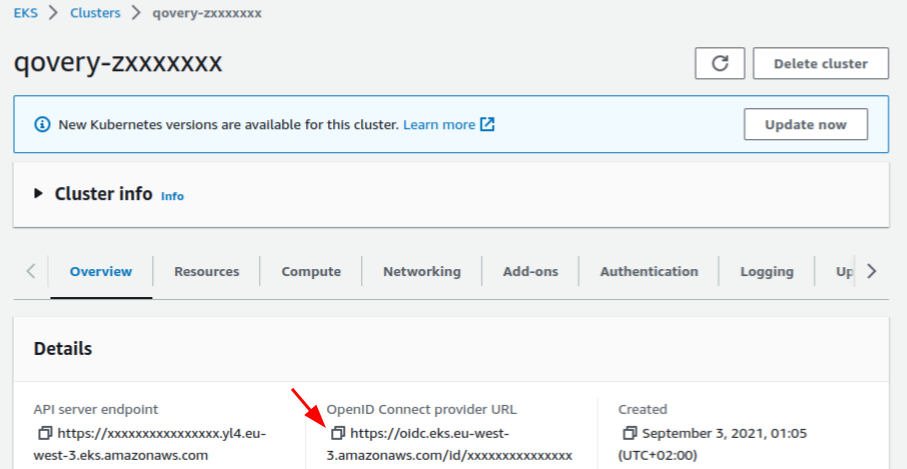
### Get Cluster OIDC Provider URL
1. Navigate to your AWS EKS cluster Overview section
2. Copy the OpenID Connect provider URL
***
## Step 2: Create the OIDC Provider and IAM Role
Add a **Terraform service** to the same environment:
* Source: Git repository `https://github.com/Qovery/create_service_account`
* Root path: `terraform/`
Set these variables on the service:
| Variable | Value |
| ------------------------------------------------------------ | -------------------------------------------------------------------------------------------------------------------------------------------------- |
| `TF_VAR_cluster_name` | Alias of the built-in `QOVERY_KUBERNETES_CLUSTER_NAME` |
| `TF_VAR_role_name` | Name for the IAM role, e.g. `my-s3-role` |
| `TF_VAR_service_account_name` | ServiceAccount name, e.g. `my-app-sa` |
| `TF_VAR_policy_arns` | e.g. `["arn:aws:iam::aws:policy/AmazonS3ReadOnlyAccess"]` |
| `TF_VAR_namespace` | Alias of `QOVERY_KUBERNETES_NAMESPACE_NAME` to scope the role to this environment, or empty for a cluster-scoped role (required for Preview/Clone) |
| `TF_VAR_create_oidc_provider` | `true` the first time, if the cluster's OIDC provider is not registered in IAM yet |
| `AWS_ACCESS_KEY_ID` / `AWS_SECRET_ACCESS_KEY` / `AWS_REGION` | Credentials allowed to manage IAM (mark the secret as such) |
Deploy the service. The module creates the trust policy for you (namespace-scoped `StringEquals`, or cluster-scoped `StringLike` on `system:serviceaccount:z*:` when `TF_VAR_namespace` is empty).
The module outputs `role_arn`. Qovery exposes it to the environment as a variable named `QOVERY_OUTPUT_TERRAFORM__ROLE_ARN`; check the exact name in your environment variables after the first deployment. You will reference it in step 3.
### Get Cluster OIDC Provider URL
1. Navigate to your AWS EKS cluster Overview section
2. Copy the OpenID Connect provider URL
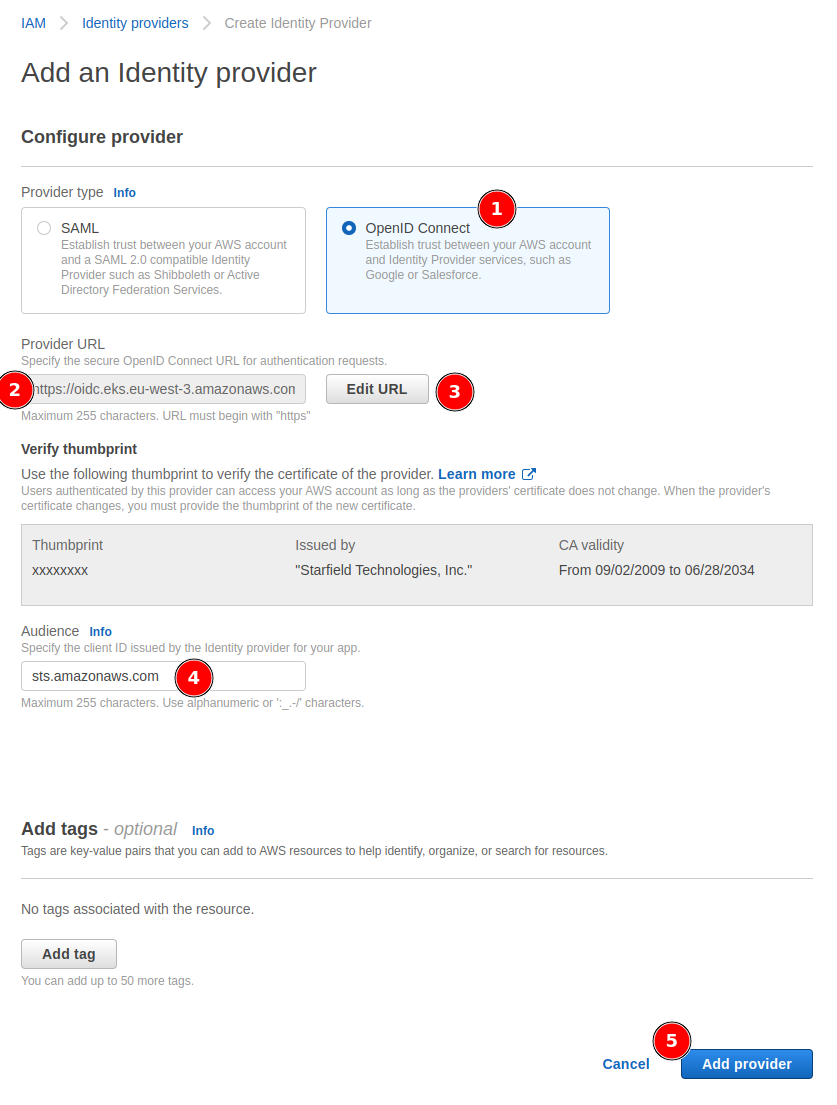
 ### Create Identity Provider
1. In AWS IAM, access the **Identity providers** section
2. Select **OpenID Connect** provider type
3. Paste the provider URL
4. Click **Get thumbprint**
5. Add `sts.amazonaws.com` as **Audience**
6. Create the provider
### Create Identity Provider
1. In AWS IAM, access the **Identity providers** section
2. Select **OpenID Connect** provider type
3. Paste the provider URL
4. Click **Get thumbprint**
5. Add `sts.amazonaws.com` as **Audience**
6. Create the provider
 ### Create a Role
1. In IAM Roles section, select **Create role**
2. Choose **Web identity** as Trusted entity type
3. Set **Identity provider** and **Audience** to `sts.amazonaws.com`
### Create a Role
1. In IAM Roles section, select **Create role**
2. Choose **Web identity** as Trusted entity type
3. Set **Identity provider** and **Audience** to `sts.amazonaws.com`
 ### Add Role Permissions
1. Select the desired policy (example uses `AmazonS3ReadOnlyAccess`)
2. Set role name and description
3. Proceed to creation
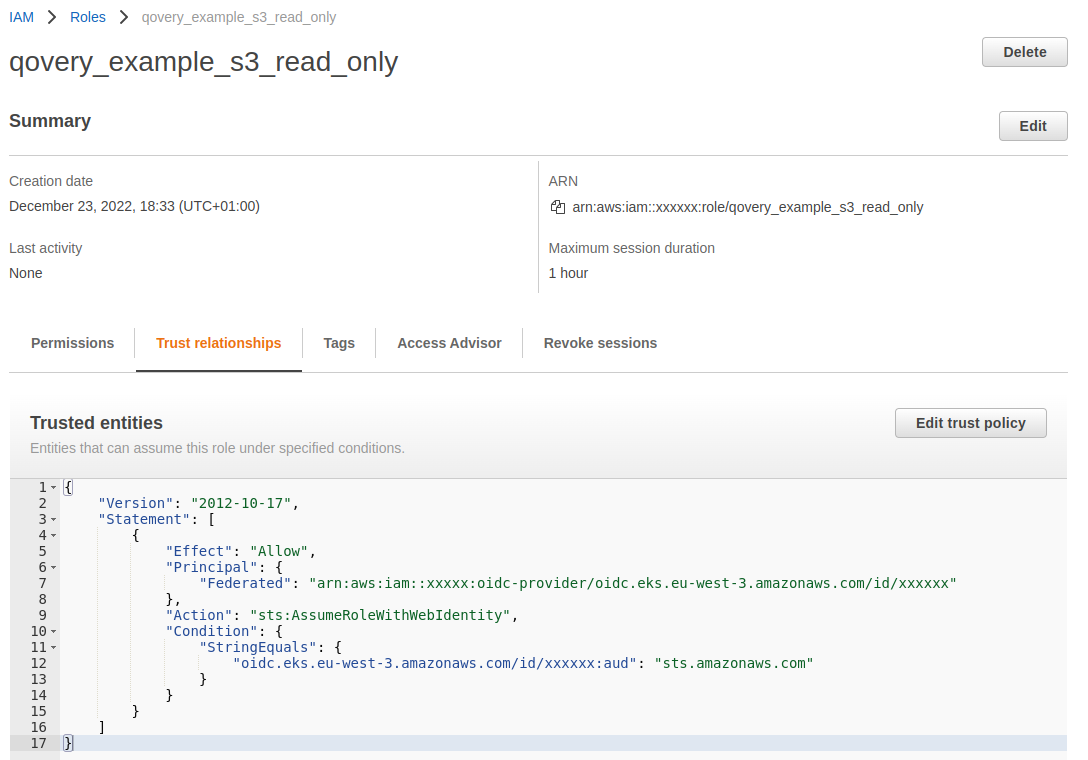
### Configure Trusted Entities
For a role scoped to one environment, update the trust policy from:
```json theme={null}
"oidc.eks.eu-west-3.amazonaws.com/id/xxxxxxx:aud": "sts.amazonaws.com"
```
To:
```json theme={null}
"oidc.eks.eu-west-3.amazonaws.com/id/xxxxxxx:sub":
"system:serviceaccount:kubernetes_namespace:service_account_name"
```
Replace placeholders:
* `kubernetes_namespace`: Your Qovery environment namespace
* `service_account_name`: Define a service account name (e.g., `my-app-sa`)
For a cluster-scoped role (required by On-demand/Clone features), use `StringLike` with a wildcard:
```json theme={null}
"Condition": {
"StringLike": {
"oidc.eks.eu-west-3.amazonaws.com/id/xxxxxxx:sub":
"system:serviceaccount:z*:service_account_name"
}
}
```
This allows the service account to be used across all namespaces starting with `z`.
### Add Role Permissions
1. Select the desired policy (example uses `AmazonS3ReadOnlyAccess`)
2. Set role name and description
3. Proceed to creation
### Configure Trusted Entities
For a role scoped to one environment, update the trust policy from:
```json theme={null}
"oidc.eks.eu-west-3.amazonaws.com/id/xxxxxxx:aud": "sts.amazonaws.com"
```
To:
```json theme={null}
"oidc.eks.eu-west-3.amazonaws.com/id/xxxxxxx:sub":
"system:serviceaccount:kubernetes_namespace:service_account_name"
```
Replace placeholders:
* `kubernetes_namespace`: Your Qovery environment namespace
* `service_account_name`: Define a service account name (e.g., `my-app-sa`)
For a cluster-scoped role (required by On-demand/Clone features), use `StringLike` with a wildcard:
```json theme={null}
"Condition": {
"StringLike": {
"oidc.eks.eu-west-3.amazonaws.com/id/xxxxxxx:sub":
"system:serviceaccount:z*:service_account_name"
}
}
```
This allows the service account to be used across all namespaces starting with `z`.
 Save the **role ARN** for step 3.
***
## Step 3: Create the Service Account
A Helm chart creates the ServiceAccount annotated for IRSA:
```yaml theme={null}
apiVersion: v1
kind: ServiceAccount
metadata:
name:
annotations:
eks.amazonaws.com/role-arn:
```
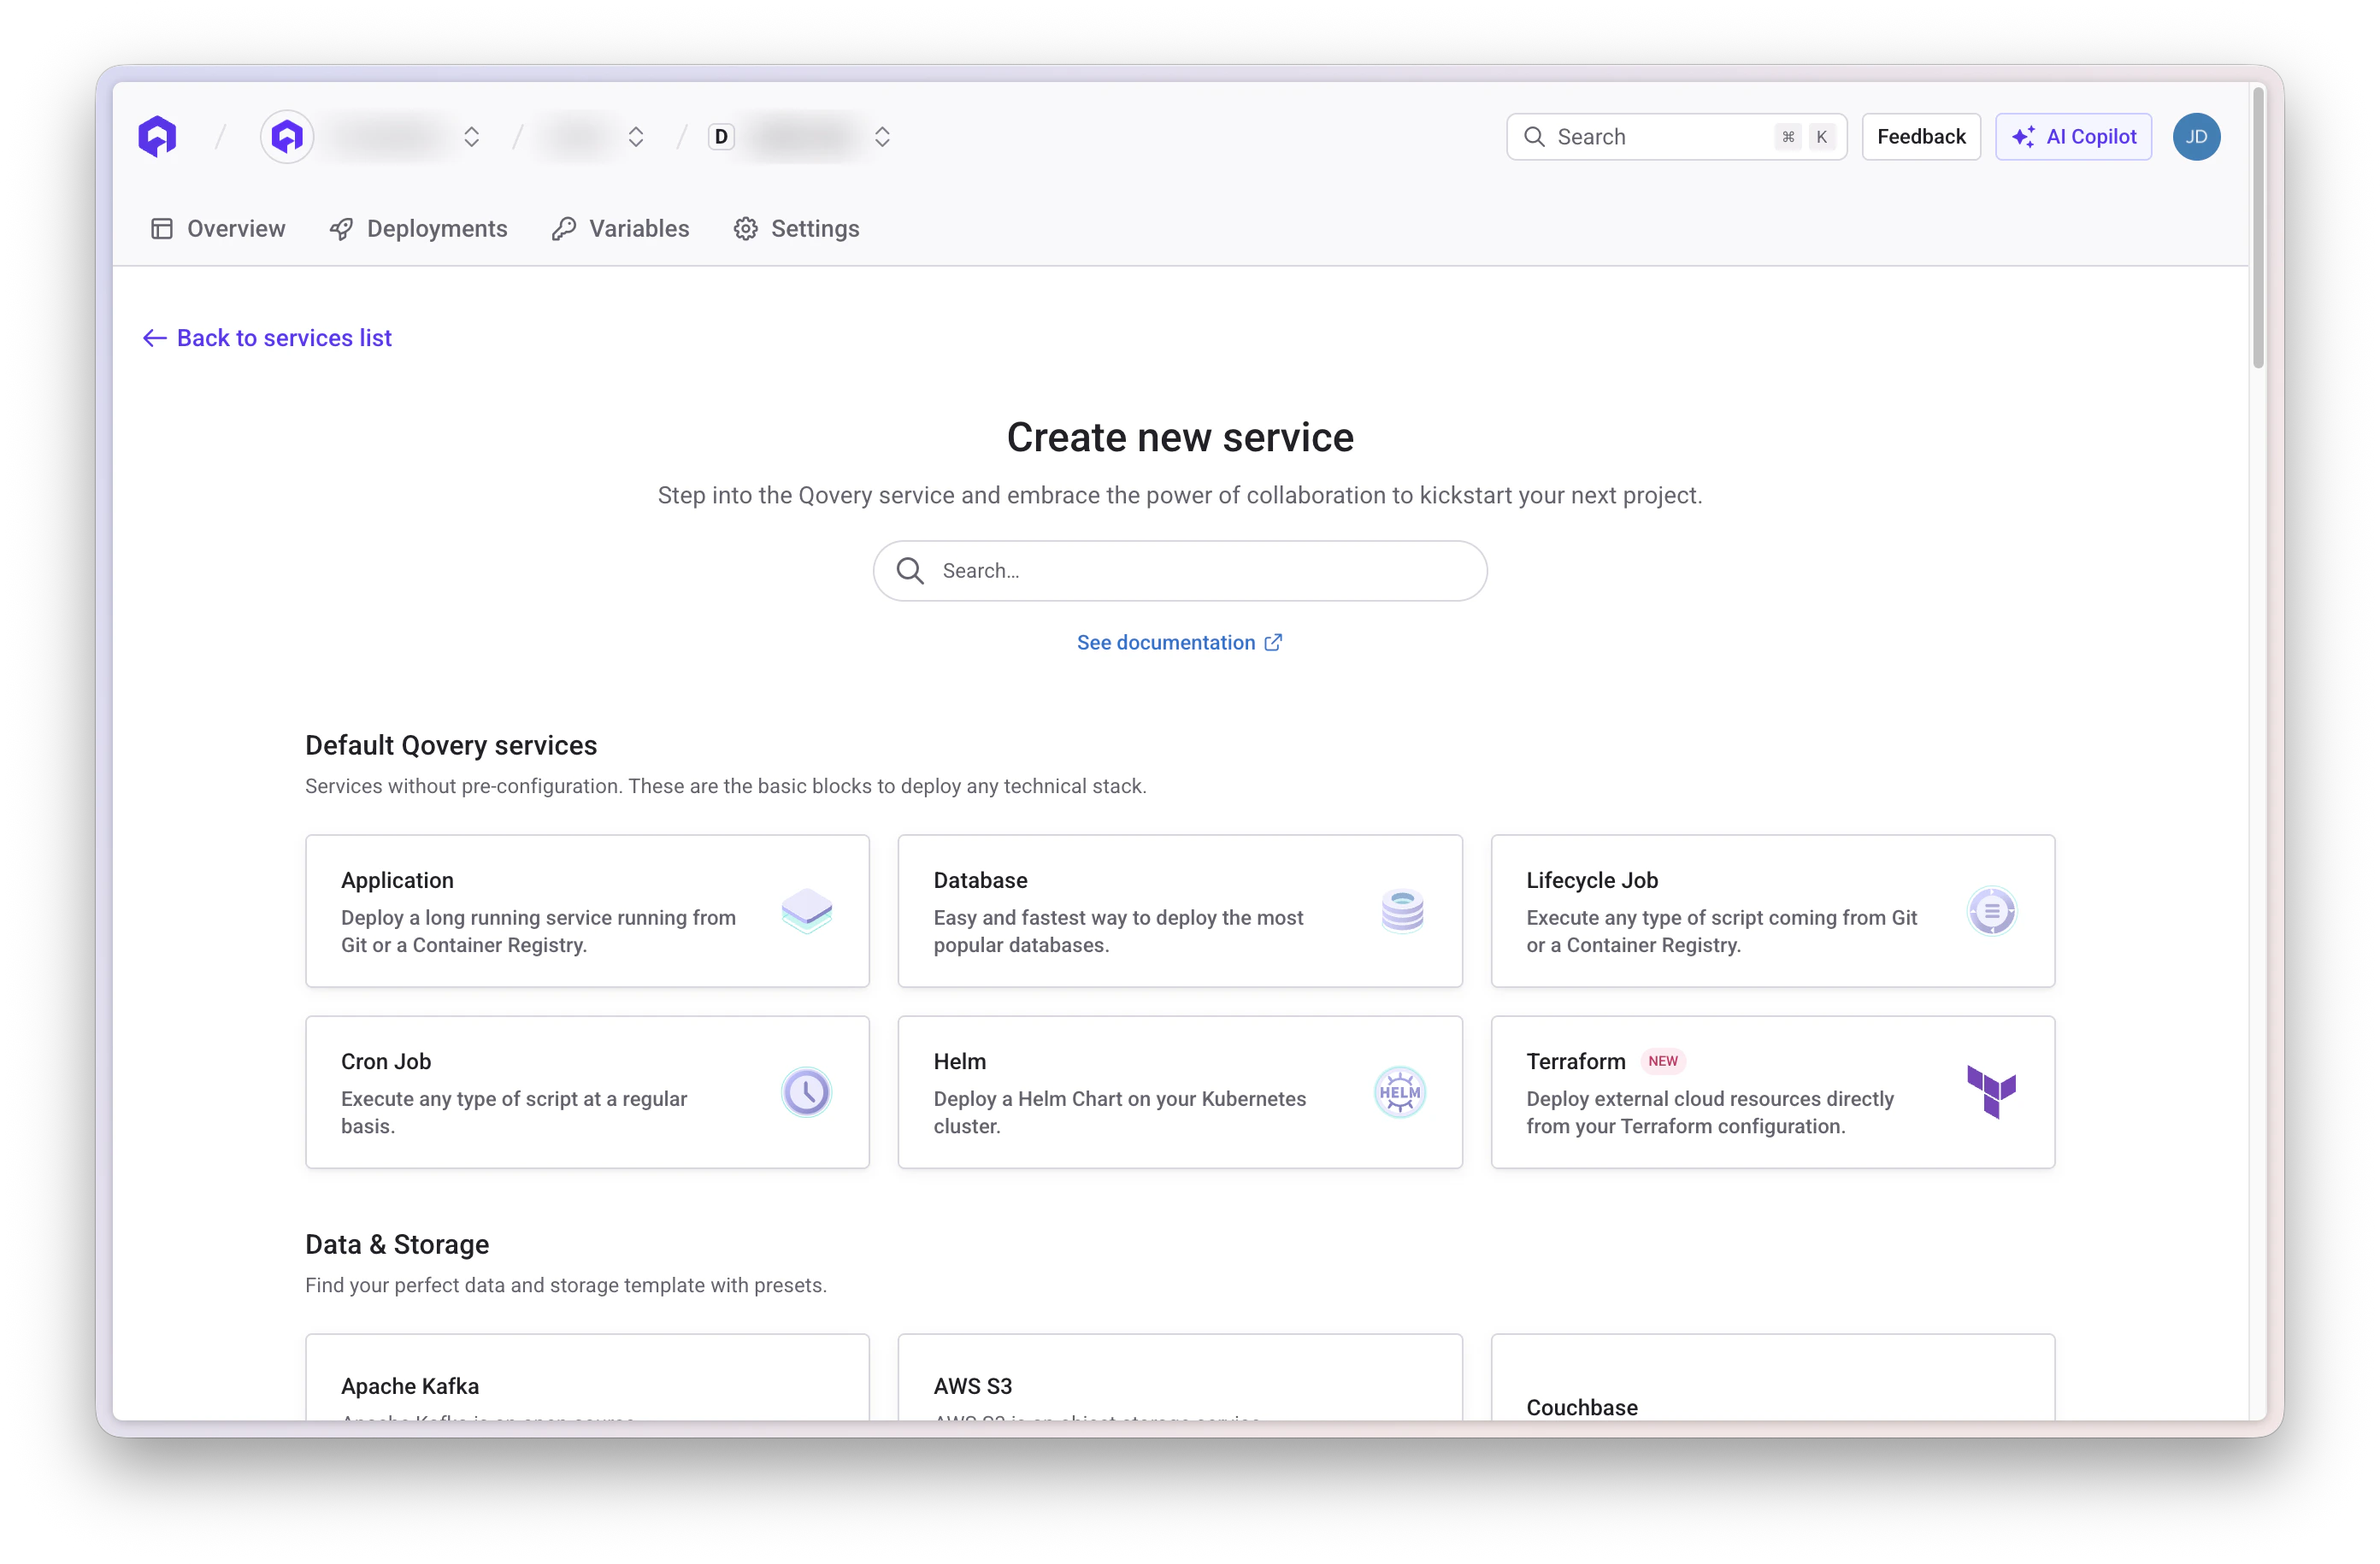
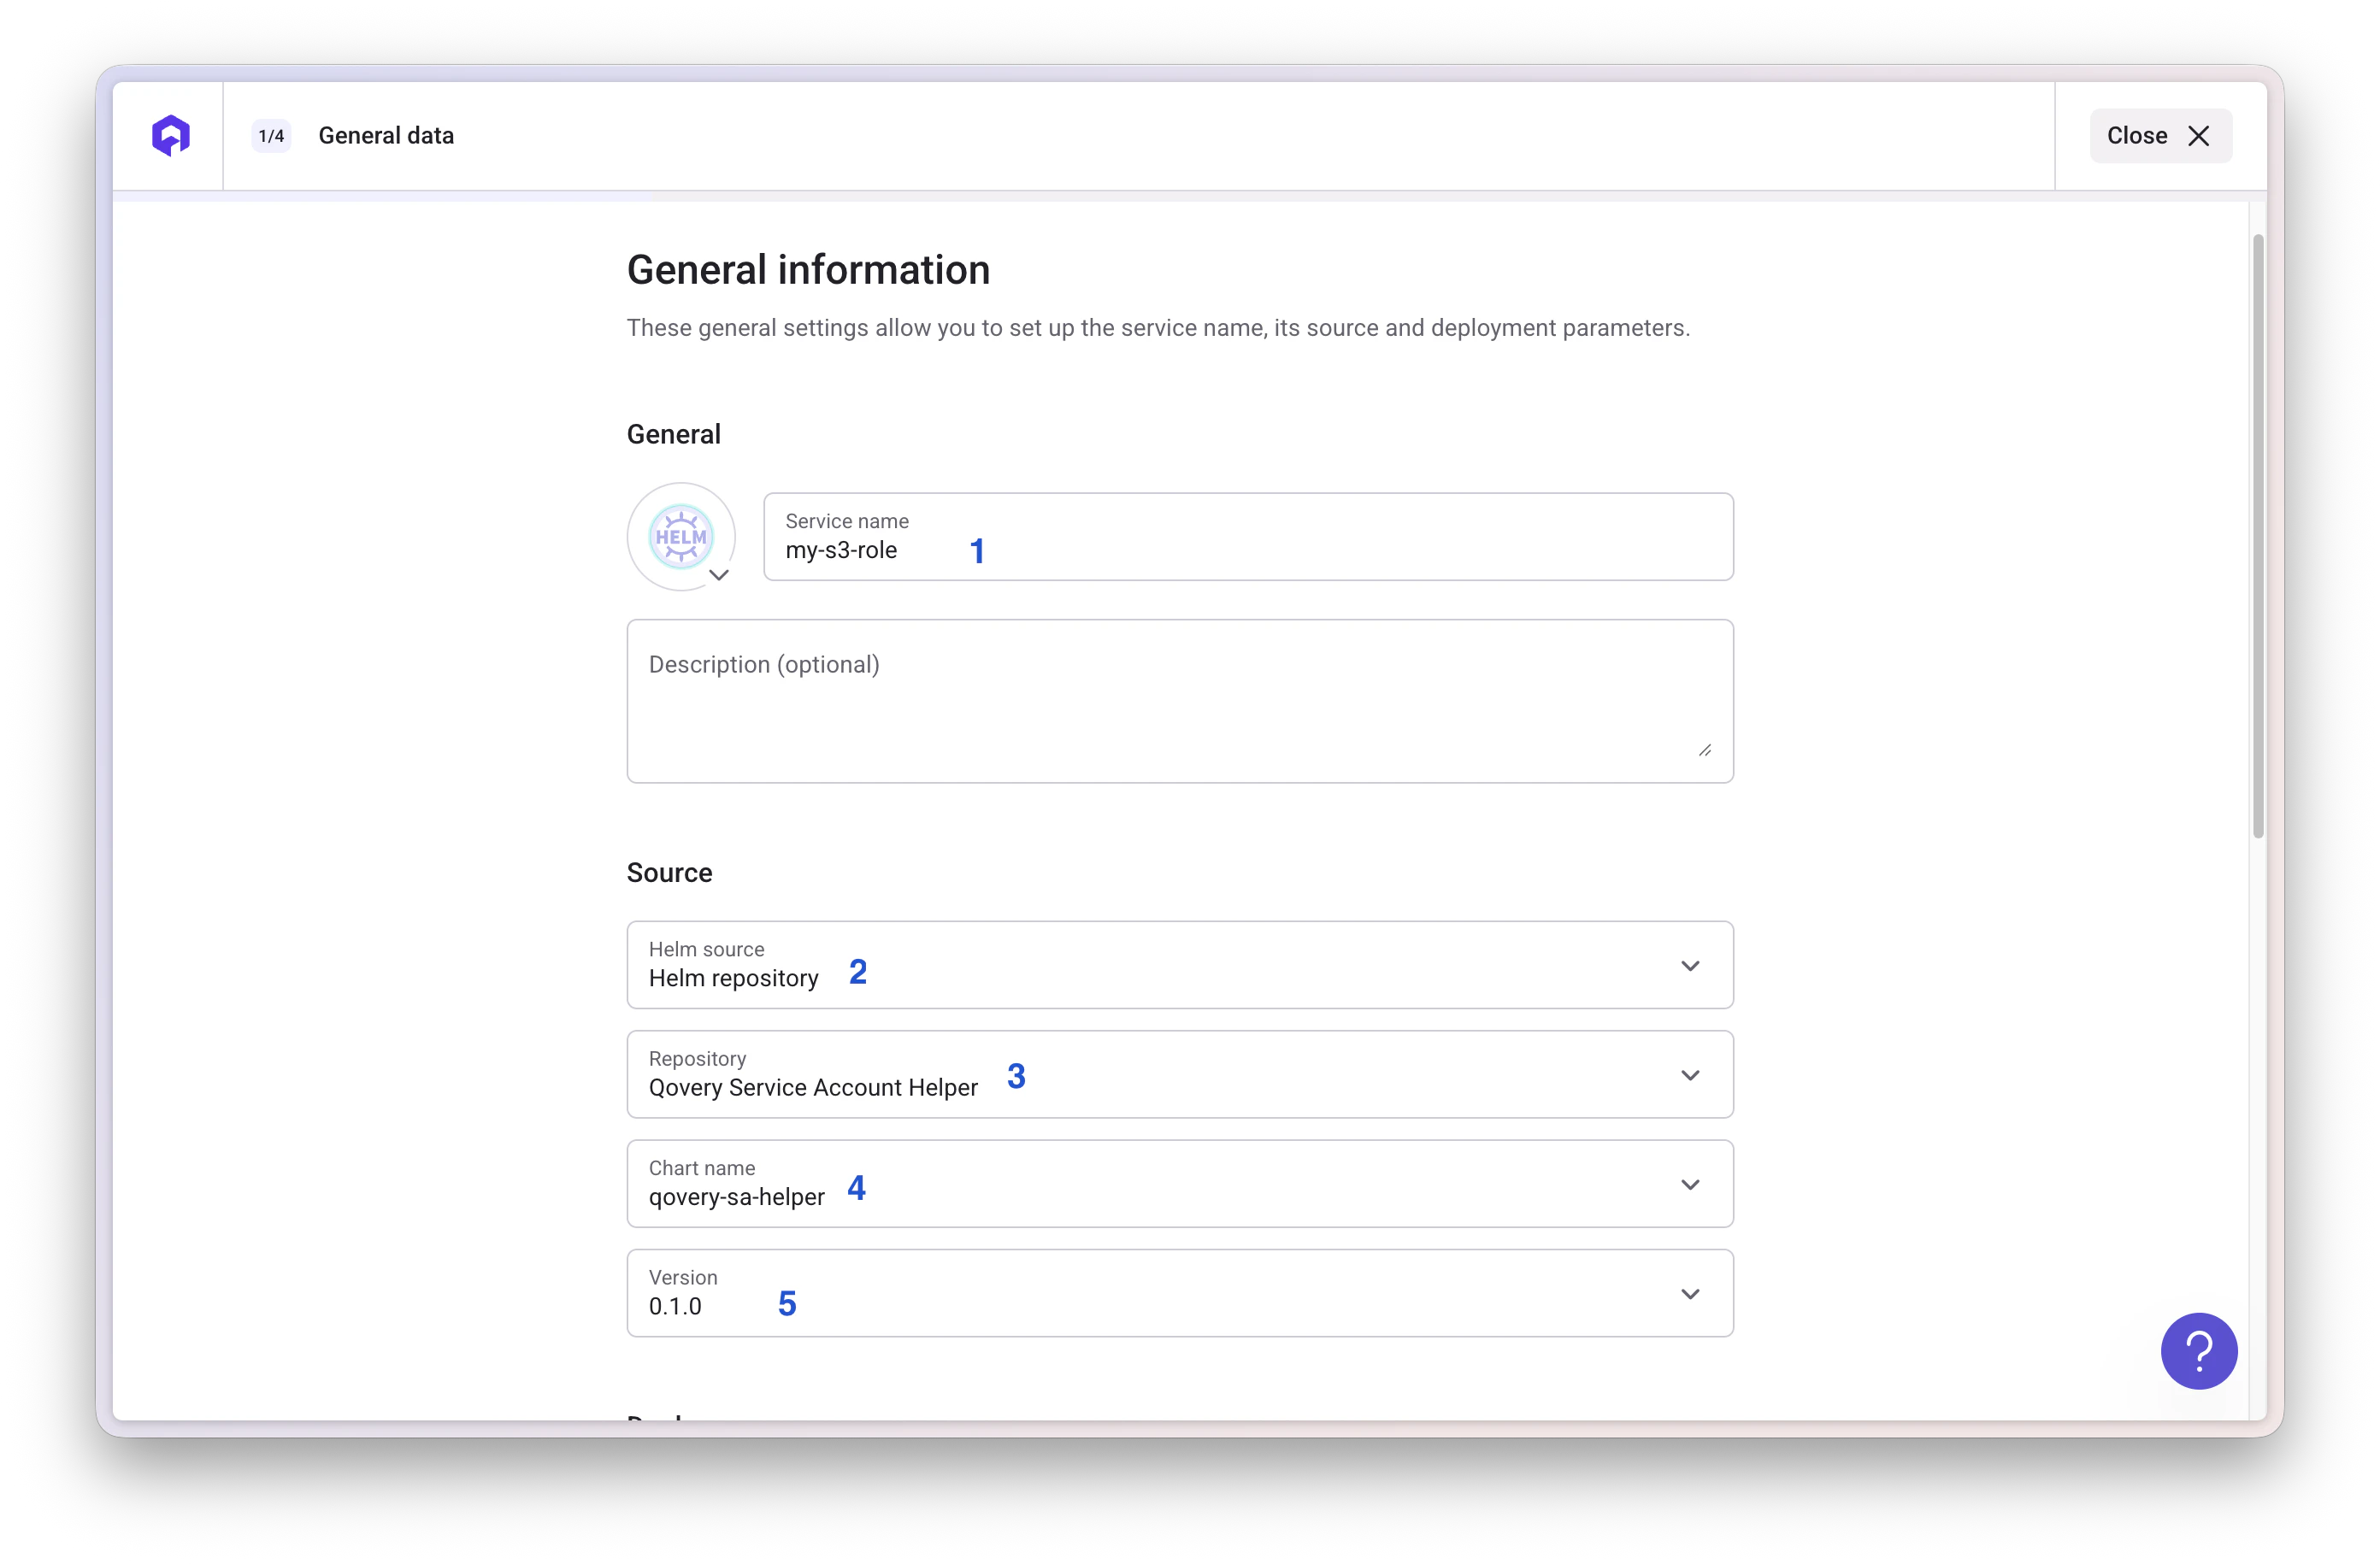
Add a **Helm service** to the same environment:
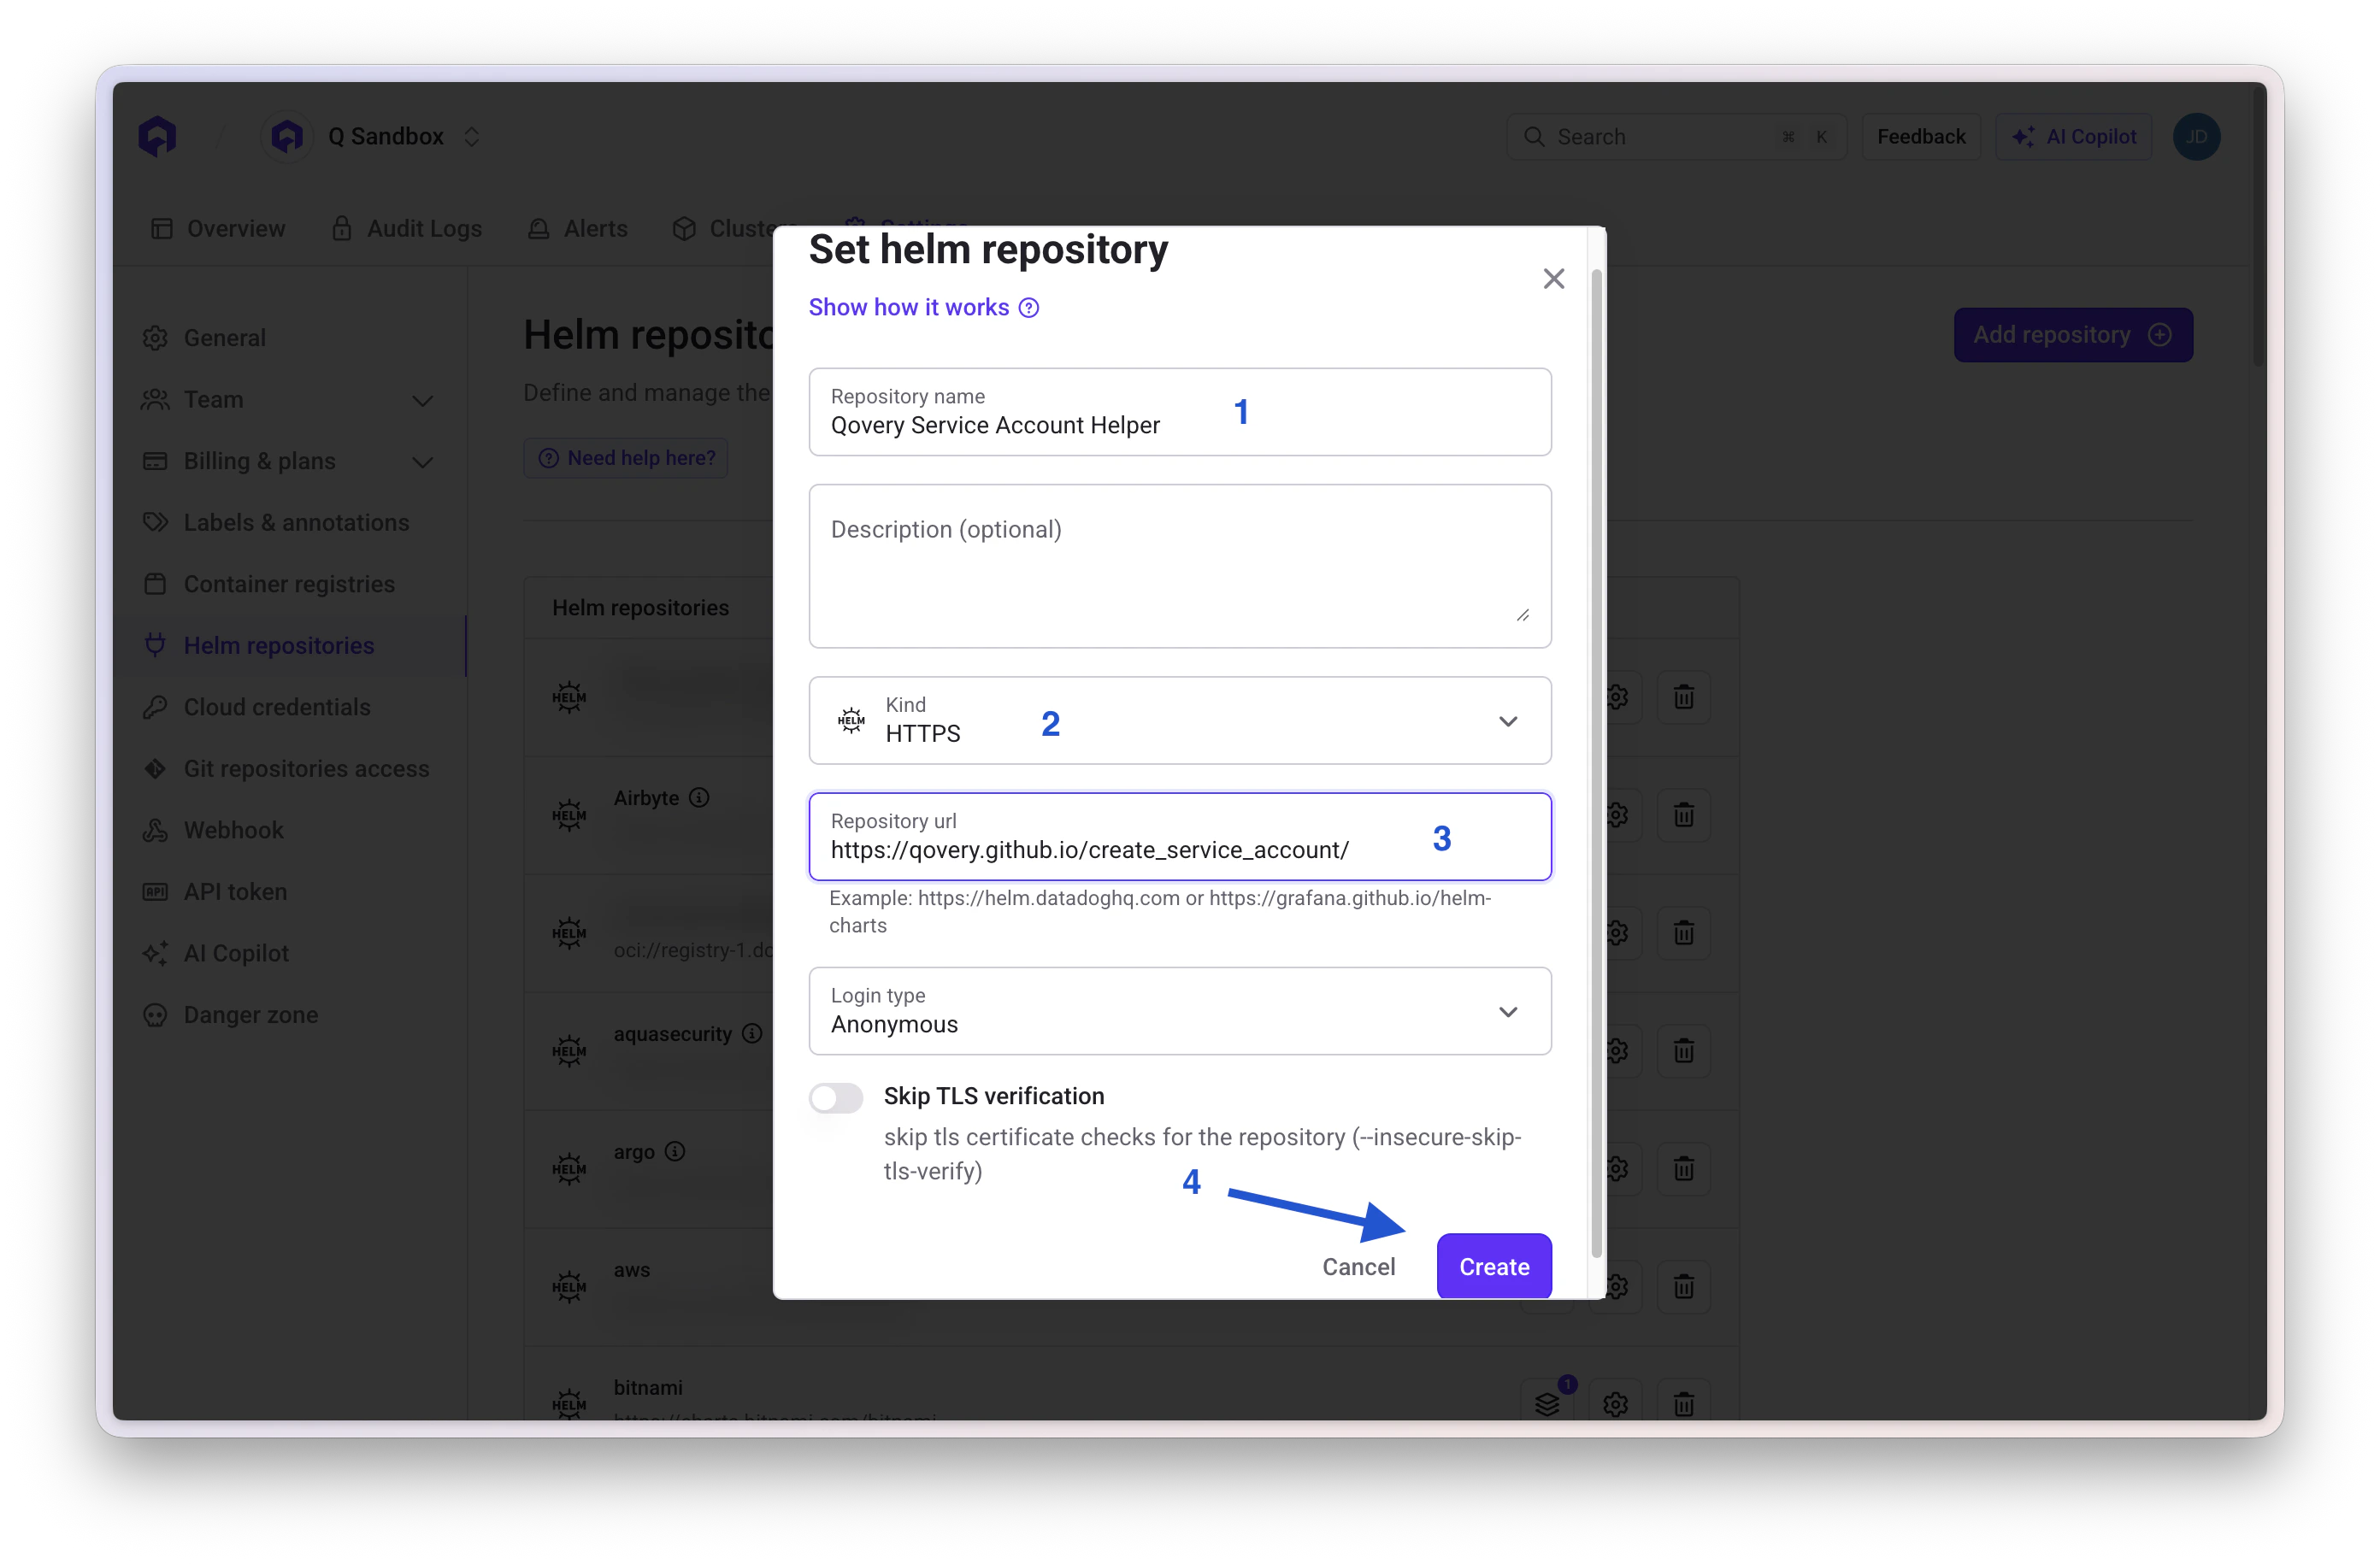
**Repository Details:**
1. Repository name: `Qovery Service Account Helper`
2. Kind: `HTTPS`
3. URL: `https://qovery.github.io/create_service_account/`
**Chart Configuration:**
* Helm source: Helm repository
* Chart name: `qovery-sa-helper`
* Version: `0.2.0`
Save the **role ARN** for step 3.
***
## Step 3: Create the Service Account
A Helm chart creates the ServiceAccount annotated for IRSA:
```yaml theme={null}
apiVersion: v1
kind: ServiceAccount
metadata:
name:
annotations:
eks.amazonaws.com/role-arn:
```
Add a **Helm service** to the same environment:
**Repository Details:**
1. Repository name: `Qovery Service Account Helper`
2. Kind: `HTTPS`
3. URL: `https://qovery.github.io/create_service_account/`
**Chart Configuration:**
* Helm source: Helm repository
* Chart name: `qovery-sa-helper`
* Version: `0.2.0`
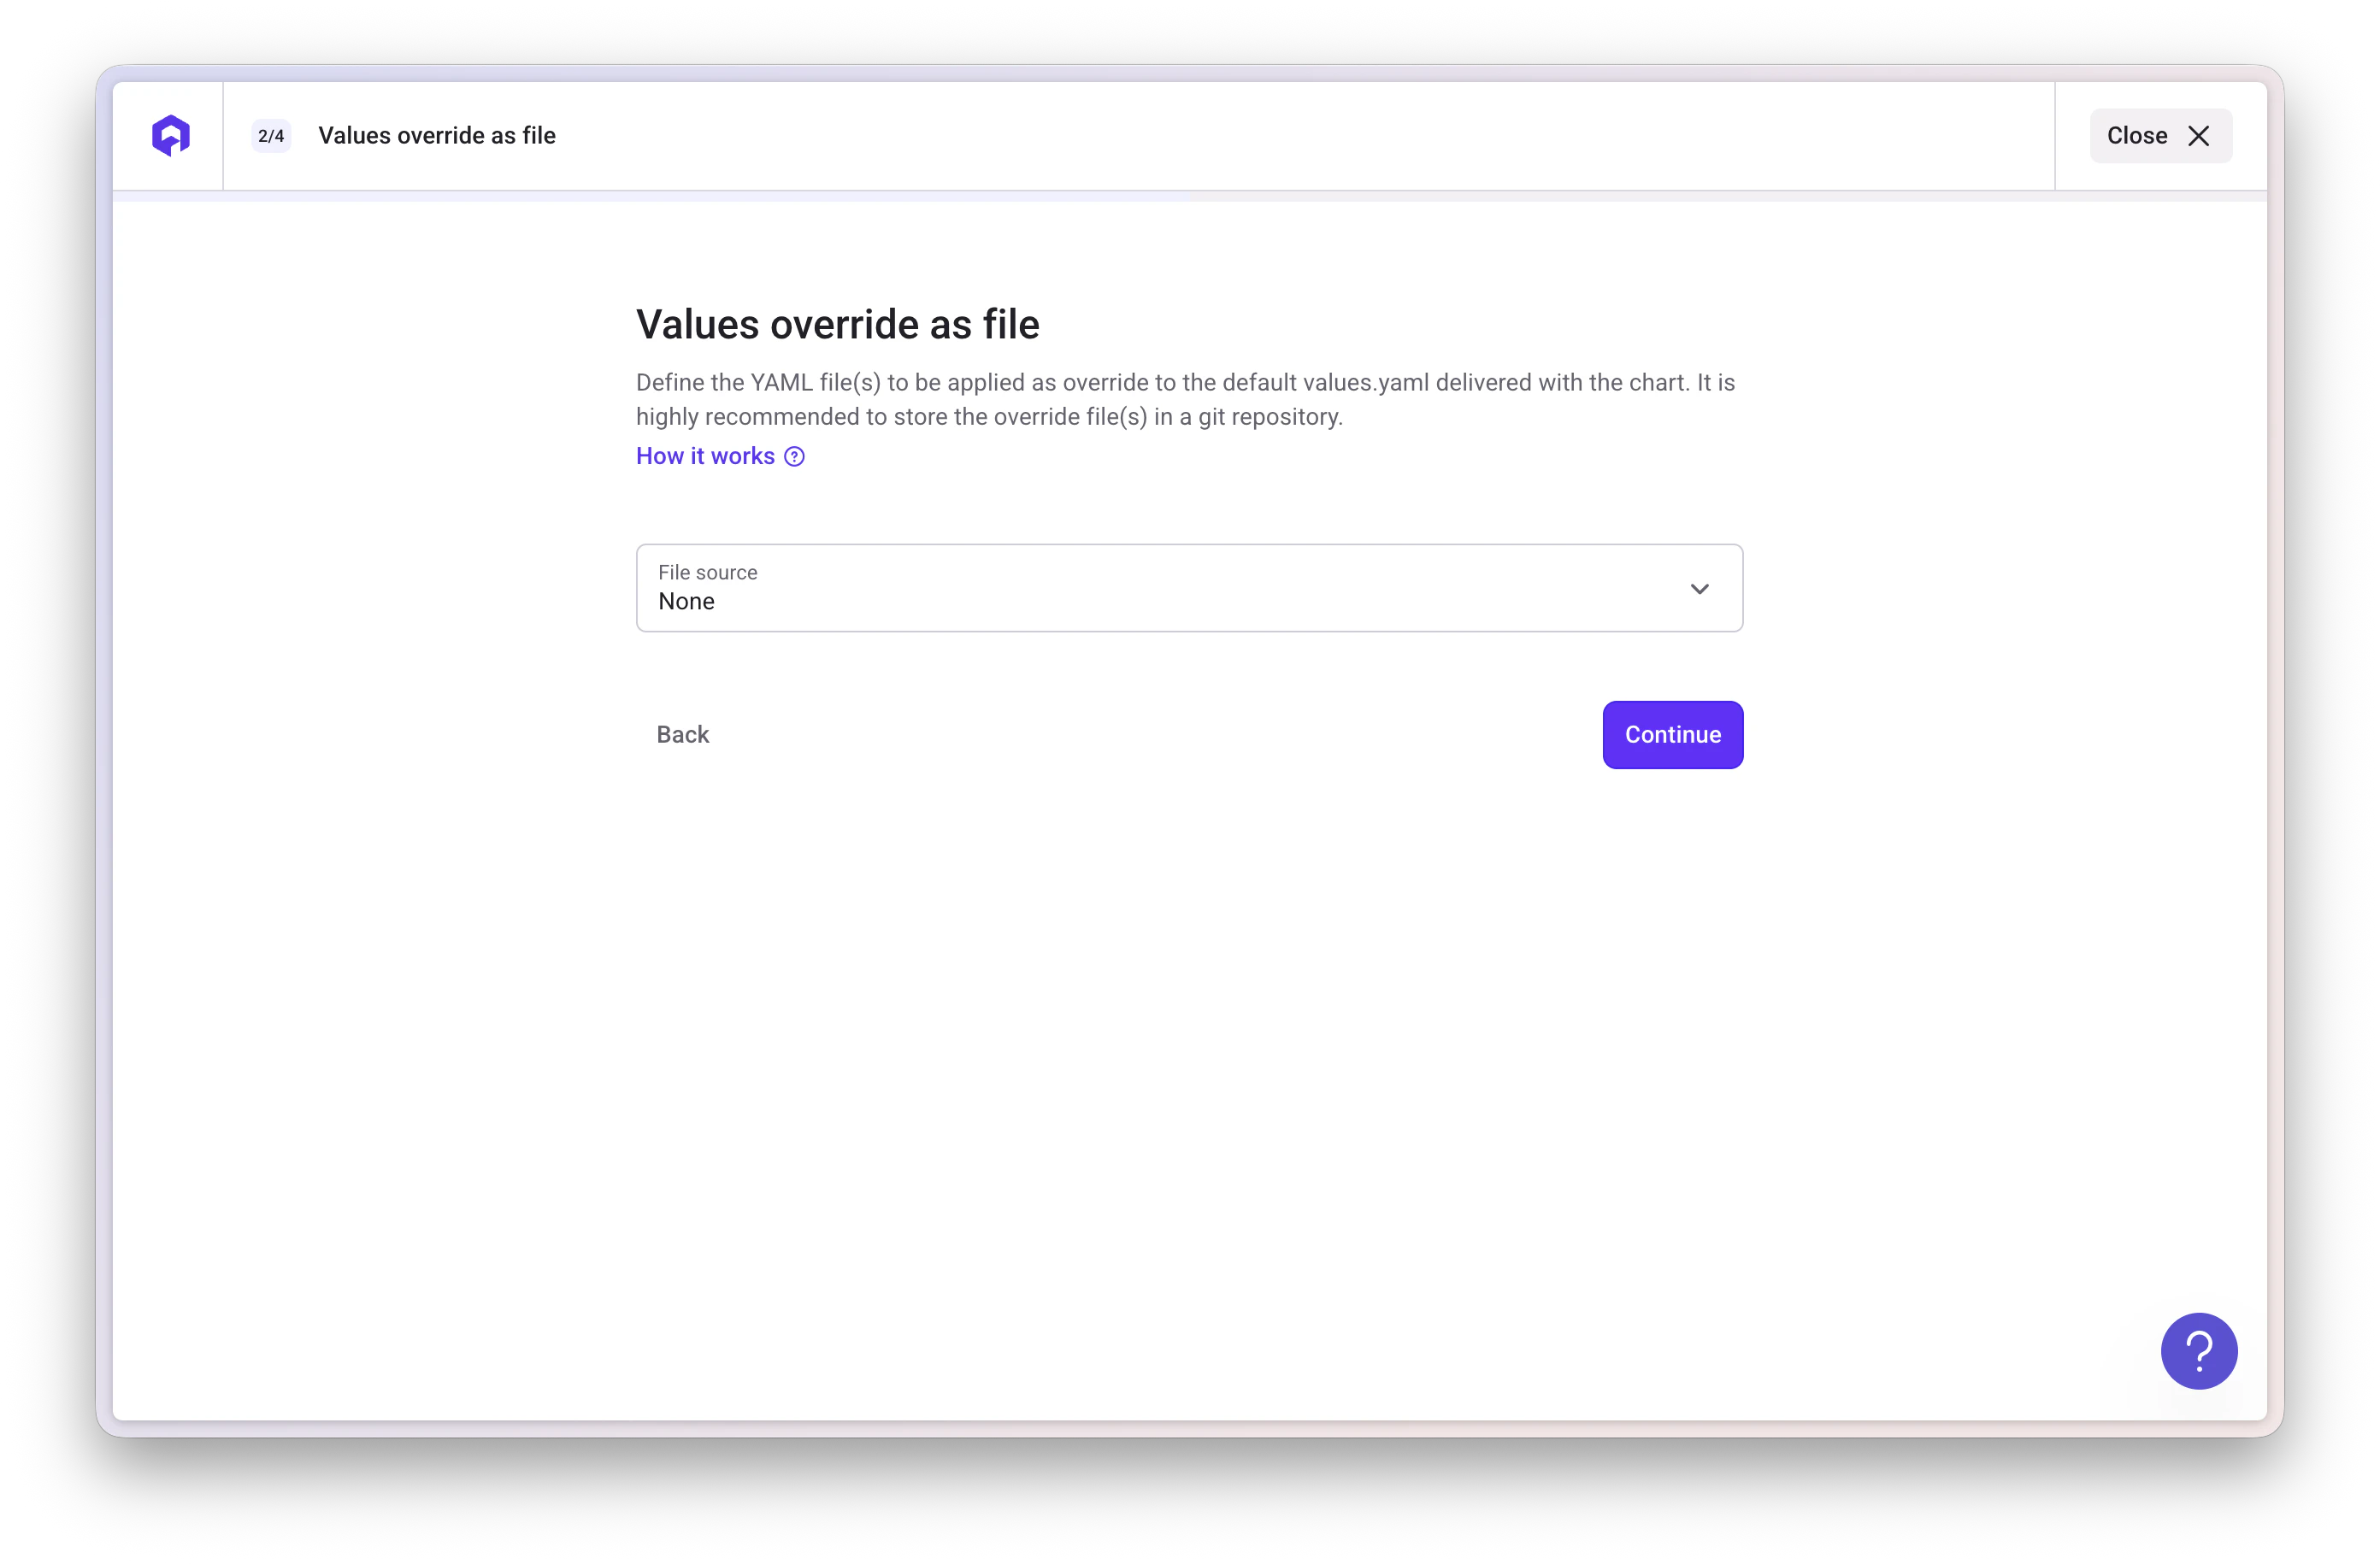
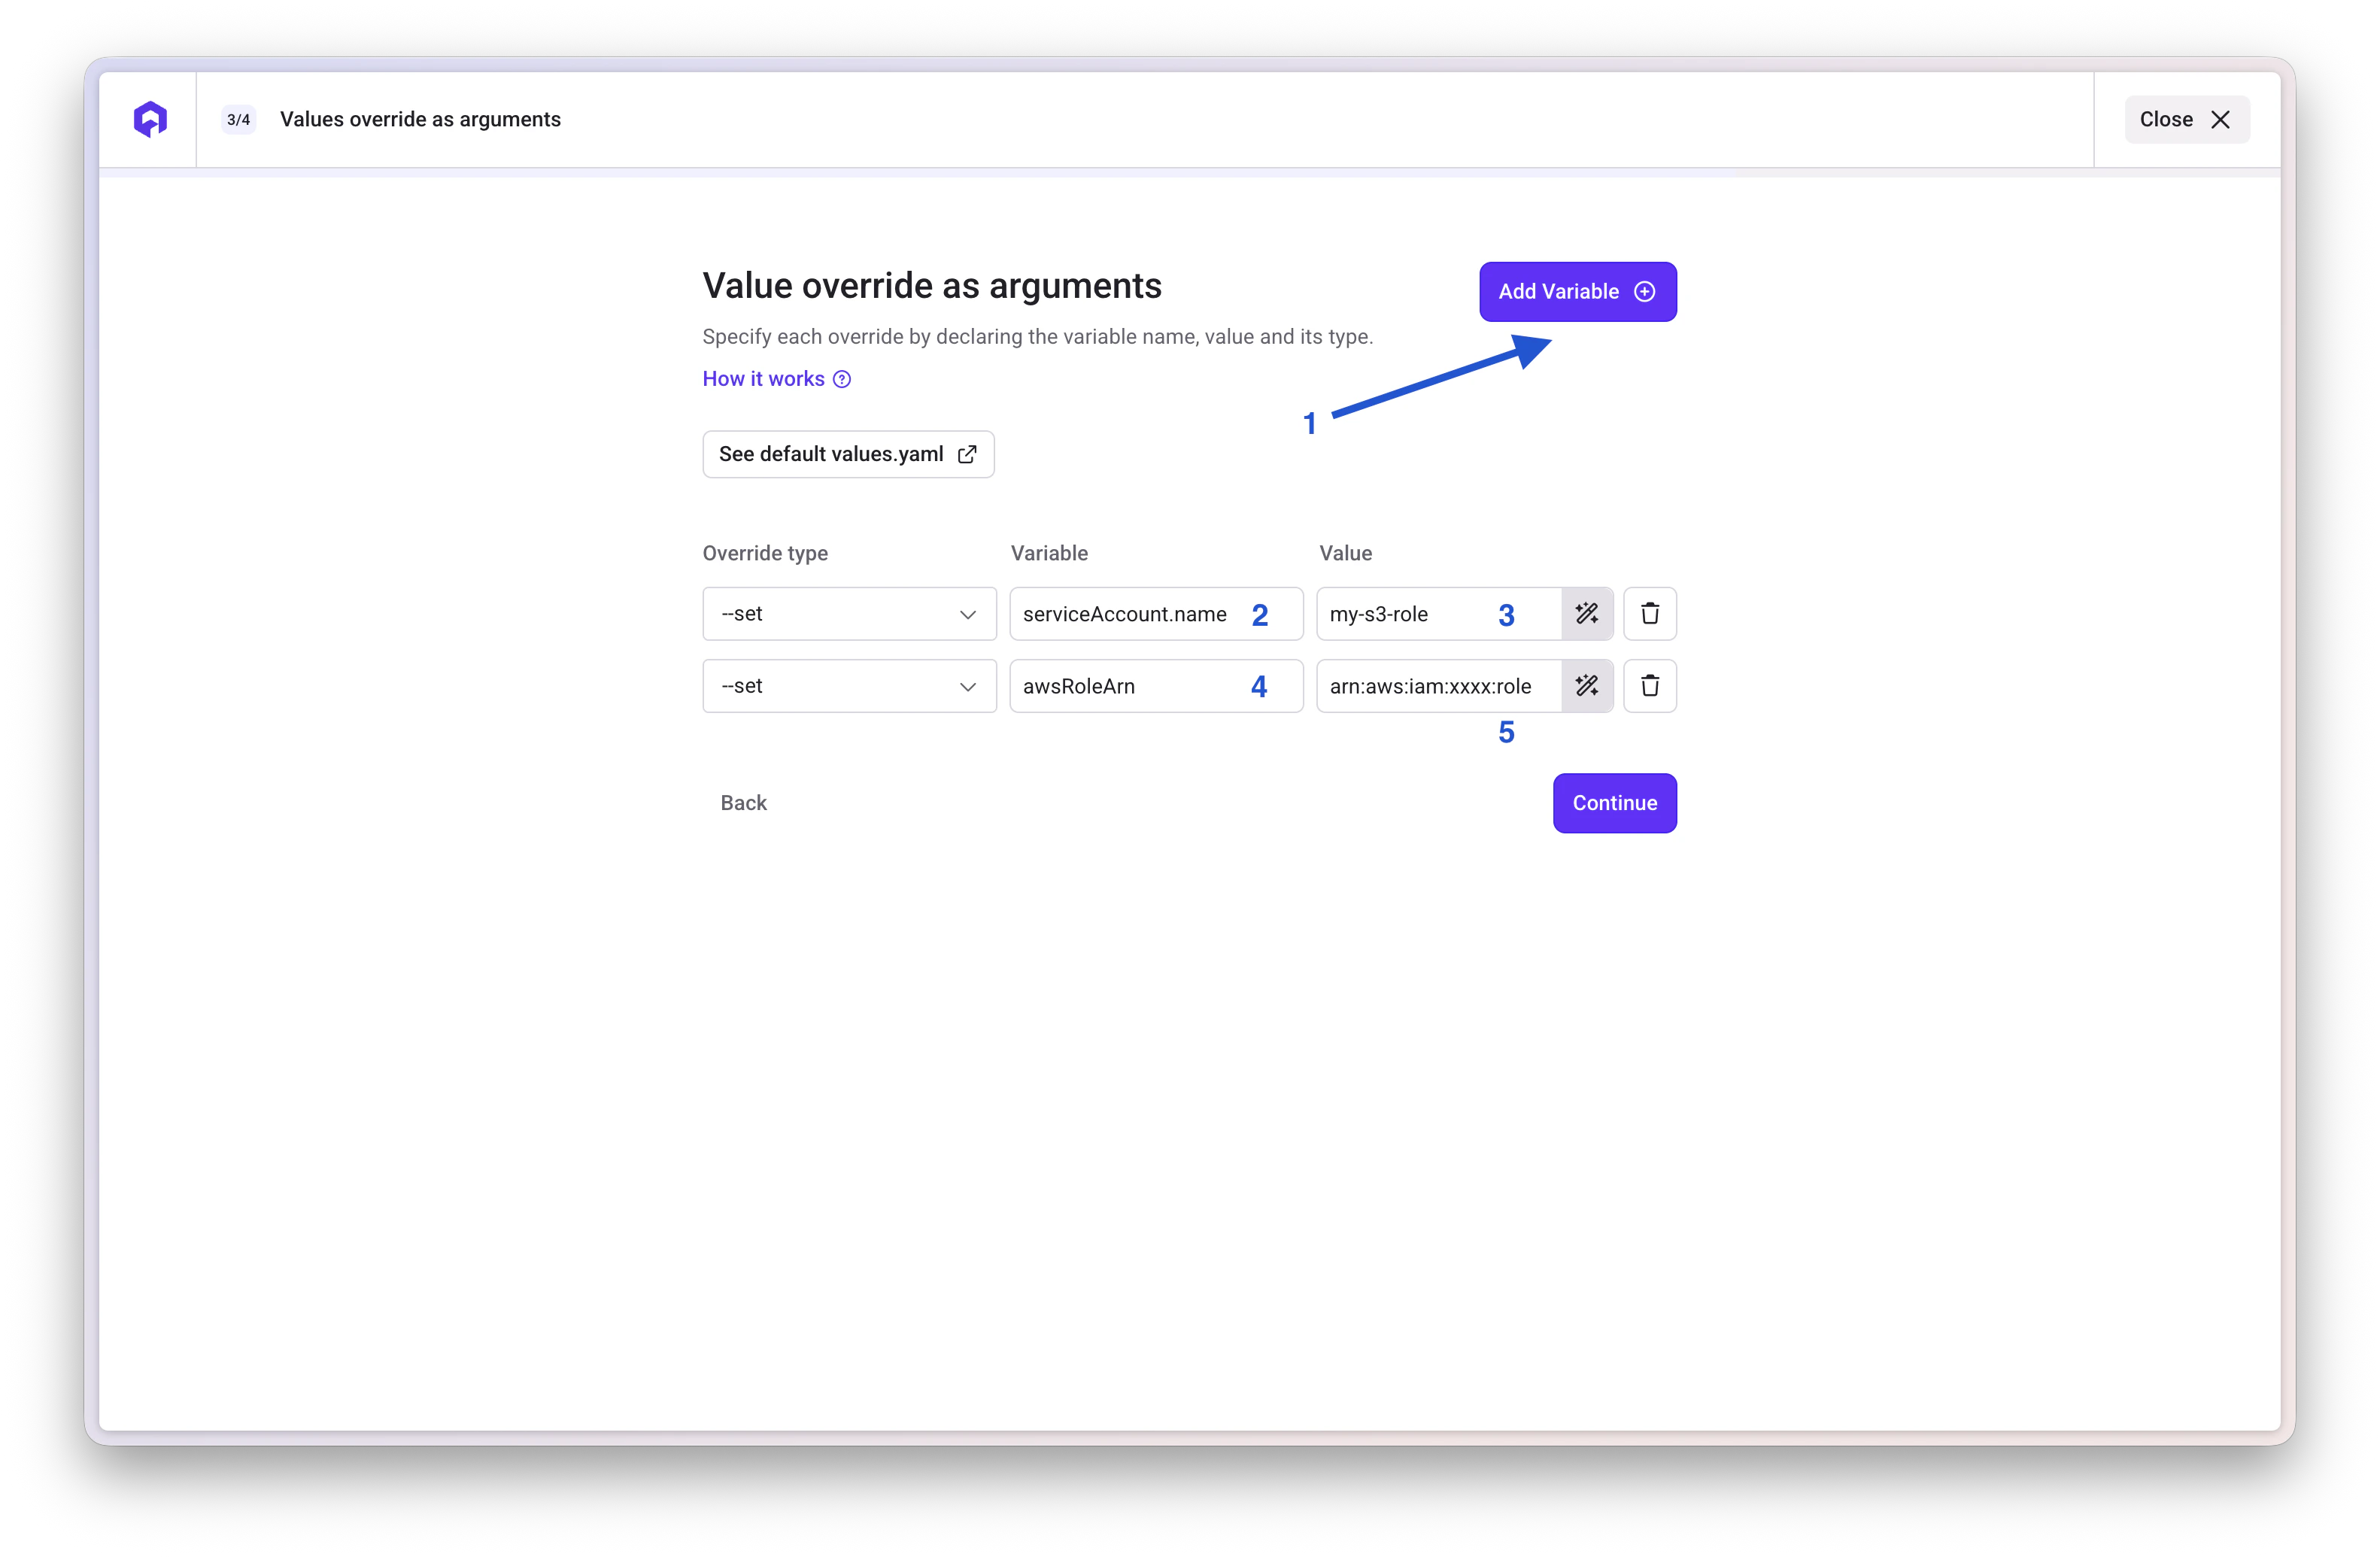
 **Values override:**
Reference the Terraform output with the `qovery.env` macro, so the role ARN is never hardcoded:
```yaml theme={null}
serviceAccount:
name: my-app-sa # same as TF_VAR_service_account_name
awsRoleArn: qovery.env.QOVERY_OUTPUT_TERRAFORM__ROLE_ARN
```
```yaml theme={null}
serviceAccount:
name: my-app-sa
awsRoleArn: arn:aws:iam::xxxxxx:role/my-s3-role
```
**Values override:**
Reference the Terraform output with the `qovery.env` macro, so the role ARN is never hardcoded:
```yaml theme={null}
serviceAccount:
name: my-app-sa # same as TF_VAR_service_account_name
awsRoleArn: qovery.env.QOVERY_OUTPUT_TERRAFORM__ROLE_ARN
```
```yaml theme={null}
serviceAccount:
name: my-app-sa
awsRoleArn: arn:aws:iam::xxxxxx:role/my-s3-role
```
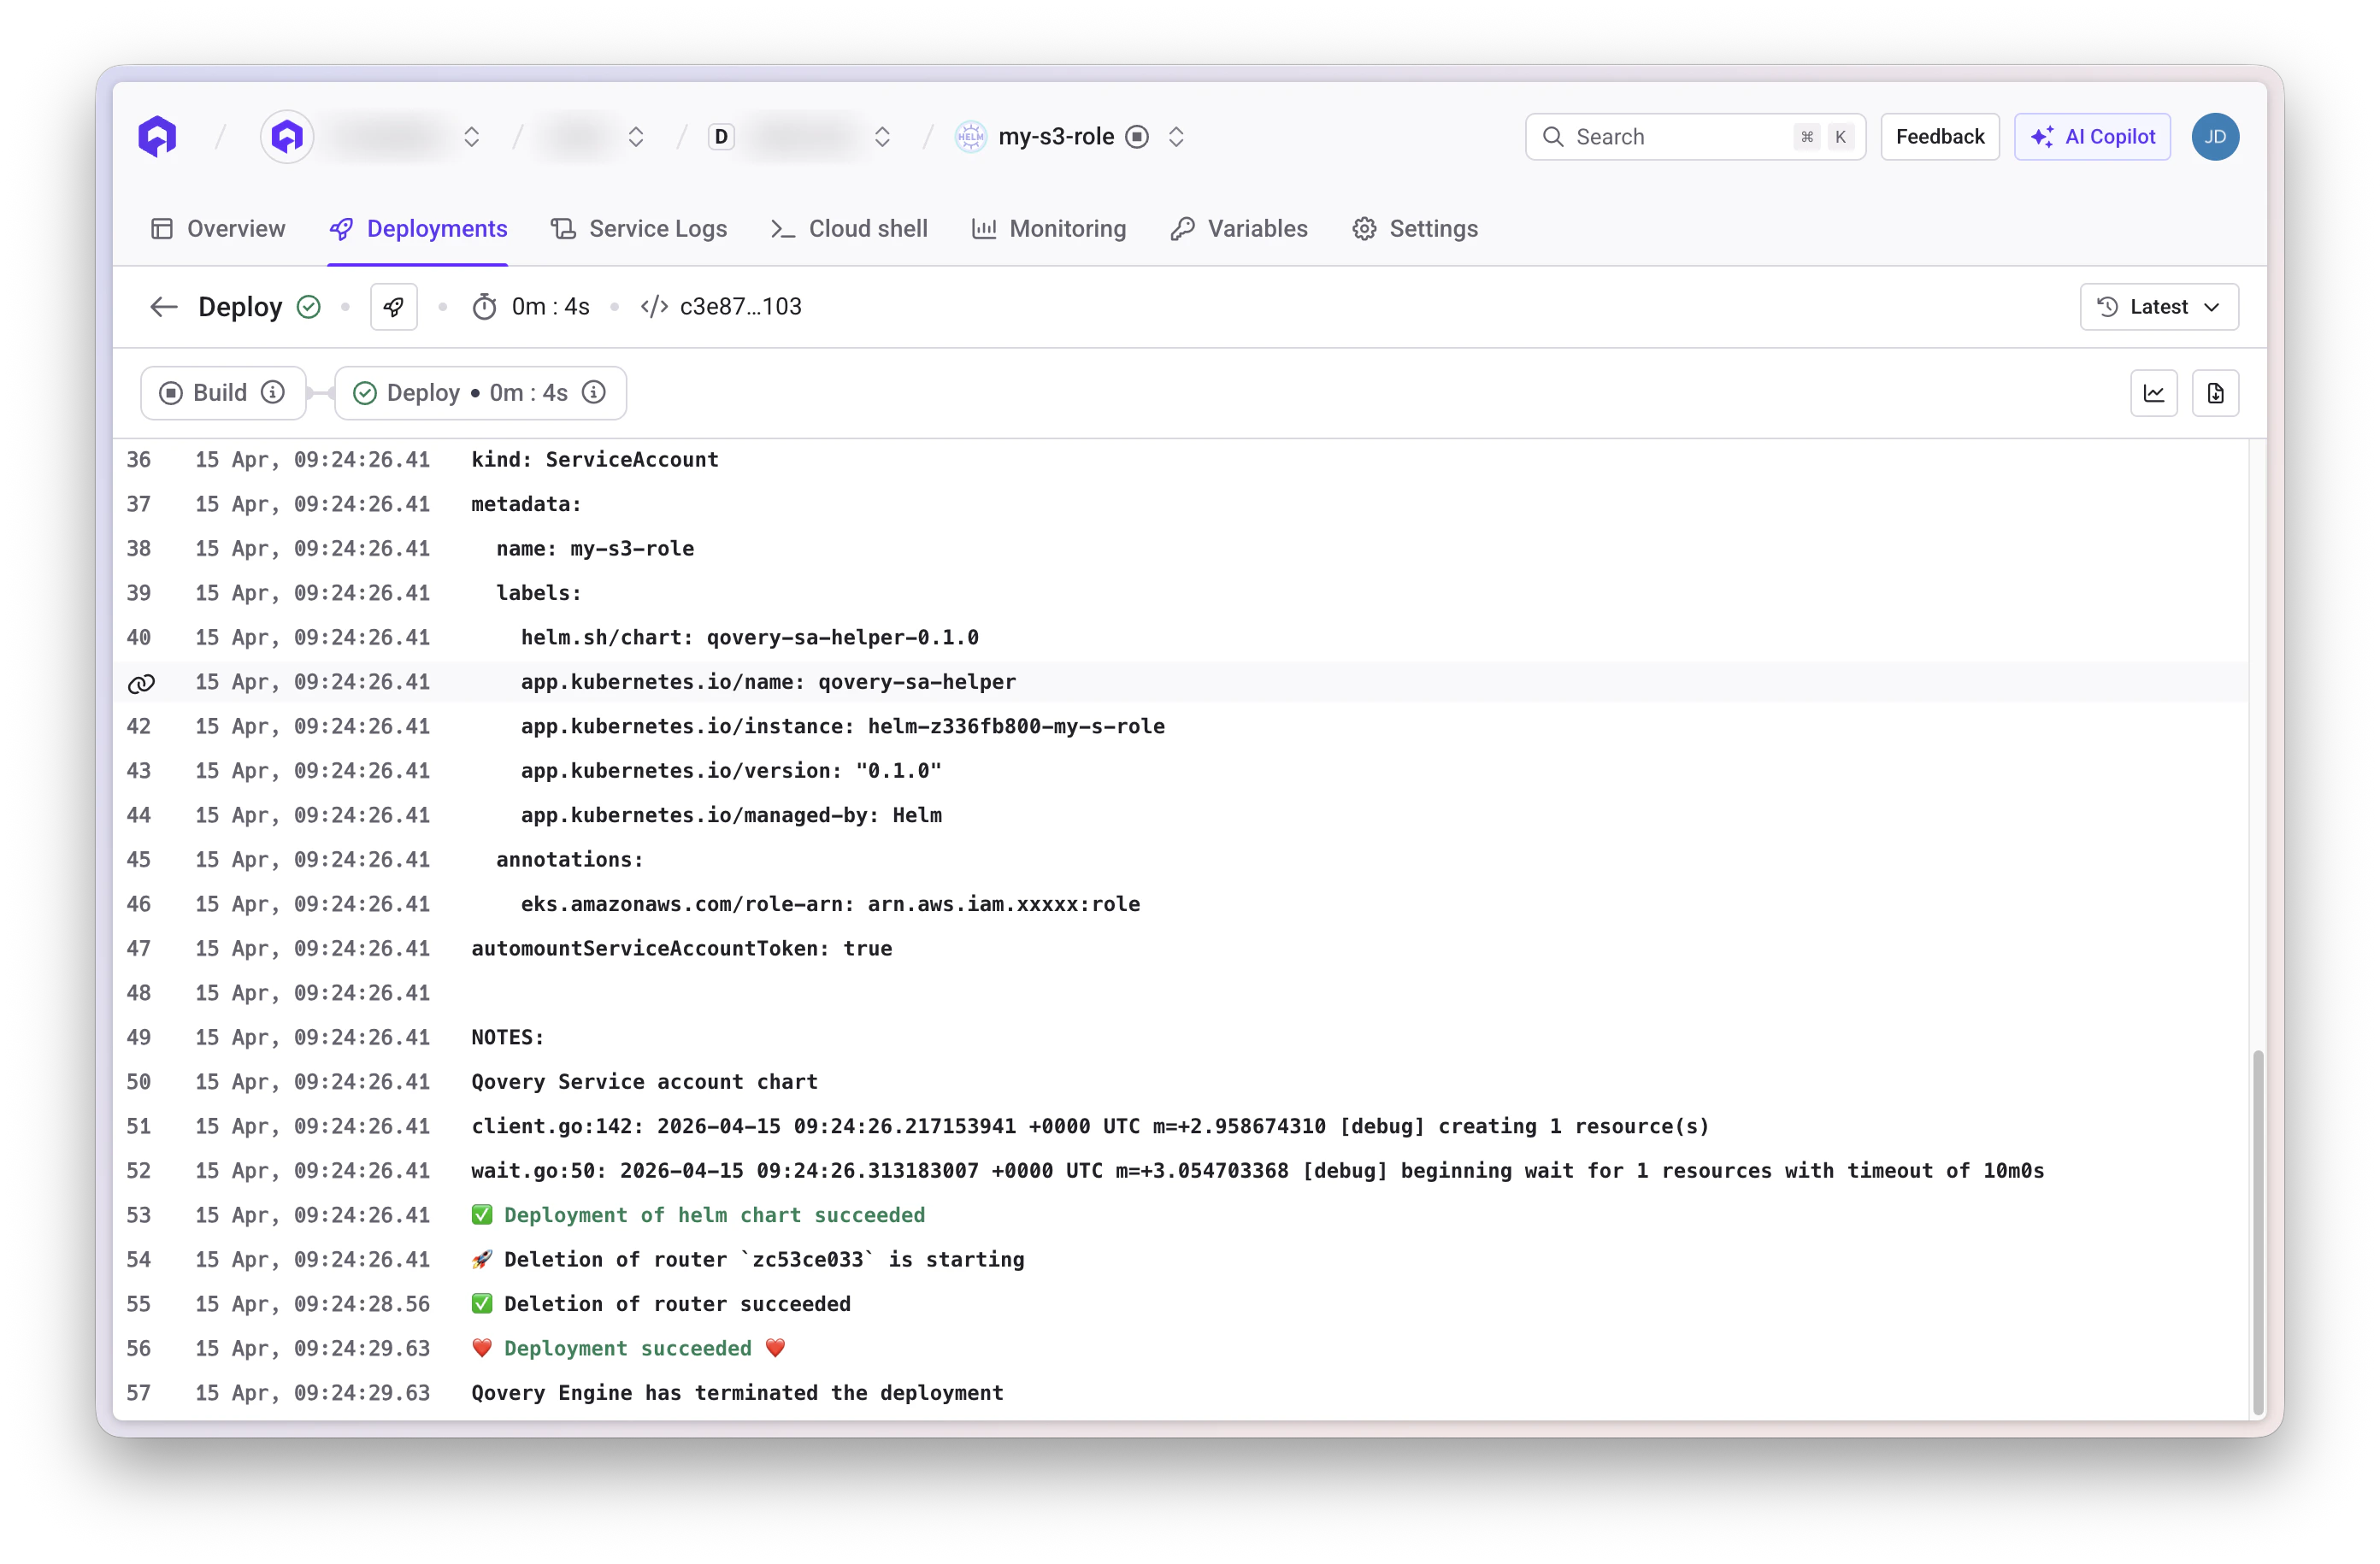
 Deploy the Helm service and verify it completes successfully:
 ***
## Step 4: Set Application Service Account
### Configure Service Account
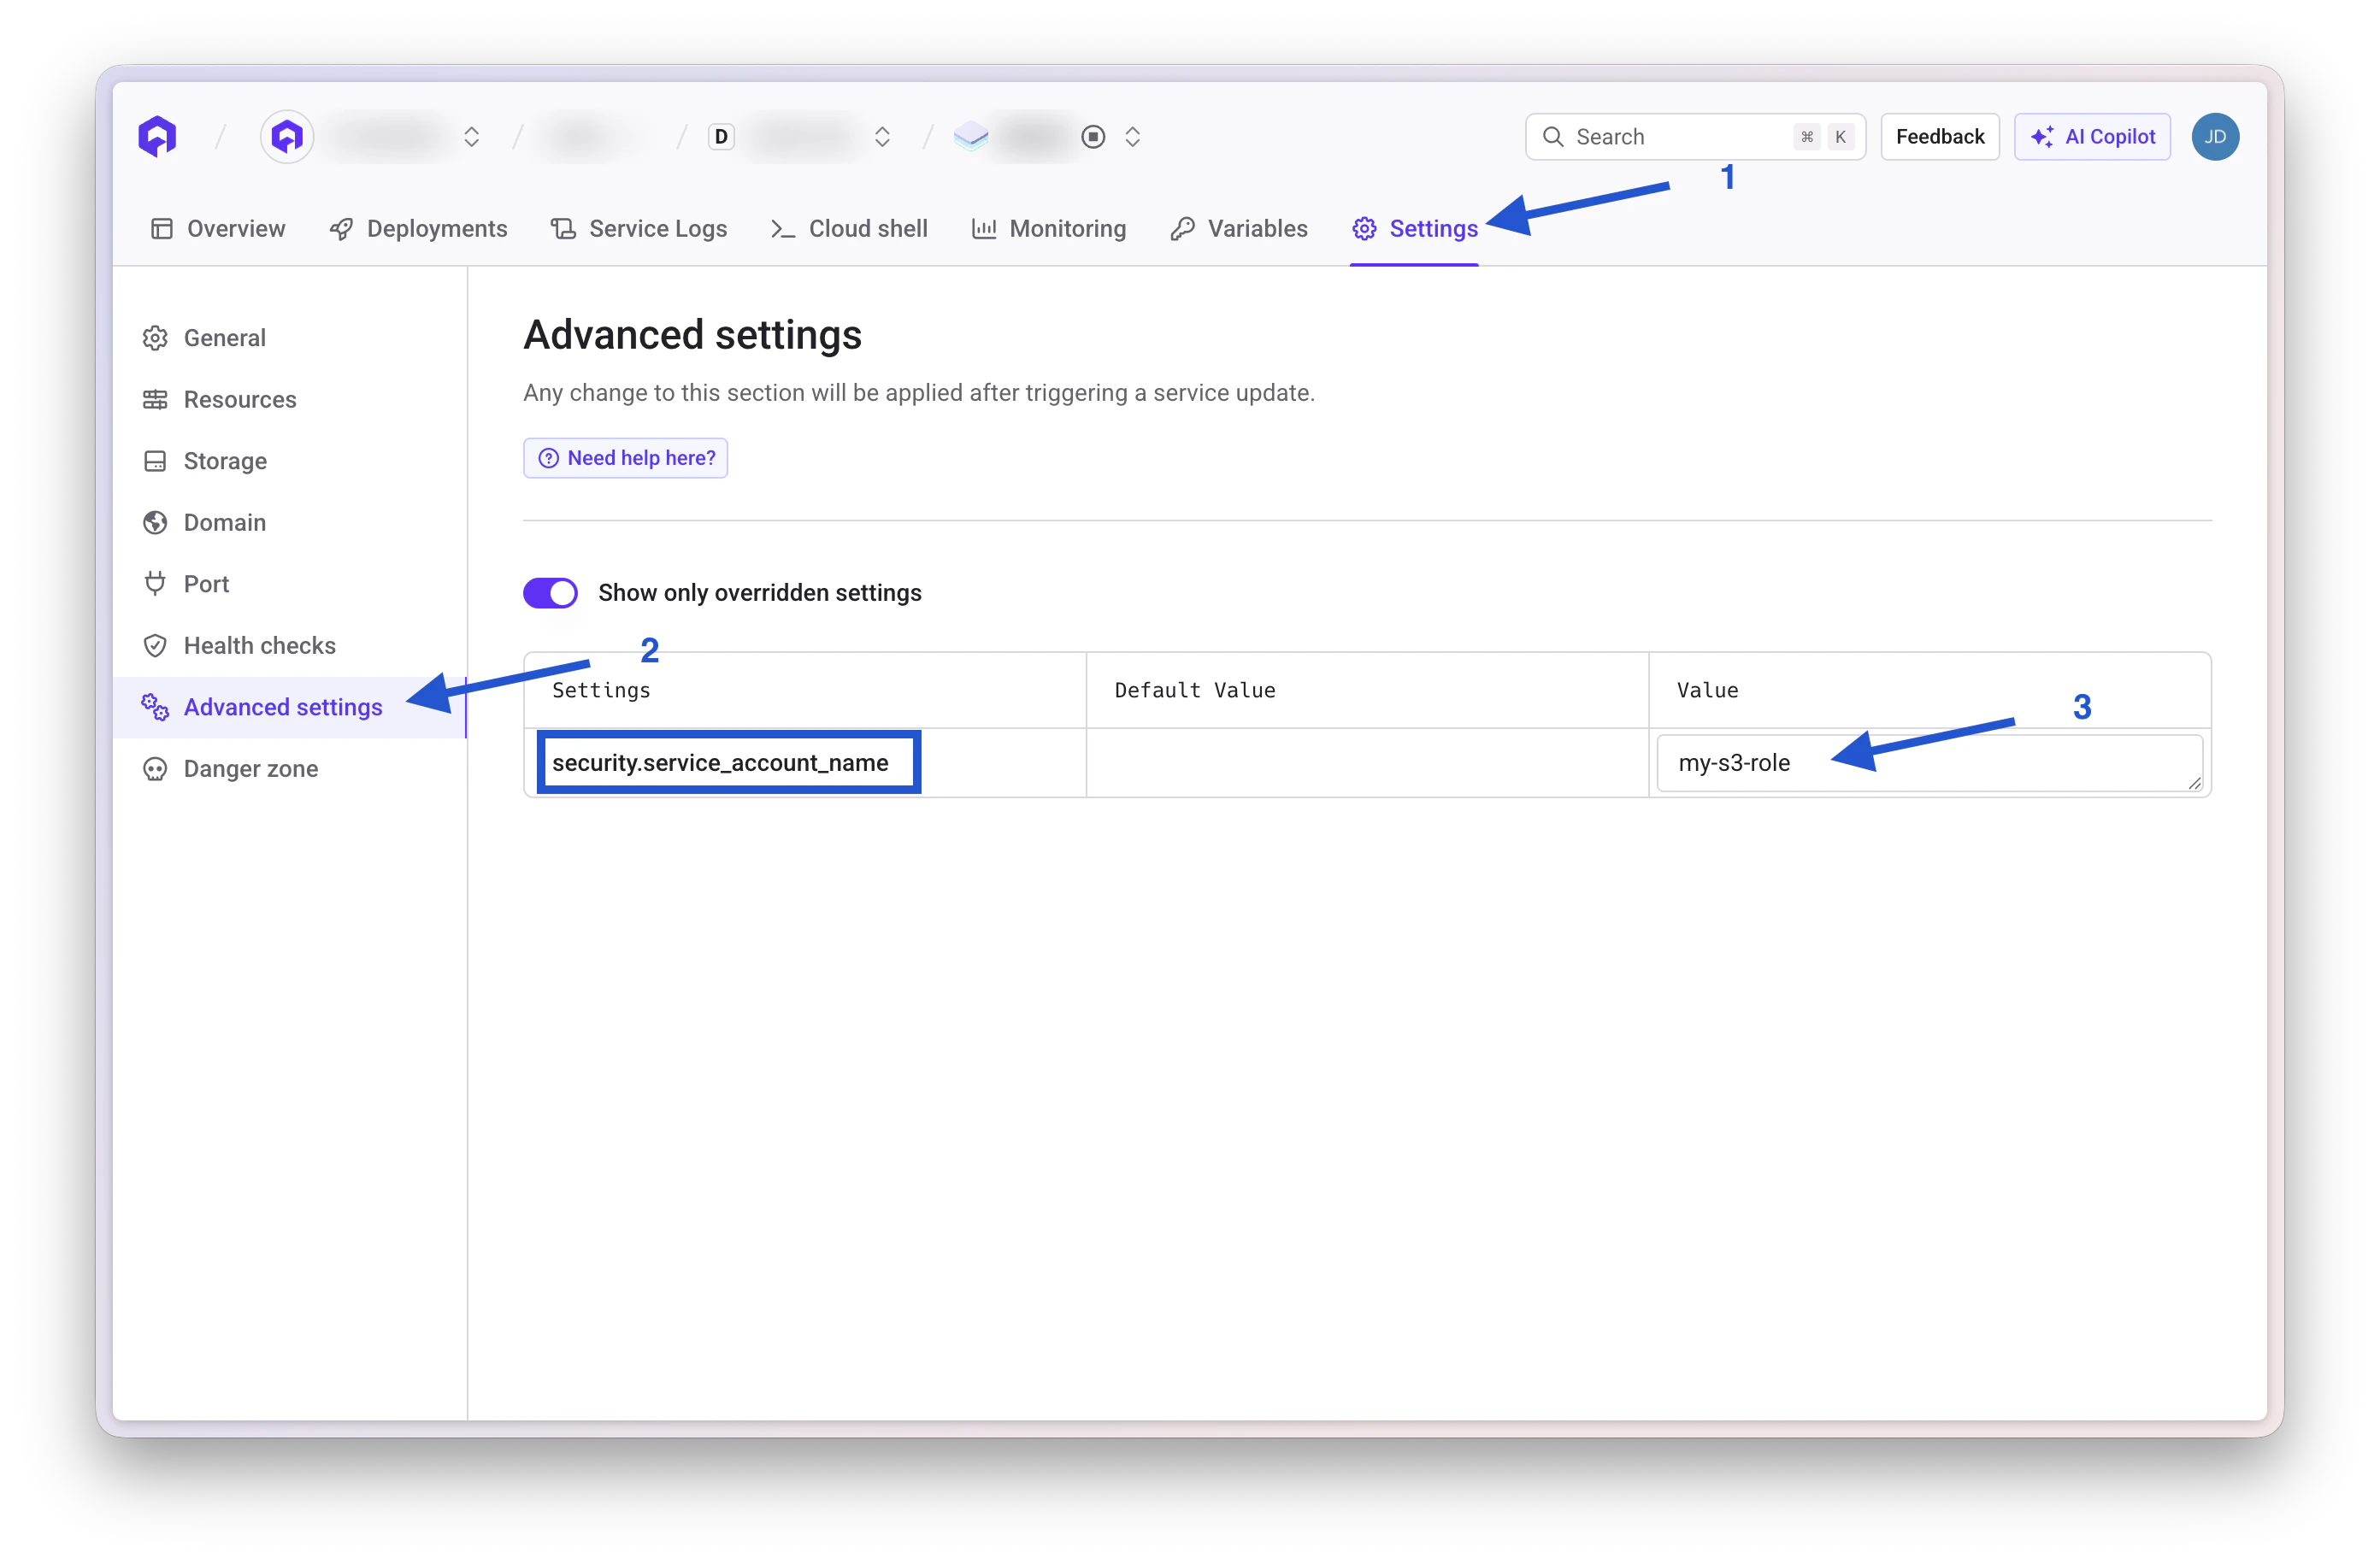
1. Access your application **Advanced settings**
2. Set **Service account** (`security.service_account_name`) to the created service account name
3. Deploy using the **Deploy now** button
***
## Step 4: Set Application Service Account
### Configure Service Account
1. Access your application **Advanced settings**
2. Set **Service account** (`security.service_account_name`) to the created service account name
3. Deploy using the **Deploy now** button
 ### Validate Access
Using Qovery CLI:
```bash theme={null}
$ qovery shell
```
Check AWS environment variables:
```bash theme={null}
$ env | grep AWS
AWS_DEFAULT_REGION=us-east-2
AWS_REGION=us-east-2
AWS_ROLE_ARN=arn:aws:iam::xxxxxx:role/my-s3-role
AWS_WEB_IDENTITY_TOKEN_FILE=/var/run/secrets/eks.amazonaws.com/serviceaccount/token
AWS_STS_REGIONAL_ENDPOINTS=regional
```
Validate S3 access:
```bash theme={null}
$ apt-get update && apt-get -y install awscli
$ aws s3 ls
```
***
## Key Concepts
* **OIDC Integration**: Enables Kubernetes service accounts to assume AWS roles
* **Token Rotation**: Automatic credential rotation without manual management
* **Namespace Scoping**: Restricts role access to specific Kubernetes namespaces
* **Everything as Qovery services**: The IAM role and the ServiceAccount are regular services in your environment, so they are versioned, visible in the Console, replicated with Clone/Preview, and cleaned up with the environment
## Conclusion
With the Terraform and Helm services in place, granting a role to a new application comes down to setting one advanced setting. The IAM side lives in your environment like any other service, without credential management overhead.
***
## Related Documentation
Deploy Terraform manifests with Qovery
Configure service advanced settings
Manage environment variables and secrets
Deploy applications with Helm
### Validate Access
Using Qovery CLI:
```bash theme={null}
$ qovery shell
```
Check AWS environment variables:
```bash theme={null}
$ env | grep AWS
AWS_DEFAULT_REGION=us-east-2
AWS_REGION=us-east-2
AWS_ROLE_ARN=arn:aws:iam::xxxxxx:role/my-s3-role
AWS_WEB_IDENTITY_TOKEN_FILE=/var/run/secrets/eks.amazonaws.com/serviceaccount/token
AWS_STS_REGIONAL_ENDPOINTS=regional
```
Validate S3 access:
```bash theme={null}
$ apt-get update && apt-get -y install awscli
$ aws s3 ls
```
***
## Key Concepts
* **OIDC Integration**: Enables Kubernetes service accounts to assume AWS roles
* **Token Rotation**: Automatic credential rotation without manual management
* **Namespace Scoping**: Restricts role access to specific Kubernetes namespaces
* **Everything as Qovery services**: The IAM role and the ServiceAccount are regular services in your environment, so they are versioned, visible in the Console, replicated with Clone/Preview, and cleaned up with the environment
## Conclusion
With the Terraform and Helm services in place, granting a role to a new application comes down to setting one advanced setting. The IAM side lives in your environment like any other service, without credential management overhead.
***
## Related Documentation
Deploy Terraform manifests with Qovery
Configure service advanced settings
Manage environment variables and secrets
Deploy applications with Helm