> ## Documentation Index
> Fetch the complete documentation index at: https://www.qovery.com/docs/llms.txt
> Use this file to discover all available pages before exploring further.
# Maintenance
> Understand how Qovery handles platform maintenance and updates
Qovery provides automatic and silent updates as much as possible, managing infrastructure maintenance through automated processes while minimizing disruption to your applications.
## Overview
Qovery handles most maintenance tasks automatically, including:
* Kubernetes cluster updates
* Infrastructure component upgrades
* Security patches
* Cloud provider managed service updates
* Certificate renewals
* Load balancer updates
This guide explains how maintenance works and what actions you may need to take.
## Kubernetes and Component Updates
### Automatic Updates
Qovery handles Kubernetes patches and upgrades using your cloud provider's native update mechanisms. This ensures compatibility across all infrastructure components:
* **Kubernetes Control Plane** - Automatically upgraded to latest stable versions
* **Nginx Ingress Controller** - Updated to maintain compatibility with Kubernetes
* **Cert-Manager** - Certificate management component updates
* **CNI (Container Network Interface)** - Network plugin updates
* **CSI (Container Storage Interface)** - Storage plugin updates
* **Karpenter** - Auto-scaling component updates
### Update Strategy
Qovery employs **rolling update strategies** to prevent downtime:
1. **Security Patches** - Applied automatically as soon as available
2. **Minor Updates** - Deployed automatically after testing
3. **Major Kubernetes Updates** - Applied by Qovery after thorough validation to ensure component compatibility
Rolling updates ensure your applications continue running while infrastructure is being updated. New nodes are added before old ones are drained.
### Managed Cluster Maintenance Schedule
Qovery performs weekly maintenance on managed clusters following a staged rollout to minimize risk:
* **Monday**: Dev and staging clusters are updated first
* **Wednesday**: Production clusters are updated, 2 days later
This 2-day gap allows the team to validate that updates are stable before rolling them out to production workloads.
**Where to track maintenance operations**
Every maintenance operation is recorded in your organization's [Audit Logs](/docs/getting-started/security-and-compliance/audit-logs). You can filter events by cluster to see exactly what was updated and when.
**Opting out of a maintenance window**
If you need to prevent maintenance from running on a specific cluster (e.g. during a critical release), you can lock it using the CLI:
```bash theme={null}
qovery cluster lock --cluster-id --reason "critical release in progress" --ttl-in-days 2
```
The `--ttl-in-days` flag (1 to 5 days) automatically unlocks the cluster after the specified duration. To unlock it manually before the TTL expires:
```bash theme={null}
qovery cluster unlock --cluster-id
```
### Important Notes
**For customers with manual Kubernetes deployments:**
If you manually deploy resources directly to the cluster (outside of Qovery), you are responsible for:
* Maintaining your own resources
* Ensuring compatibility with Kubernetes updates
* Debugging issues with manually deployed components
Qovery support may be canceled if customers manually update cluster components, as this can break Qovery's infrastructure management.
**Best Practice:** Always deploy through Qovery to ensure proper maintenance and support.
***
## Managed Services
### Database and Managed Services
By default, **every managed service deployed by Qovery is configured with automatic patches and upgrades** proposed by the cloud provider.
**What's Automatic:**
* Security patches
* Minor version updates (e.g., PostgreSQL 14.1 → 14.2)
* Operating system patches
* Performance improvements
**What Requires Your Action:**
* Major version upgrades (e.g., PostgreSQL 14 → 15)
* Breaking changes that may require application updates
* Migration to new database engine versions
Major version upgrades are intentionally manual to give you control over timing and allow for proper testing of your applications with the new version.
### Maintenance Windows
Managed services typically perform automated updates during configured maintenance windows:
* **Default Window:** Sunday 02:00-06:00 AM (your cluster timezone)
* **Duration:** Updates usually complete in minutes
* **Impact:** Minimal to zero downtime for most updates
**To customize maintenance windows:**
1. Go to your database service settings
2. Configure maintenance preferences
3. Choose a window that minimizes impact on your users
***
## Cloud Provider Quotas
### Understanding Quotas
Cloud providers impose limits on resources you can use:
* **Compute:** Number of vCPUs, instances
* **Storage:** Volume size, IOPS, snapshots
* **Networking:** Load balancers, IP addresses, VPCs
* **Services:** Database instances, managed services
### When You Hit Limits
When you encounter cloud provider limits, **Qovery displays the information in infrastructure or application logs**.
**Example Error Messages:**
```
Error: You have exceeded your quota for EC2 instances in us-east-1
Error: Maximum number of VPCs reached for this account
Error: Insufficient capacity to launch instances
```
### Requesting Quota Increases
You must contact your cloud provider directly to request quota increases:
1. Go to [AWS Service Quotas Console](https://console.aws.amazon.com/servicequotas/)
2. Select the service (e.g., EC2, VPC, RDS)
3. Find the quota you need to increase
4. Click **Request quota increase**
5. Provide business justification
6. Submit request
**Processing Time:** Usually 1-3 business days
1. Go to [GCP Quotas Page](https://console.cloud.google.com/iam-admin/quotas)
2. Filter by service and quota name
3. Select the quota to increase
4. Click **Edit Quotas**
5. Enter new limit and justification
6. Submit request
**Processing Time:** Usually instant to 2 business days
1. Go to [Azure Portal](https://portal.azure.com/)
2. Search for **Quotas**
3. Select the subscription
4. Find the resource and quota
5. Click **Request Increase**
6. Fill out the support request
**Processing Time:** Usually 1-2 business days
1. Go to [Scaleway Console](https://console.scaleway.com/)
2. Click on **Support** → **Create Ticket**
3. Request quota increase for specific resource
4. Provide justification
**Processing Time:** Usually 1-3 business days
Most cloud providers are happy to increase quotas for legitimate production workloads. Be specific about your needs and expected growth.
***
## Credential Rotation
For security compliance, rotating cloud credentials regularly is a best practice. Qovery supports both manual and automatic credential rotation.
### Manual Credential Rotation (Recommended)
The recommended approach creates a new access key, deploys it to Qovery, waits for completion, then deletes the old key—avoiding downtime during updates.
1. Go to [AWS IAM Console](https://console.aws.amazon.com/iam/)
2. Navigate to **Users**
3. Select your Qovery IAM user
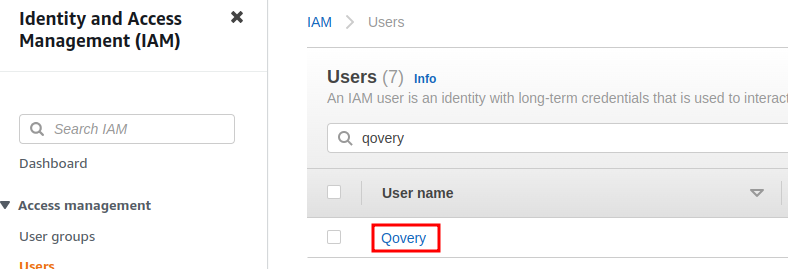 4. Click **Security credentials** tab
5. Scroll to **Access keys** section
4. Click **Security credentials** tab
5. Scroll to **Access keys** section
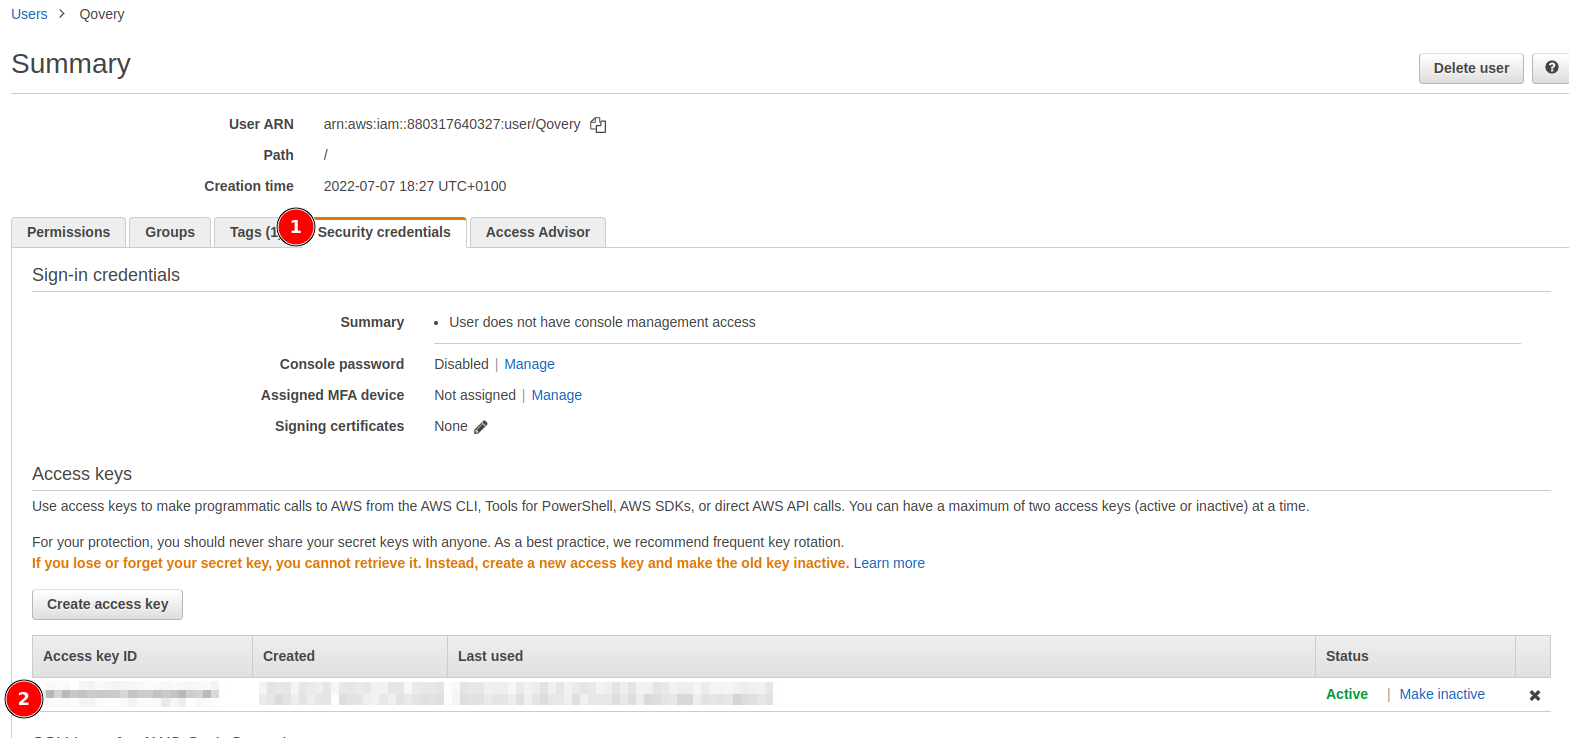 6. Click **Create access key**
7. Save the new Access Key ID and Secret Access Key
6. Click **Create access key**
7. Save the new Access Key ID and Secret Access Key
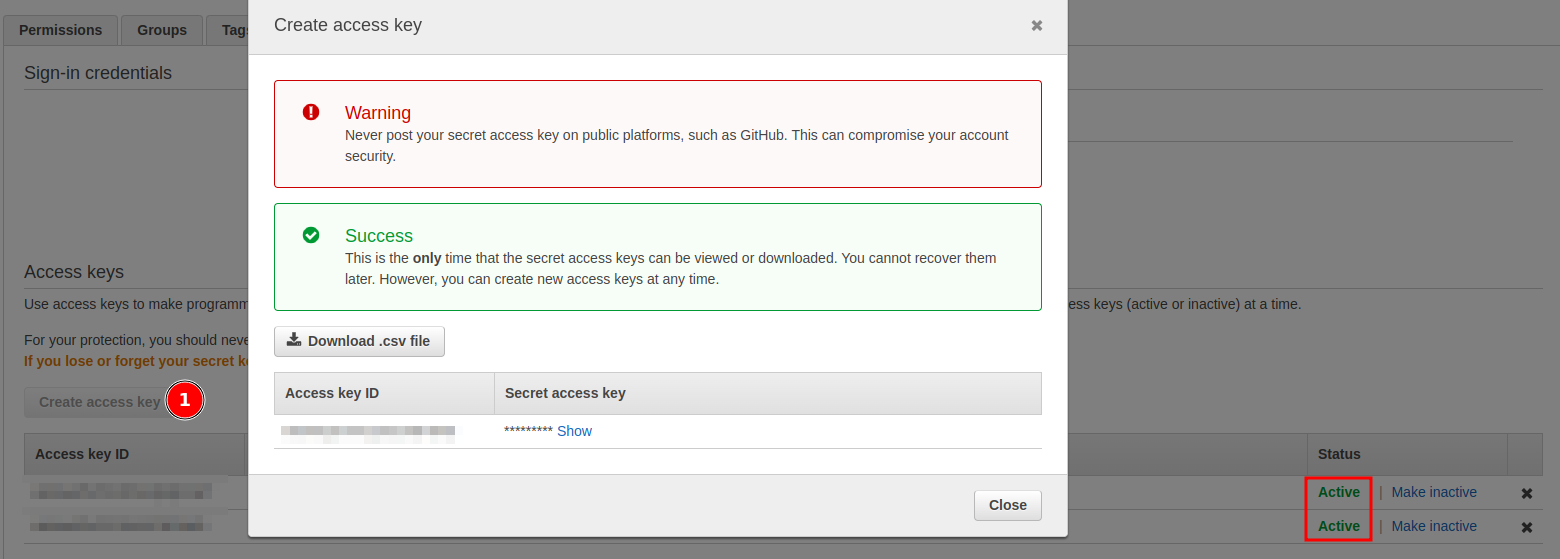 You can only view the secret access key once! Download the CSV file or copy it to a secure location.
1. Log into [Qovery Console](https://console.qovery.com)
2. Go to **Organization Settings** → **Cloud Credentials**
3. Find your AWS credentials
4. Click **Edit**
5. Enter the new Access Key ID and Secret Access Key
6. Click **Save**
1. Go to **Clusters**
2. Select your cluster
3. Click **Update** (or wait for next deployment)
4. Monitor the deployment logs
5. Wait for deployment to complete successfully
The cluster will reconnect using the new credentials. This process takes 5-10 minutes.
1. Return to [AWS IAM Console](https://console.aws.amazon.com/iam/)
2. Navigate to your Qovery IAM user
3. Go to **Security credentials** tab
4. Find the old access key (check creation date)
5. Click **Delete**
You can only view the secret access key once! Download the CSV file or copy it to a secure location.
1. Log into [Qovery Console](https://console.qovery.com)
2. Go to **Organization Settings** → **Cloud Credentials**
3. Find your AWS credentials
4. Click **Edit**
5. Enter the new Access Key ID and Secret Access Key
6. Click **Save**
1. Go to **Clusters**
2. Select your cluster
3. Click **Update** (or wait for next deployment)
4. Monitor the deployment logs
5. Wait for deployment to complete successfully
The cluster will reconnect using the new credentials. This process takes 5-10 minutes.
1. Return to [AWS IAM Console](https://console.aws.amazon.com/iam/)
2. Navigate to your Qovery IAM user
3. Go to **Security credentials** tab
4. Find the old access key (check creation date)
5. Click **Delete**
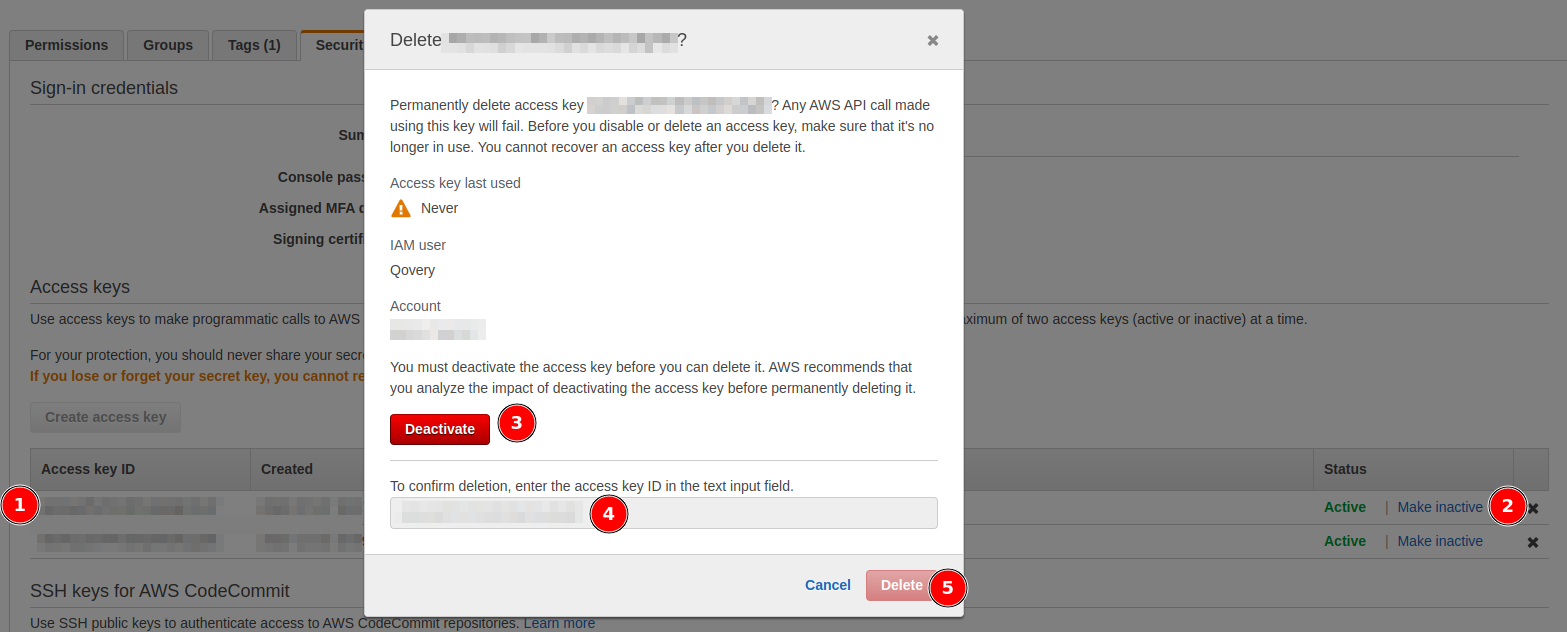 Make sure the cluster is using the new credentials before deleting the old key! Check that deployments are working correctly.
1. Deploy a test application
2. Check infrastructure logs for any authentication errors
3. Verify all services are running normally
Schedule credential rotation during low-traffic periods to minimize risk. Perform a test deployment before deleting old credentials.
### Automated Credential Rotation (Advanced)
You can automate credential rotation using the Qovery API and cloud provider CLIs.
**Requirements:**
* Qovery API token
* AWS CLI configured
* `jq` for JSON parsing
* Bash environment
**Rotation Script:**
```bash theme={null}
#!/bin/bash
# Configuration
QOVERY_API_TOKEN="your-qovery-api-token"
QOVERY_ORG_ID="your-organization-id"
QOVERY_CLOUD_CREDENTIALS_ID="your-cloud-credentials-id"
AWS_IAM_USER="qovery-admin"
# Step 1: Create new AWS access key
echo "Creating new AWS access key..."
NEW_KEY=$(aws iam create-access-key --user-name $AWS_IAM_USER)
NEW_ACCESS_KEY_ID=$(echo $NEW_KEY | jq -r '.AccessKey.AccessKeyId')
NEW_SECRET_ACCESS_KEY=$(echo $NEW_KEY | jq -r '.AccessKey.SecretAccessKey')
echo "New Access Key ID: $NEW_ACCESS_KEY_ID"
# Step 2: Update Qovery credentials
echo "Updating Qovery credentials..."
curl -X PUT "https://api.qovery.com/organization/$QOVERY_ORG_ID/aws/credentials/$QOVERY_CLOUD_CREDENTIALS_ID" \
-H "Authorization: Token $QOVERY_API_TOKEN" \
-H "Content-Type: application/json" \
-d "{
\"access_key_id\": \"$NEW_ACCESS_KEY_ID\",
\"secret_access_key\": \"$NEW_SECRET_ACCESS_KEY\"
}"
# Step 3: Wait for cluster update (adjust timing as needed)
echo "Waiting for cluster to update (10 minutes)..."
sleep 600
# Step 4: List and delete old access keys
echo "Deleting old access keys..."
OLD_KEYS=$(aws iam list-access-keys --user-name $AWS_IAM_USER | jq -r '.AccessKeyMetadata[] | select(.AccessKeyId != "'$NEW_ACCESS_KEY_ID'") | .AccessKeyId')
for OLD_KEY in $OLD_KEYS; do
echo "Deleting old key: $OLD_KEY"
aws iam delete-access-key --user-name $AWS_IAM_USER --access-key-id $OLD_KEY
done
echo "Credential rotation complete!"
```
**To use this script:**
1. Save as `rotate-credentials.sh`
2. Update configuration variables
3. Make executable: `chmod +x rotate-credentials.sh`
4. Run: `./rotate-credentials.sh`
Test this script in a non-production environment first! Ensure you have backup access to your AWS account in case of issues.
***
## Maintenance Best Practices
* Review cluster health monthly
* Check for available Kubernetes updates
* Monitor resource quotas and plan increases
* Audit IAM credentials and rotate every 90 days
* Check Qovery status page regularly
* Subscribe to cloud provider maintenance notifications
* Review deployment logs after automatic updates
* Test applications after major updates
* Test major database version upgrades in staging first
* Schedule upgrades during low-traffic periods
* Have rollback plans ready
* Communicate maintenance windows to users
* Document custom configurations
* Maintain runbooks for common issues
* Track infrastructure changes
* Share knowledge with your team
***
## Maintenance Windows and Downtime
### Zero-Downtime Updates
Most Qovery maintenance operations are performed with zero downtime:
* **Kubernetes node updates** - Rolling updates with pod migration
* **Load balancer updates** - Blue-green deployments
* **Certificate renewals** - Automatic with no interruption
* **Infrastructure patches** - Applied to standby nodes first
### Planned Maintenance
For rare cases requiring downtime:
1. **Advance Notice:** Qovery notifies you at least 7 days before
2. **Maintenance Window:** Typically 1-4 hours
3. **Status Updates:** Real-time updates via status page
4. **Post-Maintenance:** Verification and health checks
Check the [Qovery Status Page](https://status.qovery.com) for scheduled maintenance.
***
## Getting Help
Configure cluster maintenance preferences
Manage cloud provider credentials
Check platform status and maintenance
Get help with maintenance issues
Make sure the cluster is using the new credentials before deleting the old key! Check that deployments are working correctly.
1. Deploy a test application
2. Check infrastructure logs for any authentication errors
3. Verify all services are running normally
Schedule credential rotation during low-traffic periods to minimize risk. Perform a test deployment before deleting old credentials.
### Automated Credential Rotation (Advanced)
You can automate credential rotation using the Qovery API and cloud provider CLIs.
**Requirements:**
* Qovery API token
* AWS CLI configured
* `jq` for JSON parsing
* Bash environment
**Rotation Script:**
```bash theme={null}
#!/bin/bash
# Configuration
QOVERY_API_TOKEN="your-qovery-api-token"
QOVERY_ORG_ID="your-organization-id"
QOVERY_CLOUD_CREDENTIALS_ID="your-cloud-credentials-id"
AWS_IAM_USER="qovery-admin"
# Step 1: Create new AWS access key
echo "Creating new AWS access key..."
NEW_KEY=$(aws iam create-access-key --user-name $AWS_IAM_USER)
NEW_ACCESS_KEY_ID=$(echo $NEW_KEY | jq -r '.AccessKey.AccessKeyId')
NEW_SECRET_ACCESS_KEY=$(echo $NEW_KEY | jq -r '.AccessKey.SecretAccessKey')
echo "New Access Key ID: $NEW_ACCESS_KEY_ID"
# Step 2: Update Qovery credentials
echo "Updating Qovery credentials..."
curl -X PUT "https://api.qovery.com/organization/$QOVERY_ORG_ID/aws/credentials/$QOVERY_CLOUD_CREDENTIALS_ID" \
-H "Authorization: Token $QOVERY_API_TOKEN" \
-H "Content-Type: application/json" \
-d "{
\"access_key_id\": \"$NEW_ACCESS_KEY_ID\",
\"secret_access_key\": \"$NEW_SECRET_ACCESS_KEY\"
}"
# Step 3: Wait for cluster update (adjust timing as needed)
echo "Waiting for cluster to update (10 minutes)..."
sleep 600
# Step 4: List and delete old access keys
echo "Deleting old access keys..."
OLD_KEYS=$(aws iam list-access-keys --user-name $AWS_IAM_USER | jq -r '.AccessKeyMetadata[] | select(.AccessKeyId != "'$NEW_ACCESS_KEY_ID'") | .AccessKeyId')
for OLD_KEY in $OLD_KEYS; do
echo "Deleting old key: $OLD_KEY"
aws iam delete-access-key --user-name $AWS_IAM_USER --access-key-id $OLD_KEY
done
echo "Credential rotation complete!"
```
**To use this script:**
1. Save as `rotate-credentials.sh`
2. Update configuration variables
3. Make executable: `chmod +x rotate-credentials.sh`
4. Run: `./rotate-credentials.sh`
Test this script in a non-production environment first! Ensure you have backup access to your AWS account in case of issues.
***
## Maintenance Best Practices
* Review cluster health monthly
* Check for available Kubernetes updates
* Monitor resource quotas and plan increases
* Audit IAM credentials and rotate every 90 days
* Check Qovery status page regularly
* Subscribe to cloud provider maintenance notifications
* Review deployment logs after automatic updates
* Test applications after major updates
* Test major database version upgrades in staging first
* Schedule upgrades during low-traffic periods
* Have rollback plans ready
* Communicate maintenance windows to users
* Document custom configurations
* Maintain runbooks for common issues
* Track infrastructure changes
* Share knowledge with your team
***
## Maintenance Windows and Downtime
### Zero-Downtime Updates
Most Qovery maintenance operations are performed with zero downtime:
* **Kubernetes node updates** - Rolling updates with pod migration
* **Load balancer updates** - Blue-green deployments
* **Certificate renewals** - Automatic with no interruption
* **Infrastructure patches** - Applied to standby nodes first
### Planned Maintenance
For rare cases requiring downtime:
1. **Advance Notice:** Qovery notifies you at least 7 days before
2. **Maintenance Window:** Typically 1-4 hours
3. **Status Updates:** Real-time updates via status page
4. **Post-Maintenance:** Verification and health checks
Check the [Qovery Status Page](https://status.qovery.com) for scheduled maintenance.
***
## Getting Help
Configure cluster maintenance preferences
Manage cloud provider credentials
Check platform status and maintenance
Get help with maintenance issues