> ## Documentation Index
> Fetch the complete documentation index at: https://www.qovery.com/docs/llms.txt
> Use this file to discover all available pages before exploring further.
# SSO (SAML/OIDC)
> Configure Single Sign-On with your Identity Provider
Qovery allows you to configure a SAML or OIDC connection with your Identity Provider (IDP).
## How to Enable SSO
Contact your Customer Success Manager (CSM) to enable the SSO feature for your organization.
* Qovery will provide you a unique `$CONNECTION_NAME` that you will need to configure your IDP
* You will need to provide required information to setup the configuration on Qovery side
When the configuration is done on your side and on Qovery side, we plan a session to validate the authentication flow.
Once your users are provisioned using SAML or OIDC inside your organization, you will need to remove old users and transfer your organization ownership.
## Configure Your IDP
The following sections use Okta as IDP to illustrate the setup and information to share. The same principles apply to other Identity Providers.
### Configure Your SAML Application
#### Create SAML Application
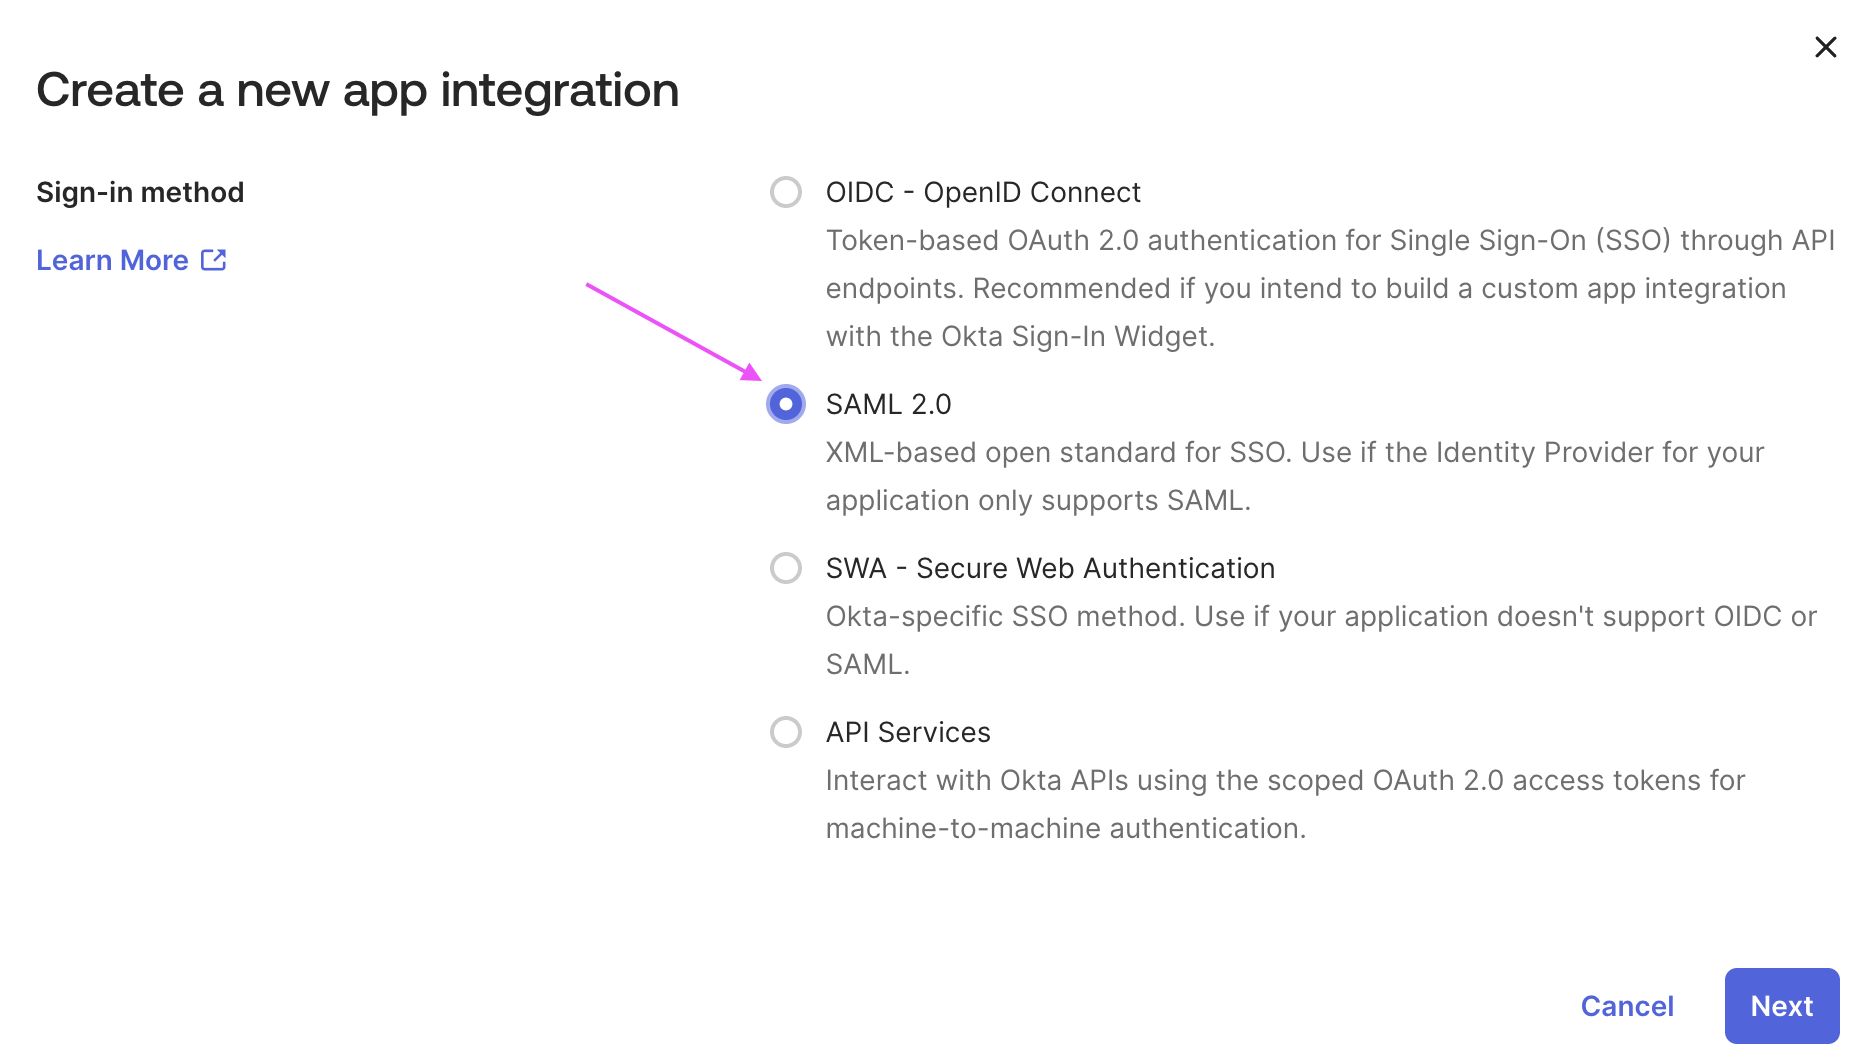
Create your SAML application and check `SAML 2.0`:
 #### Qovery Authentication Information
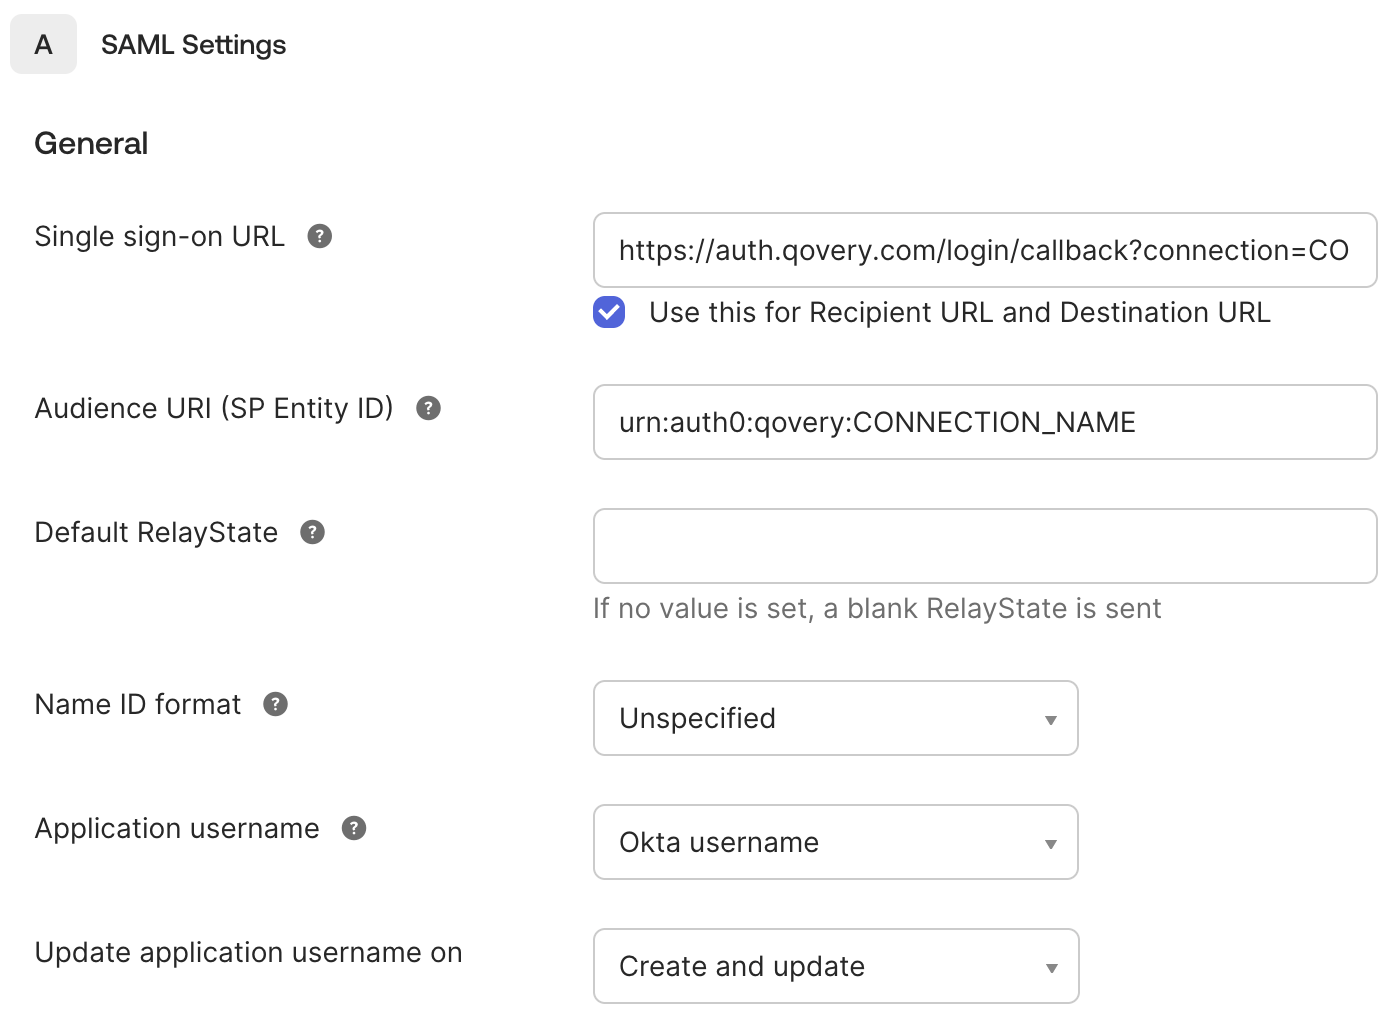
In **SAML Settings > General** section:
* Set the **Single sign-on URL** to:
```
https://auth.qovery.com/login/callback?connection=$CONNECTION_NAME
```
* Enable the **Use this for Recipient URL and Destination URL** checkbox
* Set the **Audience URI** to:
```
urn:auth0:qovery:$CONNECTION_NAME
```
Leave the other fields in this section at their default values.
#### Qovery Authentication Information
In **SAML Settings > General** section:
* Set the **Single sign-on URL** to:
```
https://auth.qovery.com/login/callback?connection=$CONNECTION_NAME
```
* Enable the **Use this for Recipient URL and Destination URL** checkbox
* Set the **Audience URI** to:
```
urn:auth0:qovery:$CONNECTION_NAME
```
Leave the other fields in this section at their default values.
 #### Configure Attribute Statements
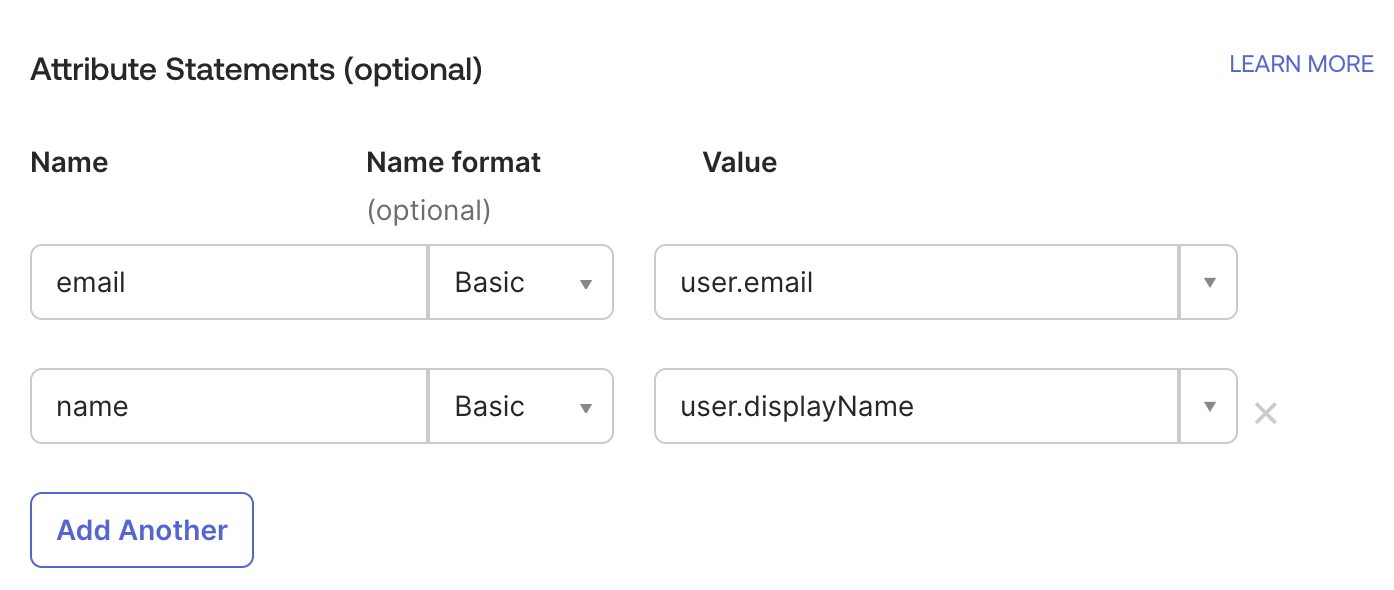
In **Attribute Statements** section:
* Add attribute `email` to point to your user email property (e.g., `user.email` in Okta)
* Add attribute `name` to point to your user full name property (e.g., `user.displayName` in Okta)
#### Configure Attribute Statements
In **Attribute Statements** section:
* Add attribute `email` to point to your user email property (e.g., `user.email` in Okta)
* Add attribute `name` to point to your user full name property (e.g., `user.displayName` in Okta)
 You may not see the "user.displayName" populated in the Okta admin console. See this [Okta documentation](https://support.okta.com/help/s/article/okta-display-name-and-group-rules?language=en_US) for more information.
#### (Optional) Configure Group Attribute Statements
If you want to automatically assign a Qovery role according to your users' groups (see [Configure Group Synchronization](#configure-group-synchronization)), you need to expose this information:
* Add attribute `groups` to match the targeted IDP groups you want to expose
* Use a regex to expose the groups you plan to use for role synchronization, i.e `.*Qovery.*`
Okta recommends to [expose only group names used by the target Application](https://help.okta.com/oie/en-us/content/topics/apps/define-group-attribute-statements.htm?cshid=ext-define-group-attribute-statements).
You may not see the "user.displayName" populated in the Okta admin console. See this [Okta documentation](https://support.okta.com/help/s/article/okta-display-name-and-group-rules?language=en_US) for more information.
#### (Optional) Configure Group Attribute Statements
If you want to automatically assign a Qovery role according to your users' groups (see [Configure Group Synchronization](#configure-group-synchronization)), you need to expose this information:
* Add attribute `groups` to match the targeted IDP groups you want to expose
* Use a regex to expose the groups you plan to use for role synchronization, i.e `.*Qovery.*`
Okta recommends to [expose only group names used by the target Application](https://help.okta.com/oie/en-us/content/topics/apps/define-group-attribute-statements.htm?cshid=ext-define-group-attribute-statements).
 #### (Optional) Enable Global Token Revocation
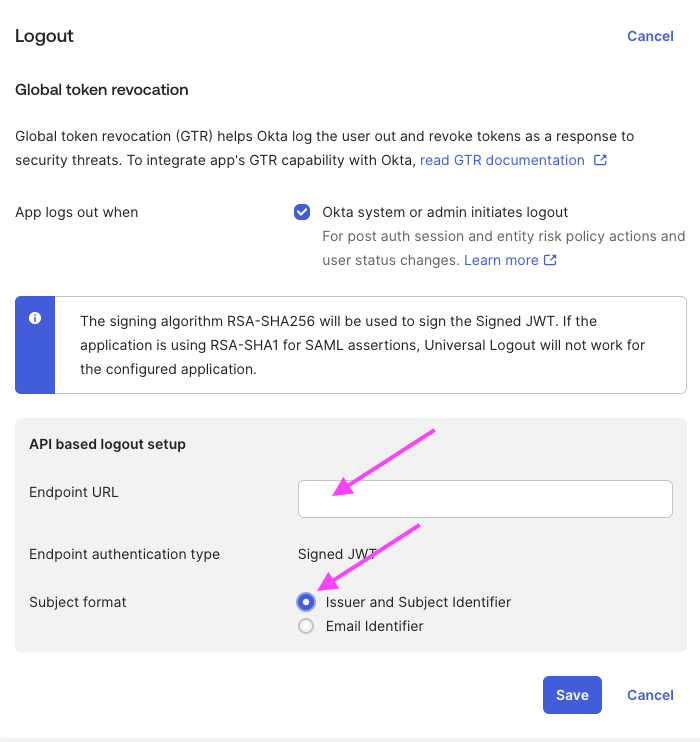
In **Logout** section:
* Set the **Endpoint URL** to:
```
https://qovery.eu.auth0.com/oauth/global-token-revocation/connection/$CONNECTION_NAME
```
* Set **Subject format** to "Issuer and Subject Identifier"
#### (Optional) Enable Global Token Revocation
In **Logout** section:
* Set the **Endpoint URL** to:
```
https://qovery.eu.auth0.com/oauth/global-token-revocation/connection/$CONNECTION_NAME
```
* Set **Subject format** to "Issuer and Subject Identifier"
 ### SAML Information To Share
#### Required Information
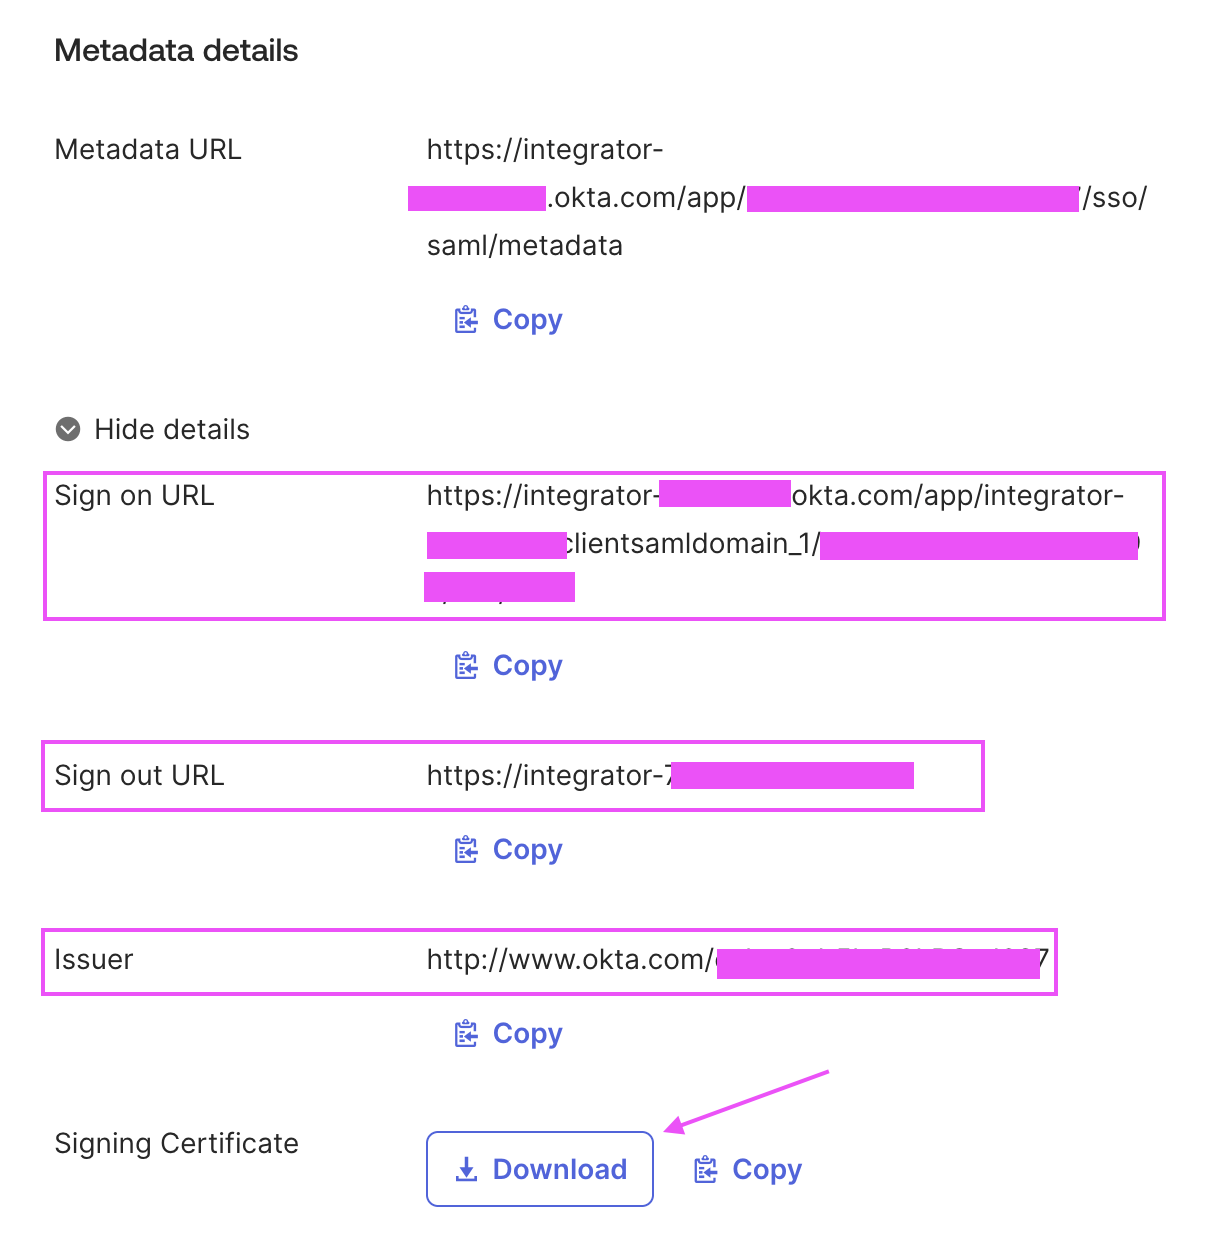
Go to **Sign On** tab and gather the following required information:
* Sign on URL
* Signing Certificate
Go to **General** section, edit **SAML Settings** section, and click on **Preview the SAML Assertion**. This will generate an XML file that you will need to share.
### SAML Information To Share
#### Required Information
Go to **Sign On** tab and gather the following required information:
* Sign on URL
* Signing Certificate
Go to **General** section, edit **SAML Settings** section, and click on **Preview the SAML Assertion**. This will generate an XML file that you will need to share.
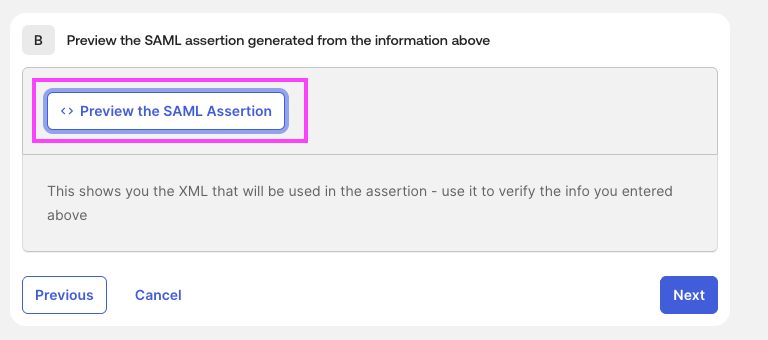 **Validate your XML**: You should see in the SAML Assertion XML file the fields that IDP will expose to Qovery inside ``, for example:
```xml theme={null}
user@example.com
Foo Bar
```
If you want to synchronize groups, you should see the property `groups` here as well.
#### (Optional) Global Token Revocation Information
If you want to enable global token revocation, you'll need to also share:
* Issuer
* Sign out URL
* Subject (follow [these instructions](https://support.okta.com/help/s/article/How-to-obtain-an-application-ID?language=en_US) for Okta)
**Validate your XML**: You should see in the SAML Assertion XML file the fields that IDP will expose to Qovery inside ``, for example:
```xml theme={null}
user@example.com
Foo Bar
```
If you want to synchronize groups, you should see the property `groups` here as well.
#### (Optional) Global Token Revocation Information
If you want to enable global token revocation, you'll need to also share:
* Issuer
* Sign out URL
* Subject (follow [these instructions](https://support.okta.com/help/s/article/How-to-obtain-an-application-ID?language=en_US) for Okta)
 ### Configure Your OIDC Application
#### Create OIDC Application
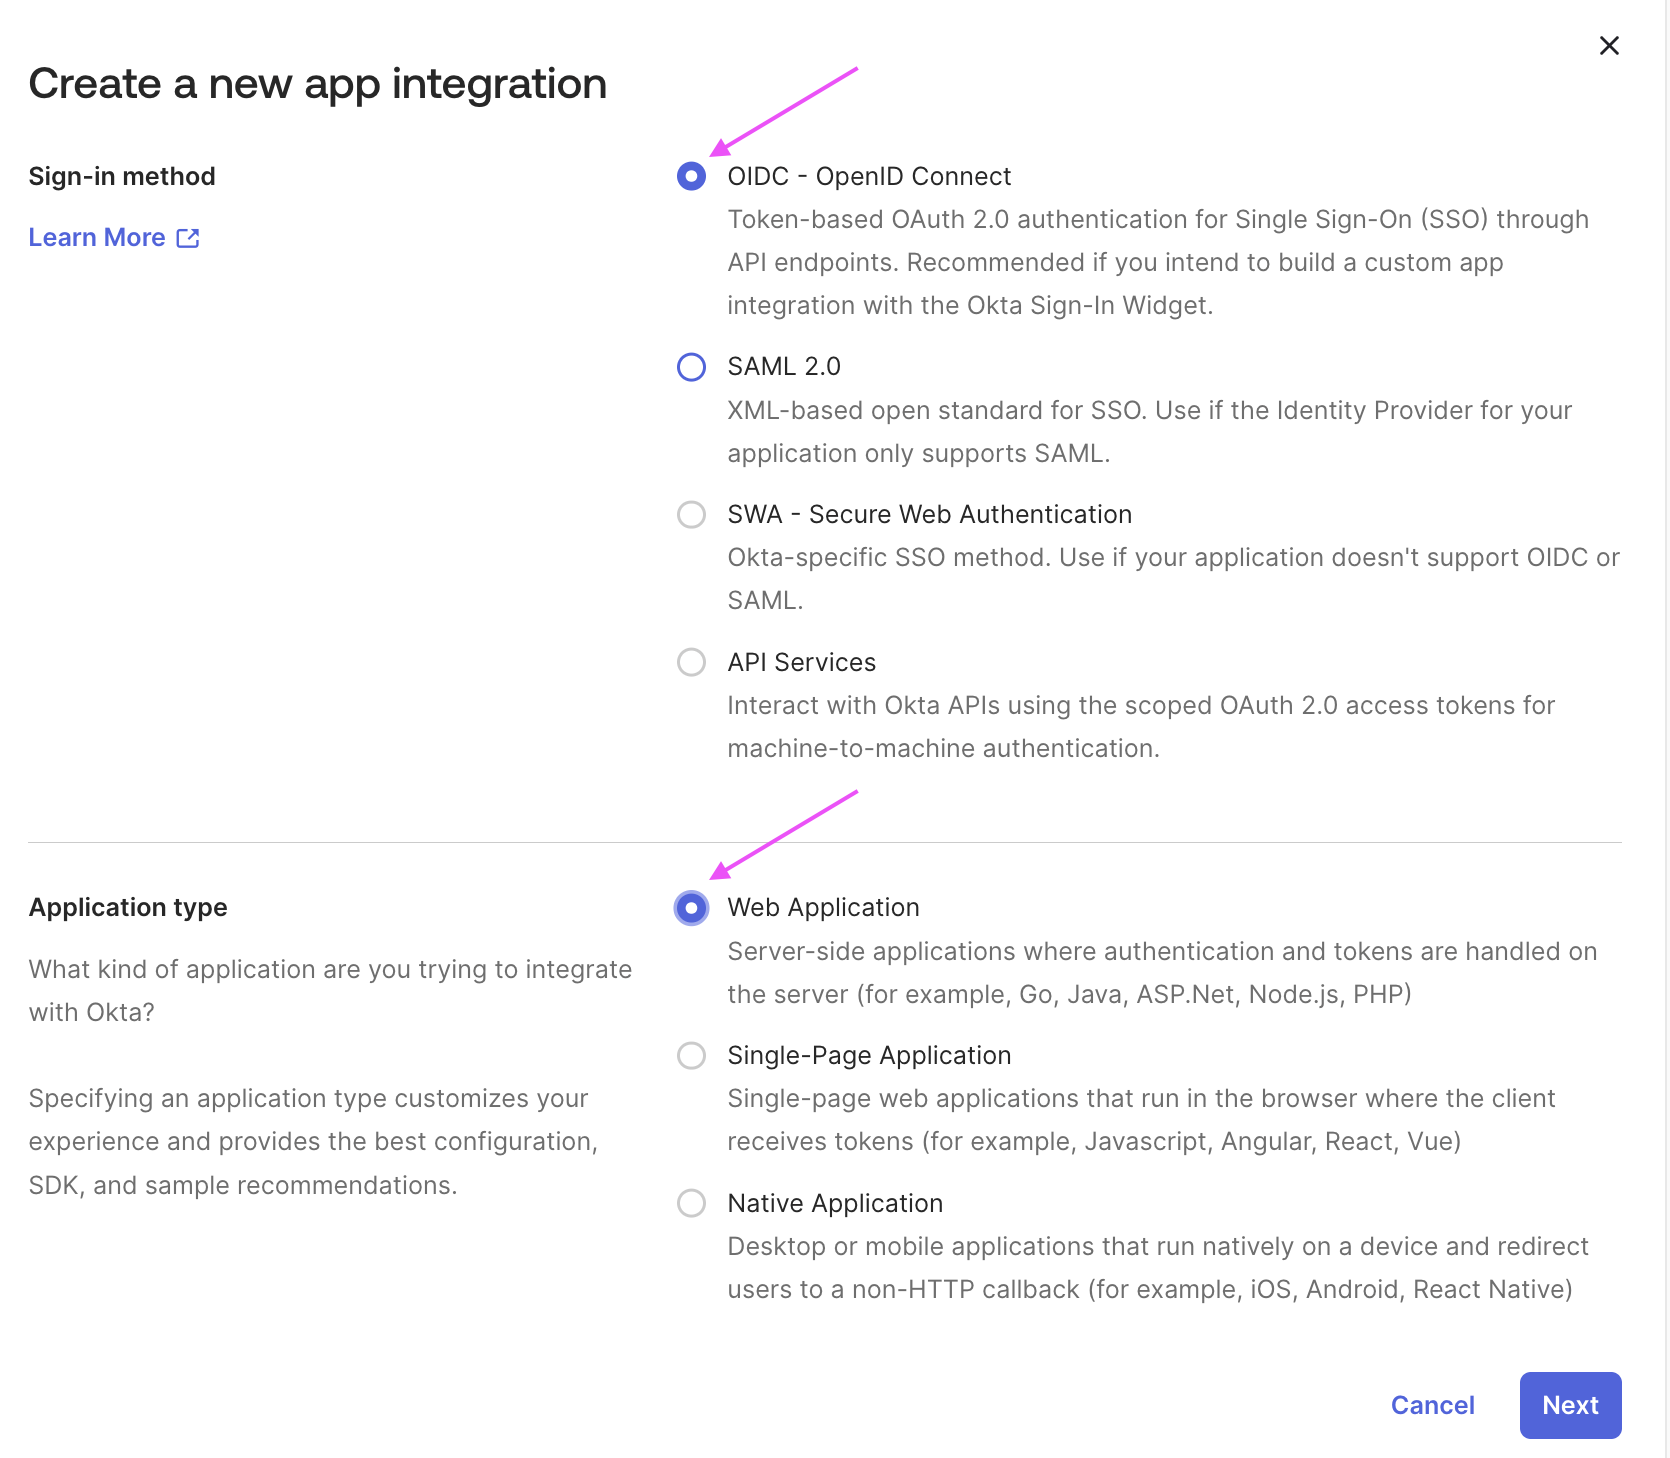
Create your OIDC application: choose `OIDC - OpenID Connect` and `Web Application`:
### Configure Your OIDC Application
#### Create OIDC Application
Create your OIDC application: choose `OIDC - OpenID Connect` and `Web Application`:
 #### Qovery Authentication Information
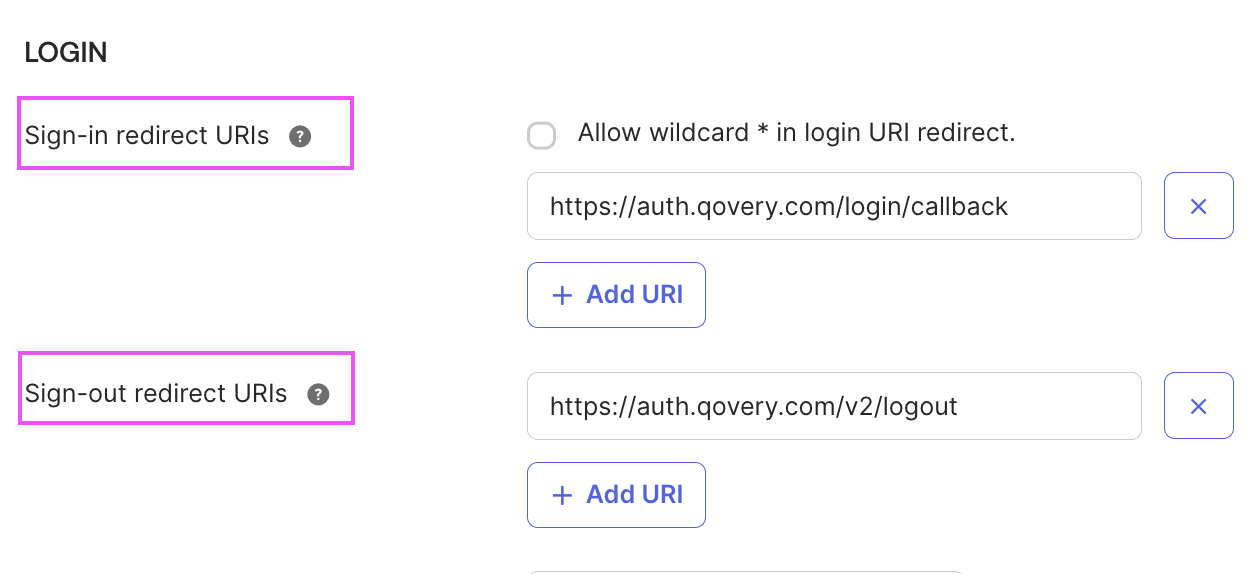
In **General** tab > **General Settings** section:
* Set the **Sign-in redirect URIs** to:
```
https://auth.qovery.com/login/callback
```
* Set the **Sign-out redirect URIs** to:
```
https://auth.qovery.com/v2/logout
```
#### Qovery Authentication Information
In **General** tab > **General Settings** section:
* Set the **Sign-in redirect URIs** to:
```
https://auth.qovery.com/login/callback
```
* Set the **Sign-out redirect URIs** to:
```
https://auth.qovery.com/v2/logout
```
 In **General** tab > **Client Credentials** section, set the **Client authentication** to `Client secret`.
#### (Optional) IDP-Initiated Login
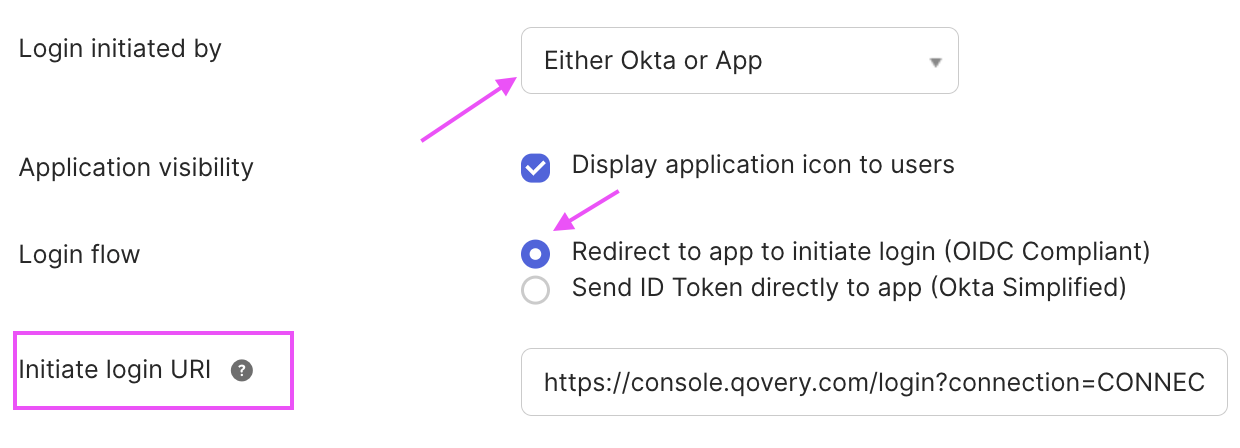
To make your application available to your users, you'll need the **Initiate Login URI**:
```
https://console.qovery.com/login?connection=CONNECTION_NAME
```
In **General** tab > **Client Credentials** section, set the **Client authentication** to `Client secret`.
#### (Optional) IDP-Initiated Login
To make your application available to your users, you'll need the **Initiate Login URI**:
```
https://console.qovery.com/login?connection=CONNECTION_NAME
```
 #### (Optional) Expose Groups
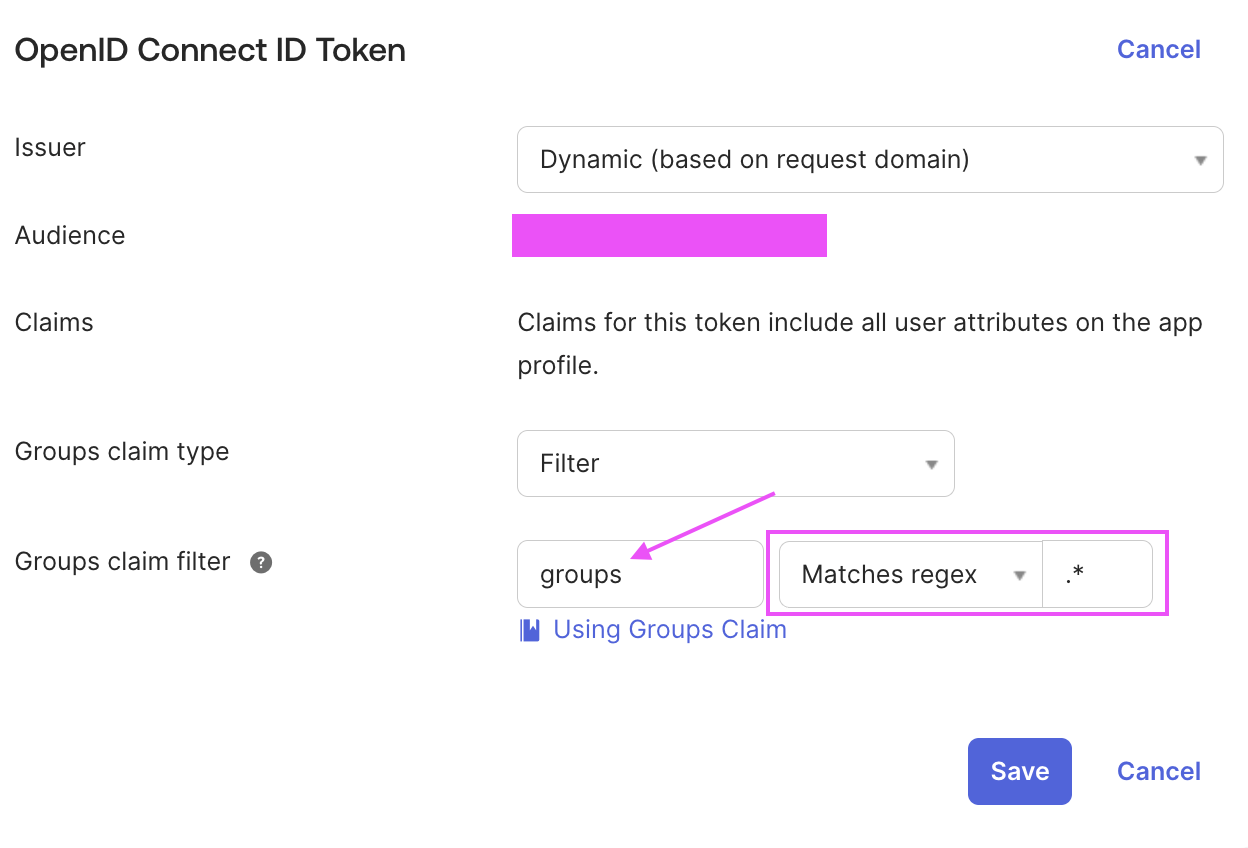
If you want to automatically assign a Qovery role according to your users' groups (see [Configure Group Synchronization](#configure-group-synchronization)), you need to expose them.
Go to **Sign On** > **OpenID Connect ID Token**:
* Add a `groups` claim
* You can filter on the groups you want to expose or not (e.g., `.*` to expose all groups assigned to your users)
#### (Optional) Expose Groups
If you want to automatically assign a Qovery role according to your users' groups (see [Configure Group Synchronization](#configure-group-synchronization)), you need to expose them.
Go to **Sign On** > **OpenID Connect ID Token**:
* Add a `groups` claim
* You can filter on the groups you want to expose or not (e.g., `.*` to expose all groups assigned to your users)
 #### (Optional) Enable Global Token Revocation
In **Logout** section:
* Set the **Endpoint URL** to:
```
https://qovery.eu.auth0.com/oauth/global-token-revocation/connection/$CONNECTION_NAME
```
* Set **Subject format** to "Issuer and Subject Identifier"
### OIDC Information To Share
#### Required Information
Qovery needs the following information to configure properly your OIDC application:
* Your **Client ID**
* Your **Client Secret**
* Your **OIDC discovery metadata** (e.g., on Okta: `https://{yourdomain}/.well-known/openid-configuration`)
## Configuration Qovery Side
Before this step, you have validated your SAML/OIDC authentication flow with your CSM.
### Check Your Enterprise Connection
You can use the CLI to check your connection configuration:
```bash theme={null}
qovery enterprise-connection get
```
This should give you the following output:
```
# Connection Name: $CONNECTION_NAME
# Connection Settings
Default Role | Enforce Sync Group
viewer | ✗ false
# Group Mappings
Qovery Role | Your IDP Groups
```
**By default:**
* The "Default Role" is set to "viewer"
* The synchronization on IDP groups is disabled
### Configure The Default Role
This is the Qovery role that will be associated to your IDP users when they log in to Qovery.
You can indicate either a [Qovery provided role](/docs/configuration/organization/members-rbac) or a [custom role](/docs/configuration/organization/members-rbac#custom-roles):
```bash Qovery Provided Role theme={null}
qovery enterprise-connection update \
--connection=$CONNECTION_NAME \
--default-role="Devops"
```
```bash Custom Role theme={null}
qovery enterprise-connection update \
--connection=$CONNECTION_NAME \
--default-role="My Custom Role"
```
If you choose to enable the "Enforce Sync Group" parameter, the default role is used in case no mapping is found for your IDP users group.
### Configure Group Synchronization
Group synchronization tells Qovery to always synchronize the Qovery role with your IDP users' groups. You need to configure **Group Mappings** when setting **Enforce Sync Group** to `true`.
#### Enable Group Synchronization
```bash theme={null}
qovery enterprise-connection update \
--connection=$CONNECTION_NAME \
--enforce-group-sync=true
```
#### Add Group Mappings
You can create a mapping table to associate the expected Qovery role based on your user IDP group.
**Example 1**: Users with IDP groups "Administrators" or "DevSecOps" get the "admin" Qovery role:
```bash theme={null}
qovery enterprise-connection group-mappings add \
--connection=$CONNECTION_NAME \
--qovery-role="admin" \
--idp-group-names="Administrators,DevSecOps"
```
**Example 2**: Users with IDP group "Devs" get the "Qovery Devs" custom role:
```bash theme={null}
qovery enterprise-connection group-mappings add \
--connection=$CONNECTION_NAME \
--qovery-role="Qovery Devs" \
--idp-group-names="Devs"
```
The output should be:
```
Qovery Role | Your IDP Groups
Qovery Devs | Devs
admin | Administrators ; DevSecOps
```
#### Manage Group Mappings
```bash theme={null}
qovery enterprise-connection group-mappings list \
--connection=$CONNECTION_NAME
```
```bash theme={null}
qovery enterprise-connection group-mappings delete \
--connection=$CONNECTION_NAME \
--qovery-role="admin"
```
Do not forget to configure your IDP correctly to expose a `groups` attribute if you want to benefit from the mappings configuration.
## User Provisioning
Users are **not auto-provisioned** into Qovery. They need to log in at least once to Qovery using the SAML or OIDC authentication flow to be present in your organization.
Qovery defines a user according to both their email and their authentication provider. This means that when your users use the new SAML/OIDC authentication flow, they will be considered as new users in your organization. You will need to manually remove the old users that were using classic SSO login.
**Billing Consideration**
Qovery computes billing according to the number of users present in your organization.
During the transition from classic SSO to SAML/OIDC authentication flow, you may experience a billing increase if you don't delete old users progressively. If it happens, a refund will be done the next month.
## Transfer Organization Ownership
Don't forget to transfer your organization ownership to the new user that will be using SAML/OIDC authentication flow.
Ensure the new owner has logged in at least once using the SAML/OIDC authentication flow.
Follow the organization ownership transfer process in the Qovery console.
Progressively remove old users who were using classic SSO authentication.
#### (Optional) Enable Global Token Revocation
In **Logout** section:
* Set the **Endpoint URL** to:
```
https://qovery.eu.auth0.com/oauth/global-token-revocation/connection/$CONNECTION_NAME
```
* Set **Subject format** to "Issuer and Subject Identifier"
### OIDC Information To Share
#### Required Information
Qovery needs the following information to configure properly your OIDC application:
* Your **Client ID**
* Your **Client Secret**
* Your **OIDC discovery metadata** (e.g., on Okta: `https://{yourdomain}/.well-known/openid-configuration`)
## Configuration Qovery Side
Before this step, you have validated your SAML/OIDC authentication flow with your CSM.
### Check Your Enterprise Connection
You can use the CLI to check your connection configuration:
```bash theme={null}
qovery enterprise-connection get
```
This should give you the following output:
```
# Connection Name: $CONNECTION_NAME
# Connection Settings
Default Role | Enforce Sync Group
viewer | ✗ false
# Group Mappings
Qovery Role | Your IDP Groups
```
**By default:**
* The "Default Role" is set to "viewer"
* The synchronization on IDP groups is disabled
### Configure The Default Role
This is the Qovery role that will be associated to your IDP users when they log in to Qovery.
You can indicate either a [Qovery provided role](/docs/configuration/organization/members-rbac) or a [custom role](/docs/configuration/organization/members-rbac#custom-roles):
```bash Qovery Provided Role theme={null}
qovery enterprise-connection update \
--connection=$CONNECTION_NAME \
--default-role="Devops"
```
```bash Custom Role theme={null}
qovery enterprise-connection update \
--connection=$CONNECTION_NAME \
--default-role="My Custom Role"
```
If you choose to enable the "Enforce Sync Group" parameter, the default role is used in case no mapping is found for your IDP users group.
### Configure Group Synchronization
Group synchronization tells Qovery to always synchronize the Qovery role with your IDP users' groups. You need to configure **Group Mappings** when setting **Enforce Sync Group** to `true`.
#### Enable Group Synchronization
```bash theme={null}
qovery enterprise-connection update \
--connection=$CONNECTION_NAME \
--enforce-group-sync=true
```
#### Add Group Mappings
You can create a mapping table to associate the expected Qovery role based on your user IDP group.
**Example 1**: Users with IDP groups "Administrators" or "DevSecOps" get the "admin" Qovery role:
```bash theme={null}
qovery enterprise-connection group-mappings add \
--connection=$CONNECTION_NAME \
--qovery-role="admin" \
--idp-group-names="Administrators,DevSecOps"
```
**Example 2**: Users with IDP group "Devs" get the "Qovery Devs" custom role:
```bash theme={null}
qovery enterprise-connection group-mappings add \
--connection=$CONNECTION_NAME \
--qovery-role="Qovery Devs" \
--idp-group-names="Devs"
```
The output should be:
```
Qovery Role | Your IDP Groups
Qovery Devs | Devs
admin | Administrators ; DevSecOps
```
#### Manage Group Mappings
```bash theme={null}
qovery enterprise-connection group-mappings list \
--connection=$CONNECTION_NAME
```
```bash theme={null}
qovery enterprise-connection group-mappings delete \
--connection=$CONNECTION_NAME \
--qovery-role="admin"
```
Do not forget to configure your IDP correctly to expose a `groups` attribute if you want to benefit from the mappings configuration.
## User Provisioning
Users are **not auto-provisioned** into Qovery. They need to log in at least once to Qovery using the SAML or OIDC authentication flow to be present in your organization.
Qovery defines a user according to both their email and their authentication provider. This means that when your users use the new SAML/OIDC authentication flow, they will be considered as new users in your organization. You will need to manually remove the old users that were using classic SSO login.
**Billing Consideration**
Qovery computes billing according to the number of users present in your organization.
During the transition from classic SSO to SAML/OIDC authentication flow, you may experience a billing increase if you don't delete old users progressively. If it happens, a refund will be done the next month.
## Transfer Organization Ownership
Don't forget to transfer your organization ownership to the new user that will be using SAML/OIDC authentication flow.
Ensure the new owner has logged in at least once using the SAML/OIDC authentication flow.
Follow the organization ownership transfer process in the Qovery console.
Progressively remove old users who were using classic SSO authentication.