> ## Documentation Index
> Fetch the complete documentation index at: https://www.qovery.com/docs/llms.txt
> Use this file to discover all available pages before exploring further.
# Git Repository Access
> Configure Git repository access for your organization
## Overview
On your first sign in to the Qovery Console, you need to login via your Git provider account (GitHub, GitLab, or Bitbucket). This allows Qovery to manage your repositories and create webhooks to track push events and pull requests for auto-deployment and preview environments.
Qovery offers two approaches for Git repository access:
1. **User-based access** (default): Uses your personal Git provider login
2. **Git tokens** (recommended): Centralized token management for decoupled permission control
This page focuses on the **Git tokens** approach, which provides organizations with better control and security.
**Legacy GitHub App**: The Qovery GitHub App is being deprecated and will be replaced by the Git tokens system. Existing users should migrate to tokens for better flexibility and control.
## Git Tokens
Git tokens enable centralized management of Git repository access. Tokens are created within your Git provider and added to your Qovery organization, decoupling permissions from individual user accounts.
### Managing Tokens on Git Provider
Create tokens in your Git provider with the appropriate permissions:
#### GitHub
GitHub supports two token types:
Classic tokens provide full control with simpler configuration.
**Required Permissions:**
* `repo` (Full control of private repositories) - **Required**
* `admin:repo_hook` (Full control of repository hooks) - **Required**
* `read:org` (Read org and team membership) - if using GitHub organizations
**Steps:**
1. Go to [GitHub Token Settings](https://github.com/settings/tokens)
2. Click **Generate new token (classic)**
3. Add a descriptive note (e.g., "Qovery Access")
4. Select the required scopes above
5. Choose an expiration period
6. Click **Generate token** and copy immediately
GitHub shows your token only once. Copy it immediately after generation.
Fine-grained tokens offer more granular control.
**Required Permissions:**
* **Contents**: Read-only access
* **Webhooks**: Read and write
* **Pull requests**: Read and write
**Steps:**
1. Go to Settings > Developer settings > Personal access tokens > Fine-grained tokens
2. Click **Generate new token**
3. Configure token name and expiration
4. Select repository access (specific repositories)
5. Grant the required permissions listed above
6. Click **Generate token** and copy immediately
Fine-grained tokens require explicit repository selection.
##### GitHub vs GitHub Enterprise
When adding a GitHub token in Qovery:
Use this option for repositories hosted on **github.com**:
* No additional configuration needed
* Uses standard GitHub.com API
* Default option for most users
Use this option for self-hosted GitHub Enterprise Server:
* Requires **GitHub Host URL** (e.g., `https://github.example.com`)
* Same token configuration as GitHub.com
* Ensure server is accessible from Qovery
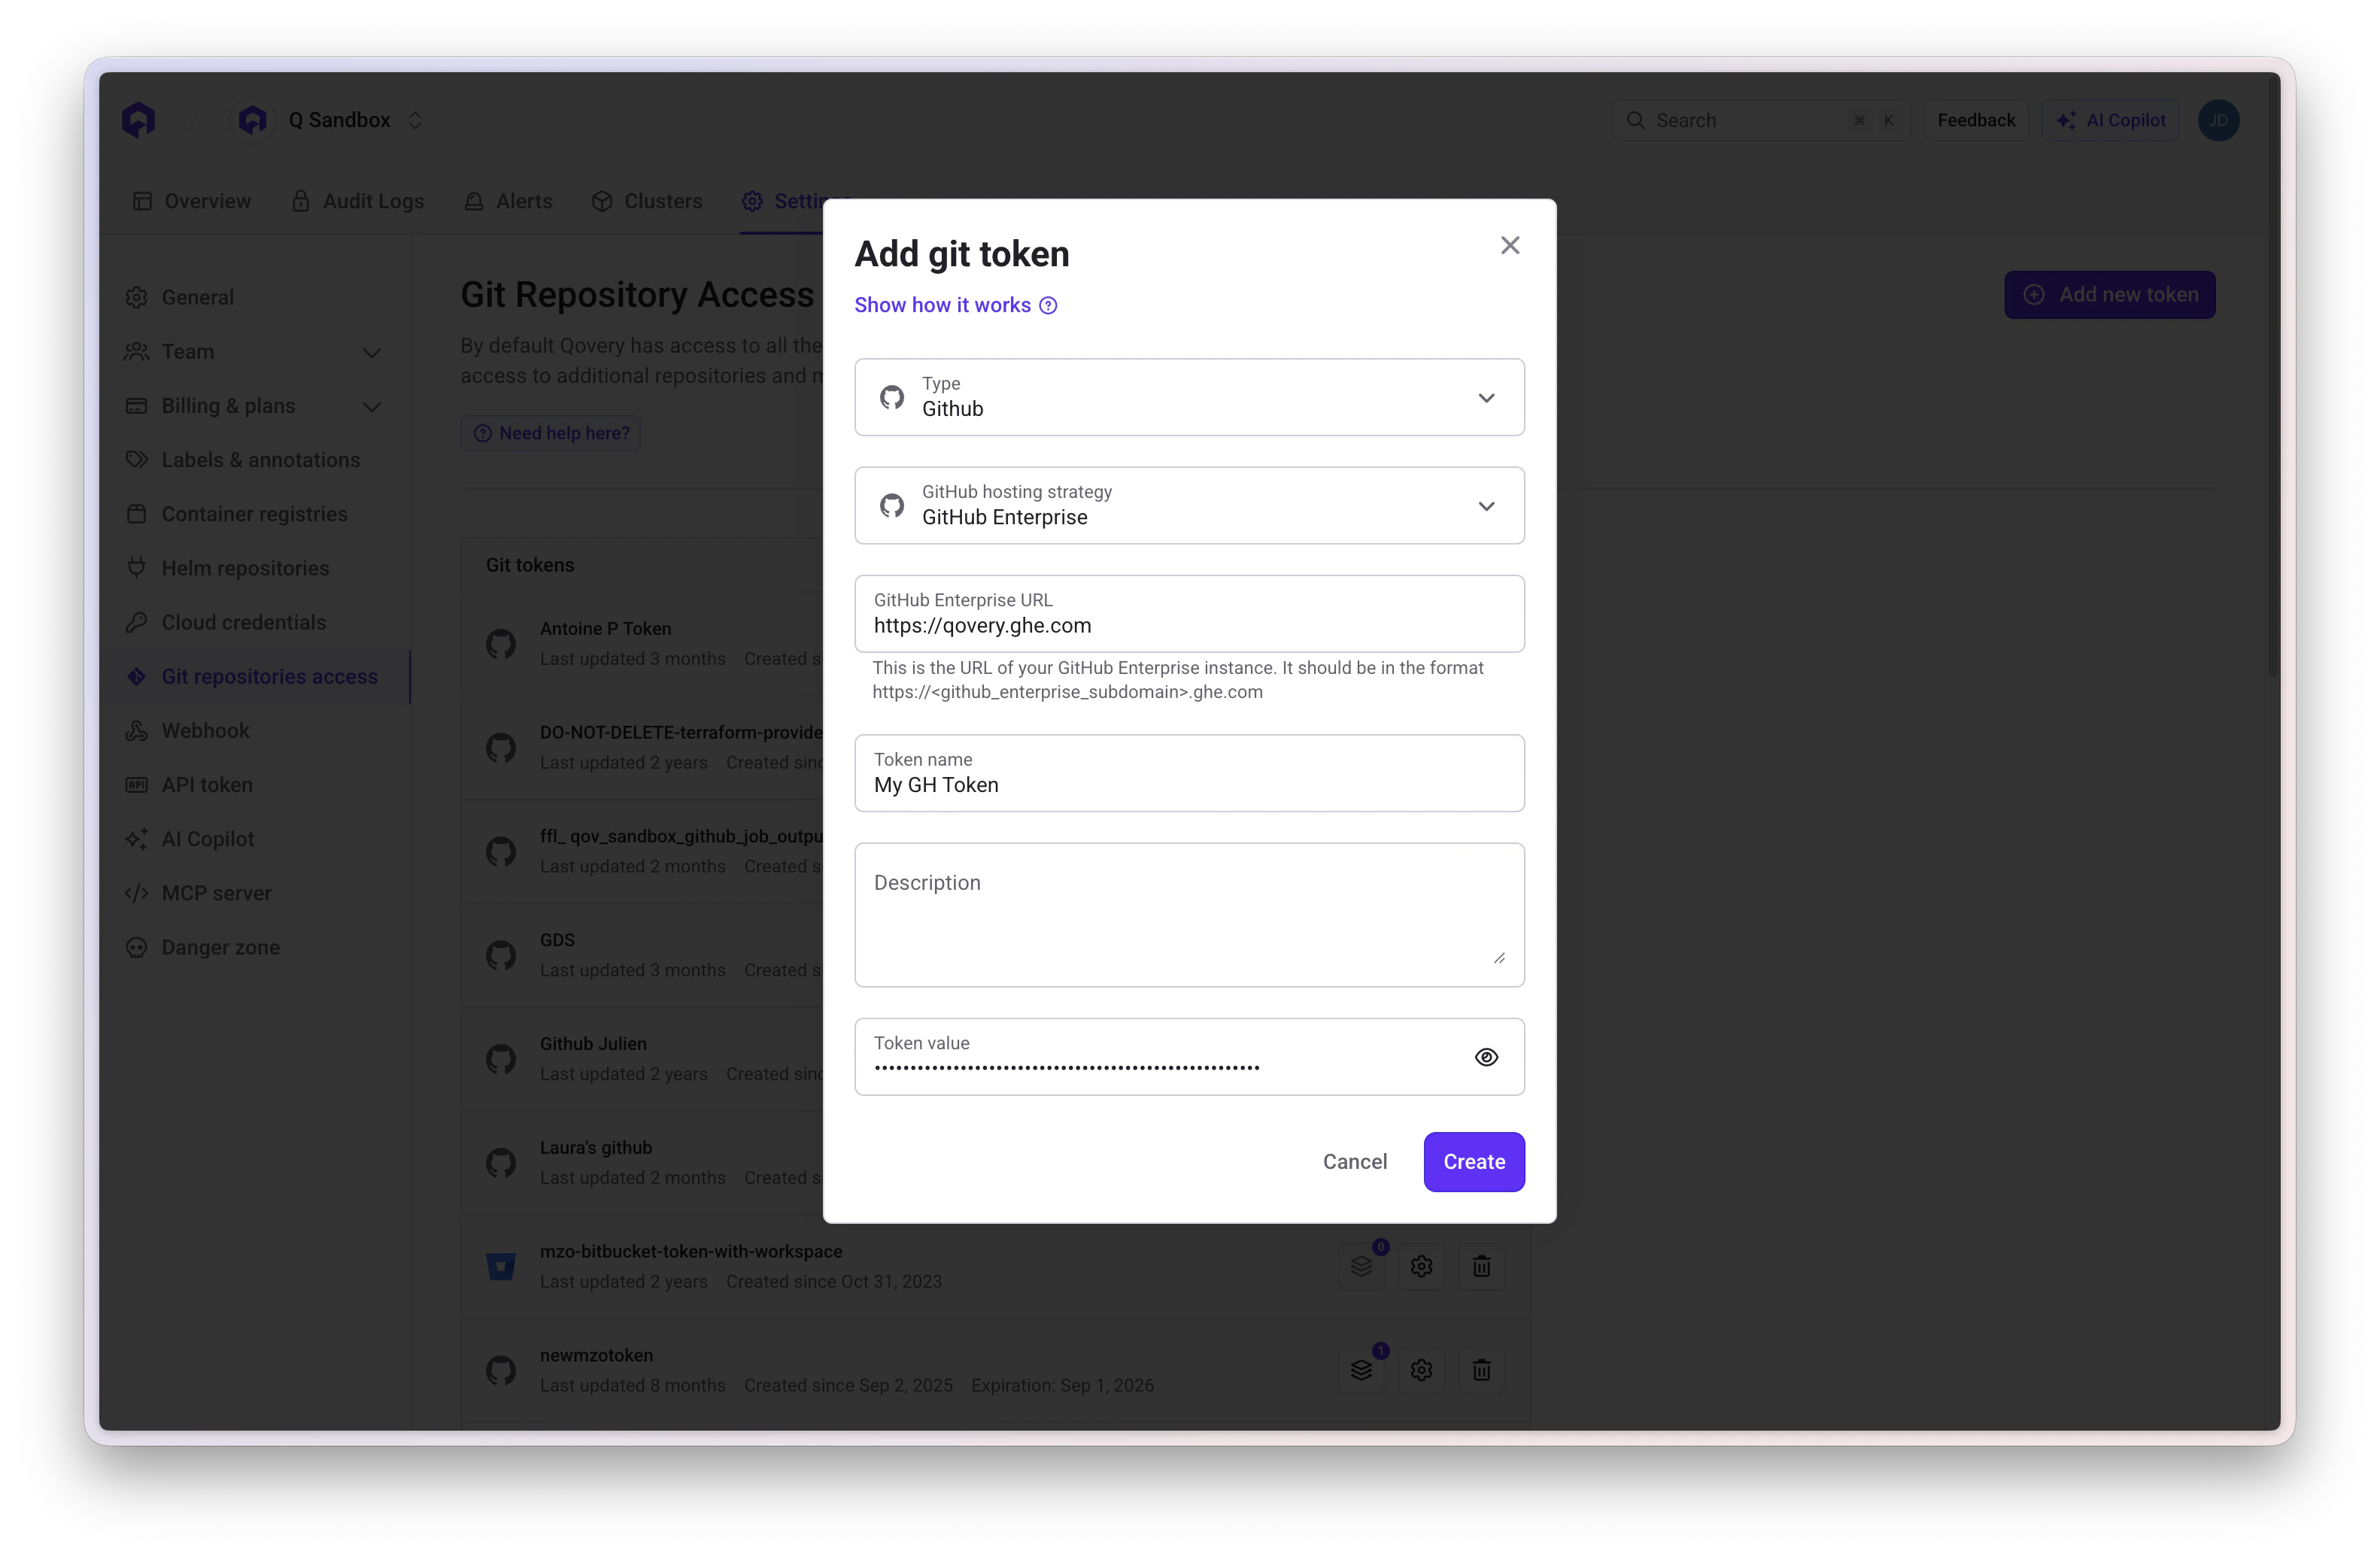 Your GitHub Enterprise server must be accessible from Qovery. Whitelist Qovery's IP addresses if behind a firewall.
#### GitLab
GitLab supports project, group, and personal access tokens.
For access to specific projects:
**Required Configuration:**
* **Role**: Maintainer or Owner
* **Scopes**:
* `api` (Access the API) - **Required**
* `read_repository` (Read access to repositories) - **Required**
**Steps:**
1. Go to your GitLab project > Settings > Access Tokens
2. Click **Add new token**
3. Enter token name and expiration date
4. Select **Maintainer** or **Owner** role
5. Check required scopes
6. Click **Create project access token** and copy immediately
For access to all projects in a group:
**Required Configuration:**
* **Role**: Maintainer or Owner
* **Scopes**:
* `api` (Access the API) - **Required**
* `read_repository` (Read access to repositories) - **Required**
**Steps:**
1. Go to your GitLab group > Settings > Access Tokens
2. Click **Add new token**
3. Enter token name and expiration date
4. Select **Maintainer** or **Owner** role
5. Check required scopes
6. Click **Create group access token** and copy immediately
##### GitLab.com vs Self-hosted
When adding a GitLab token in Qovery:
* **GitLab.com**: No additional configuration needed
* **Self-hosted GitLab**: Provide your GitLab server URL (e.g., `https://gitlab.company.com`)
Ensure your self-hosted GitLab instance is accessible from Qovery.
#### Bitbucket
Bitbucket supports repository and workspace access tokens.
For access to specific repositories:
**Required Permissions:**
* **Repositories**: Read - **Required**
* **Pull requests**: Read and write - **Required**
* **Webhooks**: Read and write - **Required**
**Steps:**
1. Go to repository > Repository settings > Access tokens
2. Click **Create Repository Access Token**
3. Enter token name and expiration
4. Select required permissions
5. Click **Create** and copy immediately
For access to all repositories in a workspace (requires Bitbucket Premium):
**Required Permissions:**
* **Repositories**: Read - **Required**
* **Pull requests**: Read and write - **Required**
* **Webhooks**: Read and write - **Required**
**Steps:**
1. Go to workspace > Settings > Access tokens
2. Click **Create Access Token**
3. Enter token name and expiration
4. Select required permissions
5. Click **Create** and copy immediately
When adding a Bitbucket token to Qovery, specify the **workspace name**.
#### Token Expiration
Git provider tokens typically include expiration dates. To maintain continuous repository access:
1. **Monitor expiration**: Check your Git provider settings regularly
2. **Renew before expiry**: Either extend expiration (if supported) or generate a new token
3. **Update in Qovery**: Replace the old token value in Qovery organization settings
4. **Verify connection**: Test with a deployment
5. **Revoke old token**: Delete the old token from your Git provider
Always update tokens in Qovery BEFORE they expire to avoid deployment interruptions.
### Managing Tokens on Qovery
Once you've created a token in your Git provider, manage it in Qovery:
#### Create the Token
Click on your organization name in the top left, then go to the **Settings** tab.
Open the `Git Repository Access` section within organization settings
Click **Add Token** button
Provide:
* **Git Provider**: Select GitHub, GitLab, or Bitbucket
* **Name**: Descriptive name (e.g., "GitHub Main Org")
* **Token**: Paste your Git provider access token
* **URL** (for self-hosted only): Your Git server URL
* **Workspace** (for Bitbucket only): Your Bitbucket workspace name
Qovery will validate the token and verify access. Click **Save** to complete.
Only users with **Owner**, **Admin**, or **DevOps** roles can manage Git tokens.
#### Using the Token
Once configured, Git tokens are automatically used when:
* Creating new applications or services from Git repositories
* Cloning repository code during builds
* Monitoring repository changes for auto-deployment
* Accessing Dockerfile and build context
* Configuring webhooks for auto-deploy and preview environments
When creating a service:
1. Choose **Git Repository** as the source
2. Select **Organization Token** (instead of personal Git account)
3. Choose the Git provider type
4. Select repository and branch
#### Update the Token
Find the token in the Git Repository Access list
Click the **Edit** button next to the token
Update token value, name, or URL as needed
Click **Save** to apply changes
Updating a token affects all applications using repositories from this Git provider connection.
#### Delete the Token
To remove a Git token:
1. Locate the token in the Git Repository Access list
2. Click the **Delete** button (trash icon)
3. Confirm deletion
Applications currently using repositories accessed through this token may fail to build or deploy. Configure alternative access before deletion.
## Deprecated: Qovery GitHub App
The Qovery GitHub App is being deprecated and will be replaced by Git tokens. Existing users should migrate to the token-based approach described above.
The legacy Qovery GitHub App provided GitHub repository access through an OAuth app. While still functional for existing users, new users should use Git tokens instead.
### Migration Recommendation
1. Create GitHub personal access token (see instructions above)
2. Add token to Qovery organization settings
3. Update applications to use organization token instead of GitHub App
4. Uninstall Qovery GitHub App once migration is complete
## Best Practices
Use organizational Git tokens instead of personal accounts for better security and to decouple deployments from individual user access.
Always set an expiration date (90 days to 1 year) and set reminders for token rotation.
Create dedicated Git accounts for Qovery integration that aren't tied to individual developers.
Use clear names like `github-main-org-production` or `gitlab-team-alpha` to identify tokens easily.
Rotate tokens periodically for security:
1. Create new token with same permissions
2. Update in Qovery
3. Test with deployment
4. Revoke old token
## Related Resources
Deploy applications from Git repositories
Manage container registries
Configure automatic deployments
Integrate with your CI/CD pipeline
Your GitHub Enterprise server must be accessible from Qovery. Whitelist Qovery's IP addresses if behind a firewall.
#### GitLab
GitLab supports project, group, and personal access tokens.
For access to specific projects:
**Required Configuration:**
* **Role**: Maintainer or Owner
* **Scopes**:
* `api` (Access the API) - **Required**
* `read_repository` (Read access to repositories) - **Required**
**Steps:**
1. Go to your GitLab project > Settings > Access Tokens
2. Click **Add new token**
3. Enter token name and expiration date
4. Select **Maintainer** or **Owner** role
5. Check required scopes
6. Click **Create project access token** and copy immediately
For access to all projects in a group:
**Required Configuration:**
* **Role**: Maintainer or Owner
* **Scopes**:
* `api` (Access the API) - **Required**
* `read_repository` (Read access to repositories) - **Required**
**Steps:**
1. Go to your GitLab group > Settings > Access Tokens
2. Click **Add new token**
3. Enter token name and expiration date
4. Select **Maintainer** or **Owner** role
5. Check required scopes
6. Click **Create group access token** and copy immediately
##### GitLab.com vs Self-hosted
When adding a GitLab token in Qovery:
* **GitLab.com**: No additional configuration needed
* **Self-hosted GitLab**: Provide your GitLab server URL (e.g., `https://gitlab.company.com`)
Ensure your self-hosted GitLab instance is accessible from Qovery.
#### Bitbucket
Bitbucket supports repository and workspace access tokens.
For access to specific repositories:
**Required Permissions:**
* **Repositories**: Read - **Required**
* **Pull requests**: Read and write - **Required**
* **Webhooks**: Read and write - **Required**
**Steps:**
1. Go to repository > Repository settings > Access tokens
2. Click **Create Repository Access Token**
3. Enter token name and expiration
4. Select required permissions
5. Click **Create** and copy immediately
For access to all repositories in a workspace (requires Bitbucket Premium):
**Required Permissions:**
* **Repositories**: Read - **Required**
* **Pull requests**: Read and write - **Required**
* **Webhooks**: Read and write - **Required**
**Steps:**
1. Go to workspace > Settings > Access tokens
2. Click **Create Access Token**
3. Enter token name and expiration
4. Select required permissions
5. Click **Create** and copy immediately
When adding a Bitbucket token to Qovery, specify the **workspace name**.
#### Token Expiration
Git provider tokens typically include expiration dates. To maintain continuous repository access:
1. **Monitor expiration**: Check your Git provider settings regularly
2. **Renew before expiry**: Either extend expiration (if supported) or generate a new token
3. **Update in Qovery**: Replace the old token value in Qovery organization settings
4. **Verify connection**: Test with a deployment
5. **Revoke old token**: Delete the old token from your Git provider
Always update tokens in Qovery BEFORE they expire to avoid deployment interruptions.
### Managing Tokens on Qovery
Once you've created a token in your Git provider, manage it in Qovery:
#### Create the Token
Click on your organization name in the top left, then go to the **Settings** tab.
Open the `Git Repository Access` section within organization settings
Click **Add Token** button
Provide:
* **Git Provider**: Select GitHub, GitLab, or Bitbucket
* **Name**: Descriptive name (e.g., "GitHub Main Org")
* **Token**: Paste your Git provider access token
* **URL** (for self-hosted only): Your Git server URL
* **Workspace** (for Bitbucket only): Your Bitbucket workspace name
Qovery will validate the token and verify access. Click **Save** to complete.
Only users with **Owner**, **Admin**, or **DevOps** roles can manage Git tokens.
#### Using the Token
Once configured, Git tokens are automatically used when:
* Creating new applications or services from Git repositories
* Cloning repository code during builds
* Monitoring repository changes for auto-deployment
* Accessing Dockerfile and build context
* Configuring webhooks for auto-deploy and preview environments
When creating a service:
1. Choose **Git Repository** as the source
2. Select **Organization Token** (instead of personal Git account)
3. Choose the Git provider type
4. Select repository and branch
#### Update the Token
Find the token in the Git Repository Access list
Click the **Edit** button next to the token
Update token value, name, or URL as needed
Click **Save** to apply changes
Updating a token affects all applications using repositories from this Git provider connection.
#### Delete the Token
To remove a Git token:
1. Locate the token in the Git Repository Access list
2. Click the **Delete** button (trash icon)
3. Confirm deletion
Applications currently using repositories accessed through this token may fail to build or deploy. Configure alternative access before deletion.
## Deprecated: Qovery GitHub App
The Qovery GitHub App is being deprecated and will be replaced by Git tokens. Existing users should migrate to the token-based approach described above.
The legacy Qovery GitHub App provided GitHub repository access through an OAuth app. While still functional for existing users, new users should use Git tokens instead.
### Migration Recommendation
1. Create GitHub personal access token (see instructions above)
2. Add token to Qovery organization settings
3. Update applications to use organization token instead of GitHub App
4. Uninstall Qovery GitHub App once migration is complete
## Best Practices
Use organizational Git tokens instead of personal accounts for better security and to decouple deployments from individual user access.
Always set an expiration date (90 days to 1 year) and set reminders for token rotation.
Create dedicated Git accounts for Qovery integration that aren't tied to individual developers.
Use clear names like `github-main-org-production` or `gitlab-team-alpha` to identify tokens easily.
Rotate tokens periodically for security:
1. Create new token with same permissions
2. Update in Qovery
3. Test with deployment
4. Revoke old token
## Related Resources
Deploy applications from Git repositories
Manage container registries
Configure automatic deployments
Integrate with your CI/CD pipeline