> ## Documentation Index
> Fetch the complete documentation index at: https://www.qovery.com/docs/llms.txt
> Use this file to discover all available pages before exploring further.
# Kubecost
> Monitor and reduce Kubernetes spend with Kubecost
Kubecost provides real-time cost visibility and insights for your Kubernetes clusters. This guide shows you how to deploy Kubecost on your Qovery cluster to track and optimize your infrastructure spending.
**Prerequisites**: You need a functioning Qovery cluster before starting this tutorial.
This tutorial takes approximately **5 minutes** to complete.
## Installation
This guide targets chart version 3.1.8. Steps may differ for other versions — check the [official Kubecost docs](https://www.ibm.com/docs/en/kubecost/self-hosted/3.x) for the latest.
### Step 1: Add the Kubecost Helm Repository
In [Qovery Console](https://console.qovery.com):
1. Go to **Settings** → **Helm Repositories**
2. Click **Add Repository**
3. Configure:
* Repository name: `Kubecost`
* Kind: `HTTPS`
* Repository URL: `https://kubecost.github.io/kubecost`
See [Helm Repository Management](/docs/configuration/organization/helm-repository) for more details.
### Step 2: Create the Kubecost Helm Service
In your environment:
1. Click **Create** → **Helm Chart**
2. Configure:
* Service name: `kubecost`
* Helm source: `Helm repository`
* Repository: `Kubecost`
* Chart name: `kubecost`
* Version: `3.1.8` (or [latest from Kubecost](https://github.com/kubecost/helm-charts/releases))
* Allow cluster-wide resources: ✔️
See [Helm Charts](/docs/configuration/helm) for more details on creating a Helm service.
### Step 3: Configure Variables and Values Override
Open the Kubecost service overview and go to the **Variables** section.
Add these variables as needed:
| Variable | Value | Scope | Secret | Notes |
| ---------------- | -------------- | ------- | ------ | ------------------------------------------------------- |
| `KUBECOST_TOKEN` | `` | Service | ✔️ | Required only for Kubecost Business/Enterprise features |
See [Environment Variables](/docs/configuration/environment-variables) for more details on managing variables in Qovery.
In the **Override as file** section of your Helm service, add the following configuration:
```yaml theme={null}
global:
clusterId: my-cluster-name # A unique identifier for your cluster in Kubecost
```
If you have a Kubecost token, add it to the override:
```yaml theme={null}
global:
clusterId: my-cluster-name
kubecostToken: qovery.env.KUBECOST_TOKEN
```
**How `qovery.env.*` works**: At deploy time, Qovery replaces `qovery.env.KUBECOST_TOKEN` with the actual value of the `KUBECOST_TOKEN` variable. The real value never appears in the Qovery UI — it is only injected at Helm install time. See [Environment Variables in Helm Values](/docs/configuration/helm#environment-variables-in-values) for more details.
### Step 4: Deploy the Chart
1. Click the **Deploy** button
2. Follow the deployment logs
3. Verify Kubecost pods are running
### Step 5: Access Kubecost via Port Forward
Kubecost does not provide authentication by default, so exposing it publicly would leave your cost data accessible to anyone. Use `kubectl port-forward` instead to access the dashboard securely from your local machine.
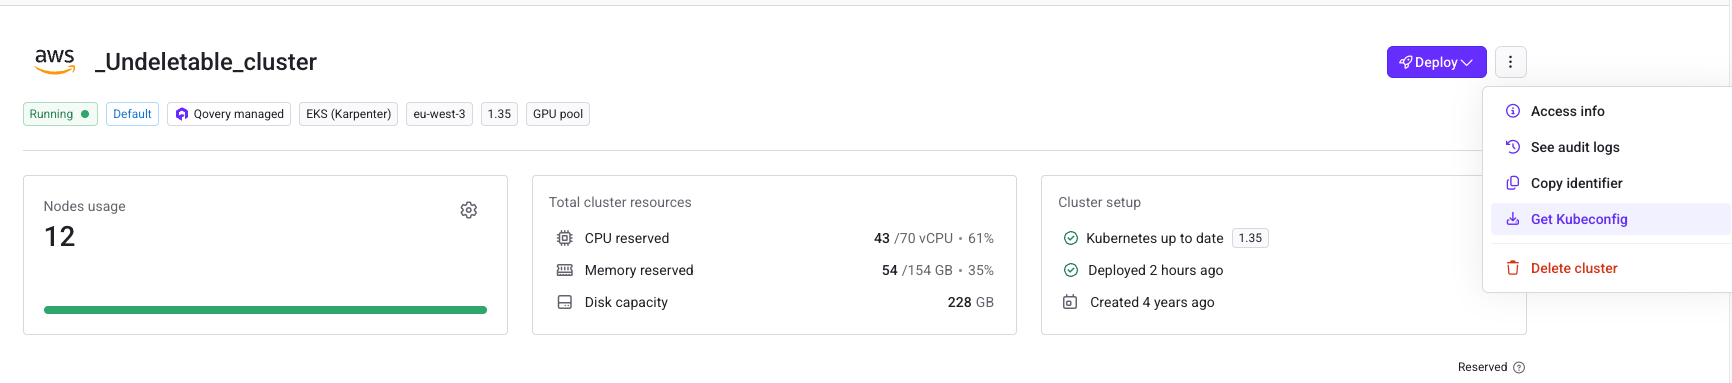
Download your cluster's kubeconfig from the Qovery Console:
1. Go to **Organization** → **Clusters**
2. Click on your cluster
3. Open the **Actions** menu and select **Get Kubeconfig**
 Once downloaded, configure `kubectl` to use it:
```bash theme={null}
export KUBECONFIG=/path/to/downloaded/kubeconfig.yaml
```
Verify the connection:
```bash theme={null}
kubectl get nodes
```
See [Cluster Kubeconfig](/docs/configuration/clusters#kubeconfig) for more details.
In Qovery Console, go to your environment and find the Kubernetes namespace in the environment details. It follows the pattern `z-`.
Alternatively, list namespaces on your cluster:
```bash theme={null}
kubectl get namespaces
```
List services in your namespace to find the Kubecost dashboard service:
```bash theme={null}
kubectl get svc -n | grep frontend
```
Run the following command, replacing `` and `` with the values from the previous steps:
```bash theme={null}
kubectl port-forward svc/ 9090:9090 -n
```
Then open your browser at [http://localhost:9090](http://localhost:9090).
Keep the terminal open while using Kubecost — closing it will terminate the port-forward session.
## Conclusion
You've successfully deployed Kubecost on your Qovery cluster. You can now access the Kubecost dashboard to monitor your Kubernetes costs and get optimization recommendations.
Kubecost is now part of IBM, which is why the official documentation is hosted on IBM's website. To learn more about using Kubecost, check out their [Getting Started guide](https://www.ibm.com/docs/en/kubecost/self-hosted/3.x).
## Next Steps
Learn more about Kubecost features
Optimization strategies with Qovery
Built-in observability
Advanced monitoring with Datadog
Once downloaded, configure `kubectl` to use it:
```bash theme={null}
export KUBECONFIG=/path/to/downloaded/kubeconfig.yaml
```
Verify the connection:
```bash theme={null}
kubectl get nodes
```
See [Cluster Kubeconfig](/docs/configuration/clusters#kubeconfig) for more details.
In Qovery Console, go to your environment and find the Kubernetes namespace in the environment details. It follows the pattern `z-`.
Alternatively, list namespaces on your cluster:
```bash theme={null}
kubectl get namespaces
```
List services in your namespace to find the Kubecost dashboard service:
```bash theme={null}
kubectl get svc -n | grep frontend
```
Run the following command, replacing `` and `` with the values from the previous steps:
```bash theme={null}
kubectl port-forward svc/ 9090:9090 -n
```
Then open your browser at [http://localhost:9090](http://localhost:9090).
Keep the terminal open while using Kubecost — closing it will terminate the port-forward session.
## Conclusion
You've successfully deployed Kubecost on your Qovery cluster. You can now access the Kubecost dashboard to monitor your Kubernetes costs and get optimization recommendations.
Kubecost is now part of IBM, which is why the official documentation is hosted on IBM's website. To learn more about using Kubecost, check out their [Getting Started guide](https://www.ibm.com/docs/en/kubecost/self-hosted/3.x).
## Next Steps
Learn more about Kubecost features
Optimization strategies with Qovery
Built-in observability
Advanced monitoring with Datadog