> ## Documentation Index
> Fetch the complete documentation index at: https://www.qovery.com/docs/llms.txt
> Use this file to discover all available pages before exploring further.
# Qovery-Managed GKE
> Learn how to configure your GCP Kubernetes clusters on Qovery
## Creating a GCP GKE Cluster
### Connect Your GCP Account
Qovery needs credentials to manage resources in your GCP project. Choose your preferred method:
**Most secure method** - Uses short-lived access tokens generated through GCP Workload Identity Federation (WIF). No downloadable service account JSON key is created or stored.
This mode is recommended if your organization disables service account key creation with `constraints/iam.disableServiceAccountKeyCreation`.
**What the setup configures**:
* A GCP service account used by Qovery to manage your GKE resources
* The Qovery custom IAM role, created or updated and bound to this service account
* A Workload Identity Pool
* An AWS Workload Identity Provider that trusts the Qovery AWS deployer identity used by q-core
* A service account impersonation binding (`roles/iam.workloadIdentityUser`)
* An organization policy entry allowing this service account to receive 4 hour access tokens
With this setup, Qovery does not receive a JSON private key. Instead, q-core exchanges the configured Qovery AWS deployer identity for a temporary GCP access token, then uses that token to create, update, or delete your GKE cluster.
### Required Permissions
The account running the setup script must have enough permissions to configure both the GCP project and the GCP organization.
At the project level, it must be able to:
* enable GCP services;
* create or reuse a service account;
* create or update the Qovery custom IAM role and bind it to this service account;
* create or update a Workload Identity Pool and Provider;
* add `roles/iam.workloadIdentityUser` on the service account.
At the organization level, it must be able to update organization policies. Qovery requires 4 hour temporary tokens for GKE operations, so the script configures:
`constraints/iam.allowServiceAccountCredentialLifetimeExtension`
for the Qovery service account.
For this last step, the account needs the `Organization Policy Administrator` role (`roles/orgpolicy.policyAdmin`) on the GCP organization, or an organization administrator must run this step for you.
### Prepare Your GCP Project
1. Go to [Google Cloud Console](https://console.cloud.google.com)
2. Either create a new project or select an existing one
3. Ensure billing is enabled for the project
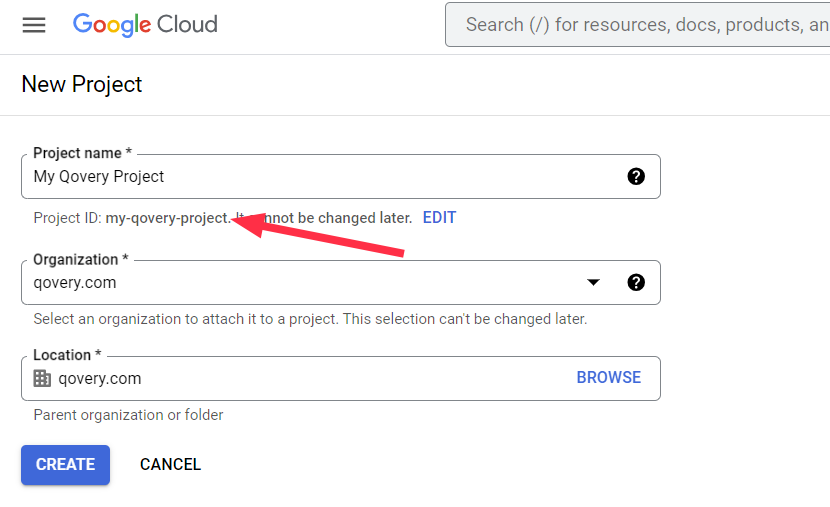 Use a dedicated project for Qovery to keep resources organized and costs trackable.
Copy your **Project ID** (not the project name) from the project selector.
Example: `my-company-production-123456`
### Generate the Workload Identity Federation Setup Command
1. Go to [Qovery Console](https://console.qovery.com)
2. Go to **Clusters** tab
3. Click **Create Cluster**
4. Select **GCP** as the cloud provider
Select **Workload Identity Federation** as the credential method.
Qovery will generate a setup command for your GCP project. The command contains only your GCP setup values. The Qovery AWS account and principal to trust are embedded in the setup script, but no Qovery secret is embedded.
Copy the generated command to your clipboard.
The command will look like:
```bash theme={null}
curl https://setup.qovery.com/create_credentials_gcp_wif.sh | bash -s -- \
YOUR_PROJECT_ID \
YOUR_SERVICE_ACCOUNT_NAME
```
The setup script creates or reuses the GCP service account named `YOUR_SERVICE_ACCOUNT_NAME`. Always provide this service account name explicitly.
Qovery requires 4 hour temporary tokens for GKE operations. The setup script uses default Qovery resource names, resolves the GCP organization ID from `YOUR_PROJECT_ID`, and configures `constraints/iam.allowServiceAccountCredentialLifetimeExtension` for the Qovery service account.
If your project is not directly attached to an organization, or if the script cannot resolve it, rerun the command with the organization ID as the last argument.
### Run the Workload Identity Federation Setup Script
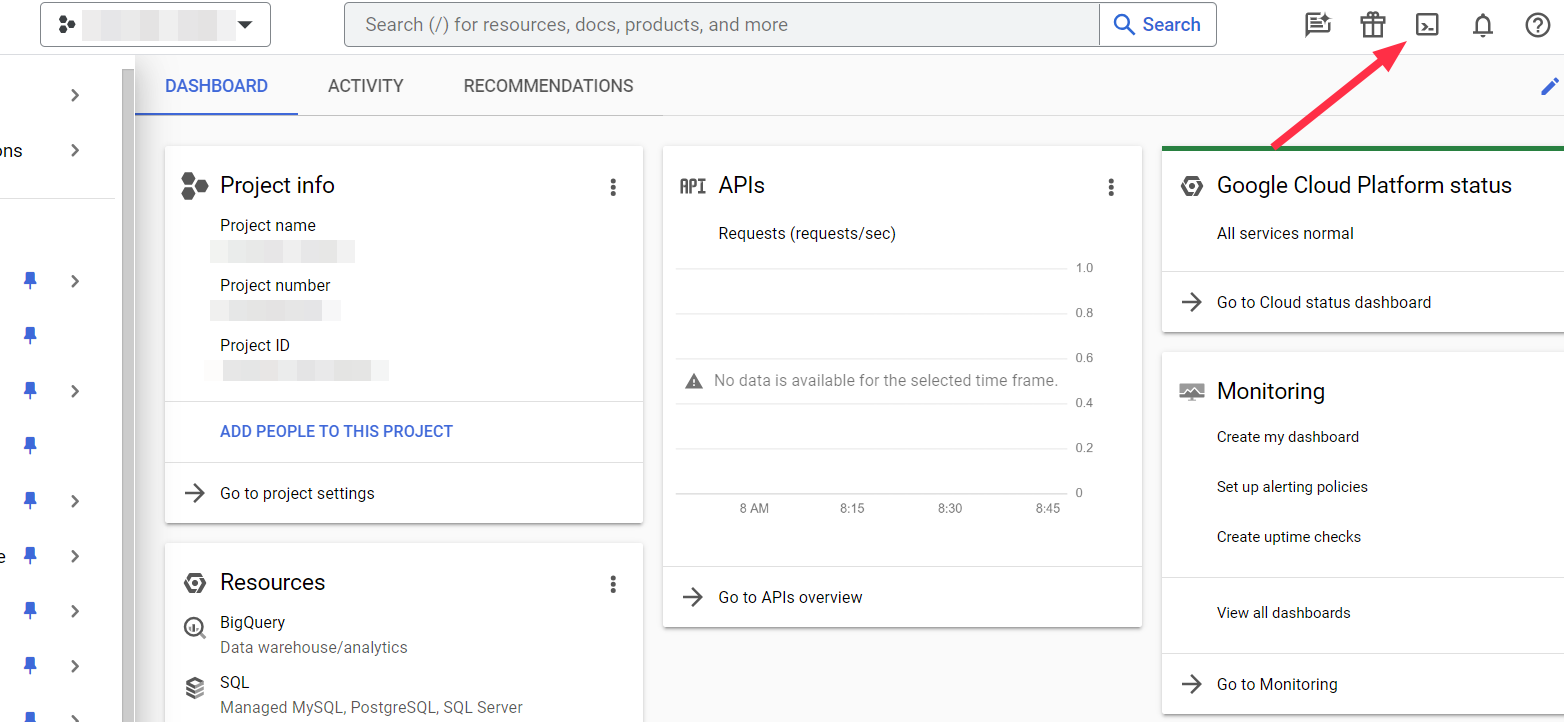
1. In Google Cloud Console, click the **Cloud Shell** icon in the top-right
2. Wait for Cloud Shell to initialize
3. Ensure you're in the correct project: `gcloud config get-value project`
Use a dedicated project for Qovery to keep resources organized and costs trackable.
Copy your **Project ID** (not the project name) from the project selector.
Example: `my-company-production-123456`
### Generate the Workload Identity Federation Setup Command
1. Go to [Qovery Console](https://console.qovery.com)
2. Go to **Clusters** tab
3. Click **Create Cluster**
4. Select **GCP** as the cloud provider
Select **Workload Identity Federation** as the credential method.
Qovery will generate a setup command for your GCP project. The command contains only your GCP setup values. The Qovery AWS account and principal to trust are embedded in the setup script, but no Qovery secret is embedded.
Copy the generated command to your clipboard.
The command will look like:
```bash theme={null}
curl https://setup.qovery.com/create_credentials_gcp_wif.sh | bash -s -- \
YOUR_PROJECT_ID \
YOUR_SERVICE_ACCOUNT_NAME
```
The setup script creates or reuses the GCP service account named `YOUR_SERVICE_ACCOUNT_NAME`. Always provide this service account name explicitly.
Qovery requires 4 hour temporary tokens for GKE operations. The setup script uses default Qovery resource names, resolves the GCP organization ID from `YOUR_PROJECT_ID`, and configures `constraints/iam.allowServiceAccountCredentialLifetimeExtension` for the Qovery service account.
If your project is not directly attached to an organization, or if the script cannot resolve it, rerun the command with the organization ID as the last argument.
### Run the Workload Identity Federation Setup Script
1. In Google Cloud Console, click the **Cloud Shell** icon in the top-right
2. Wait for Cloud Shell to initialize
3. Ensure you're in the correct project: `gcloud config get-value project`
 1. Paste the command from Qovery into Cloud Shell
2. Press **Enter**
3. The script will:
* Enable required GCP APIs
* Create or reuse the Qovery service account
* Create or update the Qovery custom IAM role
* Bind the Qovery custom IAM role to the service account
* Create or reuse the Workload Identity Pool
* Create or update the AWS Workload Identity Provider
* Allow the Qovery AWS identity to impersonate the GCP service account
* Allow this service account to receive 4 hour access tokens
**Example output:**
```bash theme={null}
Operations completed.
Store these values in Qovery:
service_account_email=my-qovery-sa@my-company-production-123456.iam.gserviceaccount.com
workload_identity_provider_resource=projects/123456789012/locations/global/workloadIdentityPools/qovery-wif-pool/providers/qovery-aws
No JSON service account key was created.
```
Return to Qovery Console and paste the values returned by the script:
* **Service account email**
* **Workload Identity provider resource**
Qovery will verify the configuration and save the credentials.
By default, GCP service account impersonation access tokens are limited to **1 hour**.
Qovery requires a **4 hour** token lifetime for GKE operations, similar to the AWS EKS STS flow. To allow this, your GCP organization must allow the Qovery service account through `constraints/iam.allowServiceAccountCredentialLifetimeExtension`.
If this policy is not configured, Workload Identity Federation credentials cannot be used for Qovery-managed GKE.
You can revoke Qovery's access at any time by removing the `roles/iam.workloadIdentityUser` binding from the service account or deleting the Workload Identity Provider.
Service account JSON keys are long-lived private keys. If they leak, they remain valid until you rotate or delete them.
With Workload Identity Federation, Qovery receives short-lived access tokens only. No customer private key is downloaded, uploaded, or stored in Qovery.
The Qovery service account still needs the same GCP permissions required to manage GKE, Compute, networking, Cloud Storage, Artifact Registry, and Cloud Run resources.
The same Workload Identity Federation credentials can also be used for GCP Artifact Registry in Qovery, as long as this service account has the required Artifact Registry permissions.
For a detailed breakdown of every permission and why it is needed, see the [GCP IAM Permissions Reference](/docs/getting-started/security-and-compliance/gcp-iam-permissions).
Yes. Pass the existing service account name as `YOUR_SERVICE_ACCOUNT_NAME`. The script will reuse it, bind the Qovery custom role to it, allow the Qovery AWS deployer identity to impersonate it through `roles/iam.workloadIdentityUser`, and allow 4 hour access tokens for this service account.
Yes. Service account JSON keys remain supported for existing installations and organizations that allow service account key creation.
However, Workload Identity Federation is recommended for new GCP credentials.
**Legacy method** - Creates a downloadable service account JSON key and uploads it to Qovery.
Workload Identity Federation is recommended for new GCP credentials. Use JSON keys only if your organization allows service account key creation and you cannot use WIF yet.
### Prepare Your GCP Project
1. Go to [Google Cloud Console](https://console.cloud.google.com)
2. Either create a new project or select an existing one
3. Ensure billing is enabled for the project
Use a dedicated project for Qovery to keep resources organized and costs trackable.
Copy your **Project ID** (not the project name) from the project selector.
Example: `my-company-production-123456`
You'll need this Project ID in the next steps.
### Generate Installation Command
1. Go to [Qovery Console](https://console.qovery.com)
2. Go to **Clusters** tab
3. Click **Create Cluster**
4. Select **GCP** as the cloud provider
1. Enter your **Project ID**
2. Click **Next**
Qovery will generate a secure installation command for you.
Copy the generated command to your clipboard.
The command will look like:
```bash theme={null}
curl https://setup.qovery.com/create_credentials_gcp.sh | bash -s -- YOUR_PROJECT_ID qovery_role qovery-service-account
```
This script creates a service account with minimal required permissions.
If you enable **static egress IPs** for GCP NAT Gateway, the role must also include `compute.addresses.create`, `compute.addresses.get`, `compute.addresses.list`, and `compute.addresses.delete`.
Typical Terraform failure when missing: `Required 'compute.addresses.create' permission ... forbidden`.
### Run Installation Script
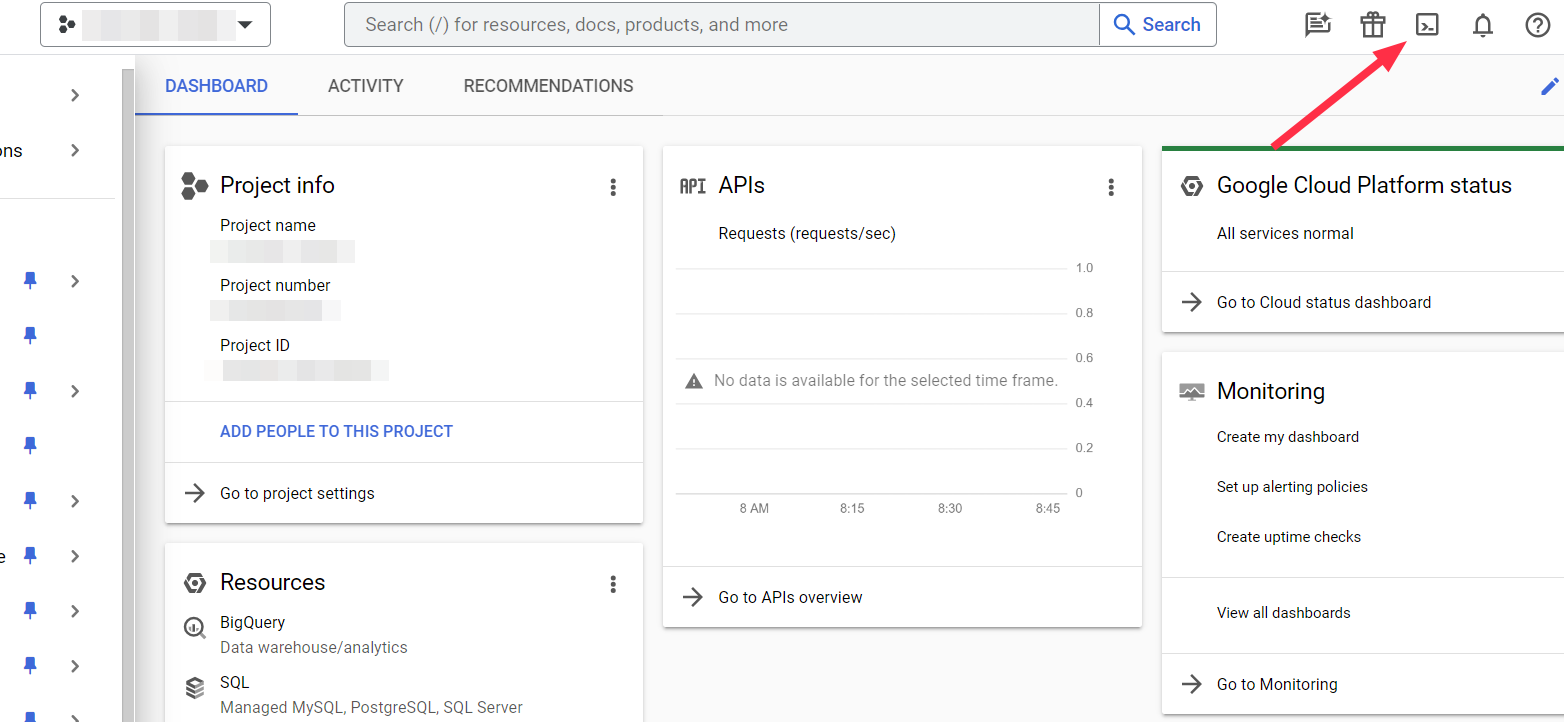
1. In Google Cloud Console, click the **Cloud Shell** icon (terminal icon) in the top-right
2. Wait for Cloud Shell to initialize
3. Ensure you're in the correct project: `gcloud config get-value project`
1. Paste the command from Qovery into Cloud Shell
2. Press **Enter**
3. The script will:
* Enable required GCP APIs (Container, Compute, Artifact Registry, Storage, Cloud Resource Manager, Cloud Run)
* Create a service account named `qovery-service-account`
* Assign necessary IAM roles
* Generate and download a JSON key file (`key.json`)
1. Paste the command from Qovery into Cloud Shell
2. Press **Enter**
3. The script will:
* Enable required GCP APIs
* Create or reuse the Qovery service account
* Create or update the Qovery custom IAM role
* Bind the Qovery custom IAM role to the service account
* Create or reuse the Workload Identity Pool
* Create or update the AWS Workload Identity Provider
* Allow the Qovery AWS identity to impersonate the GCP service account
* Allow this service account to receive 4 hour access tokens
**Example output:**
```bash theme={null}
Operations completed.
Store these values in Qovery:
service_account_email=my-qovery-sa@my-company-production-123456.iam.gserviceaccount.com
workload_identity_provider_resource=projects/123456789012/locations/global/workloadIdentityPools/qovery-wif-pool/providers/qovery-aws
No JSON service account key was created.
```
Return to Qovery Console and paste the values returned by the script:
* **Service account email**
* **Workload Identity provider resource**
Qovery will verify the configuration and save the credentials.
By default, GCP service account impersonation access tokens are limited to **1 hour**.
Qovery requires a **4 hour** token lifetime for GKE operations, similar to the AWS EKS STS flow. To allow this, your GCP organization must allow the Qovery service account through `constraints/iam.allowServiceAccountCredentialLifetimeExtension`.
If this policy is not configured, Workload Identity Federation credentials cannot be used for Qovery-managed GKE.
You can revoke Qovery's access at any time by removing the `roles/iam.workloadIdentityUser` binding from the service account or deleting the Workload Identity Provider.
Service account JSON keys are long-lived private keys. If they leak, they remain valid until you rotate or delete them.
With Workload Identity Federation, Qovery receives short-lived access tokens only. No customer private key is downloaded, uploaded, or stored in Qovery.
The Qovery service account still needs the same GCP permissions required to manage GKE, Compute, networking, Cloud Storage, Artifact Registry, and Cloud Run resources.
The same Workload Identity Federation credentials can also be used for GCP Artifact Registry in Qovery, as long as this service account has the required Artifact Registry permissions.
For a detailed breakdown of every permission and why it is needed, see the [GCP IAM Permissions Reference](/docs/getting-started/security-and-compliance/gcp-iam-permissions).
Yes. Pass the existing service account name as `YOUR_SERVICE_ACCOUNT_NAME`. The script will reuse it, bind the Qovery custom role to it, allow the Qovery AWS deployer identity to impersonate it through `roles/iam.workloadIdentityUser`, and allow 4 hour access tokens for this service account.
Yes. Service account JSON keys remain supported for existing installations and organizations that allow service account key creation.
However, Workload Identity Federation is recommended for new GCP credentials.
**Legacy method** - Creates a downloadable service account JSON key and uploads it to Qovery.
Workload Identity Federation is recommended for new GCP credentials. Use JSON keys only if your organization allows service account key creation and you cannot use WIF yet.
### Prepare Your GCP Project
1. Go to [Google Cloud Console](https://console.cloud.google.com)
2. Either create a new project or select an existing one
3. Ensure billing is enabled for the project
Use a dedicated project for Qovery to keep resources organized and costs trackable.
Copy your **Project ID** (not the project name) from the project selector.
Example: `my-company-production-123456`
You'll need this Project ID in the next steps.
### Generate Installation Command
1. Go to [Qovery Console](https://console.qovery.com)
2. Go to **Clusters** tab
3. Click **Create Cluster**
4. Select **GCP** as the cloud provider
1. Enter your **Project ID**
2. Click **Next**
Qovery will generate a secure installation command for you.
Copy the generated command to your clipboard.
The command will look like:
```bash theme={null}
curl https://setup.qovery.com/create_credentials_gcp.sh | bash -s -- YOUR_PROJECT_ID qovery_role qovery-service-account
```
This script creates a service account with minimal required permissions.
If you enable **static egress IPs** for GCP NAT Gateway, the role must also include `compute.addresses.create`, `compute.addresses.get`, `compute.addresses.list`, and `compute.addresses.delete`.
Typical Terraform failure when missing: `Required 'compute.addresses.create' permission ... forbidden`.
### Run Installation Script
1. In Google Cloud Console, click the **Cloud Shell** icon (terminal icon) in the top-right
2. Wait for Cloud Shell to initialize
3. Ensure you're in the correct project: `gcloud config get-value project`
1. Paste the command from Qovery into Cloud Shell
2. Press **Enter**
3. The script will:
* Enable required GCP APIs (Container, Compute, Artifact Registry, Storage, Cloud Resource Manager, Cloud Run)
* Create a service account named `qovery-service-account`
* Assign necessary IAM roles
* Generate and download a JSON key file (`key.json`)
 **Example output:**
```bash theme={null}
Activating services APIs
Operation "operations/acf.p2-..." finished successfully.
...
Creating service account qovery-service-account
Created service account [qovery-service-account].
...
created key [abc123...] of type [json] as [key.json]
✓ Credentials configured successfully
```
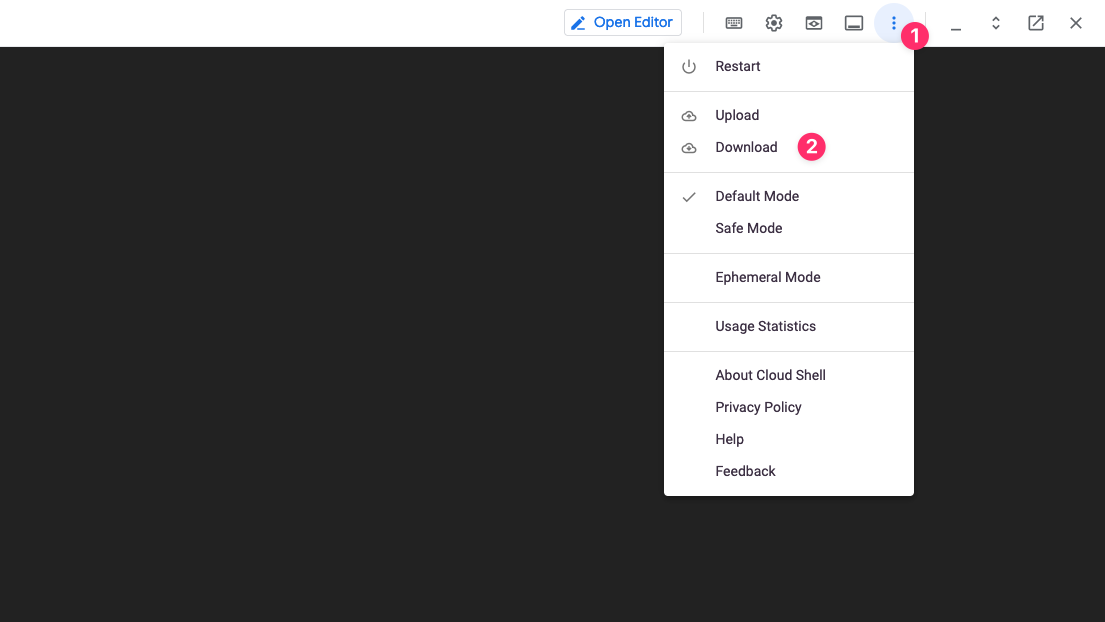
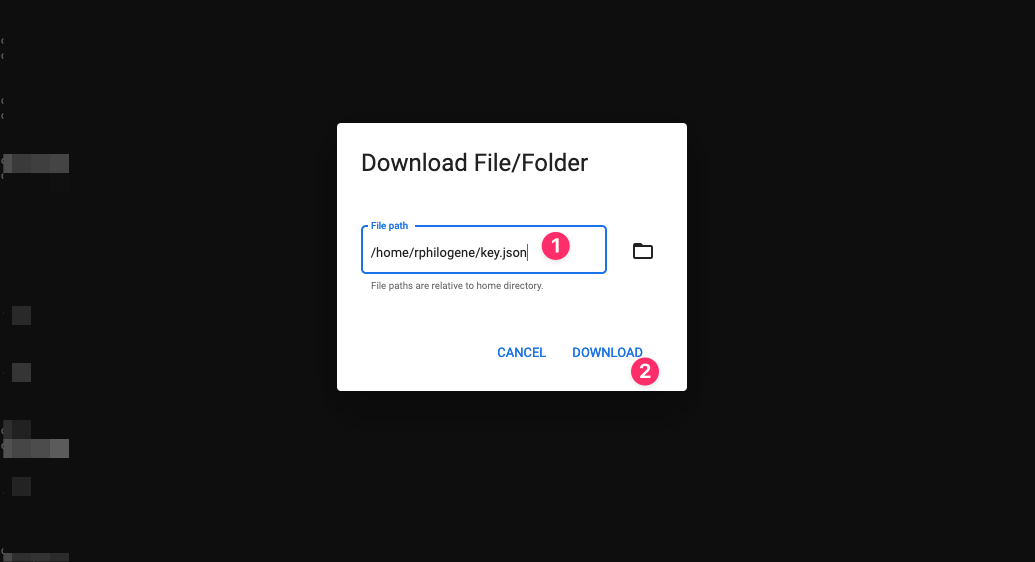
1. In Cloud Shell, click the **More** menu (three dots)
2. Select **Download**
3. Enter the file path: `key.json`
4. Save the file securely
**Example output:**
```bash theme={null}
Activating services APIs
Operation "operations/acf.p2-..." finished successfully.
...
Creating service account qovery-service-account
Created service account [qovery-service-account].
...
created key [abc123...] of type [json] as [key.json]
✓ Credentials configured successfully
```
1. In Cloud Shell, click the **More** menu (three dots)
2. Select **Download**
3. Enter the file path: `key.json`
4. Save the file securely
 **Keep this JSON key file secure!** It provides access to your GCP project. Never commit it to version control.
1. Return to Qovery Console
2. Upload the `key.json` file when prompted
3. Qovery will verify the credentials
**Keep this JSON key file secure!** It provides access to your GCP project. Never commit it to version control.
1. Return to Qovery Console
2. Upload the `key.json` file when prompted
3. Qovery will verify the credentials
 You can reuse these credentials for multiple clusters in the same GCP project.
Qovery requires these GCP permissions to manage your infrastructure:
* **Compute Engine**: Create and manage VMs, networks, and load balancers
* **Kubernetes Engine**: Create and manage GKE clusters
* **VPC Networking**: Configure networks, subnets, and firewall rules
* **Service Accounts**: Manage service identities for workloads
* **Cloud Storage**: Store Terraform state and logs
* **Artifact Registry**: Store container images
* **Cloud Run**: Manage serverless deployments (optional)
If static egress IPs are enabled on NAT Gateway, your role also needs `compute.addresses.*` permissions to reserve external IPs.
The installation script automatically assigns the minimum required roles to the service account.
Yes! You can create a service account manually with custom permissions.
However, ensure it has all the roles required for managing GKE, Compute
Engine, and networking resources. Contact support for the minimal permissions
list.
To rotate GCP credentials:
1. In GCP Console, go to **IAM & Admin** → **Service Accounts**
2. Find the `qovery-service-account`
3. Click **Keys** → **Add Key** → **Create new key**
4. Choose **JSON** format and download
5. Update credentials in Qovery Console
6. Wait 24 hours, then delete the old key in GCP
### CMEK requirements (optional)
CMEK (Customer-Managed Encryption Key) lets you control the GCP KMS key used to encrypt your cluster's data at rest instead of relying on Google-managed keys.
See [GCP documentation](https://docs.cloud.google.com/kubernetes-engine/docs/how-to/using-cmek) for more details.
You can provide your own KMS key only at cluster creation.
It is not possible to change the KMS key of an existing running cluster.
Your key encrypts the following resources:
* node boot disks
* etcd data
* storage buckets
* persistent volume claims (PVCs)
#### Step 1 - Create the key ring and key
* The KMS key **must be in the same region as your GKE cluster**.
* **Never delete the KMS key associated with your cluster** - doing so will permanently and irrecoverably destroy all encrypted data, including node disks, persistent volumes, and Kubernetes secrets.
```bash theme={null}
# Create a key ring
gcloud kms keyrings create \
--project= \
--location=
# Create the key inside that ring
gcloud kms keys create \
--project= \
--location= \
--keyring= \
--purpose=encryption
```
The full resource path for the key is:
```
projects//locations//keyRings//cryptoKeys/
```
You will need to paste this path into the **GKE KMS key** field when creating the cluster.
#### Step 2 - Grant required permissions
Three GCP service agents need `cryptoKeyEncrypterDecrypter` rights on the key.
* **Google Cloud Storage Service Agent** - encrypts GCS bucket data
```bash theme={null}
gcloud storage service-agent \
--project= \
--authorize-cmek projects//locations//keyRings//cryptoKeys/
```
* **Kubernetes Engine Service Agent** - encrypts GKE node boot disks and secrets
```bash theme={null}
gcloud kms keys add-iam-policy-binding \
--project= \
--location= \
--keyring= \
--member="serviceAccount:service-@container-engine-robot.iam.gserviceaccount.com" \
--role="roles/cloudkms.cryptoKeyEncrypterDecrypter"
```
* **Compute Engine Service Agent** - encrypts persistent disks
```bash theme={null}
gcloud kms keys add-iam-policy-binding \
--project= \
--location= \
--keyring= \
--member="serviceAccount:service-@compute-system.iam.gserviceaccount.com" \
--role="roles/cloudkms.cryptoKeyEncrypterDecrypter"
```
`` - the GCP project ID of the project where your KMS key is stored (e.g. my-test-project)
`` - the GCP project ID of the project where your GKE cluster is created (e.g. my-test-project)
`` - the numeric project number where your cluster is created (find it with `gcloud projects describe --format="value(projectNumber)"`)
`` - the region of your GKE cluster (e.g. `europe-west9`); the KMS key must be in the same region
`` - the name of the key ring containing your KMS key (e.g. my-key-ring)
`` - the name of the KMS key (e.g. my-key)
#### Step 3 - Grant your cluster service account on your KMS key
This step is needed only for GKE clusters in a different project than the KMS key created
* Create dedicated role in your KMS Key project:
```bash theme={null}
gcloud iam roles create qovery-role-kms-get-iam-policy \
--project= \
--title="Qovery KMS Get IAM Policy" \
--description="Allows reading IAM policy on KMS resources only" \
--permissions=cloudkms.cryptoKeys.getIamPolicy \
--stage=GA
```
* Grant your service account on your kms key with the new role:
```bash theme={null}
gcloud kms keys add-iam-policy-binding \
--keyring= \
--location= \
--project= \
--member="serviceAccount:" \
--role="projects//roles/qovery-role-kms-get-iam-policy"
```
#### Step 4 - Set your KMS key on cluster creation
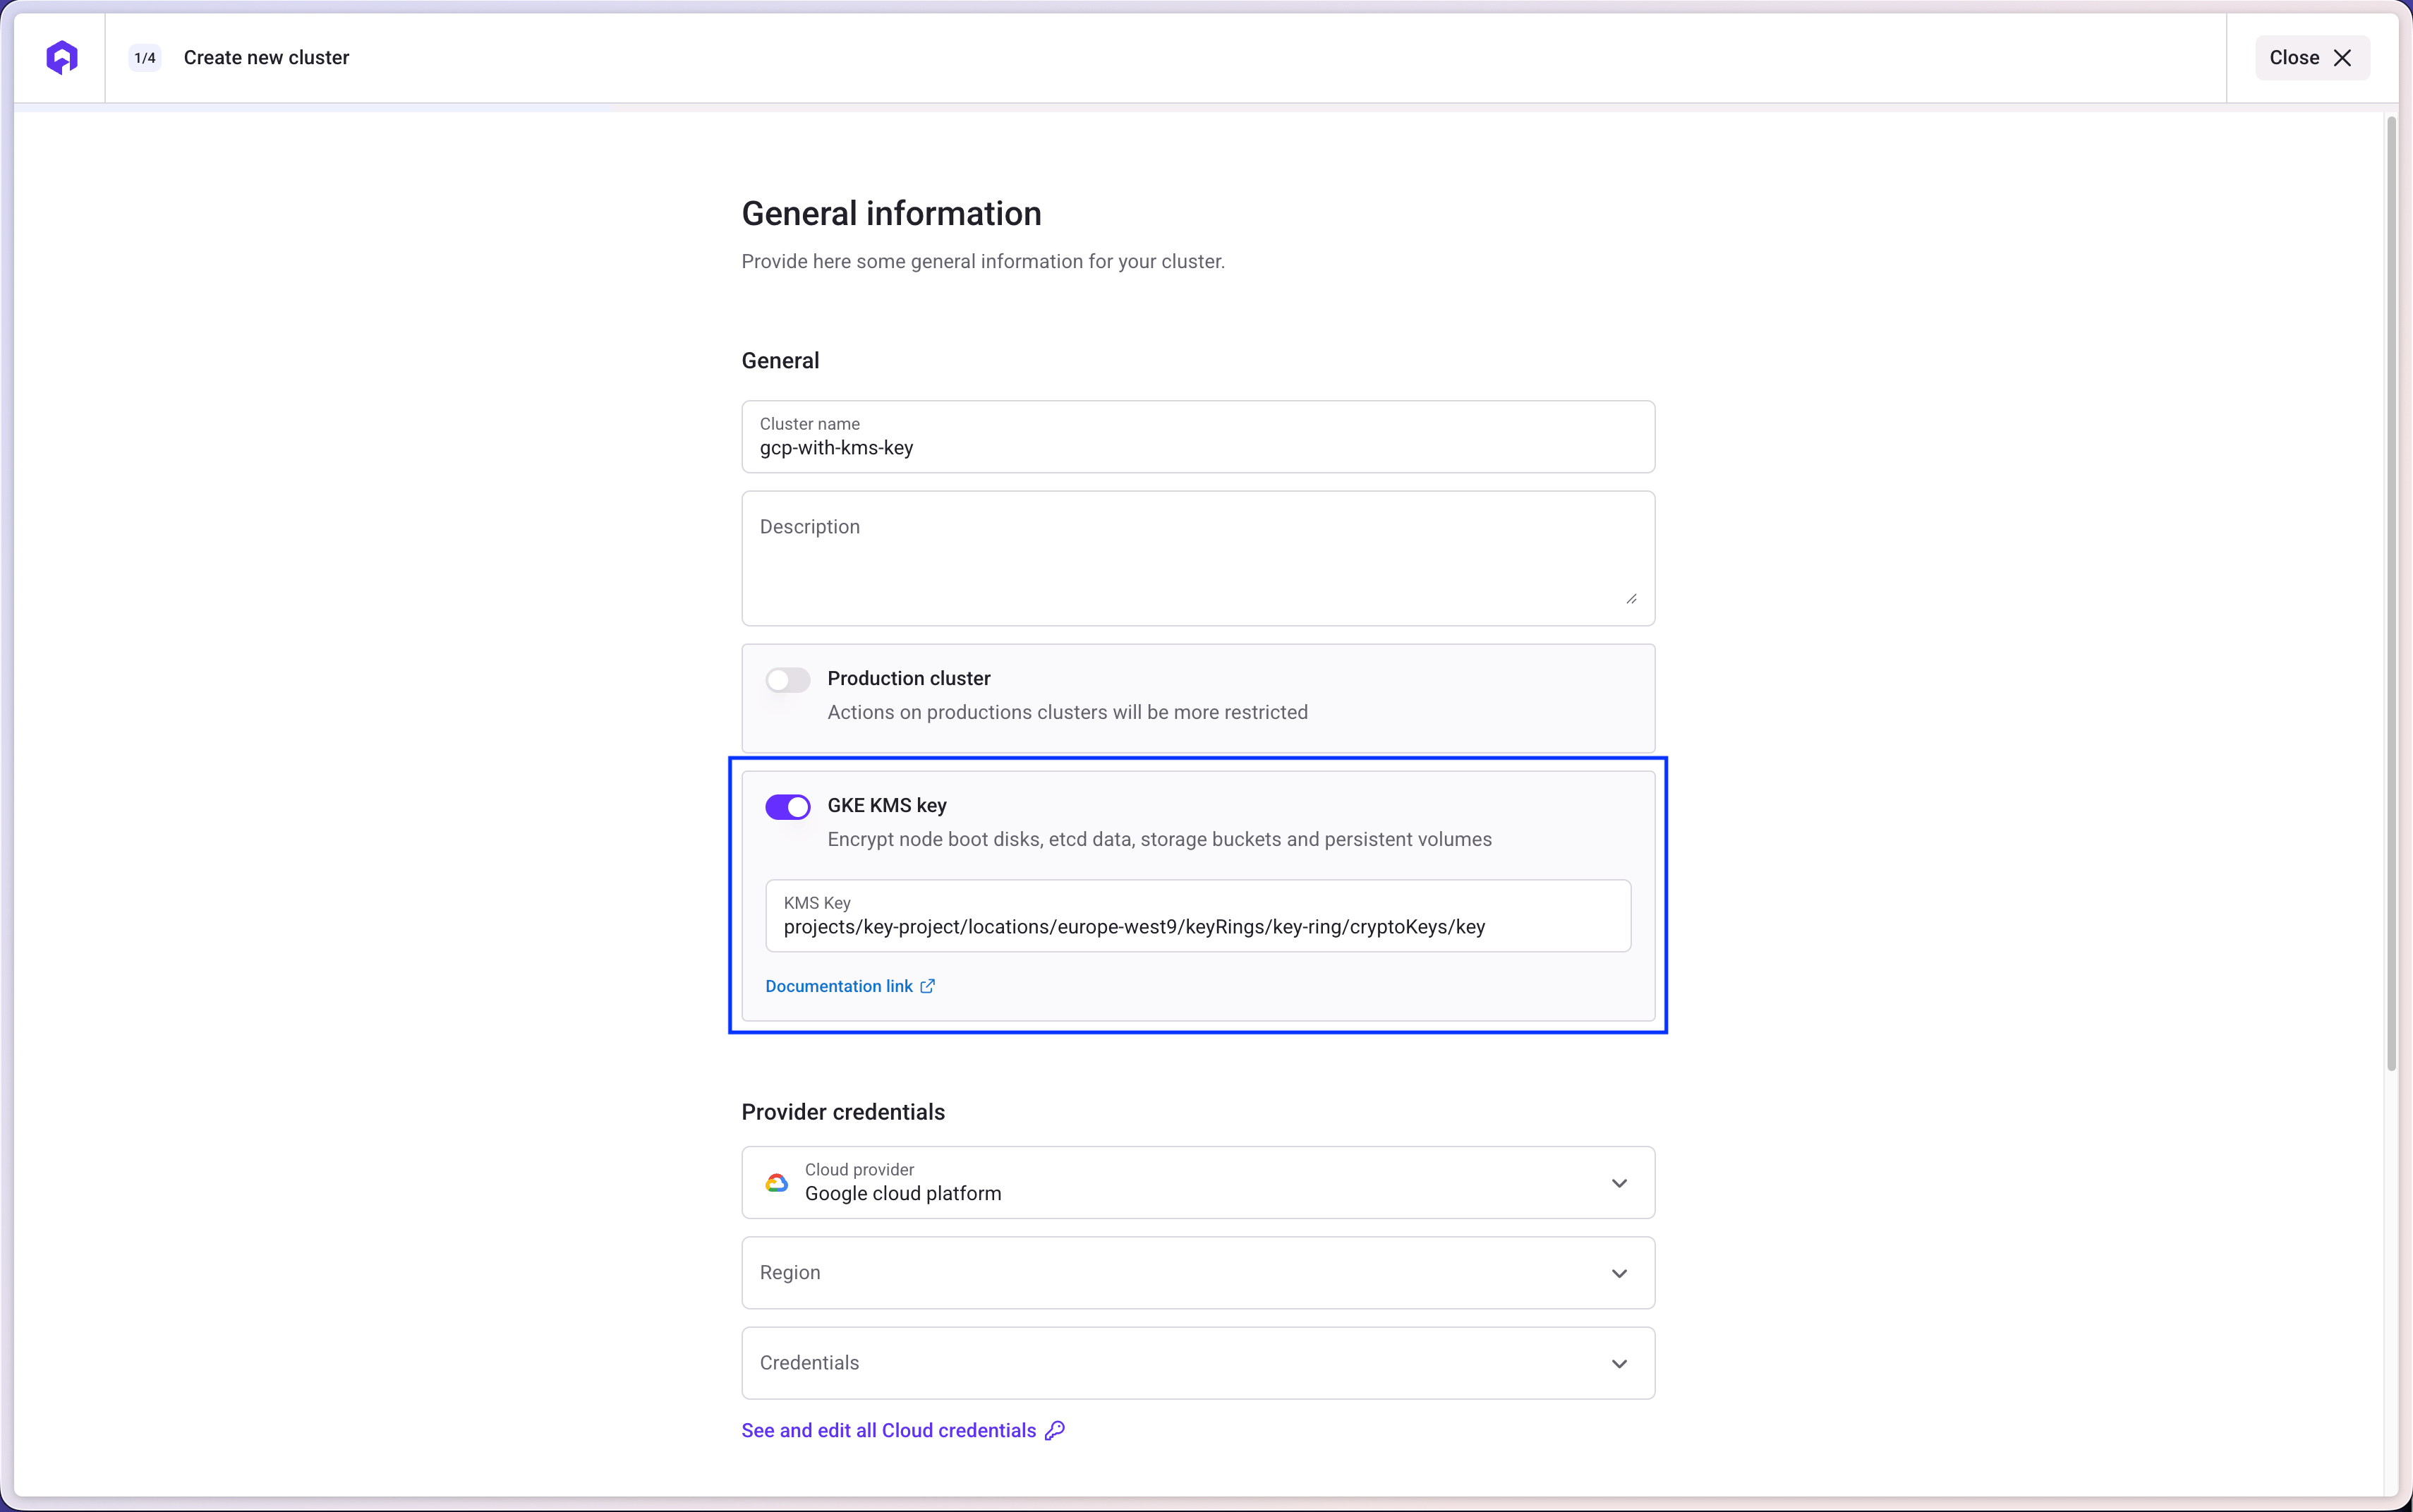
Enable the GKE KMS key option when creating your cluster:
You can reuse these credentials for multiple clusters in the same GCP project.
Qovery requires these GCP permissions to manage your infrastructure:
* **Compute Engine**: Create and manage VMs, networks, and load balancers
* **Kubernetes Engine**: Create and manage GKE clusters
* **VPC Networking**: Configure networks, subnets, and firewall rules
* **Service Accounts**: Manage service identities for workloads
* **Cloud Storage**: Store Terraform state and logs
* **Artifact Registry**: Store container images
* **Cloud Run**: Manage serverless deployments (optional)
If static egress IPs are enabled on NAT Gateway, your role also needs `compute.addresses.*` permissions to reserve external IPs.
The installation script automatically assigns the minimum required roles to the service account.
Yes! You can create a service account manually with custom permissions.
However, ensure it has all the roles required for managing GKE, Compute
Engine, and networking resources. Contact support for the minimal permissions
list.
To rotate GCP credentials:
1. In GCP Console, go to **IAM & Admin** → **Service Accounts**
2. Find the `qovery-service-account`
3. Click **Keys** → **Add Key** → **Create new key**
4. Choose **JSON** format and download
5. Update credentials in Qovery Console
6. Wait 24 hours, then delete the old key in GCP
### CMEK requirements (optional)
CMEK (Customer-Managed Encryption Key) lets you control the GCP KMS key used to encrypt your cluster's data at rest instead of relying on Google-managed keys.
See [GCP documentation](https://docs.cloud.google.com/kubernetes-engine/docs/how-to/using-cmek) for more details.
You can provide your own KMS key only at cluster creation.
It is not possible to change the KMS key of an existing running cluster.
Your key encrypts the following resources:
* node boot disks
* etcd data
* storage buckets
* persistent volume claims (PVCs)
#### Step 1 - Create the key ring and key
* The KMS key **must be in the same region as your GKE cluster**.
* **Never delete the KMS key associated with your cluster** - doing so will permanently and irrecoverably destroy all encrypted data, including node disks, persistent volumes, and Kubernetes secrets.
```bash theme={null}
# Create a key ring
gcloud kms keyrings create \
--project= \
--location=
# Create the key inside that ring
gcloud kms keys create \
--project= \
--location= \
--keyring= \
--purpose=encryption
```
The full resource path for the key is:
```
projects//locations//keyRings//cryptoKeys/
```
You will need to paste this path into the **GKE KMS key** field when creating the cluster.
#### Step 2 - Grant required permissions
Three GCP service agents need `cryptoKeyEncrypterDecrypter` rights on the key.
* **Google Cloud Storage Service Agent** - encrypts GCS bucket data
```bash theme={null}
gcloud storage service-agent \
--project= \
--authorize-cmek projects//locations//keyRings//cryptoKeys/
```
* **Kubernetes Engine Service Agent** - encrypts GKE node boot disks and secrets
```bash theme={null}
gcloud kms keys add-iam-policy-binding \
--project= \
--location= \
--keyring= \
--member="serviceAccount:service-@container-engine-robot.iam.gserviceaccount.com" \
--role="roles/cloudkms.cryptoKeyEncrypterDecrypter"
```
* **Compute Engine Service Agent** - encrypts persistent disks
```bash theme={null}
gcloud kms keys add-iam-policy-binding \
--project= \
--location= \
--keyring= \
--member="serviceAccount:service-@compute-system.iam.gserviceaccount.com" \
--role="roles/cloudkms.cryptoKeyEncrypterDecrypter"
```
`` - the GCP project ID of the project where your KMS key is stored (e.g. my-test-project)
`` - the GCP project ID of the project where your GKE cluster is created (e.g. my-test-project)
`` - the numeric project number where your cluster is created (find it with `gcloud projects describe --format="value(projectNumber)"`)
`` - the region of your GKE cluster (e.g. `europe-west9`); the KMS key must be in the same region
`` - the name of the key ring containing your KMS key (e.g. my-key-ring)
`` - the name of the KMS key (e.g. my-key)
#### Step 3 - Grant your cluster service account on your KMS key
This step is needed only for GKE clusters in a different project than the KMS key created
* Create dedicated role in your KMS Key project:
```bash theme={null}
gcloud iam roles create qovery-role-kms-get-iam-policy \
--project= \
--title="Qovery KMS Get IAM Policy" \
--description="Allows reading IAM policy on KMS resources only" \
--permissions=cloudkms.cryptoKeys.getIamPolicy \
--stage=GA
```
* Grant your service account on your kms key with the new role:
```bash theme={null}
gcloud kms keys add-iam-policy-binding \
--keyring= \
--location= \
--project= \
--member="serviceAccount:" \
--role="projects//roles/qovery-role-kms-get-iam-policy"
```
#### Step 4 - Set your KMS key on cluster creation
Enable the GKE KMS key option when creating your cluster:
 ### Create the Cluster
Click on `GCP` as hosting mode and then `Qovery Managed` option.
In the `Create Cluster` window enter:
* **Cluster name**: enter the name of your choice for your cluster.
* **Description**: enter a description to identify better your cluster.
* **Production cluster**: select this option if your cluster will be used for production.
* **GKE KMS key**: (optional) paste the full KMS key resource path created in the [CMEK requirements](#cmek-requirements-optional) section above (format: `projects//locations//keyRings//cryptoKeys/`).
* **Region**: select the geographical area in which you want your cluster to be hosted.
* **Credentials**: select one of the existing cloud provider credentials or [create new credentials](/docs/getting-started/installation/gcp#connect-your-gcp-account).
To confirm, click `Next`.
In the `Network` step, select the network mode you want to enable on your cluster.
If you want to manage the network layer of your cluster by yourself, you can switch VPC mode to `Deploy on my existing VPC` to use your own VPC instead of the one provided by Qovery.
These options can only be configured during cluster creation and cannot be modified later.
### Static IP
The **Static IP** feature is currently only available to clusters deployed with a VPC managed by Qovery and can only be enabled at cluster creation.
By default, when your cluster is created, its worker nodes are allocated public IP addresses, which are used for external communication. For improved security and control, the **Static IP** feature allows you to ensure that outbound traffic from your cluster uses specific IP addresses.
Here is what will be deployed on your cluster:
* Cloud Routers
* Cloud NAT gateways
* Auto-allocated Cloud NAT IPs (default) or two reserved external IPs per cluster (opt-in, see below)
#### Default behavior: auto-allocated Cloud NAT IPs
By default, the Cloud NAT gateways provisioned by Qovery use **auto-allocated** public IPs managed by GCP. These IPs can rotate over time (for example after maintenance, scaling events, or NAT reconfiguration) and are therefore **not suitable** for whitelisting with third-party services that require a fixed source IP.
#### Opt-in: stable egress IPs via the NAT Gateway feature
To get stable egress IPs that you can safely allowlist with services like Stripe, payment gateways, or partner APIs, enable static Cloud NAT IPs on the cluster's NAT Gateway feature. When configuring the NAT Gateway feature on your GKE cluster, set the `staticIpsEnabled` option to `true` (default `false`). When enabled, the engine reserves **two static external IPs** (`google_compute_address`) per cluster and binds them to the Cloud NAT in `MANUAL_ONLY` mode. These IPs remain stable for the entire lifetime of the cluster.
This option is configured alongside the other NAT Gateway parameters via the cluster's NAT Gateway configuration in the Console, API, or Terraform provider. On the API and Terraform sides the field is named `staticIpsEnabled` on `NatGatewayParameters` (serialized as `static_ips_enabled` on the JSON wire format).
**Enabling on an existing cluster**: turning on `staticIpsEnabled` on a cluster that was previously running with auto-allocated NAT IPs triggers a **one-time NAT IP swap** on the next infrastructure apply. Egress traffic is briefly interrupted (seconds to a couple of minutes) while Cloud NAT switches from `AUTO_ONLY` to `MANUAL_ONLY`. Pods, nodes, services, and the router are not recreated. Plan to refresh any IP allowlists with your third-party providers right after that apply.
**Things to know before enabling**:
* **Cost**: each reserved external IP is billed by GCP at about `$0.005/hour` (\~`$3.65` per IP per month), so two IPs add roughly `$7.30/month` to your GCP bill per cluster.
* **GCP quota**: GCP enforces a default quota of 8 reserved external IPs per region. Make sure your project quota can accommodate 2 IPs per GKE cluster region before enabling.
* **Connection capacity**: with `MANUAL_ONLY`, GCP can no longer scale NAT IPs automatically. Simultaneous outbound connections are hard-capped at `2 × 64512 / min_ports_per_vm`. For most clusters this is well within the budget, but very high-traffic or multi-tenant clusters should validate.
#### Finding the reserved IPs once enabled
Once `staticIpsEnabled` is on and the cluster has been applied, here is the procedure to find the IPs in the [GCP console](https://console.cloud.google.com):
1. Select the project that hosts your Qovery cluster.
2. Go to **VPC network** then **External IP addresses**.
3. Filter by the region where your cluster is deployed.
4. Look for the two reserved addresses named `${vpc_name}-nat-1` and `${vpc_name}-nat-2`, with type `External` and status `In use by` your Cloud NAT gateway.
You can also list them from the command line:
```bash theme={null}
gcloud compute addresses list \
--project \
--filter="name~^.*-nat-"
```
Use those two IPs as the source addresses to allowlist with your third-party providers.
On AWS, NAT Gateways always require Elastic IPs (this is the only mode AWS supports), so Qovery-managed EKS clusters have stable egress IPs by default. You can find them in the AWS console under **VPC** then **Elastic IP addresses**. See [Static IP on EKS](/docs/configuration/integrations/kubernetes/eks/managed#static-ip) for details.
### Use existing VPC
You can opt to use your own VPC instead of the one provided by Qovery by switching VPC mode to `Deploy on my existing VPC`.
In GCP you have two VPC modes: `Automatic` or `Custom`.
If you are using an automatic or a custom VPC, you have to set:
* Your VPC Name
* External project id (optional): by default, the project id used is the one specified in the credentials file. But if your VPC is defined in another GCP project, you have to specify the Project id.
You can also enable **Private nodes** to create GKE nodes without public IPs. In this mode, node traffic goes through your gateway instead of exposing public node addresses.
In addition if you are using a custom VPC, you have to set:
* Your Subnet range name (`https://console.cloud.google.com/networking/networks/details/?project=&pageTab=SUBNETS`)
You can also specify (optional):
* Pod ipv4 address range name
* Additional cluster pod ipv4 ranges names (separated with a comma)
* Ipv4 service range name
For these ranges, you have to create Secondary IPv4 ranges inside your subnet.
The **Deploy on my existing VPC** and **Private nodes** settings are fixed at cluster creation time. After the cluster is created, you can view them in the **Network** tab, but you cannot change them in place.
In the `Ready to install your cluster` window, check that the services needed to install your cluster are correct.
You can now press the `Create and Install` button.
Your cluster is now displayed in your organization settings, featuring the `Installing...` status (orange status). Once your cluster is properly installed, its status turns to green and you will be able to deploy your applications on it.
You can follow the execution of the action via the cluster status and/or by accessing the [Cluster Logs](/docs/configuration/clusters#logs)
## Managing your Cluster Settings
To manage the settings of an existing cluster:
Open your [Qovery Console](https://console.qovery.com).
On your organization overview, go on the Clusters page.
To access your cluster settings, click on your cluster card and then go on Settings tab.
Below you can find a description of each section
### General
The `General` tab allows you to define high-level information on your cluster:
| Item | Description |
| ------------------ | ----------------------------------------------------- |
| Cluster Name | To edit the name of your cluster. |
| Description | To enter or edit the description of your cluster. |
| Production Cluster | To enter or edit the production flag of your cluster. |
### Credentials
Here you can manage here the cloud provider credentials associated with your cluster.
If you need to change the credentials:
* generate a new set of credentials on your cloud provider ([Procedure for GCP account](/docs/installation/gcp#connect-gcp-account))
* create the new credential on the Qovery by opening the drop-down and selecting "New Credentials"
Once created and associated, you need to [update your cluster](/docs/configuration/clusters#updating-a-cluster) to apply the change.
### Mirroring registry
In this tab, you will see that a container registry already exist (called `registry-{$UIID}`).
This is your cloud provider container registry used by Qovery to manage the deployment of your applications by mirroring the docker images.
The credentials configured on this registry are the one used to create the cluster. But you can still update them if you prefer to manage them separately (dedicated pair of creds just to access the registry).
Check [this link](/docs/configuration/deployment/image-mirroring) for more information.
### Network
The `Network` tab in your cluster settings allows you to check if the [**Static IP**](#static-ip), [**Deploy on existing VPC**](#use-existing-vpc), and **Private nodes** features are enabled on your cluster. These settings cannot be changed after the creation of the cluster.
### Create the Cluster
Click on `GCP` as hosting mode and then `Qovery Managed` option.
In the `Create Cluster` window enter:
* **Cluster name**: enter the name of your choice for your cluster.
* **Description**: enter a description to identify better your cluster.
* **Production cluster**: select this option if your cluster will be used for production.
* **GKE KMS key**: (optional) paste the full KMS key resource path created in the [CMEK requirements](#cmek-requirements-optional) section above (format: `projects//locations//keyRings//cryptoKeys/`).
* **Region**: select the geographical area in which you want your cluster to be hosted.
* **Credentials**: select one of the existing cloud provider credentials or [create new credentials](/docs/getting-started/installation/gcp#connect-your-gcp-account).
To confirm, click `Next`.
In the `Network` step, select the network mode you want to enable on your cluster.
If you want to manage the network layer of your cluster by yourself, you can switch VPC mode to `Deploy on my existing VPC` to use your own VPC instead of the one provided by Qovery.
These options can only be configured during cluster creation and cannot be modified later.
### Static IP
The **Static IP** feature is currently only available to clusters deployed with a VPC managed by Qovery and can only be enabled at cluster creation.
By default, when your cluster is created, its worker nodes are allocated public IP addresses, which are used for external communication. For improved security and control, the **Static IP** feature allows you to ensure that outbound traffic from your cluster uses specific IP addresses.
Here is what will be deployed on your cluster:
* Cloud Routers
* Cloud NAT gateways
* Auto-allocated Cloud NAT IPs (default) or two reserved external IPs per cluster (opt-in, see below)
#### Default behavior: auto-allocated Cloud NAT IPs
By default, the Cloud NAT gateways provisioned by Qovery use **auto-allocated** public IPs managed by GCP. These IPs can rotate over time (for example after maintenance, scaling events, or NAT reconfiguration) and are therefore **not suitable** for whitelisting with third-party services that require a fixed source IP.
#### Opt-in: stable egress IPs via the NAT Gateway feature
To get stable egress IPs that you can safely allowlist with services like Stripe, payment gateways, or partner APIs, enable static Cloud NAT IPs on the cluster's NAT Gateway feature. When configuring the NAT Gateway feature on your GKE cluster, set the `staticIpsEnabled` option to `true` (default `false`). When enabled, the engine reserves **two static external IPs** (`google_compute_address`) per cluster and binds them to the Cloud NAT in `MANUAL_ONLY` mode. These IPs remain stable for the entire lifetime of the cluster.
This option is configured alongside the other NAT Gateway parameters via the cluster's NAT Gateway configuration in the Console, API, or Terraform provider. On the API and Terraform sides the field is named `staticIpsEnabled` on `NatGatewayParameters` (serialized as `static_ips_enabled` on the JSON wire format).
**Enabling on an existing cluster**: turning on `staticIpsEnabled` on a cluster that was previously running with auto-allocated NAT IPs triggers a **one-time NAT IP swap** on the next infrastructure apply. Egress traffic is briefly interrupted (seconds to a couple of minutes) while Cloud NAT switches from `AUTO_ONLY` to `MANUAL_ONLY`. Pods, nodes, services, and the router are not recreated. Plan to refresh any IP allowlists with your third-party providers right after that apply.
**Things to know before enabling**:
* **Cost**: each reserved external IP is billed by GCP at about `$0.005/hour` (\~`$3.65` per IP per month), so two IPs add roughly `$7.30/month` to your GCP bill per cluster.
* **GCP quota**: GCP enforces a default quota of 8 reserved external IPs per region. Make sure your project quota can accommodate 2 IPs per GKE cluster region before enabling.
* **Connection capacity**: with `MANUAL_ONLY`, GCP can no longer scale NAT IPs automatically. Simultaneous outbound connections are hard-capped at `2 × 64512 / min_ports_per_vm`. For most clusters this is well within the budget, but very high-traffic or multi-tenant clusters should validate.
#### Finding the reserved IPs once enabled
Once `staticIpsEnabled` is on and the cluster has been applied, here is the procedure to find the IPs in the [GCP console](https://console.cloud.google.com):
1. Select the project that hosts your Qovery cluster.
2. Go to **VPC network** then **External IP addresses**.
3. Filter by the region where your cluster is deployed.
4. Look for the two reserved addresses named `${vpc_name}-nat-1` and `${vpc_name}-nat-2`, with type `External` and status `In use by` your Cloud NAT gateway.
You can also list them from the command line:
```bash theme={null}
gcloud compute addresses list \
--project \
--filter="name~^.*-nat-"
```
Use those two IPs as the source addresses to allowlist with your third-party providers.
On AWS, NAT Gateways always require Elastic IPs (this is the only mode AWS supports), so Qovery-managed EKS clusters have stable egress IPs by default. You can find them in the AWS console under **VPC** then **Elastic IP addresses**. See [Static IP on EKS](/docs/configuration/integrations/kubernetes/eks/managed#static-ip) for details.
### Use existing VPC
You can opt to use your own VPC instead of the one provided by Qovery by switching VPC mode to `Deploy on my existing VPC`.
In GCP you have two VPC modes: `Automatic` or `Custom`.
If you are using an automatic or a custom VPC, you have to set:
* Your VPC Name
* External project id (optional): by default, the project id used is the one specified in the credentials file. But if your VPC is defined in another GCP project, you have to specify the Project id.
You can also enable **Private nodes** to create GKE nodes without public IPs. In this mode, node traffic goes through your gateway instead of exposing public node addresses.
In addition if you are using a custom VPC, you have to set:
* Your Subnet range name (`https://console.cloud.google.com/networking/networks/details/?project=&pageTab=SUBNETS`)
You can also specify (optional):
* Pod ipv4 address range name
* Additional cluster pod ipv4 ranges names (separated with a comma)
* Ipv4 service range name
For these ranges, you have to create Secondary IPv4 ranges inside your subnet.
The **Deploy on my existing VPC** and **Private nodes** settings are fixed at cluster creation time. After the cluster is created, you can view them in the **Network** tab, but you cannot change them in place.
In the `Ready to install your cluster` window, check that the services needed to install your cluster are correct.
You can now press the `Create and Install` button.
Your cluster is now displayed in your organization settings, featuring the `Installing...` status (orange status). Once your cluster is properly installed, its status turns to green and you will be able to deploy your applications on it.
You can follow the execution of the action via the cluster status and/or by accessing the [Cluster Logs](/docs/configuration/clusters#logs)
## Managing your Cluster Settings
To manage the settings of an existing cluster:
Open your [Qovery Console](https://console.qovery.com).
On your organization overview, go on the Clusters page.
To access your cluster settings, click on your cluster card and then go on Settings tab.
Below you can find a description of each section
### General
The `General` tab allows you to define high-level information on your cluster:
| Item | Description |
| ------------------ | ----------------------------------------------------- |
| Cluster Name | To edit the name of your cluster. |
| Description | To enter or edit the description of your cluster. |
| Production Cluster | To enter or edit the production flag of your cluster. |
### Credentials
Here you can manage here the cloud provider credentials associated with your cluster.
If you need to change the credentials:
* generate a new set of credentials on your cloud provider ([Procedure for GCP account](/docs/installation/gcp#connect-gcp-account))
* create the new credential on the Qovery by opening the drop-down and selecting "New Credentials"
Once created and associated, you need to [update your cluster](/docs/configuration/clusters#updating-a-cluster) to apply the change.
### Mirroring registry
In this tab, you will see that a container registry already exist (called `registry-{$UIID}`).
This is your cloud provider container registry used by Qovery to manage the deployment of your applications by mirroring the docker images.
The credentials configured on this registry are the one used to create the cluster. But you can still update them if you prefer to manage them separately (dedicated pair of creds just to access the registry).
Check [this link](/docs/configuration/deployment/image-mirroring) for more information.
### Network
The `Network` tab in your cluster settings allows you to check if the [**Static IP**](#static-ip), [**Deploy on existing VPC**](#use-existing-vpc), and **Private nodes** features are enabled on your cluster. These settings cannot be changed after the creation of the cluster.