> ## Documentation Index
> Fetch the complete documentation index at: https://www.qovery.com/docs/llms.txt
> Use this file to discover all available pages before exploring further.
# Qovery-Managed AKS
> Learn how to configure your AKS Kubernetes clusters on Qovery
## Creating an Azure AKS Cluster
### Connect Your Azure Account
Qovery needs credentials to manage resources in your Azure subscription. We use a secure service principal approach that avoids storing long-lived credentials.
### Get Your Azure IDs
1. Go to [Azure Portal](https://portal.azure.com)
2. Navigate to **Azure Active Directory**
3. Click **Overview** in the left sidebar
4. Copy your **Tenant ID** (also called Directory ID)
You can also find it directly at: [portal.azure.com/#view/Microsoft\_AAD\_IAM/TenantProperties.ReactView](https://portal.azure.com/#view/Microsoft_AAD_IAM/TenantProperties.ReactView)
The Tenant ID is a GUID that looks like: `12345678-1234-1234-1234-123456789abc`
1. In Azure Portal, go to **Subscriptions**
2. Click on the subscription you want to use
3. Copy the **Subscription ID** from the overview page
You can also find it at: [portal.azure.com/#view/Microsoft\_Azure\_Billing/SubscriptionsBlade](https://portal.azure.com/#view/Microsoft_Azure_Billing/SubscriptionsBlade)
Make sure the subscription is **active** and has billing enabled. Qovery cannot create resources in disabled subscriptions.
### Generate Installation Command
1. Go to [Qovery Console](https://console.qovery.com)
2. Go to your organization overview and click on the **Clusters** tab
3. Click **Create Cluster**
4. Select **Azure** as the cloud provider
1. Enter your **Tenant ID**
2. Enter your **Subscription ID**
3. Click **Next**
Qovery will generate a secure installation command for you.
Copy the generated command to your clipboard.
This command creates a service principal using Azure's app registration.
### Run Installation Script
1. In Azure Portal, click the **Cloud Shell** icon (>\_) in the top navigation bar
2. **Important**: Select **Bash** mode (not PowerShell)
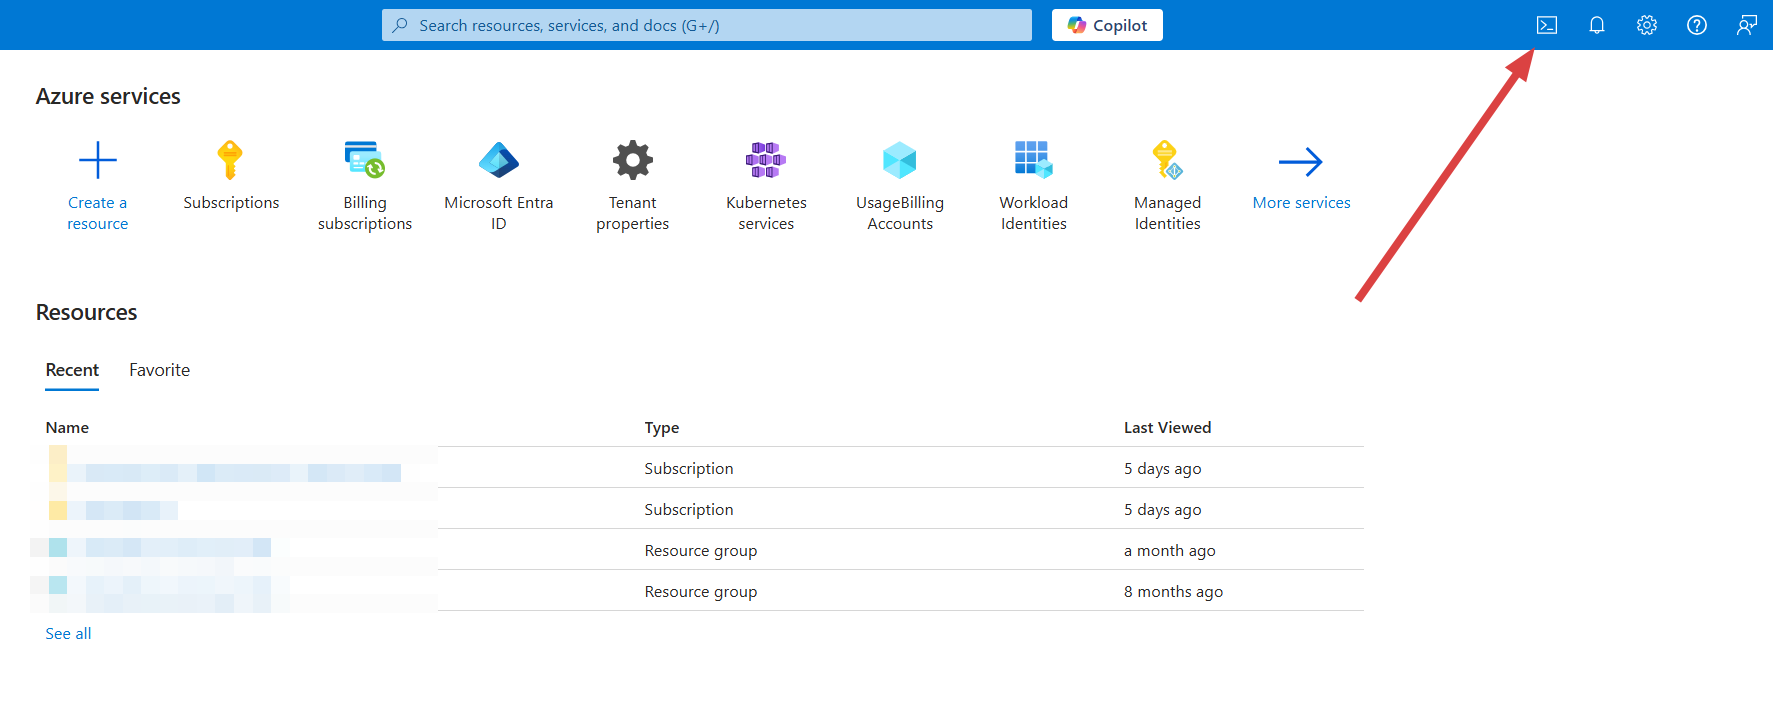 The script must run in **Bash mode**. If you're in PowerShell, click the dropdown and switch to Bash.
1. Paste the command from Qovery into Azure Cloud Shell
2. Press **Enter**
3. Review the subscription details displayed
4. The script will create a service principal and assign necessary permissions
**Example output:**
```bash theme={null}
Creating service principal for Qovery...
Service principal created successfully!
Assigning Contributor role...
✓ Credentials configured successfully
Subscription ID: 12345678-1234-1234-1234-123456789abc
Tenant ID: 87654321-4321-4321-4321-cba987654321
```
The credentials are automatically linked to your Qovery organization.
If you have multiple subscriptions, you can specify which one to use by passing it as a parameter to the script.
Qovery requires these Azure permissions to manage your infrastructure:
* **Contributor Role**: Full access to create and manage resources (AKS, VMs, VNets, Load Balancers, etc.)
* **Resource Group Management**: Create and manage resource groups
* **Azure Kubernetes Service**: Create and manage AKS clusters
* **Virtual Network**: Configure VNets, subnets, NSGs, and NAT Gateways
* **Compute**: Provision VM Scale Sets for node pools
* **Storage**: Create and manage Managed Disks for persistent storage
* **DNS**: Configure DNS zones and records
The service principal created by the script is assigned the **Contributor** role at the subscription level, which provides all necessary permissions.
A service principal is an identity created for use with applications, hosted services, and automated tools to access Azure resources. It's similar to a "service account" in other cloud providers.
**Key benefits:**
* **Security**: No need to share personal Azure credentials
* **Scope Control**: Permissions limited to specific subscription
* **Auditability**: All actions tracked in Azure Activity Log
* **Revocable**: Can be deleted without affecting user accounts
The service principal uses certificate-based authentication, which is more secure than password-based authentication.
To rotate Azure credentials:
1. In Azure Portal, go to **Azure Active Directory** → **App registrations**
2. Find the Qovery service principal (name starts with `qovery-`)
3. Go to **Certificates & secrets**
4. Add a new certificate or client secret
5. Run the Qovery credential creation script again to generate new credentials
6. Update credentials in Qovery Console
7. Wait 24 hours to ensure all systems use new credentials
8. Remove the old certificate/secret in Azure Portal
Qovery uses certificate-based authentication by default, which is more secure than client secrets.
Yes! If you have an existing service principal with the Contributor role, you can use it instead of creating a new one. However, ensure it has:
* Contributor role at the subscription level (or at minimum, the resource group where clusters will be created)
* Certificate or client secret configured
* No expiration date conflicts with your security policies
You'll need to manually provide the credentials to Qovery Console instead of using the automated script.
**Common issues and solutions:**
**"Insufficient privileges"**:
* You need at least "User Access Administrator" or "Owner" role to create service principals
* Contact your Azure administrator for assistance
**"PowerShell mode detected"**:
* The script only runs in Bash mode
* Click the dropdown in Cloud Shell and select "Bash"
**"Subscription not found"**:
* Verify the Subscription ID is correct
* Ensure the subscription is active and not disabled
* Check you have access to the subscription
**"Tenant ID mismatch"**:
* Verify you're logged into the correct Azure tenant
* Some accounts have access to multiple tenants - switch if needed
### Create the Cluster
Click on `AKS` as hosting mode and then `Qovery Managed` option.
In the `Create Cluster` window enter:
* **Cluster name**: enter the name of your choice for your cluster.
* **Description**: enter a description to identify better your cluster.
* **Production cluster**: select this option if your cluster will be used for production.
* **Region**: select the geographical area in which you want your cluster to be hosted.
* **Credentials**: select one of the existing cloud provider credentials or [create new credentials](/docs/getting-started/installation/azure#connect-your-azure-account).
To confirm, click `Next`.
In the `Set Resources` window, select:
* **Instance type**: select the type of [worker nodes](/docs/configuration/clusters#what-is-a-cluster) you want to deploy to your cluster.
* **Node auto-scaling**: define the minimum and the maximum number of worker nodes that your cluster can run. The lowest number is the number of worker nodes running on your infrastructure at any time, while the highest number is the maximum number of worker nodes that can automatically be deployed as traffic grows. Please note that a minimum of 3 worker nodes is required to deploy your AKS cluster.
## Managing your Cluster Settings
To manage the settings of an existing cluster:
Open your [Qovery Console](https://console.qovery.com).
On your organization overview, go to the **Clusters** tab.
Click on your cluster card and go to the **Settings** tab.
Below you can find a description of each section
### General
The `General` tab allows you to define high-level information on your cluster:
| Item | Description |
| ------------------ | ----------------------------------------------------- |
| Cluster Name | To edit the name of your cluster. |
| Description | To enter or edit the description of your cluster. |
| Production Cluster | To enter or edit the production flag of your cluster. |
### Credentials
Here you can manage here the cloud provider credentials associated with your cluster.
If you need to change the credentials:
* generate a new set of credentials on your cloud provider ([Procedure for Azure account](/docs/installation/azure#connect-azure-account))
* create the new credential on the Qovery by opening the drop-down and selecting "New Credentials"
Once created and associated, you need to [update your cluster](/docs/configuration/clusters#updating-a-cluster) to apply the change.
### Mirroring registry
In this tab, you will see that a container registry already exist (called `registry-{$UIID}`).
This is your cloud provider container registry used by Qovery to manage the deployment of your applications by mirroring the docker images.
The credentials configured on this registry are the one used to create the cluster. But you can still update them if you prefer to manage them separately (dedicated pair of creds just to access the registry).
Check [this link](/docs/configuration/deployment/image-mirroring) for more information.
The script must run in **Bash mode**. If you're in PowerShell, click the dropdown and switch to Bash.
1. Paste the command from Qovery into Azure Cloud Shell
2. Press **Enter**
3. Review the subscription details displayed
4. The script will create a service principal and assign necessary permissions
**Example output:**
```bash theme={null}
Creating service principal for Qovery...
Service principal created successfully!
Assigning Contributor role...
✓ Credentials configured successfully
Subscription ID: 12345678-1234-1234-1234-123456789abc
Tenant ID: 87654321-4321-4321-4321-cba987654321
```
The credentials are automatically linked to your Qovery organization.
If you have multiple subscriptions, you can specify which one to use by passing it as a parameter to the script.
Qovery requires these Azure permissions to manage your infrastructure:
* **Contributor Role**: Full access to create and manage resources (AKS, VMs, VNets, Load Balancers, etc.)
* **Resource Group Management**: Create and manage resource groups
* **Azure Kubernetes Service**: Create and manage AKS clusters
* **Virtual Network**: Configure VNets, subnets, NSGs, and NAT Gateways
* **Compute**: Provision VM Scale Sets for node pools
* **Storage**: Create and manage Managed Disks for persistent storage
* **DNS**: Configure DNS zones and records
The service principal created by the script is assigned the **Contributor** role at the subscription level, which provides all necessary permissions.
A service principal is an identity created for use with applications, hosted services, and automated tools to access Azure resources. It's similar to a "service account" in other cloud providers.
**Key benefits:**
* **Security**: No need to share personal Azure credentials
* **Scope Control**: Permissions limited to specific subscription
* **Auditability**: All actions tracked in Azure Activity Log
* **Revocable**: Can be deleted without affecting user accounts
The service principal uses certificate-based authentication, which is more secure than password-based authentication.
To rotate Azure credentials:
1. In Azure Portal, go to **Azure Active Directory** → **App registrations**
2. Find the Qovery service principal (name starts with `qovery-`)
3. Go to **Certificates & secrets**
4. Add a new certificate or client secret
5. Run the Qovery credential creation script again to generate new credentials
6. Update credentials in Qovery Console
7. Wait 24 hours to ensure all systems use new credentials
8. Remove the old certificate/secret in Azure Portal
Qovery uses certificate-based authentication by default, which is more secure than client secrets.
Yes! If you have an existing service principal with the Contributor role, you can use it instead of creating a new one. However, ensure it has:
* Contributor role at the subscription level (or at minimum, the resource group where clusters will be created)
* Certificate or client secret configured
* No expiration date conflicts with your security policies
You'll need to manually provide the credentials to Qovery Console instead of using the automated script.
**Common issues and solutions:**
**"Insufficient privileges"**:
* You need at least "User Access Administrator" or "Owner" role to create service principals
* Contact your Azure administrator for assistance
**"PowerShell mode detected"**:
* The script only runs in Bash mode
* Click the dropdown in Cloud Shell and select "Bash"
**"Subscription not found"**:
* Verify the Subscription ID is correct
* Ensure the subscription is active and not disabled
* Check you have access to the subscription
**"Tenant ID mismatch"**:
* Verify you're logged into the correct Azure tenant
* Some accounts have access to multiple tenants - switch if needed
### Create the Cluster
Click on `AKS` as hosting mode and then `Qovery Managed` option.
In the `Create Cluster` window enter:
* **Cluster name**: enter the name of your choice for your cluster.
* **Description**: enter a description to identify better your cluster.
* **Production cluster**: select this option if your cluster will be used for production.
* **Region**: select the geographical area in which you want your cluster to be hosted.
* **Credentials**: select one of the existing cloud provider credentials or [create new credentials](/docs/getting-started/installation/azure#connect-your-azure-account).
To confirm, click `Next`.
In the `Set Resources` window, select:
* **Instance type**: select the type of [worker nodes](/docs/configuration/clusters#what-is-a-cluster) you want to deploy to your cluster.
* **Node auto-scaling**: define the minimum and the maximum number of worker nodes that your cluster can run. The lowest number is the number of worker nodes running on your infrastructure at any time, while the highest number is the maximum number of worker nodes that can automatically be deployed as traffic grows. Please note that a minimum of 3 worker nodes is required to deploy your AKS cluster.
## Managing your Cluster Settings
To manage the settings of an existing cluster:
Open your [Qovery Console](https://console.qovery.com).
On your organization overview, go to the **Clusters** tab.
Click on your cluster card and go to the **Settings** tab.
Below you can find a description of each section
### General
The `General` tab allows you to define high-level information on your cluster:
| Item | Description |
| ------------------ | ----------------------------------------------------- |
| Cluster Name | To edit the name of your cluster. |
| Description | To enter or edit the description of your cluster. |
| Production Cluster | To enter or edit the production flag of your cluster. |
### Credentials
Here you can manage here the cloud provider credentials associated with your cluster.
If you need to change the credentials:
* generate a new set of credentials on your cloud provider ([Procedure for Azure account](/docs/installation/azure#connect-azure-account))
* create the new credential on the Qovery by opening the drop-down and selecting "New Credentials"
Once created and associated, you need to [update your cluster](/docs/configuration/clusters#updating-a-cluster) to apply the change.
### Mirroring registry
In this tab, you will see that a container registry already exist (called `registry-{$UIID}`).
This is your cloud provider container registry used by Qovery to manage the deployment of your applications by mirroring the docker images.
The credentials configured on this registry are the one used to create the cluster. But you can still update them if you prefer to manage them separately (dedicated pair of creds just to access the registry).
Check [this link](/docs/configuration/deployment/image-mirroring) for more information.