> ## Documentation Index
> Fetch the complete documentation index at: https://www.qovery.com/docs/llms.txt
> Use this file to discover all available pages before exploring further.
# Environment
> Configure and manage environments for your applications
## Overview
An environment is a group of applications, databases, and services running within the same Kubernetes namespace. Each environment provides isolation and organization for your services across different stages of your development lifecycle.
## Types of Environment
Qovery supports four environment modes, each designed for specific use cases:
### Production
**Critical environment** for live applications serving real users.
Production environments should not be stopped or deleted by anyone without careful consideration and proper approval.
### Staging
**Production-like environment** for final testing before deployment. Often reflects production conditions and is critical for companies to validate changes before release.
### Development
**Working environment** for developing and testing features. Used by developers for day-to-day work, testing, and experimentation.
### Preview
**Ephemeral environment** automatically created for pull requests. Temporary environments that can be auto-deleted when no longer needed.
## Create an Environment
Navigate to the project where you want to create the environment
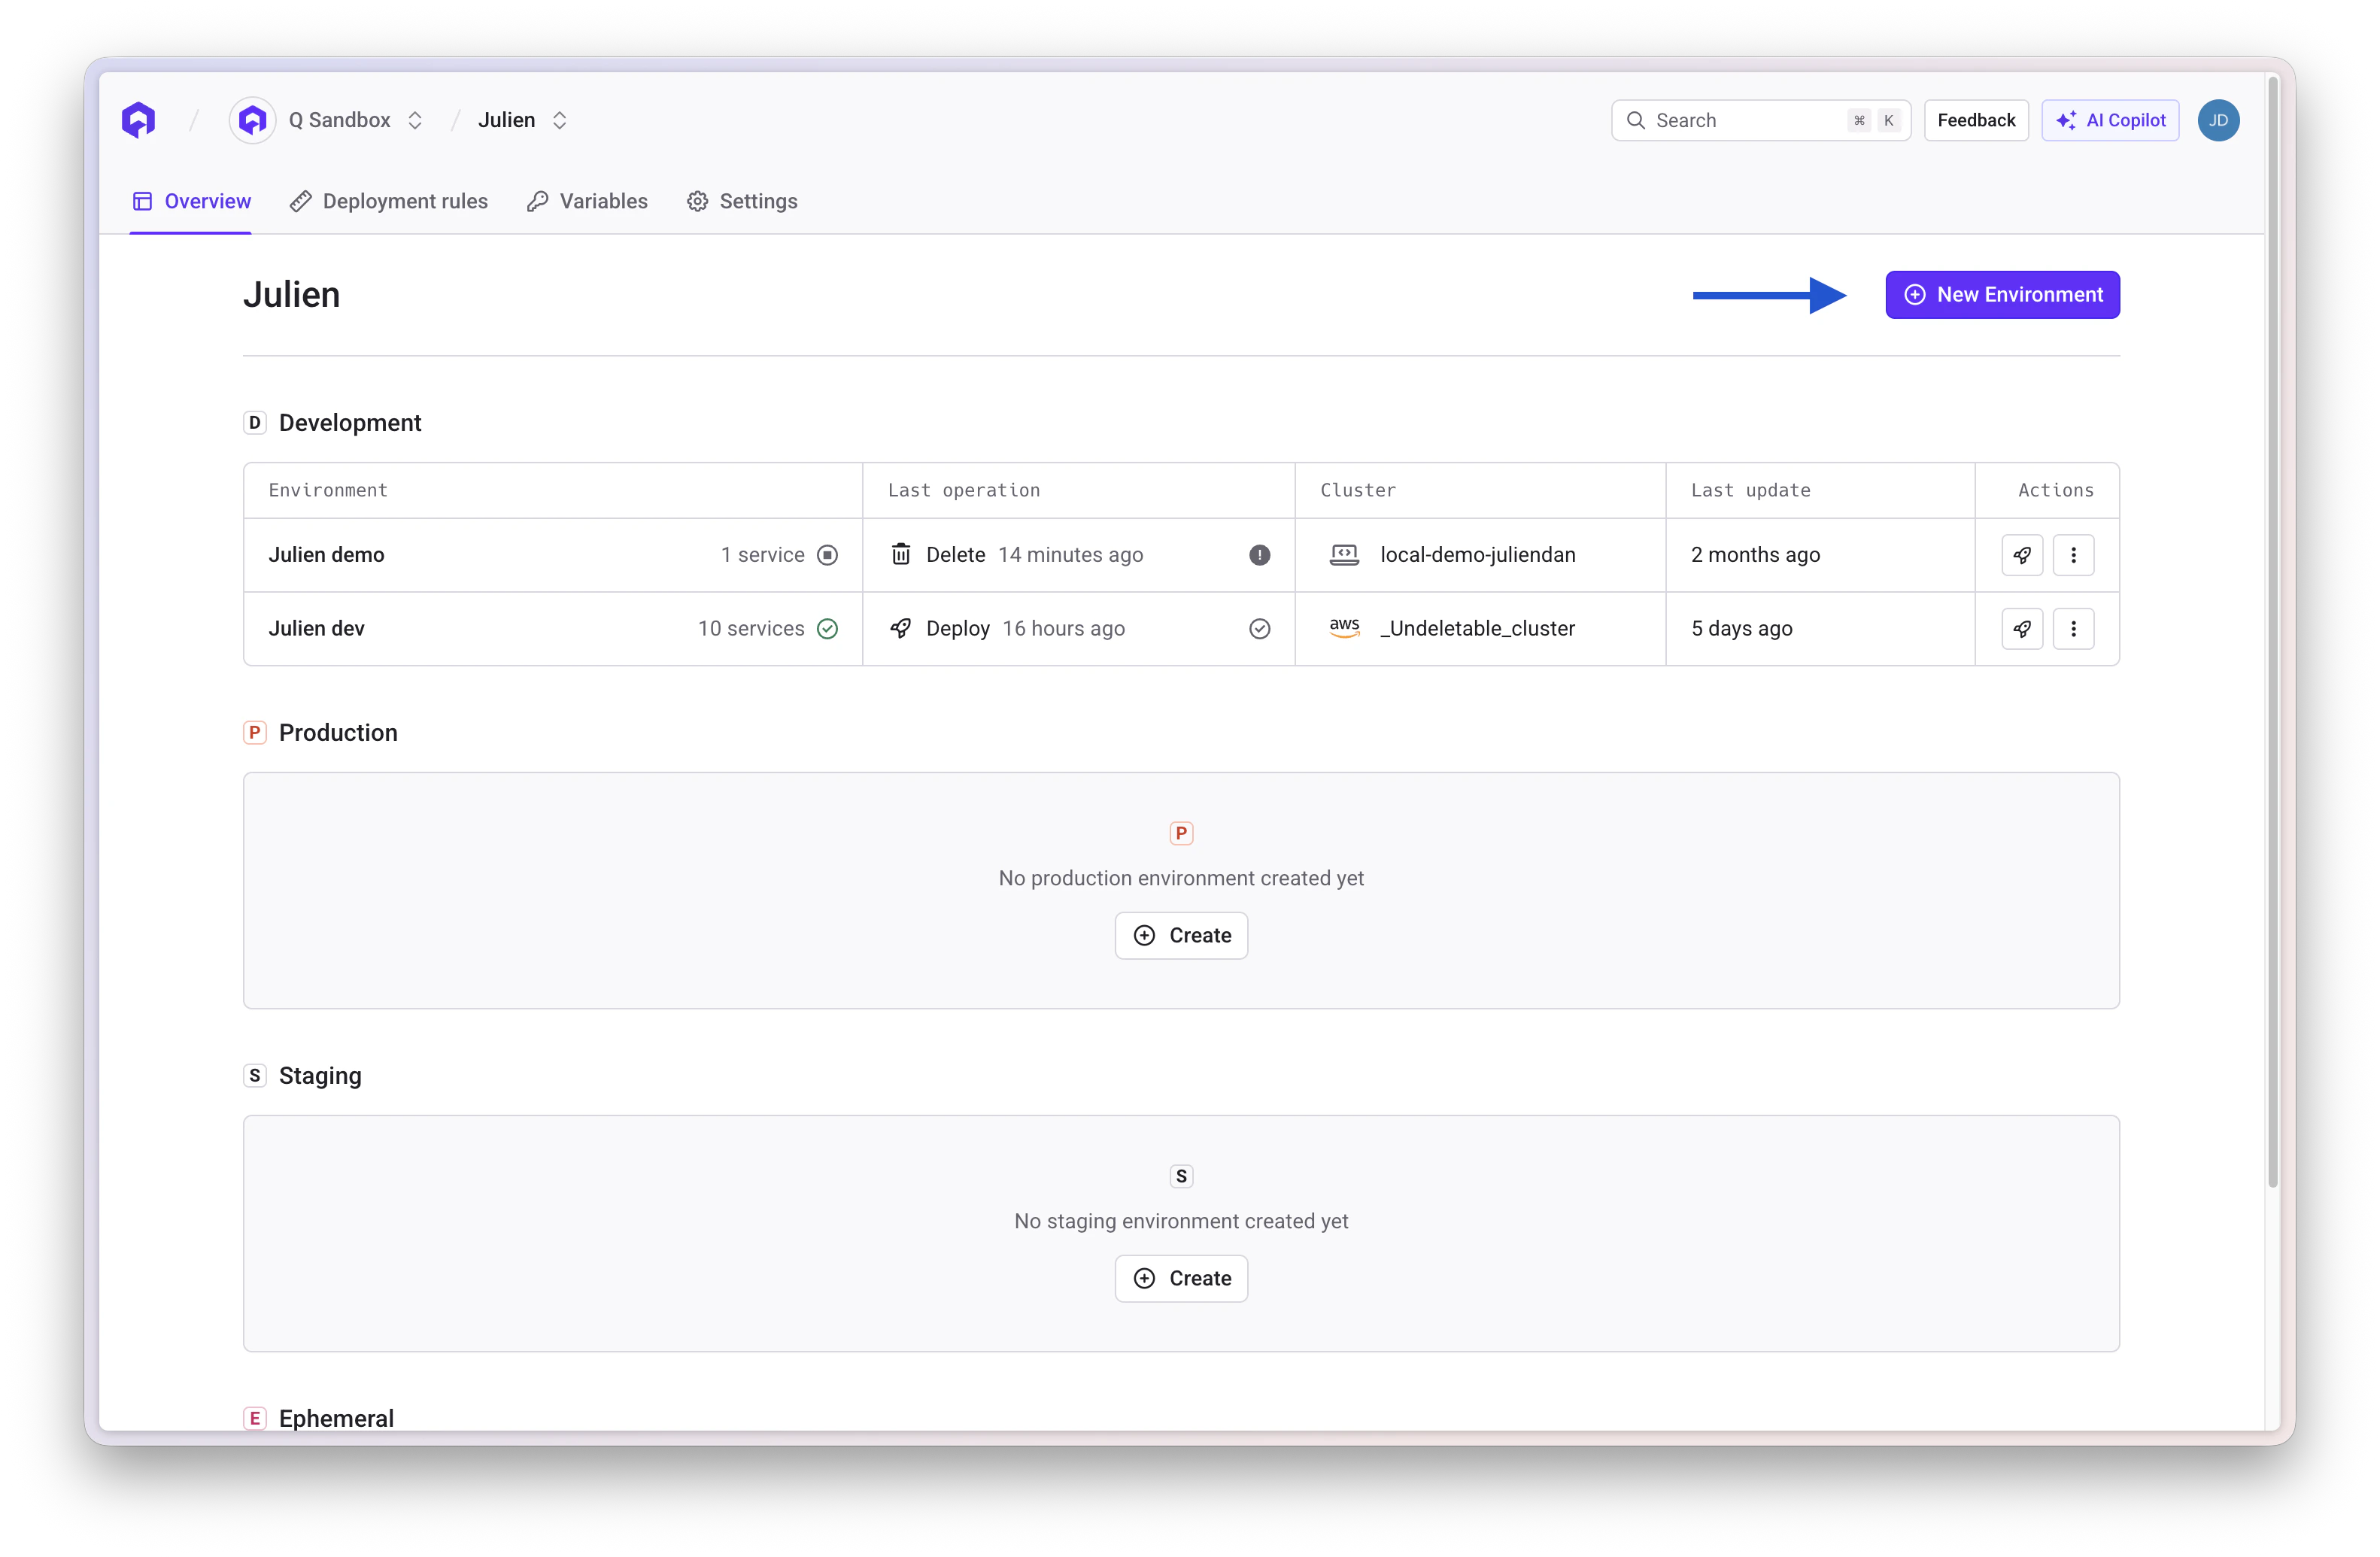 Click the **Create Environment** button
Specify the following parameters:
* **Name**: A descriptive name for your environment
* **Mode**: Select environment type (Production, Staging, Development, or Preview)
* **Cluster**: Choose the Kubernetes cluster where the environment will run
Click the **Create Environment** button
Specify the following parameters:
* **Name**: A descriptive name for your environment
* **Mode**: Select environment type (Production, Staging, Development, or Preview)
* **Cluster**: Choose the Kubernetes cluster where the environment will run
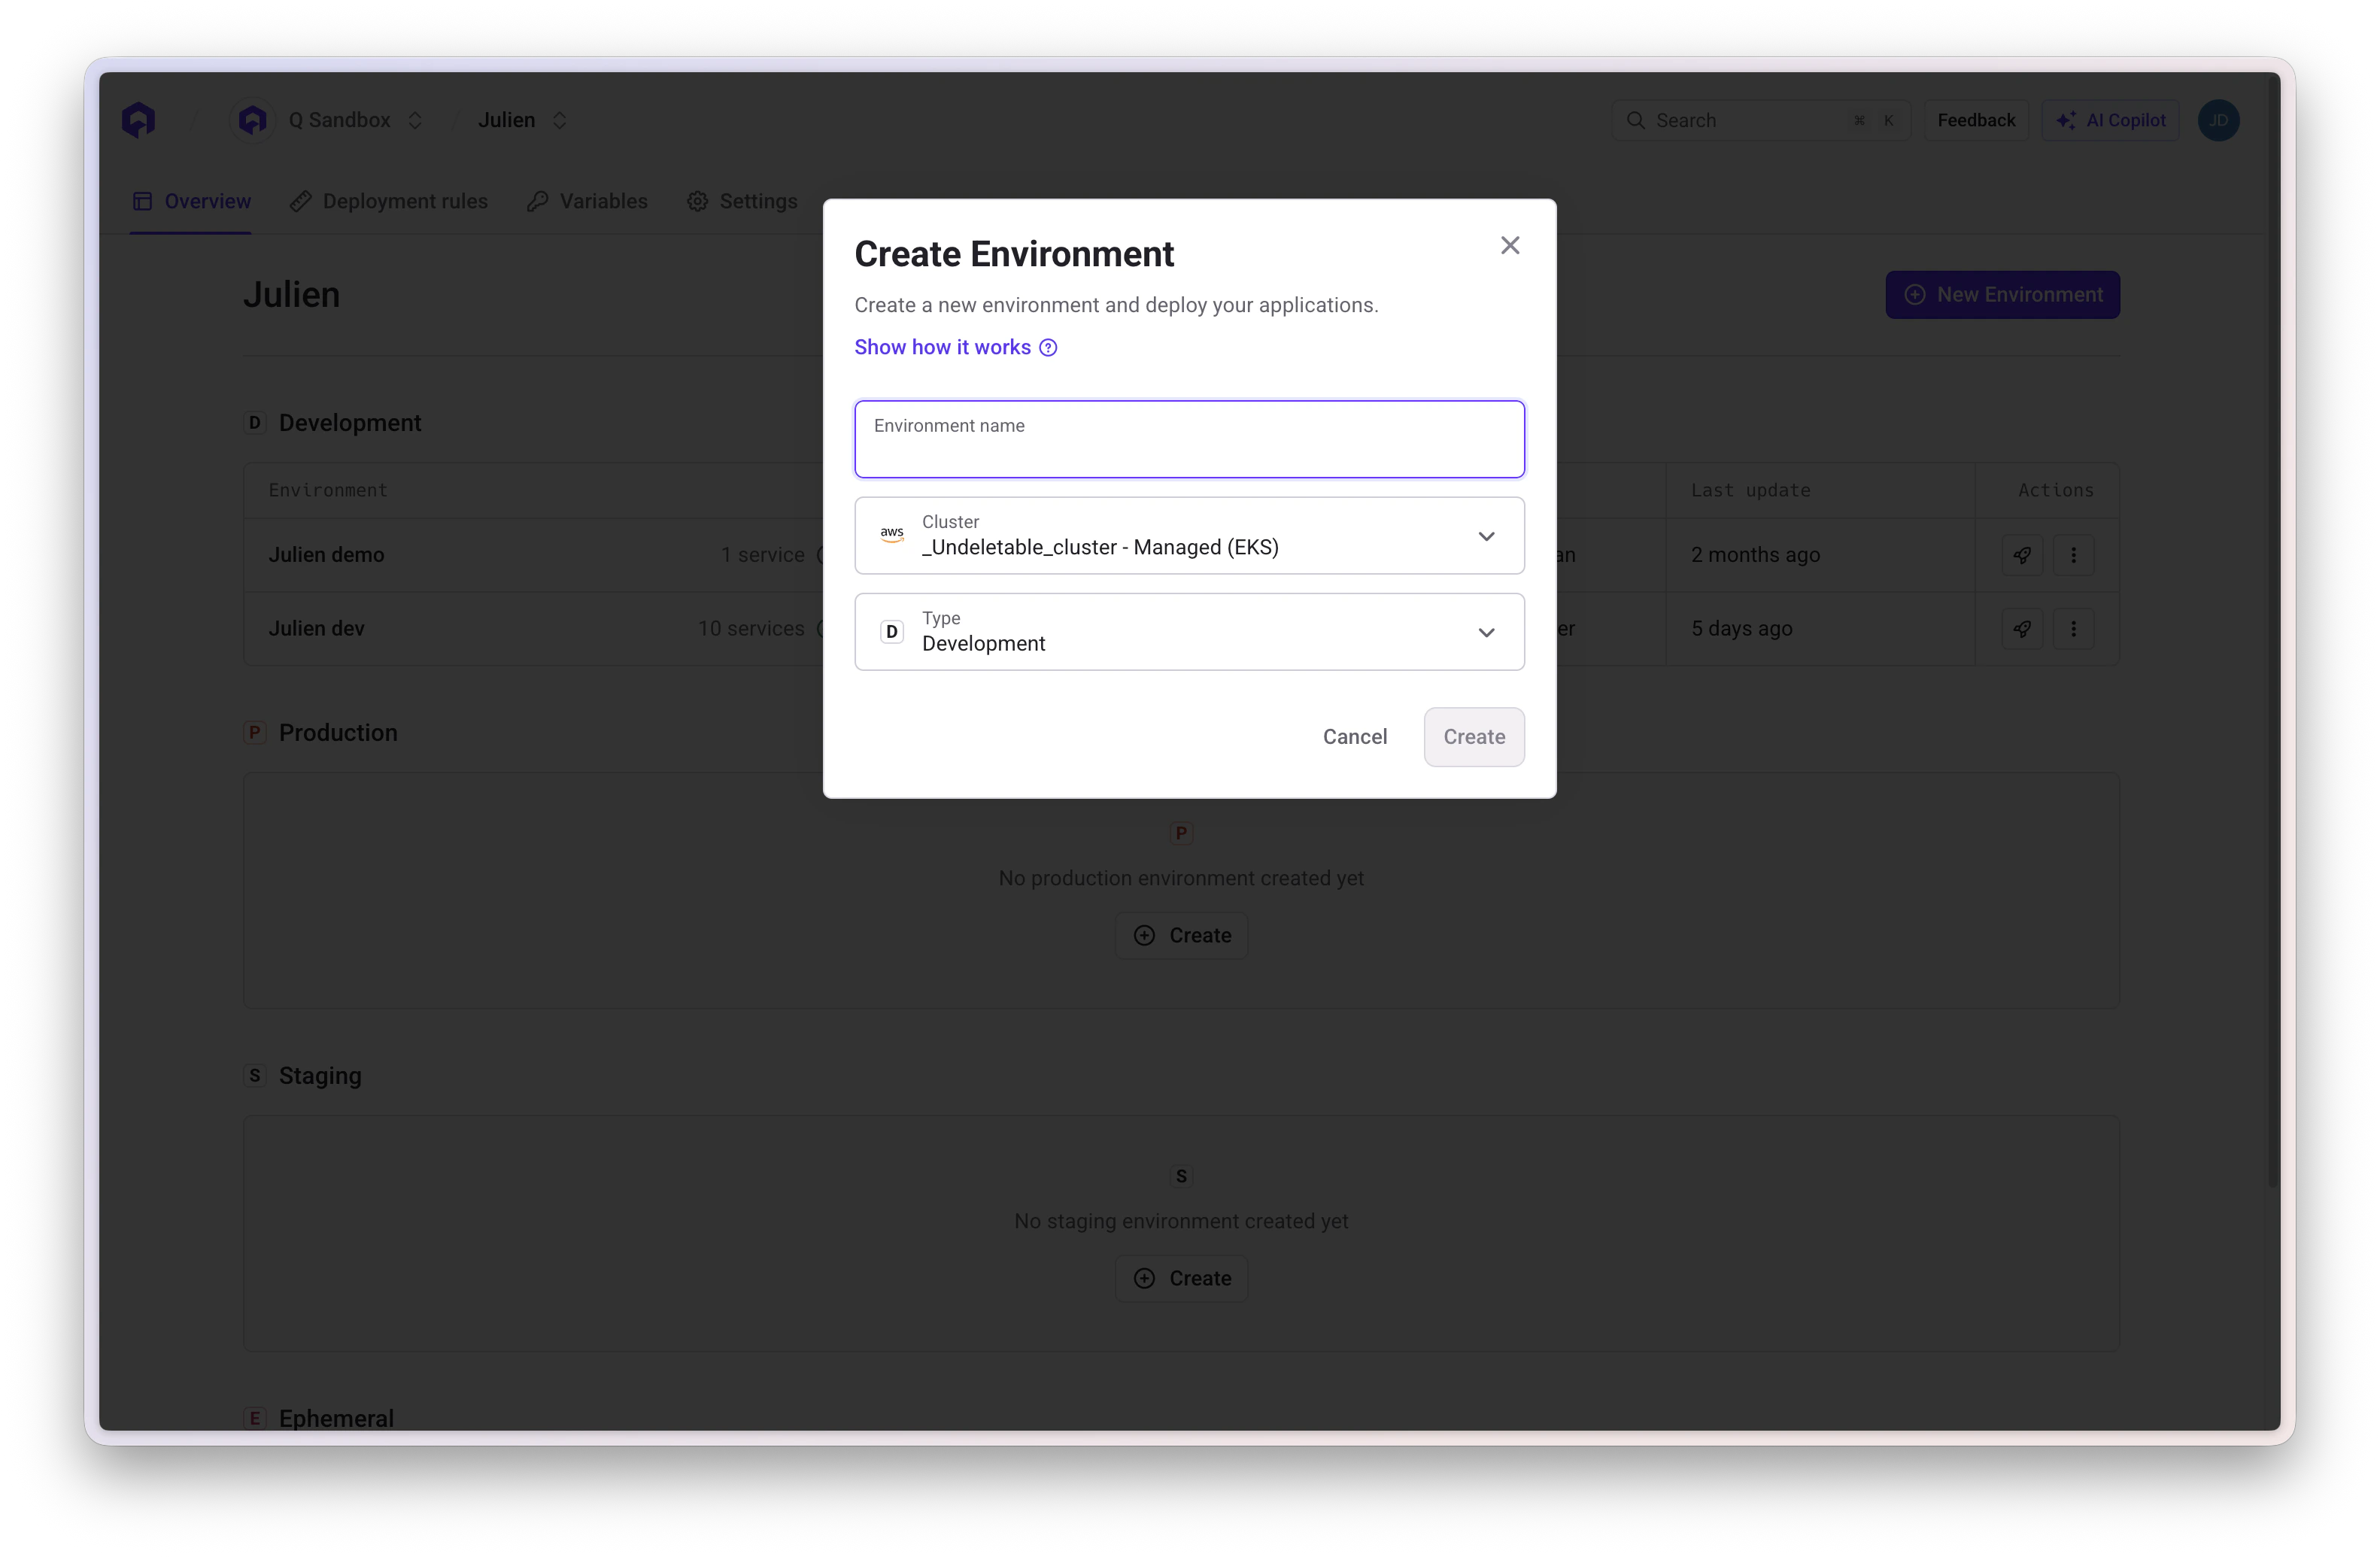 Once an environment is provisioned, the cluster assignment cannot be changed.
Click **Create** to finalize the environment setup
### Adding Services
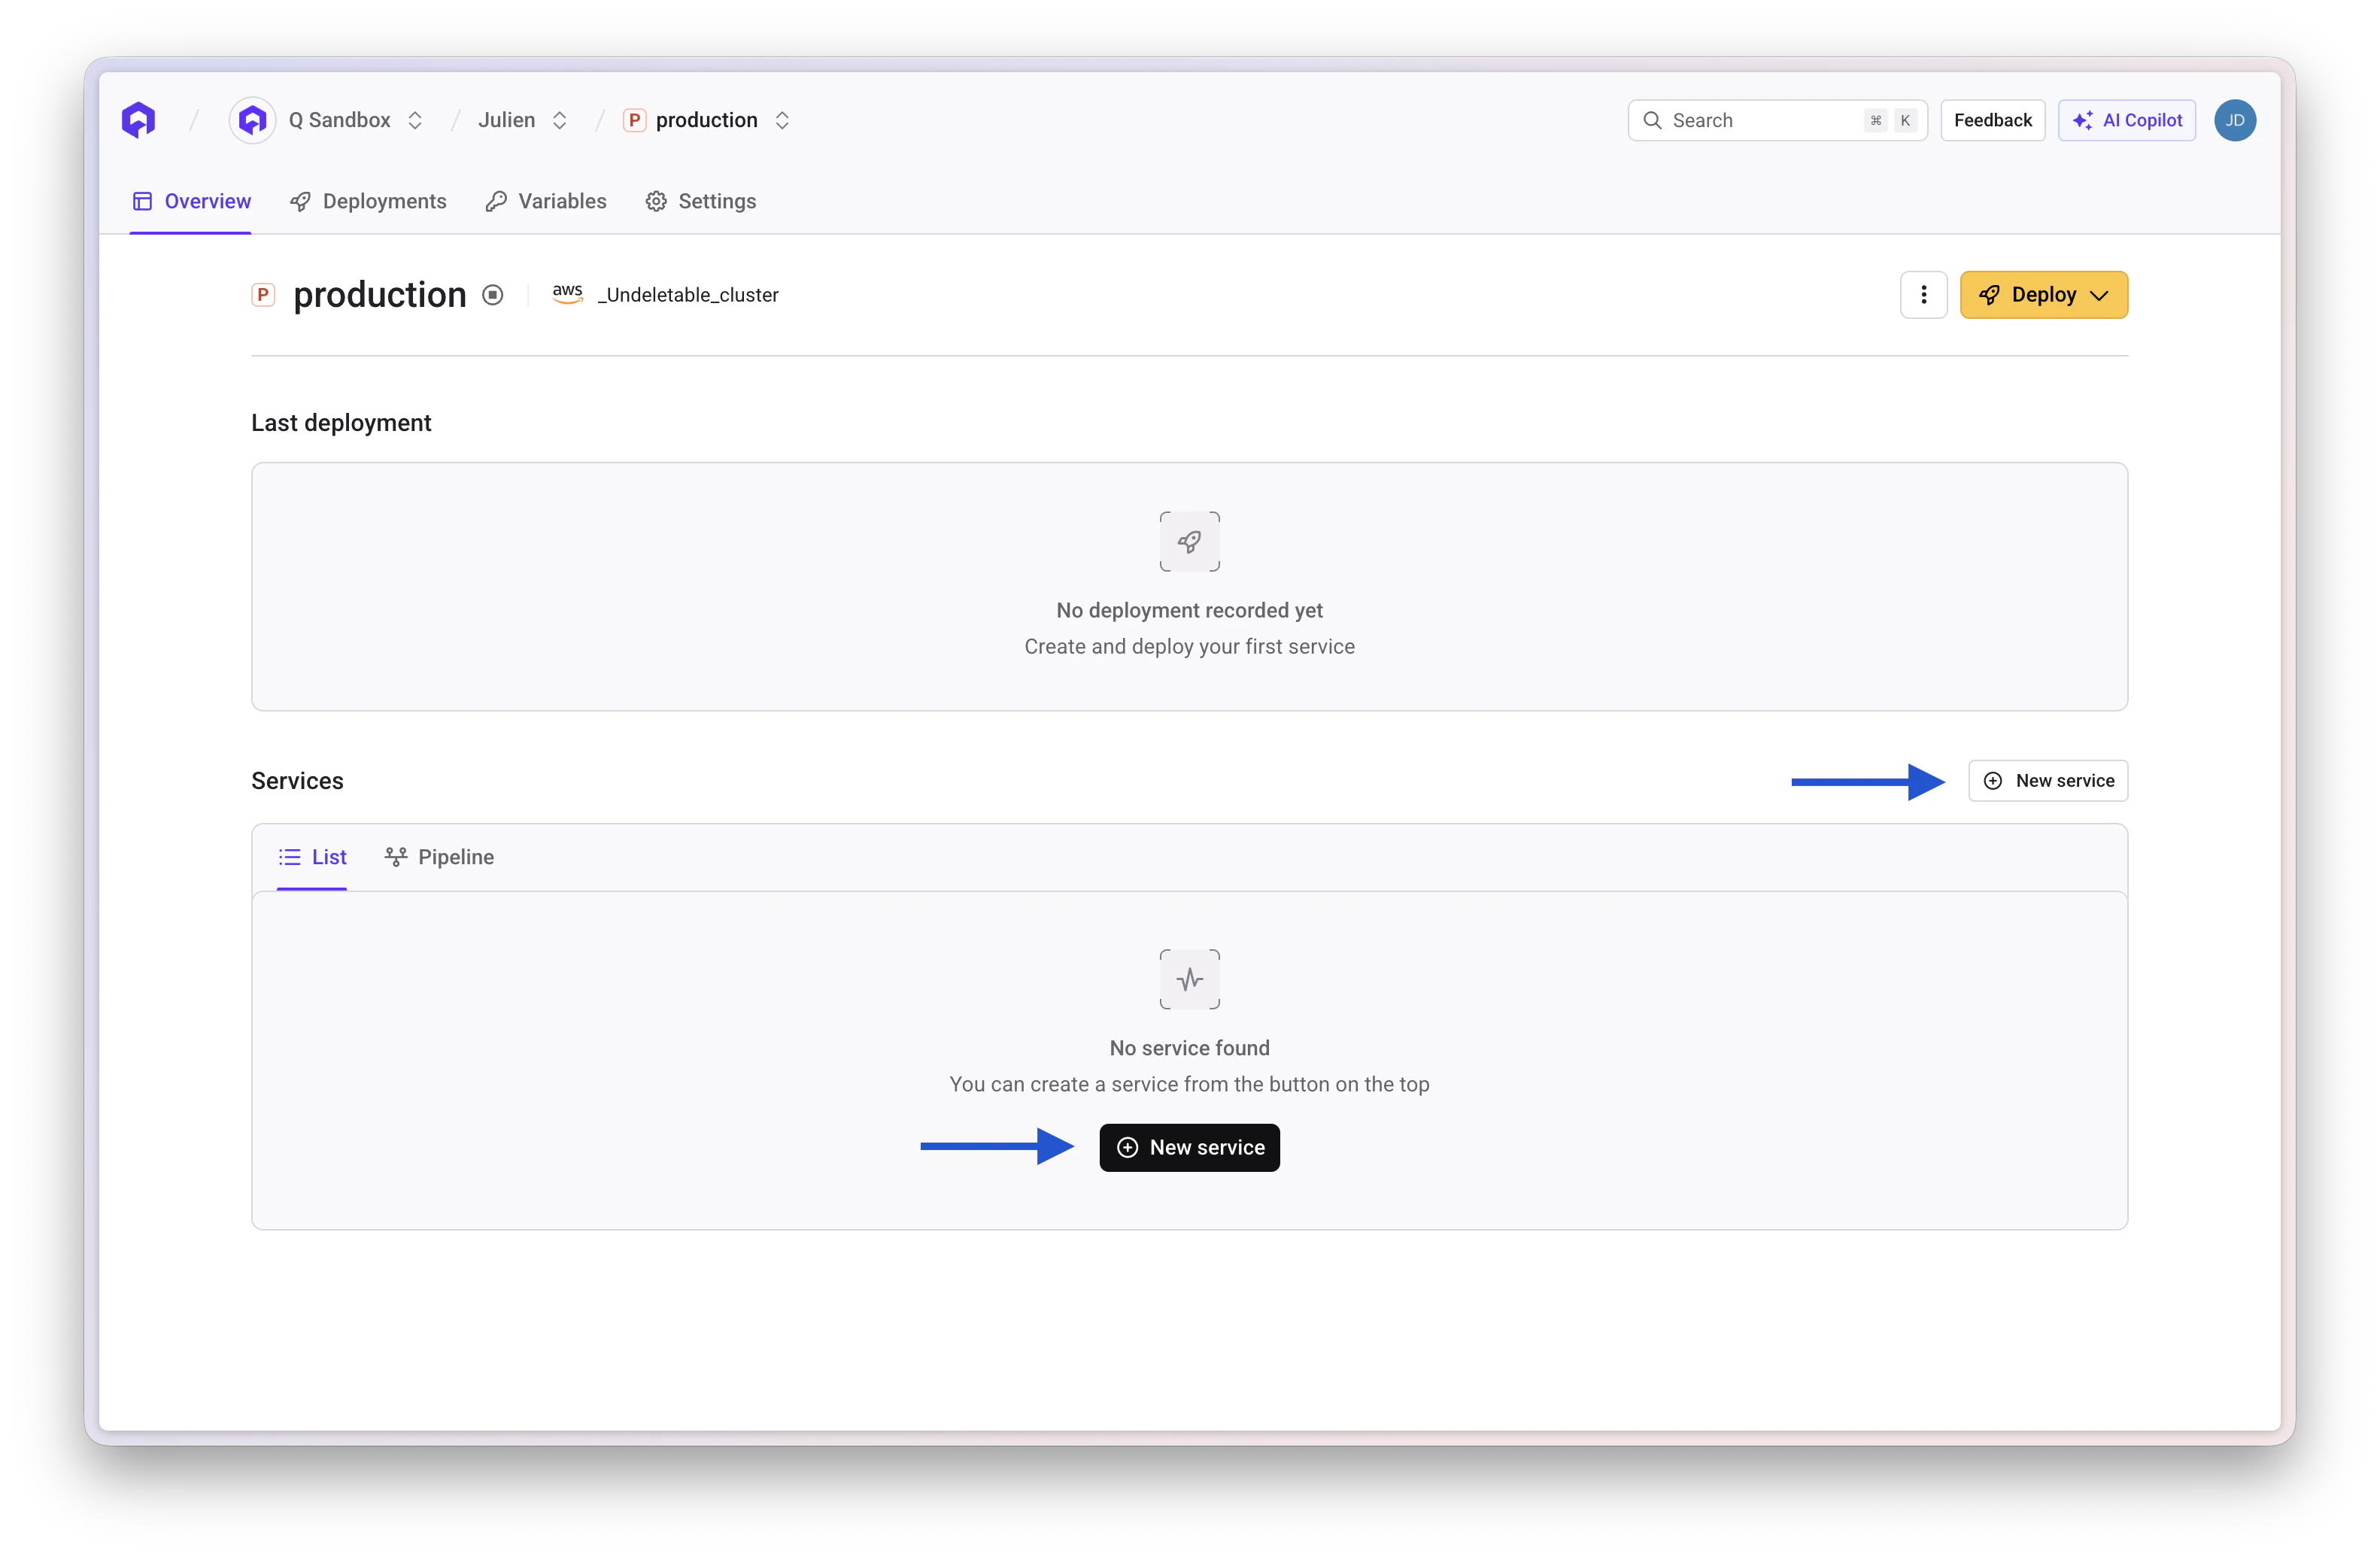
After creation, you can add services including:
* Applications
* Cronjobs
* Lifecycle jobs
* Databases
Once an environment is provisioned, the cluster assignment cannot be changed.
Click **Create** to finalize the environment setup
### Adding Services
After creation, you can add services including:
* Applications
* Cronjobs
* Lifecycle jobs
* Databases
 ## Environment Settings
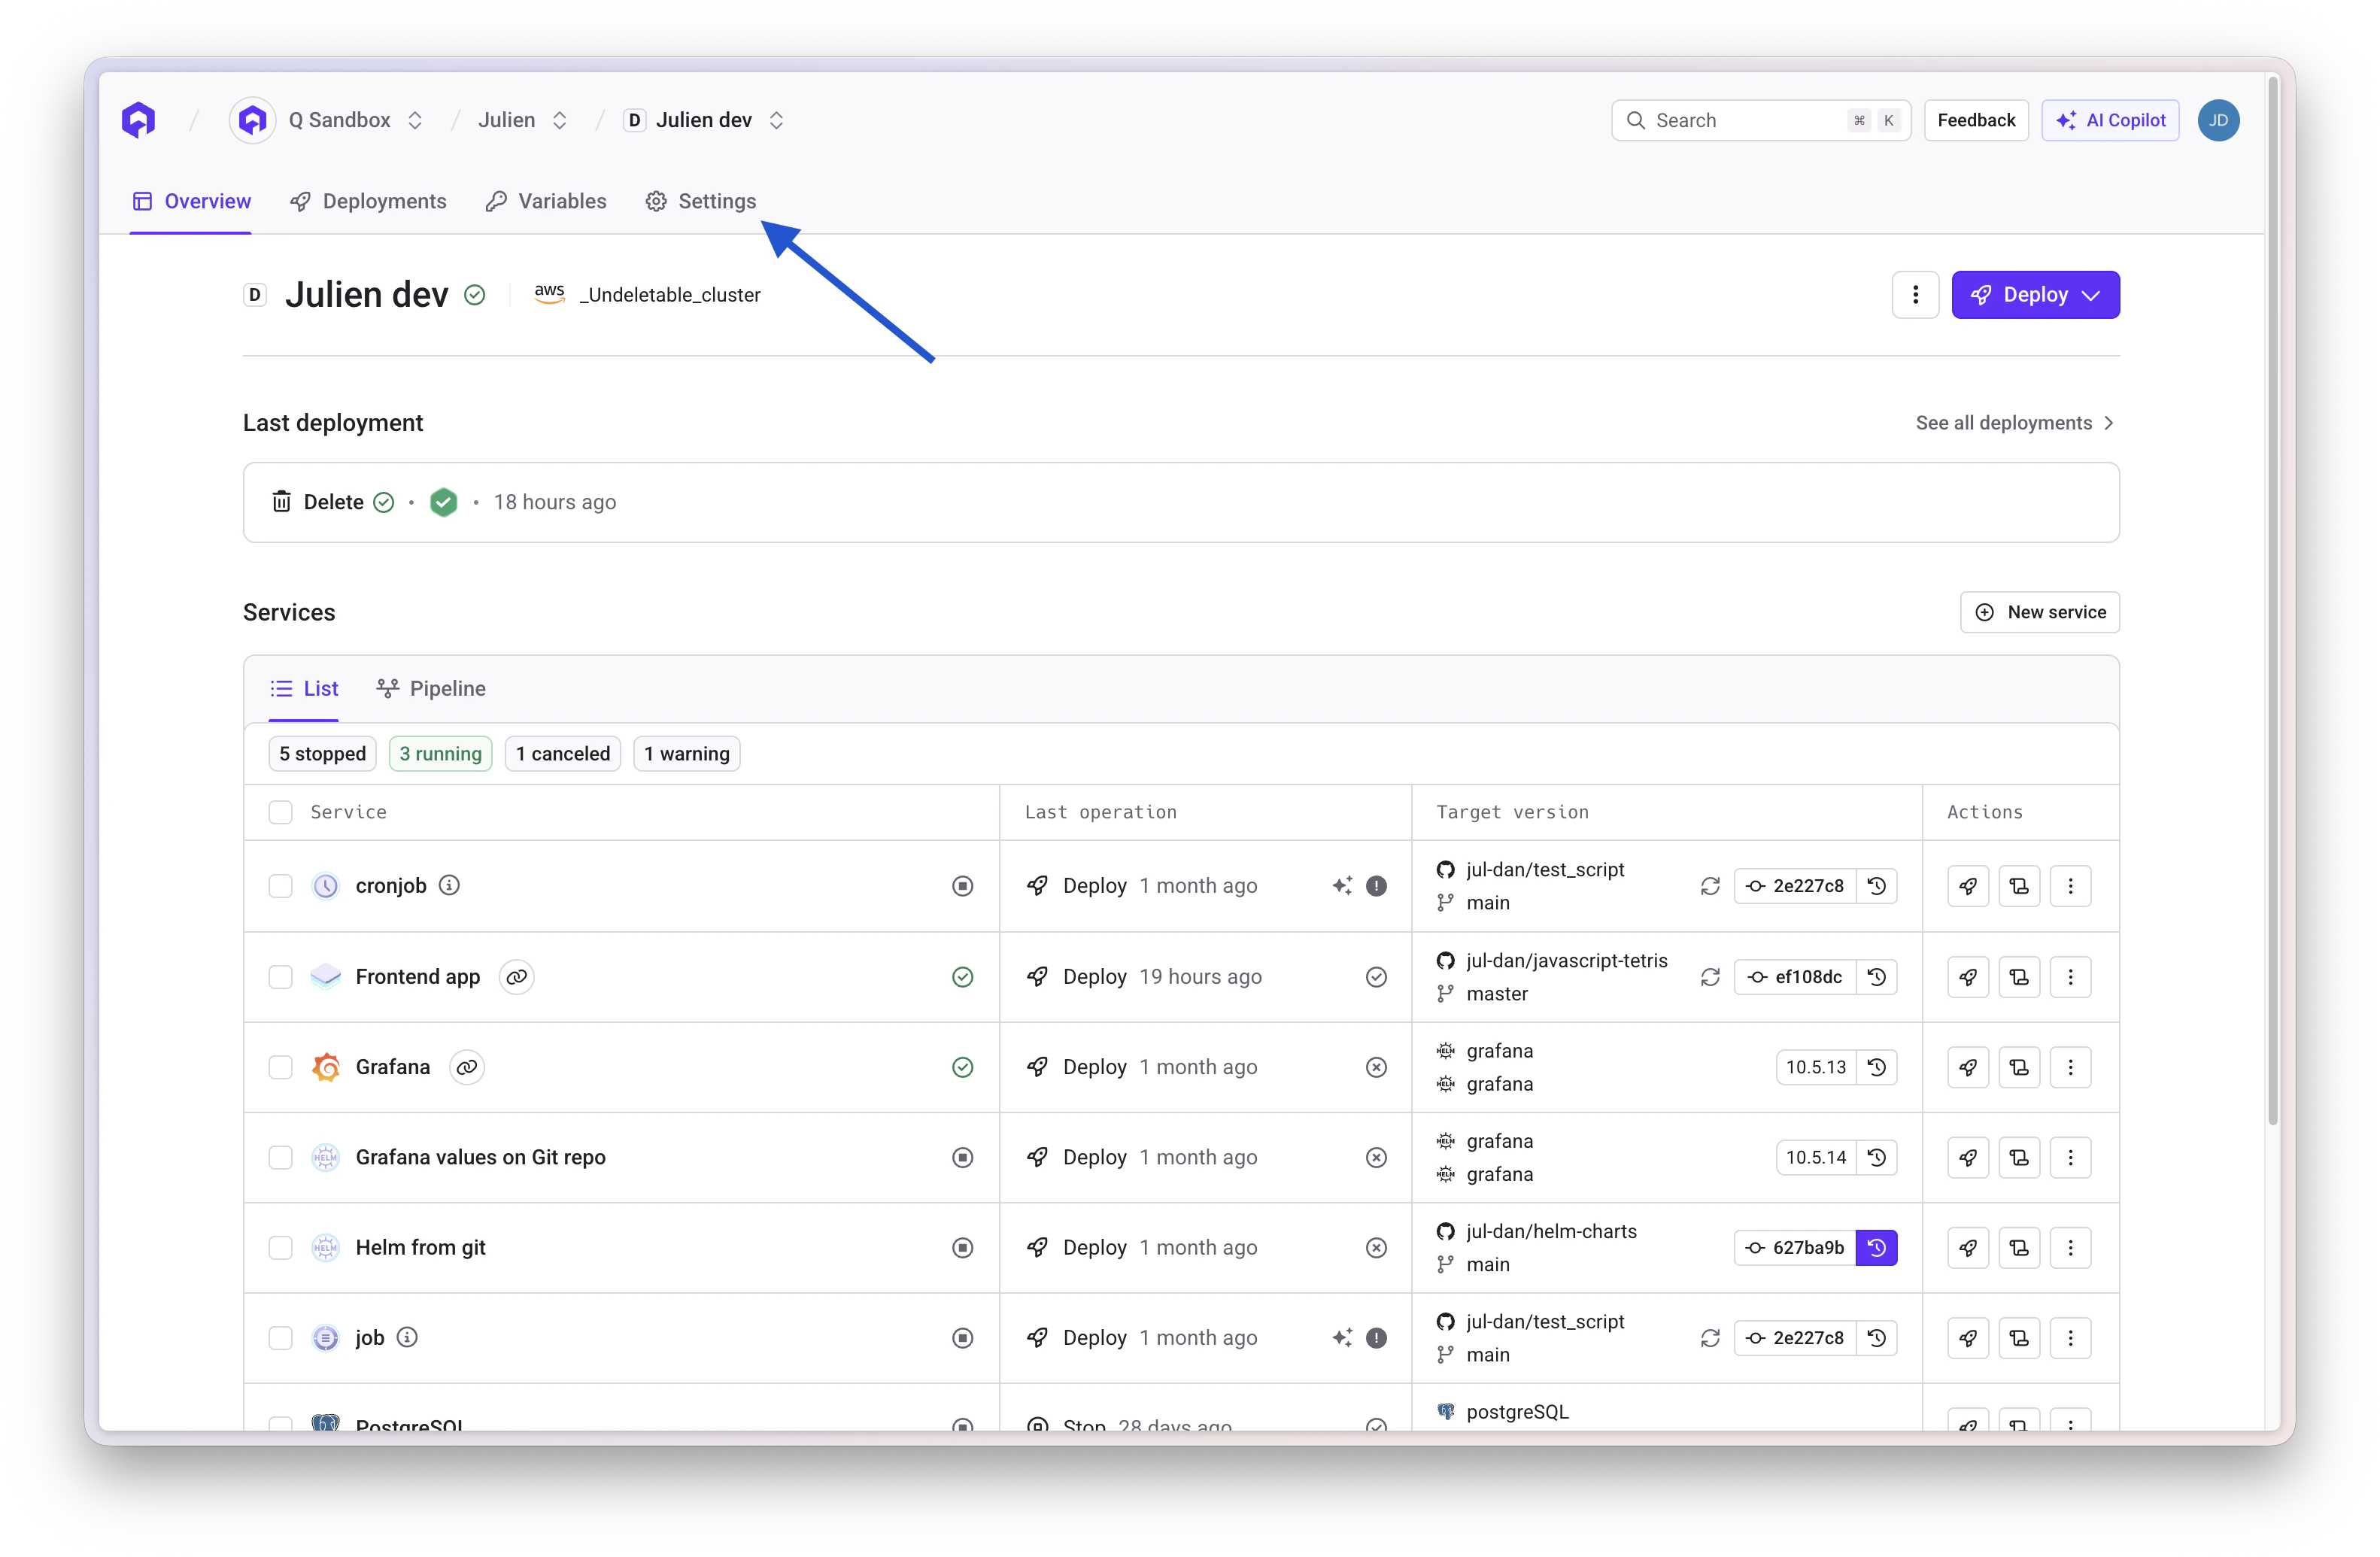
Access environment settings to configure various aspects of your environment:
## Environment Settings
Access environment settings to configure various aspects of your environment:
 ### General Tab
Configure basic environment properties:
* **Environment Name**: Update the environment name
* **Environment Mode**: Change between Production, Staging, Development, or Preview
The cluster assignment is immutable after the environment is provisioned.
### Deployment Rules
Set policies to reduce costs and control deployments. Learn more about [deployment rules](/docs/configuration/deployment/overview) for cost optimization.
### Deployment Pipeline
Configure the deployment pipeline to be executed when a deployment on the environment is triggered. Control how services are deployed within the environment.
Learn more about [deployment pipelines](/docs/configuration/deployment/pipeline).
## Preview Environments
Preview Environments are temporary, isolated environments automatically created from your blueprint environment when you open a pull request. They enable you to test changes in production-like conditions before merging.
**Tutorial**: For a complete step-by-step tutorial on getting started with Preview Environments, including prerequisites and detailed setup instructions, see our [Getting Started with Preview Environments Tutorial](/docs/getting-started/guides/use-cases/preview-environments).
### What are Preview Environments?
Preview Environments solve the challenge of maintaining testing environments that accurately mirror production without manual DevOps overhead. When you open a pull request, Qovery automatically creates a clone of your production setup, allowing you to:
* **Share live changes** in code reviews beyond Git diffs
* **Generate shareable links** for stakeholder collaboration
* **Run CI tests** against high-fidelity production copies before merging
### General Tab
Configure basic environment properties:
* **Environment Name**: Update the environment name
* **Environment Mode**: Change between Production, Staging, Development, or Preview
The cluster assignment is immutable after the environment is provisioned.
### Deployment Rules
Set policies to reduce costs and control deployments. Learn more about [deployment rules](/docs/configuration/deployment/overview) for cost optimization.
### Deployment Pipeline
Configure the deployment pipeline to be executed when a deployment on the environment is triggered. Control how services are deployed within the environment.
Learn more about [deployment pipelines](/docs/configuration/deployment/pipeline).
## Preview Environments
Preview Environments are temporary, isolated environments automatically created from your blueprint environment when you open a pull request. They enable you to test changes in production-like conditions before merging.
**Tutorial**: For a complete step-by-step tutorial on getting started with Preview Environments, including prerequisites and detailed setup instructions, see our [Getting Started with Preview Environments Tutorial](/docs/getting-started/guides/use-cases/preview-environments).
### What are Preview Environments?
Preview Environments solve the challenge of maintaining testing environments that accurately mirror production without manual DevOps overhead. When you open a pull request, Qovery automatically creates a clone of your production setup, allowing you to:
* **Share live changes** in code reviews beyond Git diffs
* **Generate shareable links** for stakeholder collaboration
* **Run CI tests** against high-fidelity production copies before merging
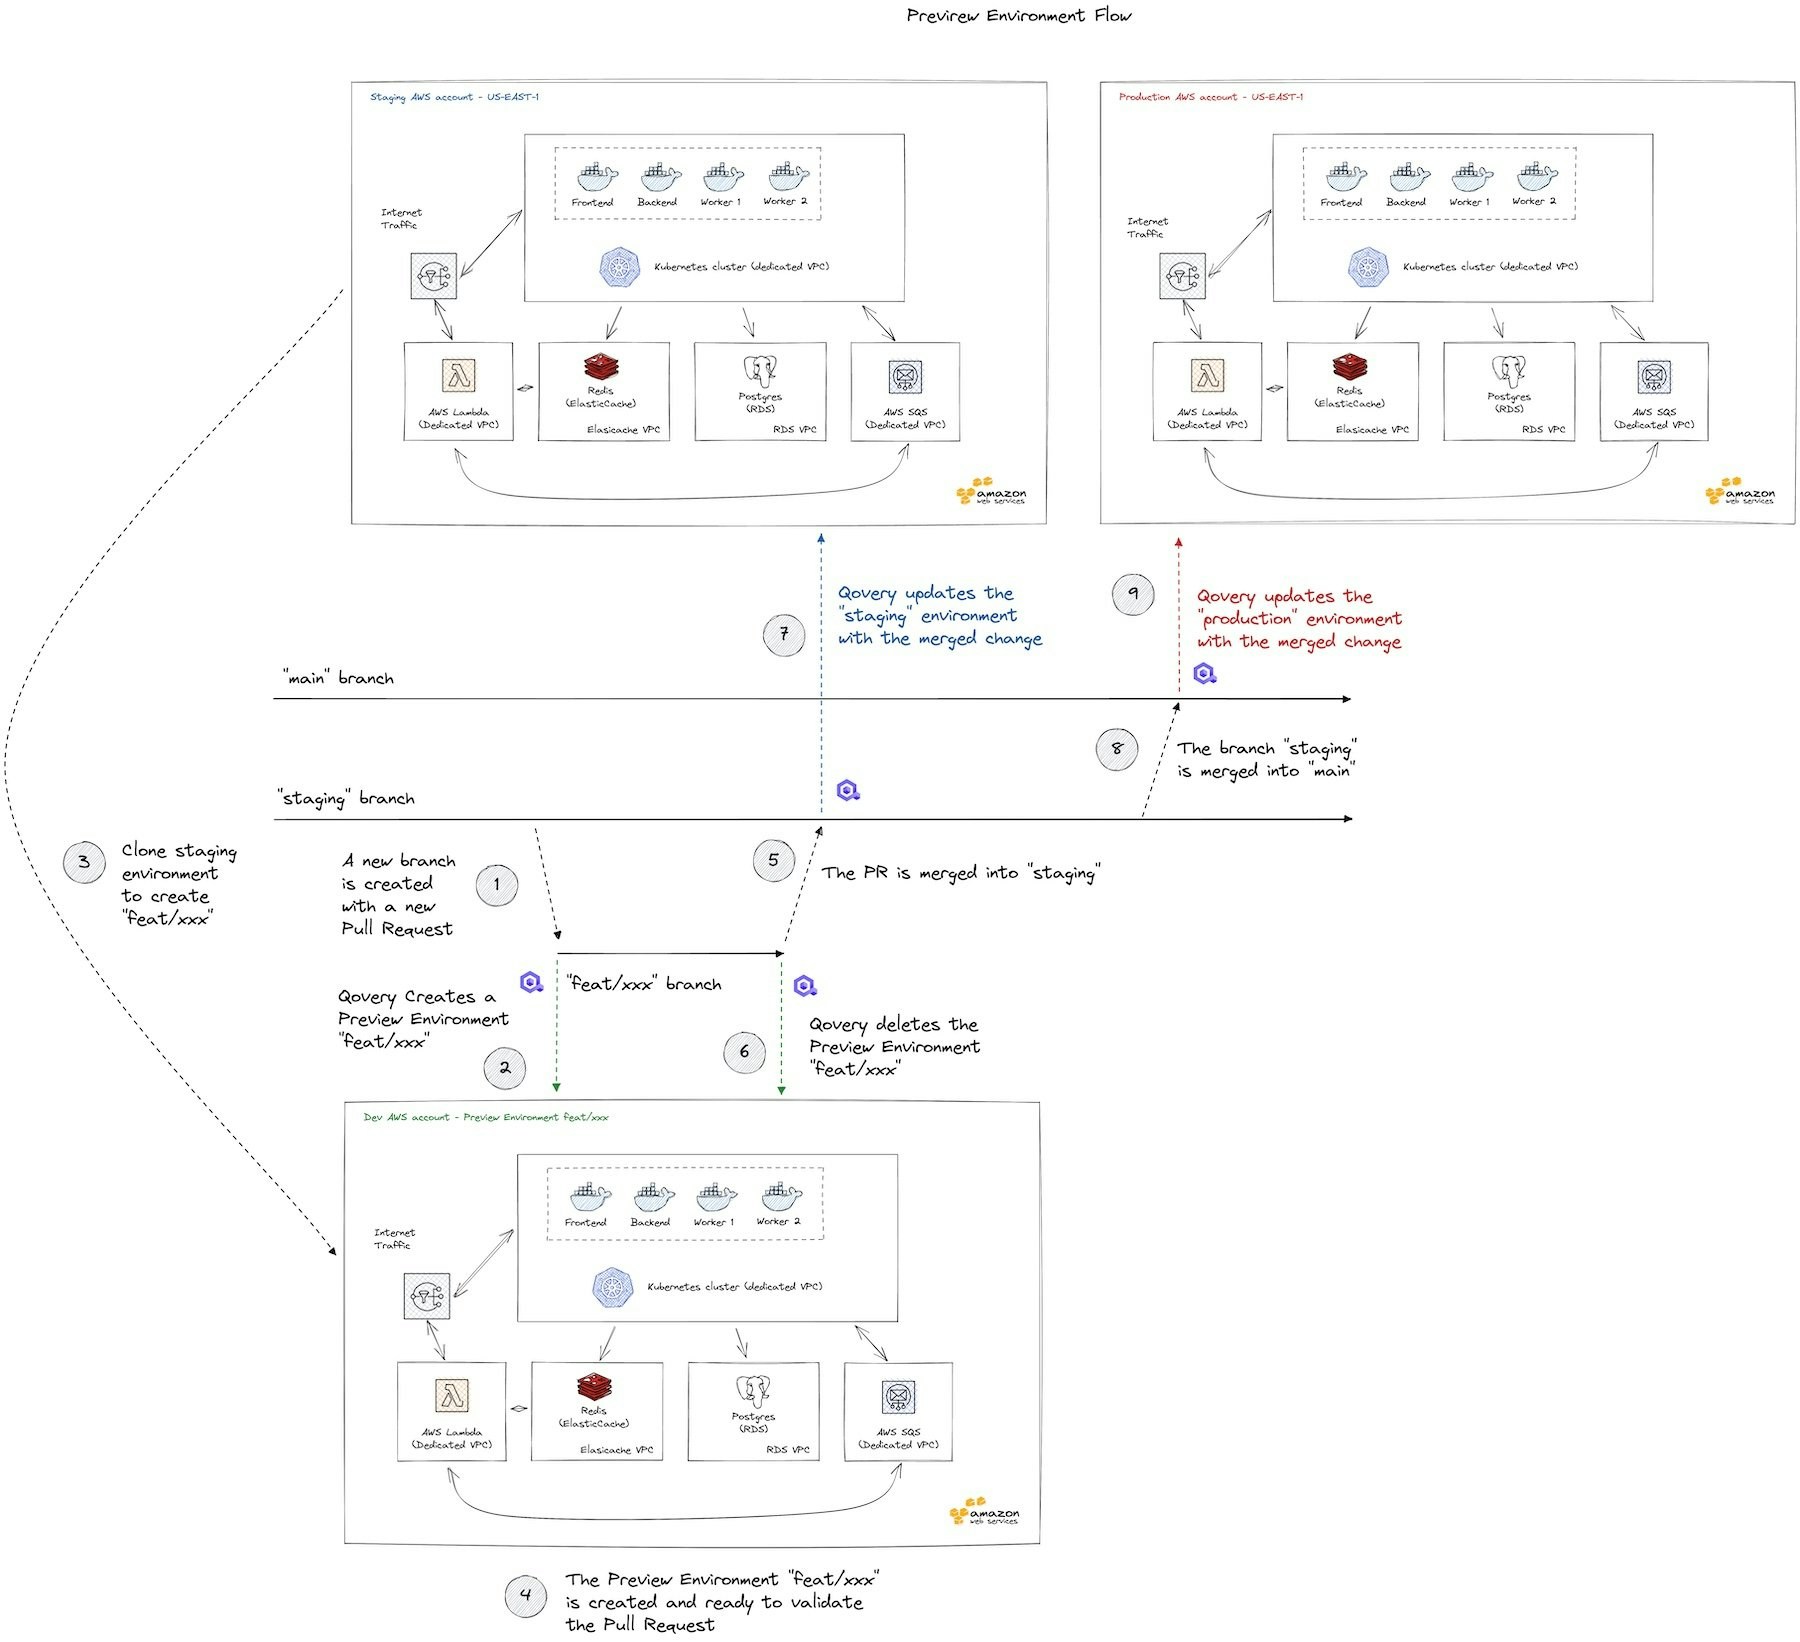 ### Key Concepts
#### Blueprint Environment
A Blueprint Environment serves as the template for all your Preview Environments. It's a fully-configured, working environment that Qovery clones whenever a new pull request is created. The deployment pipeline configuration, including [skipped services](/docs/configuration/deployment/pipeline#skipped-services), is inherited by each Preview Environment created from the Blueprint.
**Blueprint Best Practices**:
* Use a separate cluster from production for Preview Environments
* Ensure all applications and services are properly configured
* Test the Blueprint thoroughly before enabling Preview Environments
* Keep it in sync with your production configuration
* Review which services are [skipped](/docs/configuration/deployment/pipeline#skipped-services) in the Blueprint, as Preview Environments will inherit this configuration
### Key Concepts
#### Blueprint Environment
A Blueprint Environment serves as the template for all your Preview Environments. It's a fully-configured, working environment that Qovery clones whenever a new pull request is created. The deployment pipeline configuration, including [skipped services](/docs/configuration/deployment/pipeline#skipped-services), is inherited by each Preview Environment created from the Blueprint.
**Blueprint Best Practices**:
* Use a separate cluster from production for Preview Environments
* Ensure all applications and services are properly configured
* Test the Blueprint thoroughly before enabling Preview Environments
* Keep it in sync with your production configuration
* Review which services are [skipped](/docs/configuration/deployment/pipeline#skipped-services) in the Blueprint, as Preview Environments will inherit this configuration
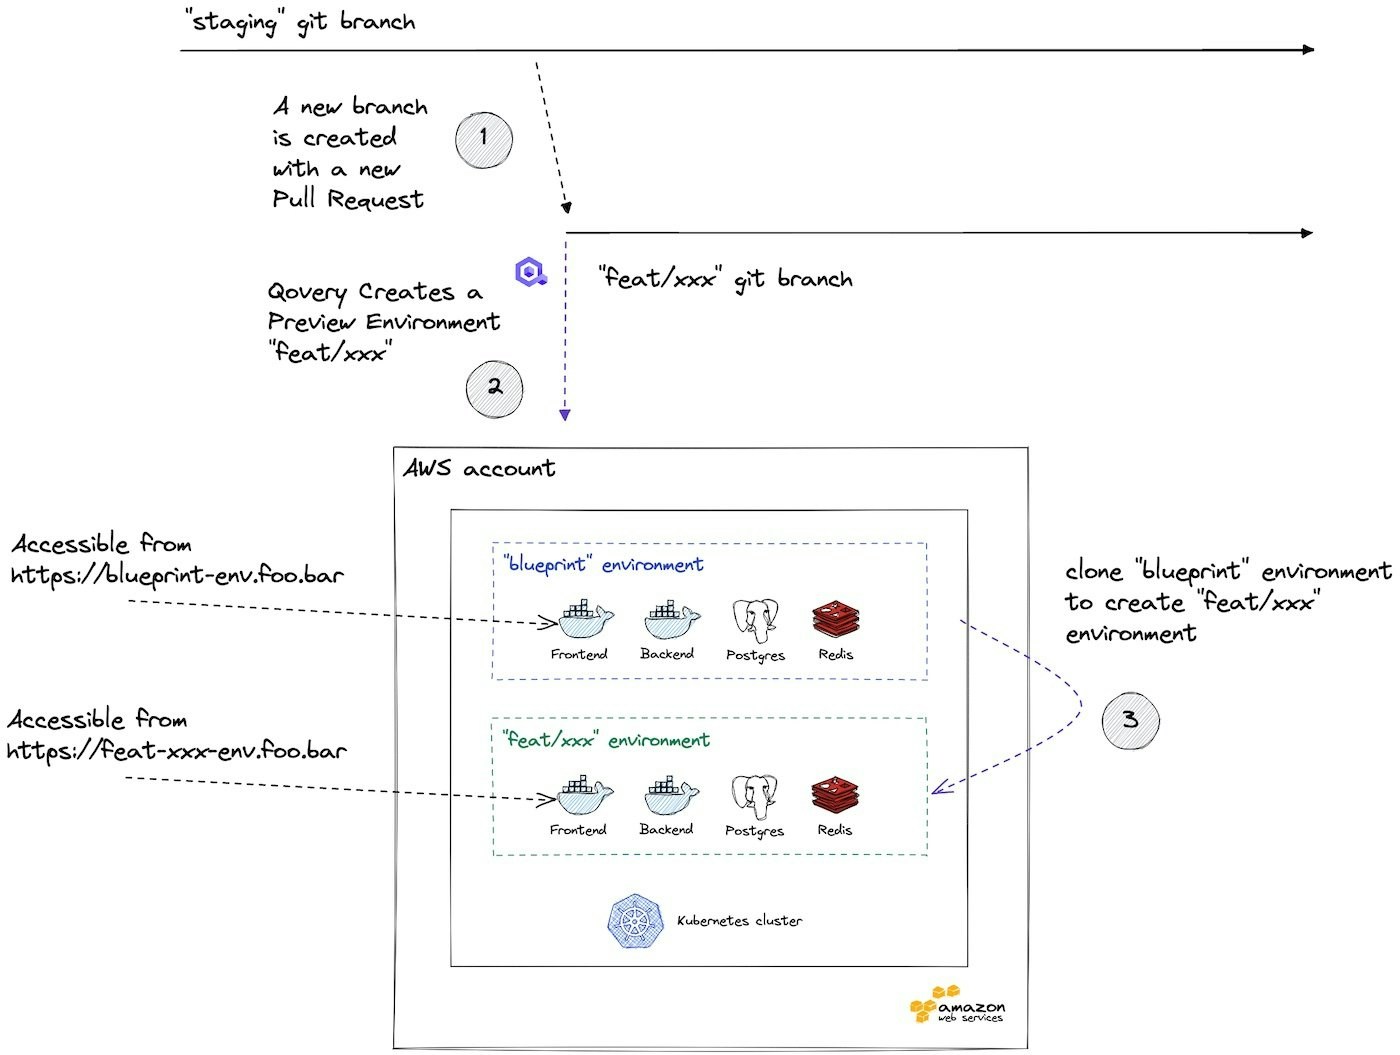 #### Base Branch
The base branch (e.g., `main` or `staging`) determines when Preview Environments are created. When you create a pull request targeting the base branch, Qovery automatically clones your Blueprint Environment.
### Quick Setup
Clone your existing working environment and name it "blueprint"
1. Navigate to your working environment
2. Click **Clone Environment**
3. Name it "blueprint" or similar
4. Deploy and verify it works correctly
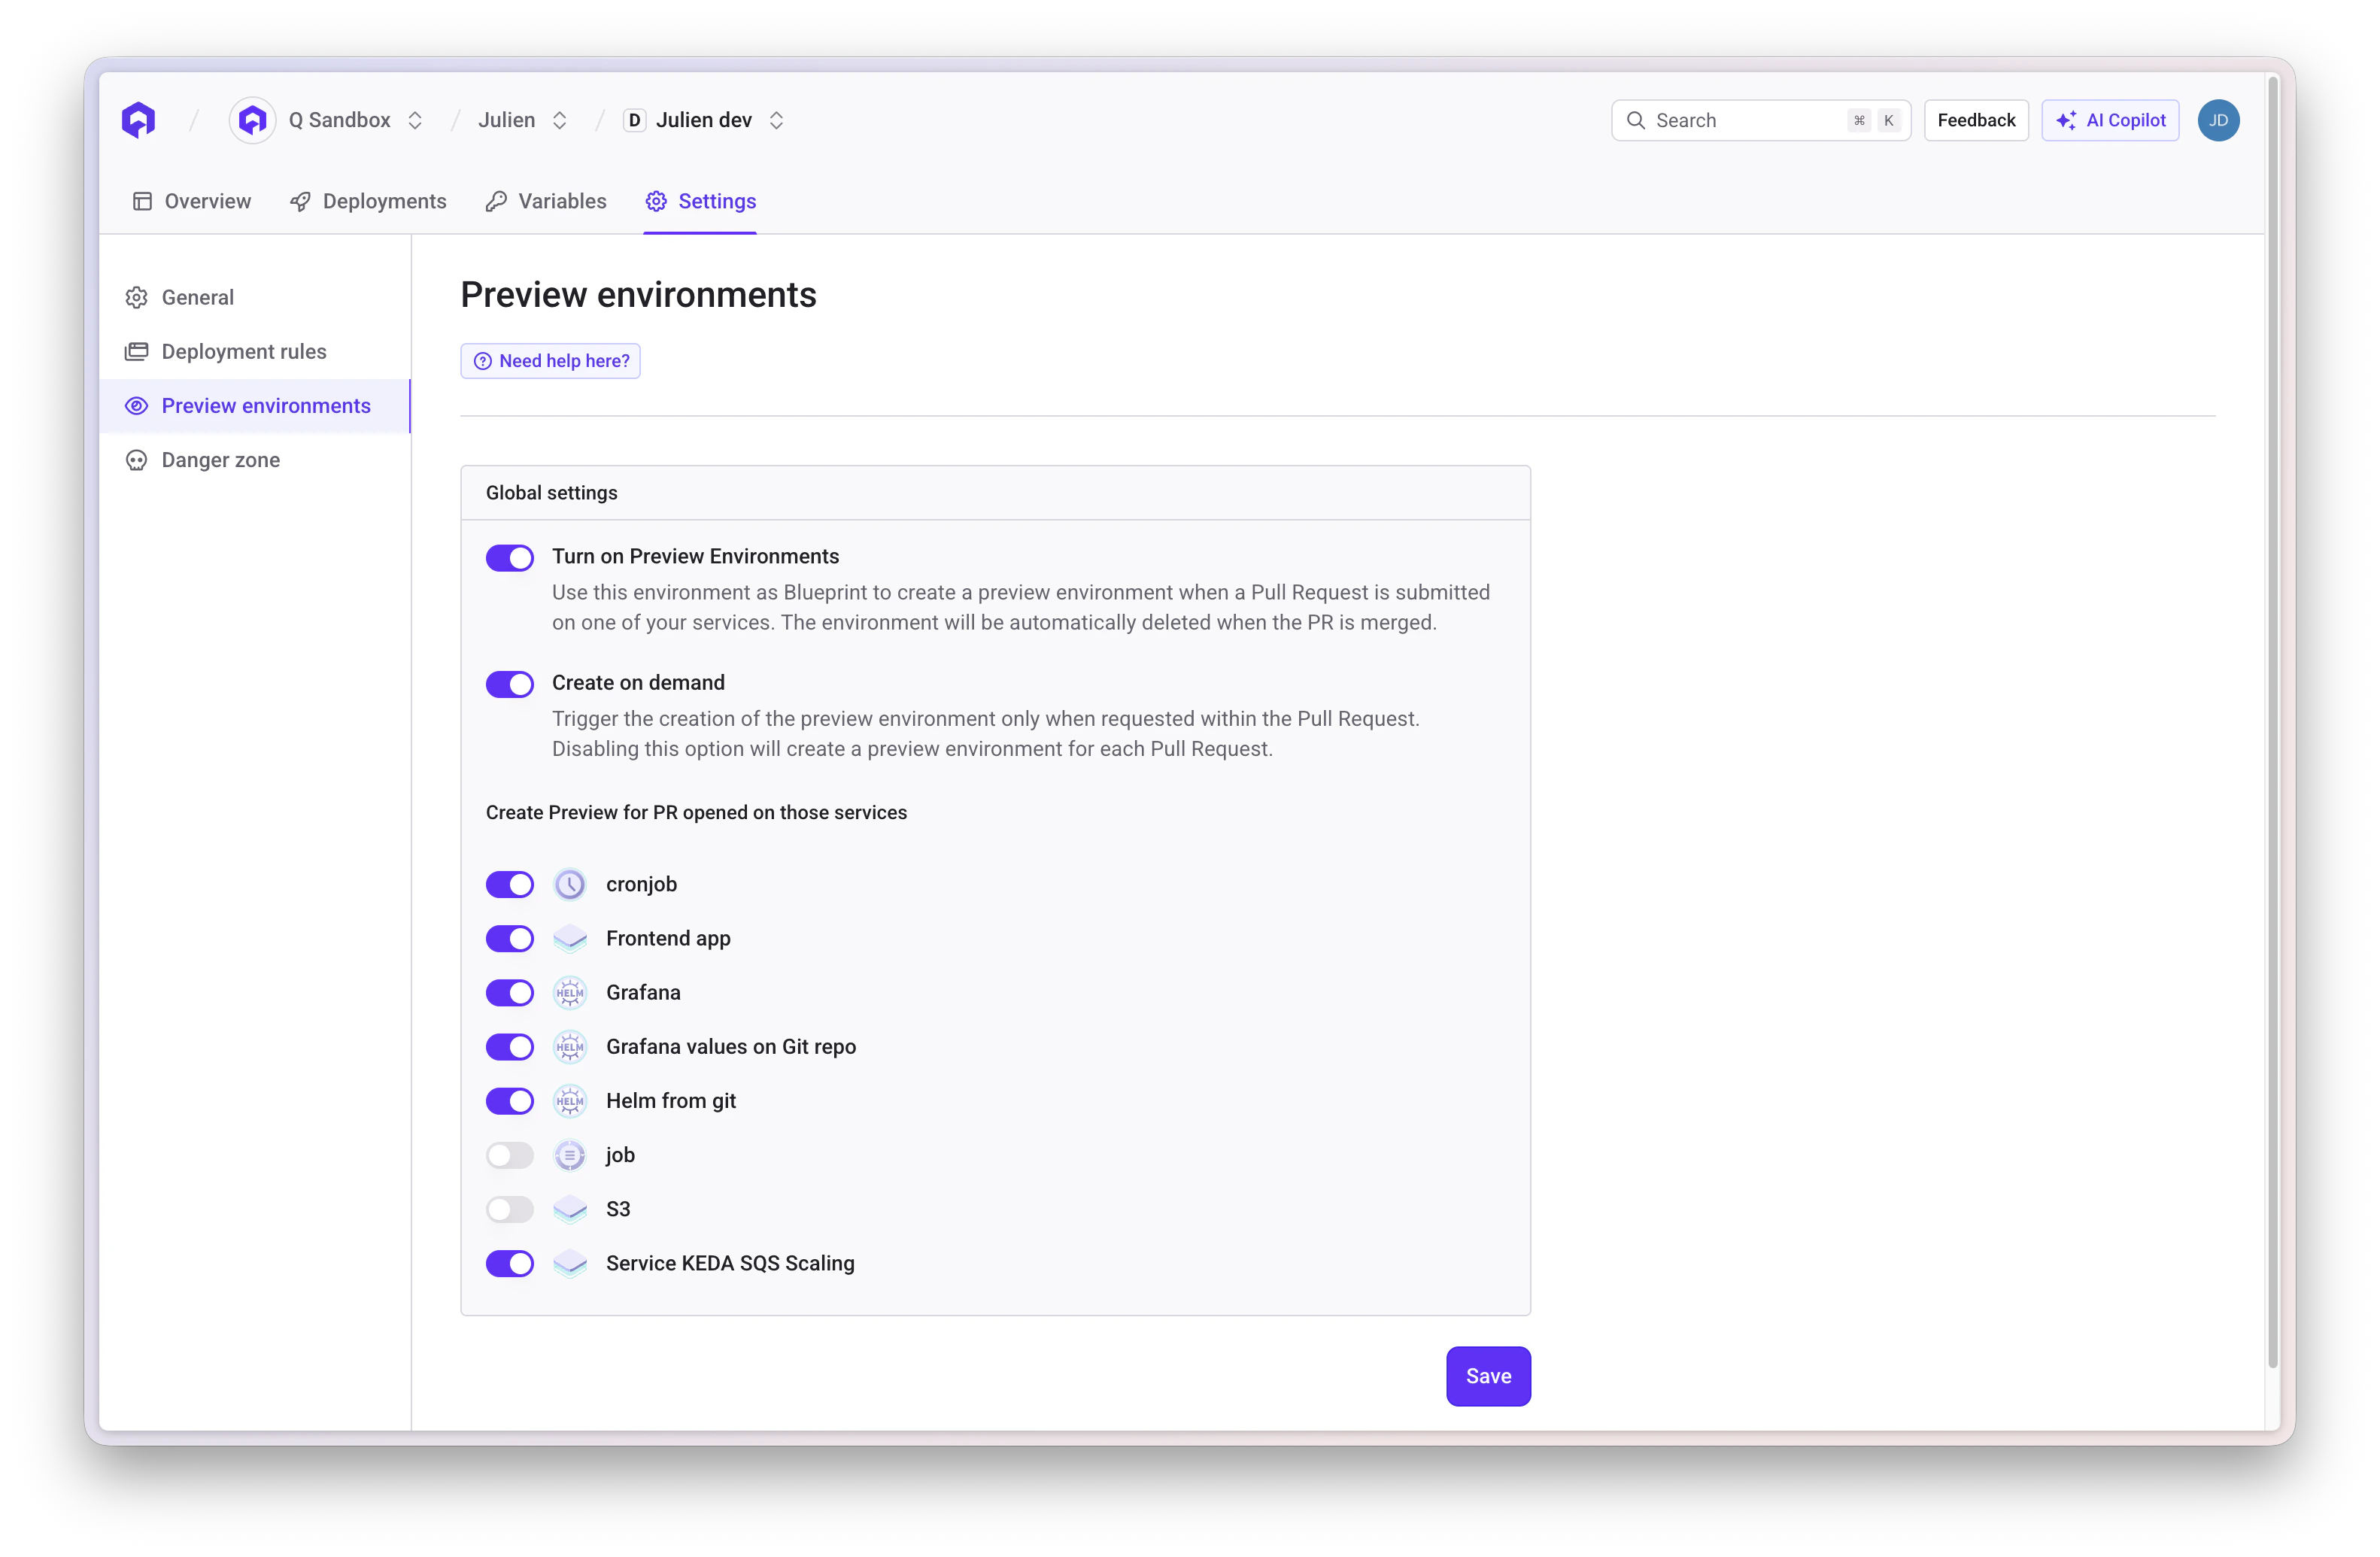
Activate the Preview Environment feature for your applications
1. Go to Environment Settings
2. Select the **Preview Environments** tab
3. Toggle **Enable Preview Environments**
4. Select which services to include
#### Base Branch
The base branch (e.g., `main` or `staging`) determines when Preview Environments are created. When you create a pull request targeting the base branch, Qovery automatically clones your Blueprint Environment.
### Quick Setup
Clone your existing working environment and name it "blueprint"
1. Navigate to your working environment
2. Click **Clone Environment**
3. Name it "blueprint" or similar
4. Deploy and verify it works correctly
Activate the Preview Environment feature for your applications
1. Go to Environment Settings
2. Select the **Preview Environments** tab
3. Toggle **Enable Preview Environments**
4. Select which services to include
 Set the base branch for each application in your Blueprint
1. Open each application in the Blueprint environment
2. Go to application settings
3. Change Git Branch to your base branch (e.g., `main` or `staging`)
4. This ensures feature branches create isolated Preview Environments
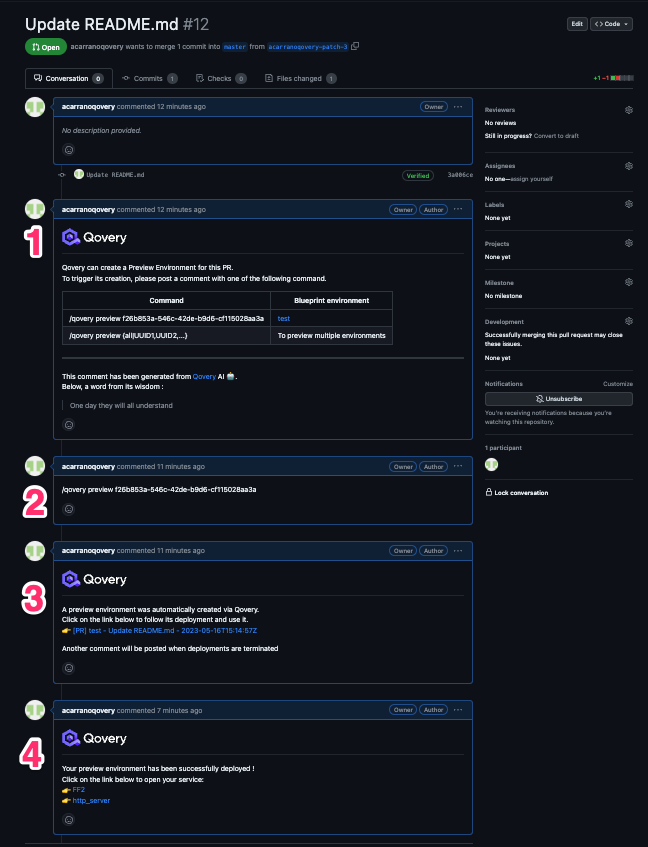
Open a PR and Qovery will automatically create a Preview Environment
1. Create a feature branch
2. Make your changes
3. Open a pull request to the base branch
4. Qovery creates a Preview Environment automatically
5. Access the preview URL from the PR comments
### Preview Environment Workflows
Qovery supports two workflows for creating Preview Environments:
#### Automatic (On Every PR)
Qovery automatically creates a Preview Environment for every pull request targeting your base branch.
**Best for**: Teams that want maximum automation and always need to test changes
**Setup**:
1. Enable auto-preview in environment settings
2. Select services to deploy automatically
3. Configure auto-delete rules
#### Manual (On Demand)
Developers manually trigger Preview Environment creation by commenting on pull requests.
**Best for**: Teams that want to control costs or only need Preview Environments for specific PRs
**Setup**:
1. Enable preview environments in environment settings
2. Configure which services to include
3. Developers comment `/qovery preview` on PRs to trigger creation
Set the base branch for each application in your Blueprint
1. Open each application in the Blueprint environment
2. Go to application settings
3. Change Git Branch to your base branch (e.g., `main` or `staging`)
4. This ensures feature branches create isolated Preview Environments
Open a PR and Qovery will automatically create a Preview Environment
1. Create a feature branch
2. Make your changes
3. Open a pull request to the base branch
4. Qovery creates a Preview Environment automatically
5. Access the preview URL from the PR comments
### Preview Environment Workflows
Qovery supports two workflows for creating Preview Environments:
#### Automatic (On Every PR)
Qovery automatically creates a Preview Environment for every pull request targeting your base branch.
**Best for**: Teams that want maximum automation and always need to test changes
**Setup**:
1. Enable auto-preview in environment settings
2. Select services to deploy automatically
3. Configure auto-delete rules
#### Manual (On Demand)
Developers manually trigger Preview Environment creation by commenting on pull requests.
**Best for**: Teams that want to control costs or only need Preview Environments for specific PRs
**Setup**:
1. Enable preview environments in environment settings
2. Configure which services to include
3. Developers comment `/qovery preview` on PRs to trigger creation
 ### Per-Service Configuration
You have fine-grained control over which services are deployed in Preview Environments:
* **Applications**: Choose which applications to include
* **Databases**: Optionally include databases (clones or shared)
* **Services**: Select supporting services to deploy
This flexibility helps control costs and deployment times.
### Auto-Delete Functionality
Configure automatic cleanup of Preview Environments to control costs:
**Delete triggers**:
* When PR is merged
* When PR is closed without merging
* After specified period of inactivity
* Manual deletion via CLI or Console
**Cost optimization**: Preview Environments are typically deleted within minutes of PR closure, preventing unnecessary infrastructure costs.
### Advanced Features
Populate Preview Environment databases with test data using Lifecycle Jobs.
* Run SQL scripts on environment startup
* Seed databases with production-like data
* Reset data between deployments
[Learn more about database seeding](/docs/getting-started/guides/others/database-seeding-lifecycle-job)
Integrate Preview Environments with your CI/CD pipeline for automated testing.
* Trigger tests automatically when Preview Environment is ready
* Run E2E tests against preview URLs
* Post results back to pull requests
[See CI/CD integration examples](/docs/configuration/integrations/ci-cd/github-actions)
Configure custom domains for Preview Environments.
* Use wildcard DNS (e.g., `*.preview.yourdomain.com`)
* Automatic SSL certificates
* Shareable URLs for stakeholders
Control resources to optimize costs for Preview Environments.
* Use smaller instance sizes than production
* Set auto-stop rules for inactive environments
* Configure memory and CPU limits per service
### Common Use Cases
Test new features in isolation before merging to main branch
Verify bug fixes work correctly in production-like environment
Share live previews with product managers, designers, and clients
Run automated tests against realistic environments before deployment
### Best Practices
* Keep your Blueprint environment up-to-date with production configuration
* Test Blueprint deployments regularly to catch issues early
* Document any special configuration requirements
* Use environment variables for environment-specific values
* Enable auto-delete for merged/closed PRs
* Use smaller instance sizes for Preview Environments
* Set up deployment rules to stop inactive environments
* Only include necessary services in previews
* Use shared databases instead of cloning when appropriate
* Don't use production secrets in Preview Environments
* Restrict access to preview URLs if needed
* Use separate clusters for production and previews
* Regularly audit and clean up orphaned environments
* Optimize Docker images to reduce deployment time
* Use caching strategies for dependencies
* Consider lazy-loading large databases
* Parallel deploy services when possible
### Troubleshooting
**Possible causes**:
* Preview Environments not enabled in settings
* PR not targeting the configured base branch
* Blueprint environment has errors
* Insufficient cluster resources
**Solutions**:
* Verify Preview Environment settings are enabled
* Check that PR targets correct base branch
* Ensure Blueprint environment deploys successfully
* Review cluster capacity and quotas
**Possible causes**:
* Blueprint environment configuration errors
* Missing environment variables
* Resource constraints
* Container image build failures
**Solutions**:
* Test Blueprint environment deployment manually
* Review application logs for errors
* Verify all required environment variables are set
* Check container image build logs
**Possible causes**:
* Auto-delete not configured
* Webhook not triggered
* Manual intervention required
**Solutions**:
* Check auto-delete settings
* Manually delete via Console or CLI
* Review webhook configuration in Git provider
## Clone Environment
Duplicate an existing environment to quickly create a copy across projects or clusters:
### Per-Service Configuration
You have fine-grained control over which services are deployed in Preview Environments:
* **Applications**: Choose which applications to include
* **Databases**: Optionally include databases (clones or shared)
* **Services**: Select supporting services to deploy
This flexibility helps control costs and deployment times.
### Auto-Delete Functionality
Configure automatic cleanup of Preview Environments to control costs:
**Delete triggers**:
* When PR is merged
* When PR is closed without merging
* After specified period of inactivity
* Manual deletion via CLI or Console
**Cost optimization**: Preview Environments are typically deleted within minutes of PR closure, preventing unnecessary infrastructure costs.
### Advanced Features
Populate Preview Environment databases with test data using Lifecycle Jobs.
* Run SQL scripts on environment startup
* Seed databases with production-like data
* Reset data between deployments
[Learn more about database seeding](/docs/getting-started/guides/others/database-seeding-lifecycle-job)
Integrate Preview Environments with your CI/CD pipeline for automated testing.
* Trigger tests automatically when Preview Environment is ready
* Run E2E tests against preview URLs
* Post results back to pull requests
[See CI/CD integration examples](/docs/configuration/integrations/ci-cd/github-actions)
Configure custom domains for Preview Environments.
* Use wildcard DNS (e.g., `*.preview.yourdomain.com`)
* Automatic SSL certificates
* Shareable URLs for stakeholders
Control resources to optimize costs for Preview Environments.
* Use smaller instance sizes than production
* Set auto-stop rules for inactive environments
* Configure memory and CPU limits per service
### Common Use Cases
Test new features in isolation before merging to main branch
Verify bug fixes work correctly in production-like environment
Share live previews with product managers, designers, and clients
Run automated tests against realistic environments before deployment
### Best Practices
* Keep your Blueprint environment up-to-date with production configuration
* Test Blueprint deployments regularly to catch issues early
* Document any special configuration requirements
* Use environment variables for environment-specific values
* Enable auto-delete for merged/closed PRs
* Use smaller instance sizes for Preview Environments
* Set up deployment rules to stop inactive environments
* Only include necessary services in previews
* Use shared databases instead of cloning when appropriate
* Don't use production secrets in Preview Environments
* Restrict access to preview URLs if needed
* Use separate clusters for production and previews
* Regularly audit and clean up orphaned environments
* Optimize Docker images to reduce deployment time
* Use caching strategies for dependencies
* Consider lazy-loading large databases
* Parallel deploy services when possible
### Troubleshooting
**Possible causes**:
* Preview Environments not enabled in settings
* PR not targeting the configured base branch
* Blueprint environment has errors
* Insufficient cluster resources
**Solutions**:
* Verify Preview Environment settings are enabled
* Check that PR targets correct base branch
* Ensure Blueprint environment deploys successfully
* Review cluster capacity and quotas
**Possible causes**:
* Blueprint environment configuration errors
* Missing environment variables
* Resource constraints
* Container image build failures
**Solutions**:
* Test Blueprint environment deployment manually
* Review application logs for errors
* Verify all required environment variables are set
* Check container image build logs
**Possible causes**:
* Auto-delete not configured
* Webhook not triggered
* Manual intervention required
**Solutions**:
* Check auto-delete settings
* Manually delete via Console or CLI
* Review webhook configuration in Git provider
## Clone Environment
Duplicate an existing environment to quickly create a copy across projects or clusters:
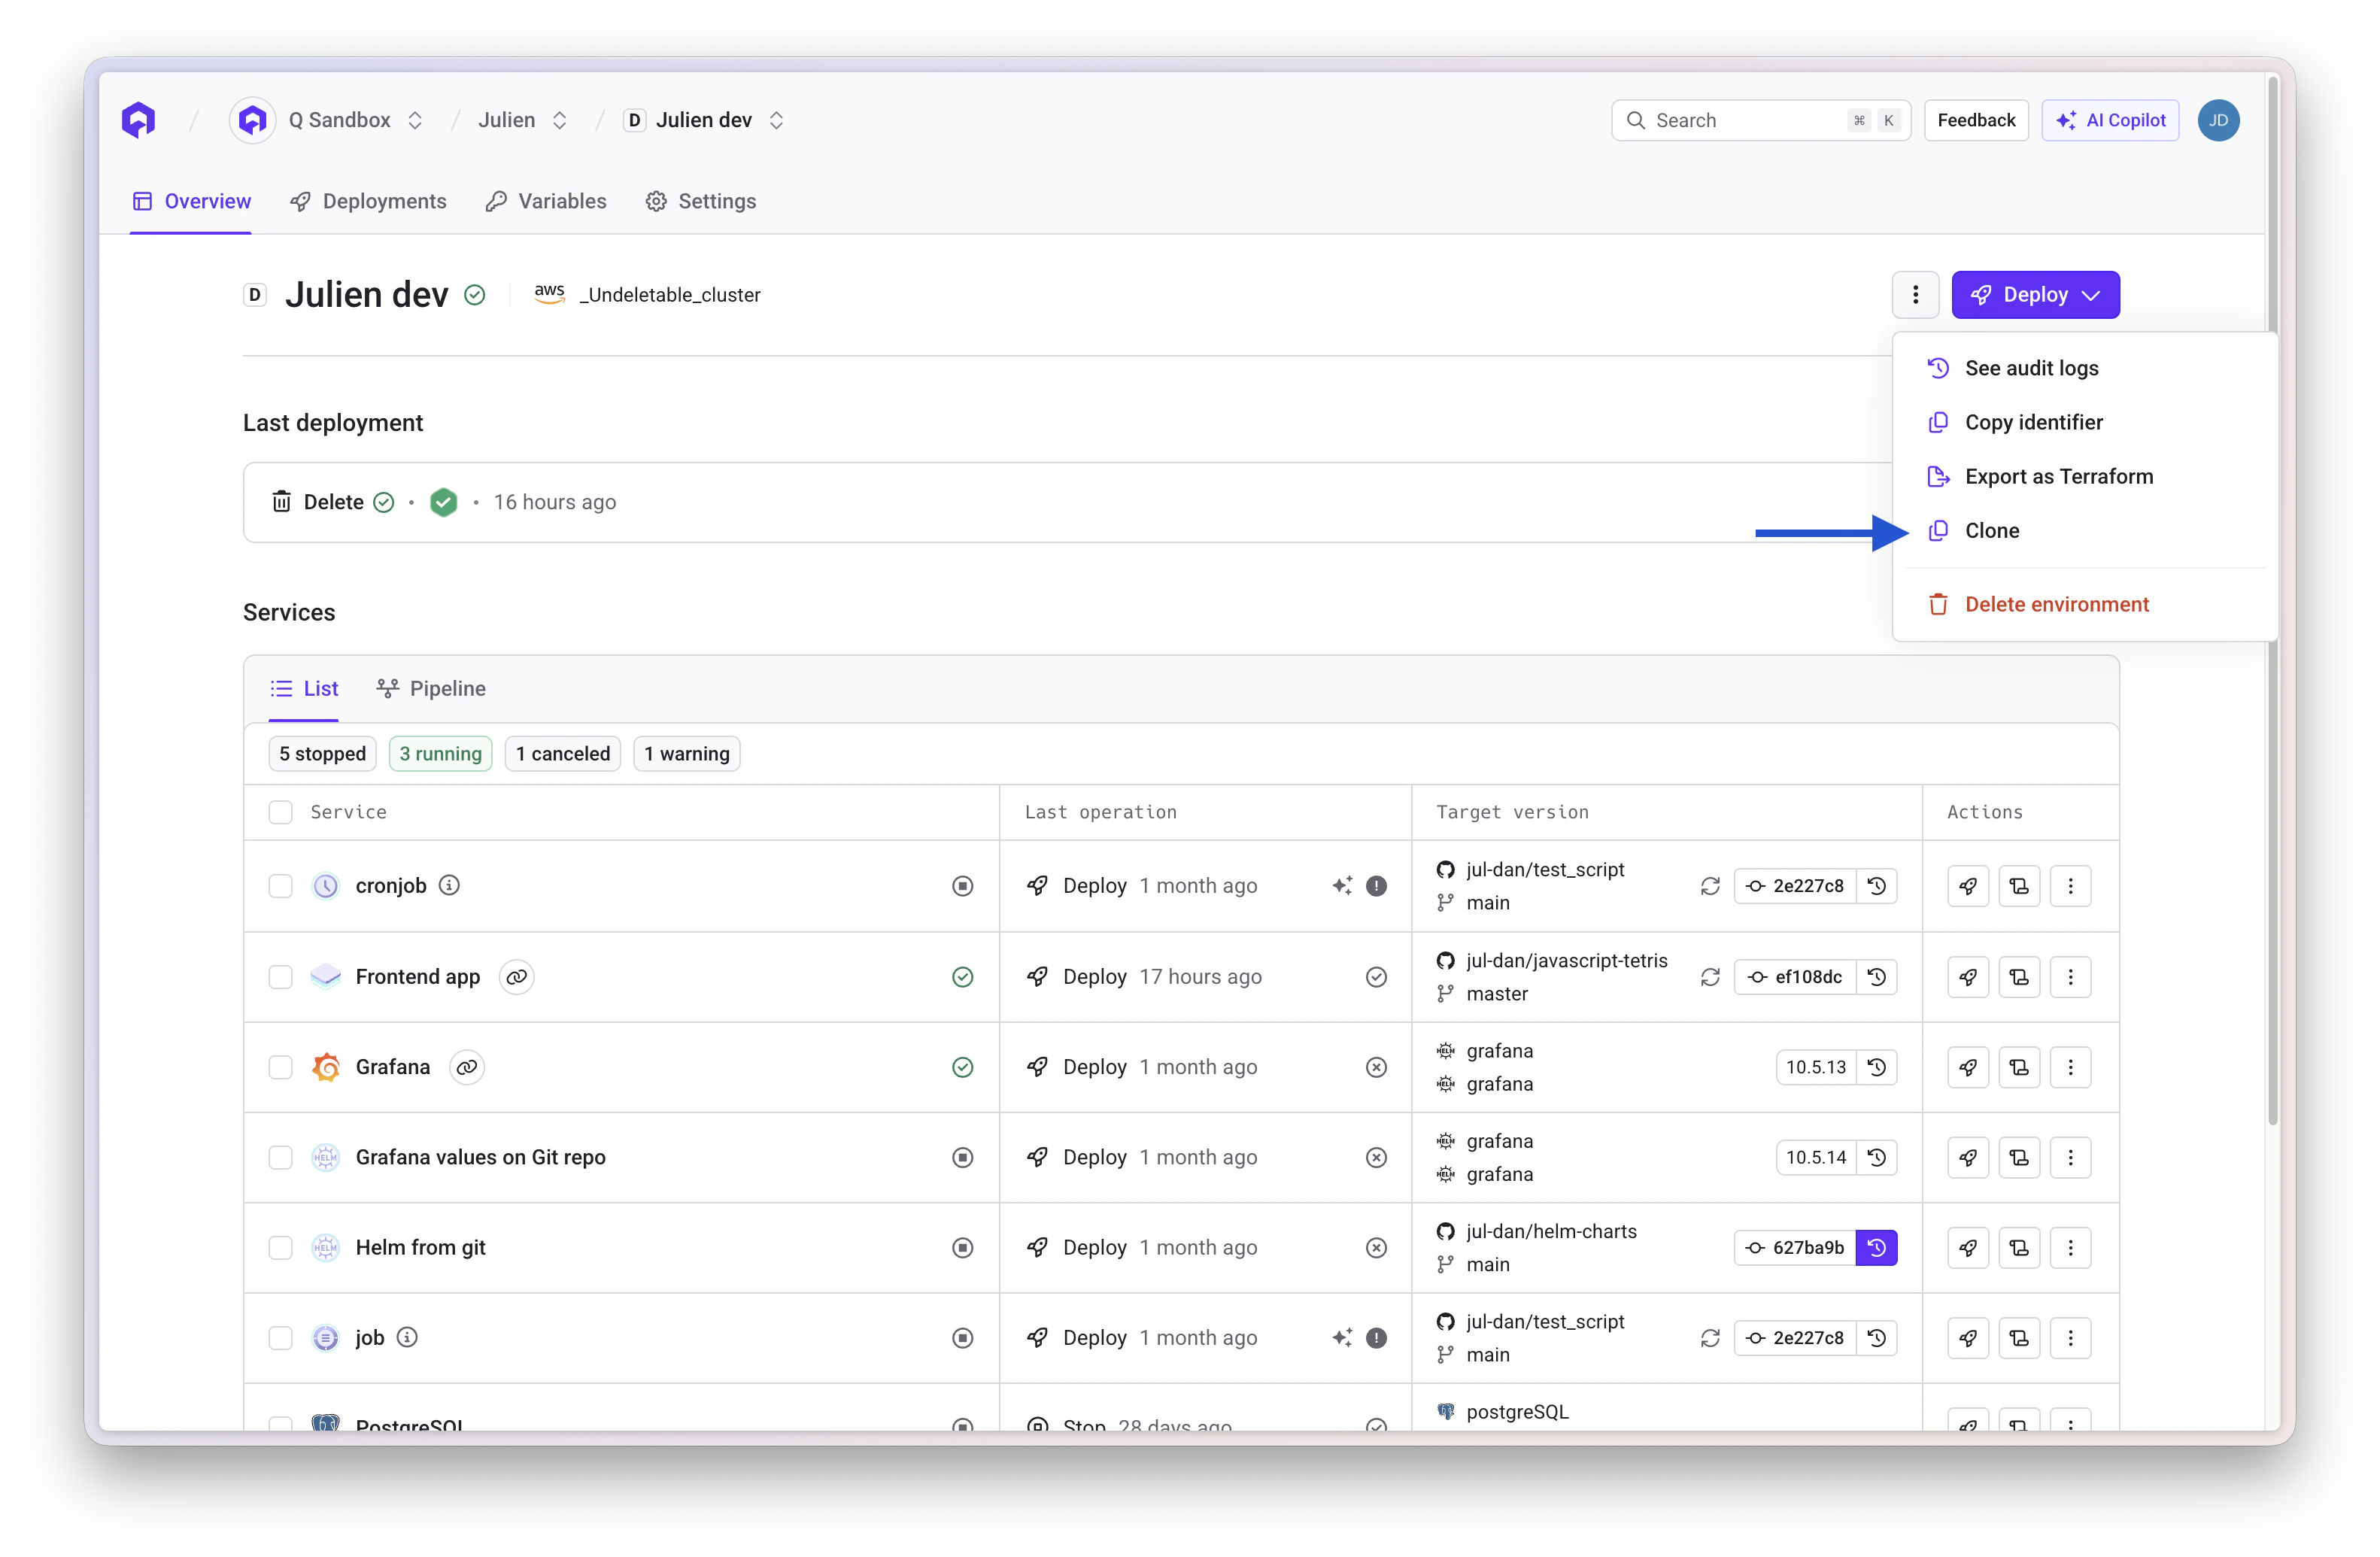 Go to the environment you want to clone
Click the **Clone** button in environment settings
Specify:
* New environment name
* Target project (can be different)
* Target cluster (can be different)
* Which services to include
Go to the environment you want to clone
Click the **Clone** button in environment settings
Specify:
* New environment name
* Target project (can be different)
* Target cluster (can be different)
* Which services to include
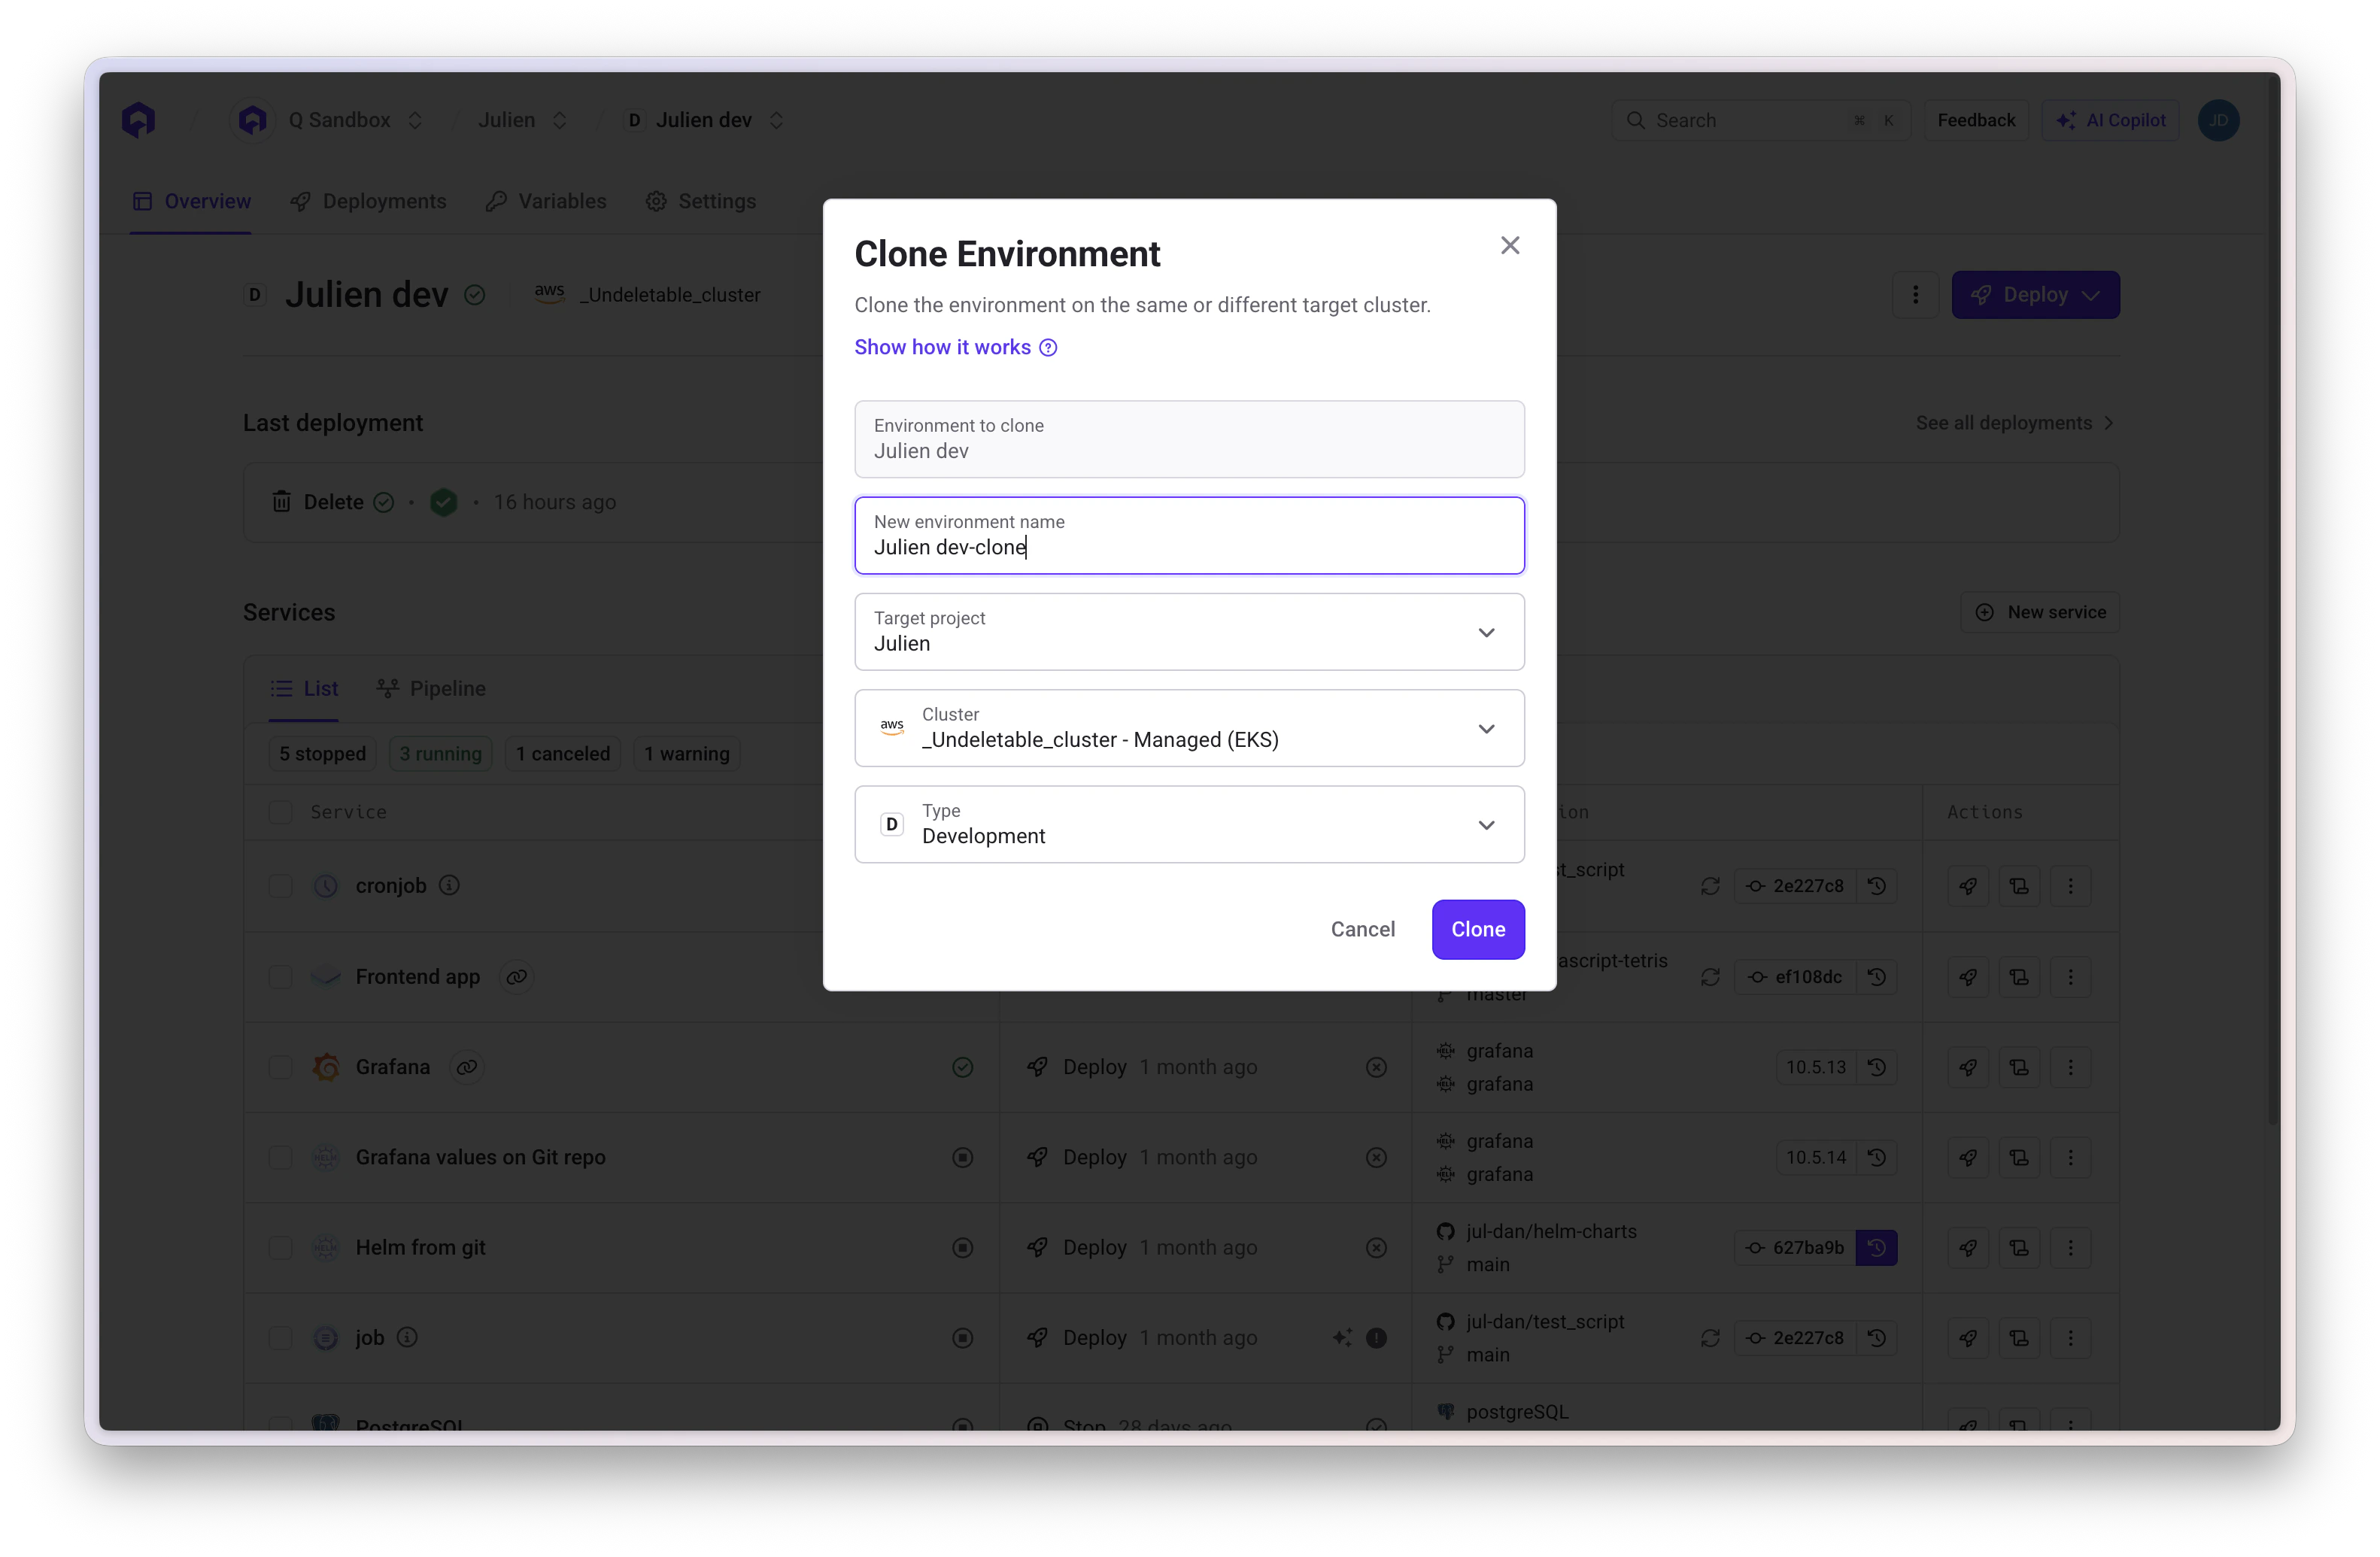 Click **Clone Environment** to create the copy
Cloning excludes:
* Custom domains
* Certain built-in environment variables
Cloning preserves:
* [Deployment pipeline](/docs/configuration/deployment/pipeline) stage configuration
* [Skipped services](/docs/configuration/deployment/pipeline#skipped-services) status — services that were skipped in the source environment will also be skipped in the cloned environment
## Deployment & Deletion
### Deploying an Environment
Deploy all services in an environment through the Qovery Console or CLI. See [deployment management](/docs/configuration/deployment/overview) for details.
### Deleting an Environment
Deleting an environment is a **permanent operation**. All services, databases, and data will be irreversibly deleted.
Before deleting:
1. Backup important data
2. Stop all services
3. Verify you're deleting the correct environment
## Related Topics
Learn about project configuration
Configure applications within environments
Add databases to your environments
Learn about preview environments and CI/CD integration
Configure deployment order and strategies
Export environment as Terraform code
Click **Clone Environment** to create the copy
Cloning excludes:
* Custom domains
* Certain built-in environment variables
Cloning preserves:
* [Deployment pipeline](/docs/configuration/deployment/pipeline) stage configuration
* [Skipped services](/docs/configuration/deployment/pipeline#skipped-services) status — services that were skipped in the source environment will also be skipped in the cloned environment
## Deployment & Deletion
### Deploying an Environment
Deploy all services in an environment through the Qovery Console or CLI. See [deployment management](/docs/configuration/deployment/overview) for details.
### Deleting an Environment
Deleting an environment is a **permanent operation**. All services, databases, and data will be irreversibly deleted.
Before deleting:
1. Backup important data
2. Stop all services
3. Verify you're deleting the correct environment
## Related Topics
Learn about project configuration
Configure applications within environments
Add databases to your environments
Learn about preview environments and CI/CD integration
Configure deployment order and strategies
Export environment as Terraform code