> ## Documentation Index
> Fetch the complete documentation index at: https://www.qovery.com/docs/llms.txt
> Use this file to discover all available pages before exploring further.
# Deployment
> Understand how Qovery deploys your applications
## Overview
The deployment is the process of creating all the necessary resources to run your applications on your cloud account based on the configuration done on the Qovery console.
 ## How It Works
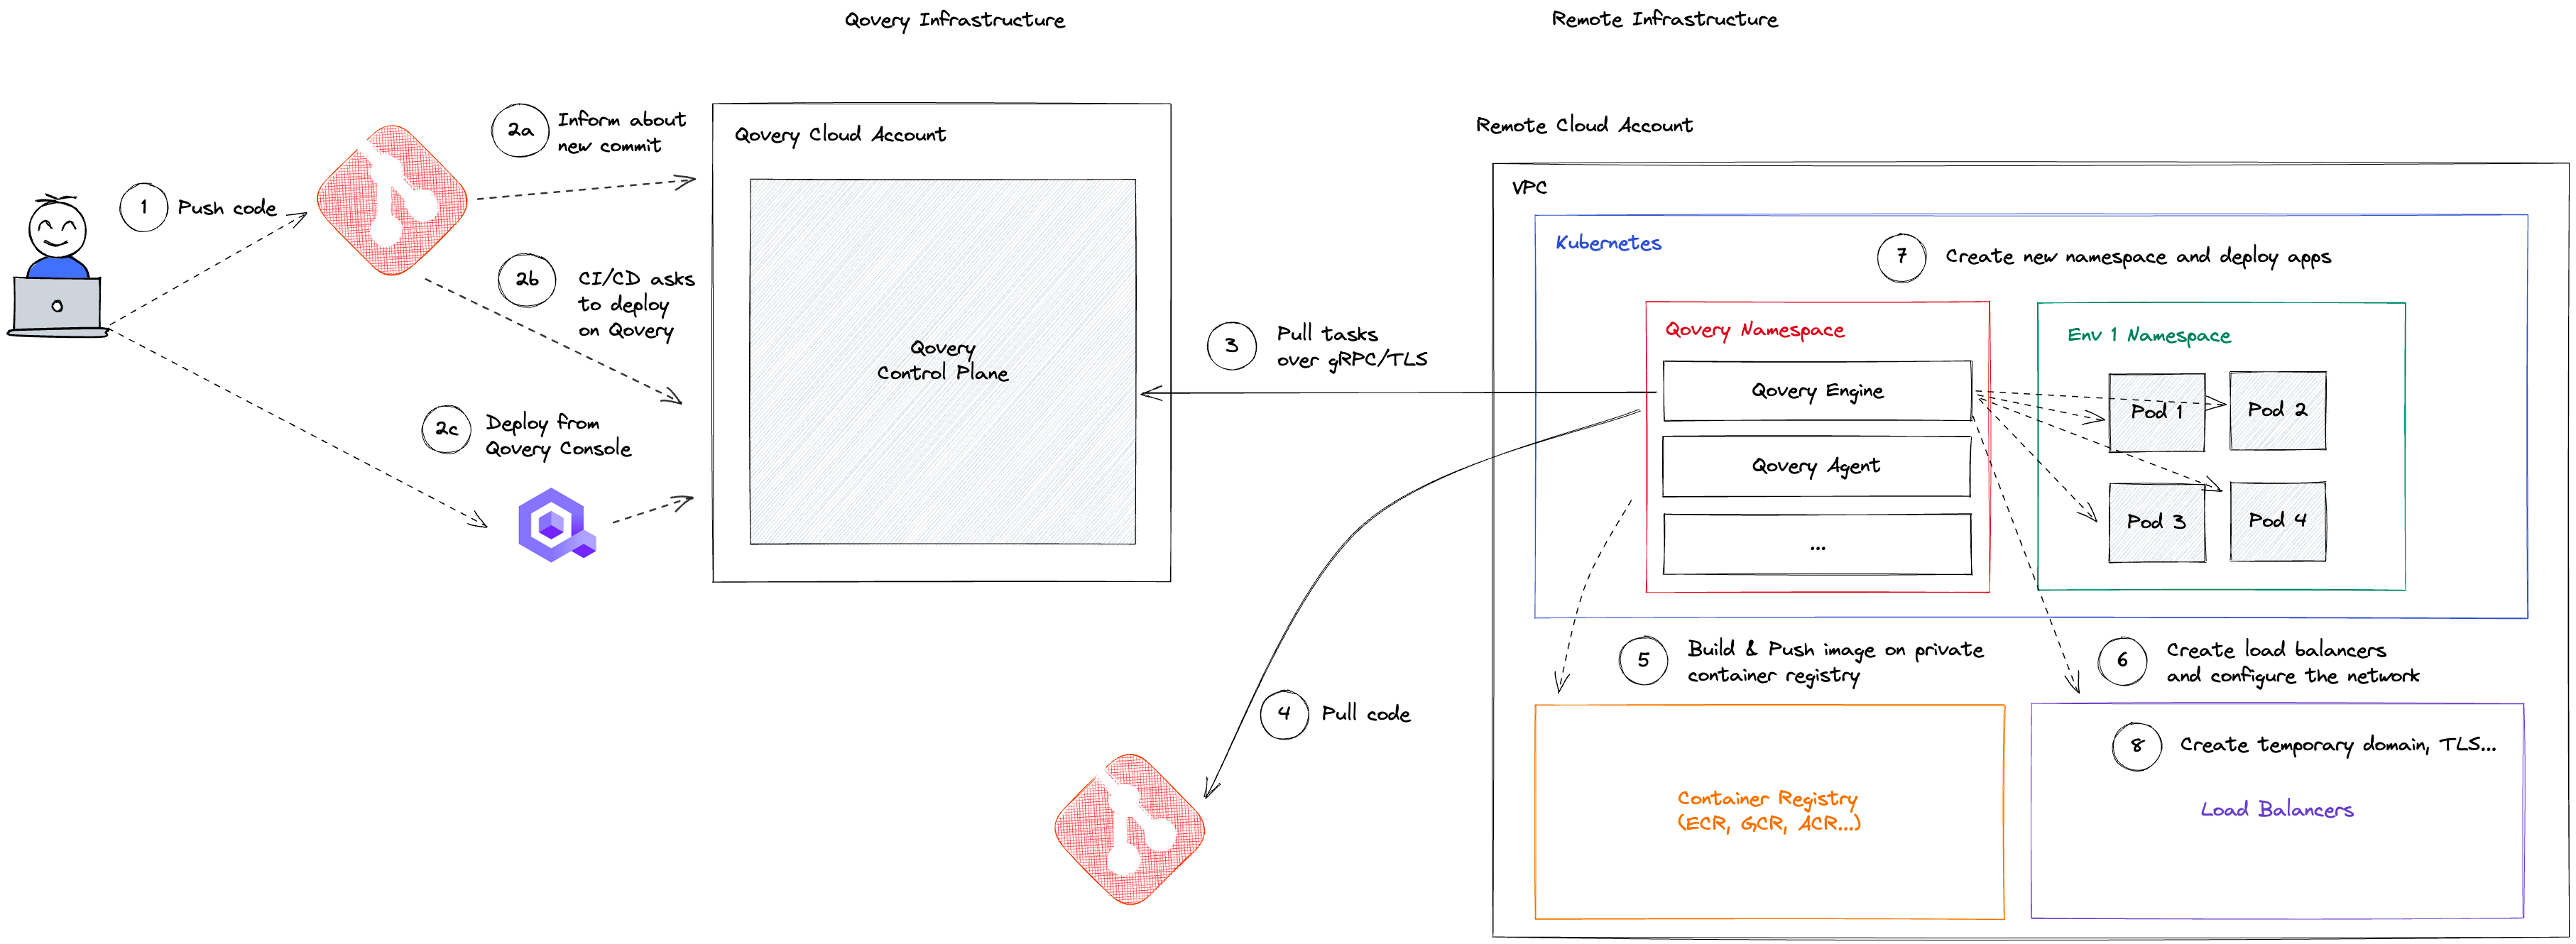
Here's the complete deployment flow:
A developer commits code to the Git repository
The deployment can be triggered in three ways:
* **Auto-deploy activated**: A webhook automatically triggers the deployment when a commit is pushed
* **Auto-deploy inactive**: Your CI/CD manages the deployment
* **Manual trigger**: Deploy manually from the Qovery console
The Qovery engine processes your deployment pipeline configuration
The engine pulls the code from your Git repository
The engine builds your code and pushes the container image to your cloud registry
The engine creates the load balancers and configures networking
The engine creates a Kubernetes namespace and deploys your application
The engine sets up your custom domain and configures TLS certificates
For applications deployed from a container registry, the deployment workflow is modified - the build step is skipped and Qovery directly deploys the pre-built container image.
## Monitoring Deployments
As a developer, you can track the deployment through:
* **Deployment Status**: Monitor the deployment and running status of your services
* **Real-time Logs**: Access logs during deployment and while your application is running
* **Deployment History**: Review details of past deployments
Qovery provides you with a complete set of [Deployment Actions](/docs/configuration/deployment/actions) allowing you to manage the deployment lifecycle, including stop and restart functions.
## Next Steps
Configure automatic deployments from your Git repository
Integrate Qovery with your existing CI/CD pipeline
Understand and customize deployment stages
Choose between rolling updates and recreate strategies
## How It Works
Here's the complete deployment flow:
A developer commits code to the Git repository
The deployment can be triggered in three ways:
* **Auto-deploy activated**: A webhook automatically triggers the deployment when a commit is pushed
* **Auto-deploy inactive**: Your CI/CD manages the deployment
* **Manual trigger**: Deploy manually from the Qovery console
The Qovery engine processes your deployment pipeline configuration
The engine pulls the code from your Git repository
The engine builds your code and pushes the container image to your cloud registry
The engine creates the load balancers and configures networking
The engine creates a Kubernetes namespace and deploys your application
The engine sets up your custom domain and configures TLS certificates
For applications deployed from a container registry, the deployment workflow is modified - the build step is skipped and Qovery directly deploys the pre-built container image.
## Monitoring Deployments
As a developer, you can track the deployment through:
* **Deployment Status**: Monitor the deployment and running status of your services
* **Real-time Logs**: Access logs during deployment and while your application is running
* **Deployment History**: Review details of past deployments
Qovery provides you with a complete set of [Deployment Actions](/docs/configuration/deployment/actions) allowing you to manage the deployment lifecycle, including stop and restart functions.
## Next Steps
Configure automatic deployments from your Git repository
Integrate Qovery with your existing CI/CD pipeline
Understand and customize deployment stages
Choose between rolling updates and recreate strategies