> ## Documentation Index
> Fetch the complete documentation index at: https://www.qovery.com/docs/llms.txt
> Use this file to discover all available pages before exploring further.
# Clusters
> Manage your Kubernetes clusters with Qovery
For detailed cluster installation instructions, see [Kubernetes Installation
Guide](/docs/installation/kubernetes). For troubleshooting, check the
[Troubleshooting Section](#troubleshooting).
## Managing your Clusters with Qovery
### Creating a Cluster
To create a new cluster:
1. Open the [Qovery Console](https://console.qovery.com)
2. Navigate to the **Clusters** tab
3. Click **Add Cluster**
4. Follow the provider-specific guide for your cloud platform:
Create managed EKS cluster
Create EKS Anywhere cluster directly from Qovery. Contact us to enable this
integration.
Create managed AKS cluster
Create managed GKE cluster
Create managed Kapsule cluster
### Managed Cluster by Qovery vs Self-Managed
Qovery offers two deployment models for your Kubernetes clusters:
**Zero Configuration**
Qovery creates and manages your Kubernetes cluster in your cloud account. Automated setup, updates, and scaling.
✅ Full automation
✅ 15-30 minute setup
✅ Best practices built-in
✅ Auto-scaling (with Karpenter on AWS)
✅ Automatic Kubernetes upgrades
✅ Monitoring and alerting included
**Full Control**
Connect your existing Kubernetes cluster to Qovery. You manage the cluster infrastructure, Qovery manages your application deployments.
✅ Use existing clusters
✅ Custom configurations
✅ Compliance requirements
✅ Multi-tenant setups
✅ Your upgrade schedule
✅ Bring your own tools
#### Comparison
| Feature | Qovery-Managed | Self-Managed (BYOK) |
| ----------------------------- | -------------------------------- | -------------------------------- |
| **Setup Time** | 15-30 minutes | 10-15 minutes (existing cluster) |
| **Infrastructure Management** | Fully automated by Qovery | You manage infrastructure |
| **Kubernetes Upgrades** | Automatic, tested by Qovery | You control timing and process |
| **Auto-scaling** | Built-in (Karpenter on AWS) | You configure |
| **Monitoring** | Included | You provide |
| **Cost** | Infrastructure + Qovery platform | Infrastructure + Qovery platform |
| **Customization** | Standard configurations | Full control |
| **Best For** | Teams wanting automation | Teams with specific requirements |
For production workloads, we recommend **Qovery-Managed clusters** for their
automated updates, built-in best practices, and reduced operational overhead.
Choose **BYOK** if you have specific compliance requirements or existing
cluster investments.
### Overview
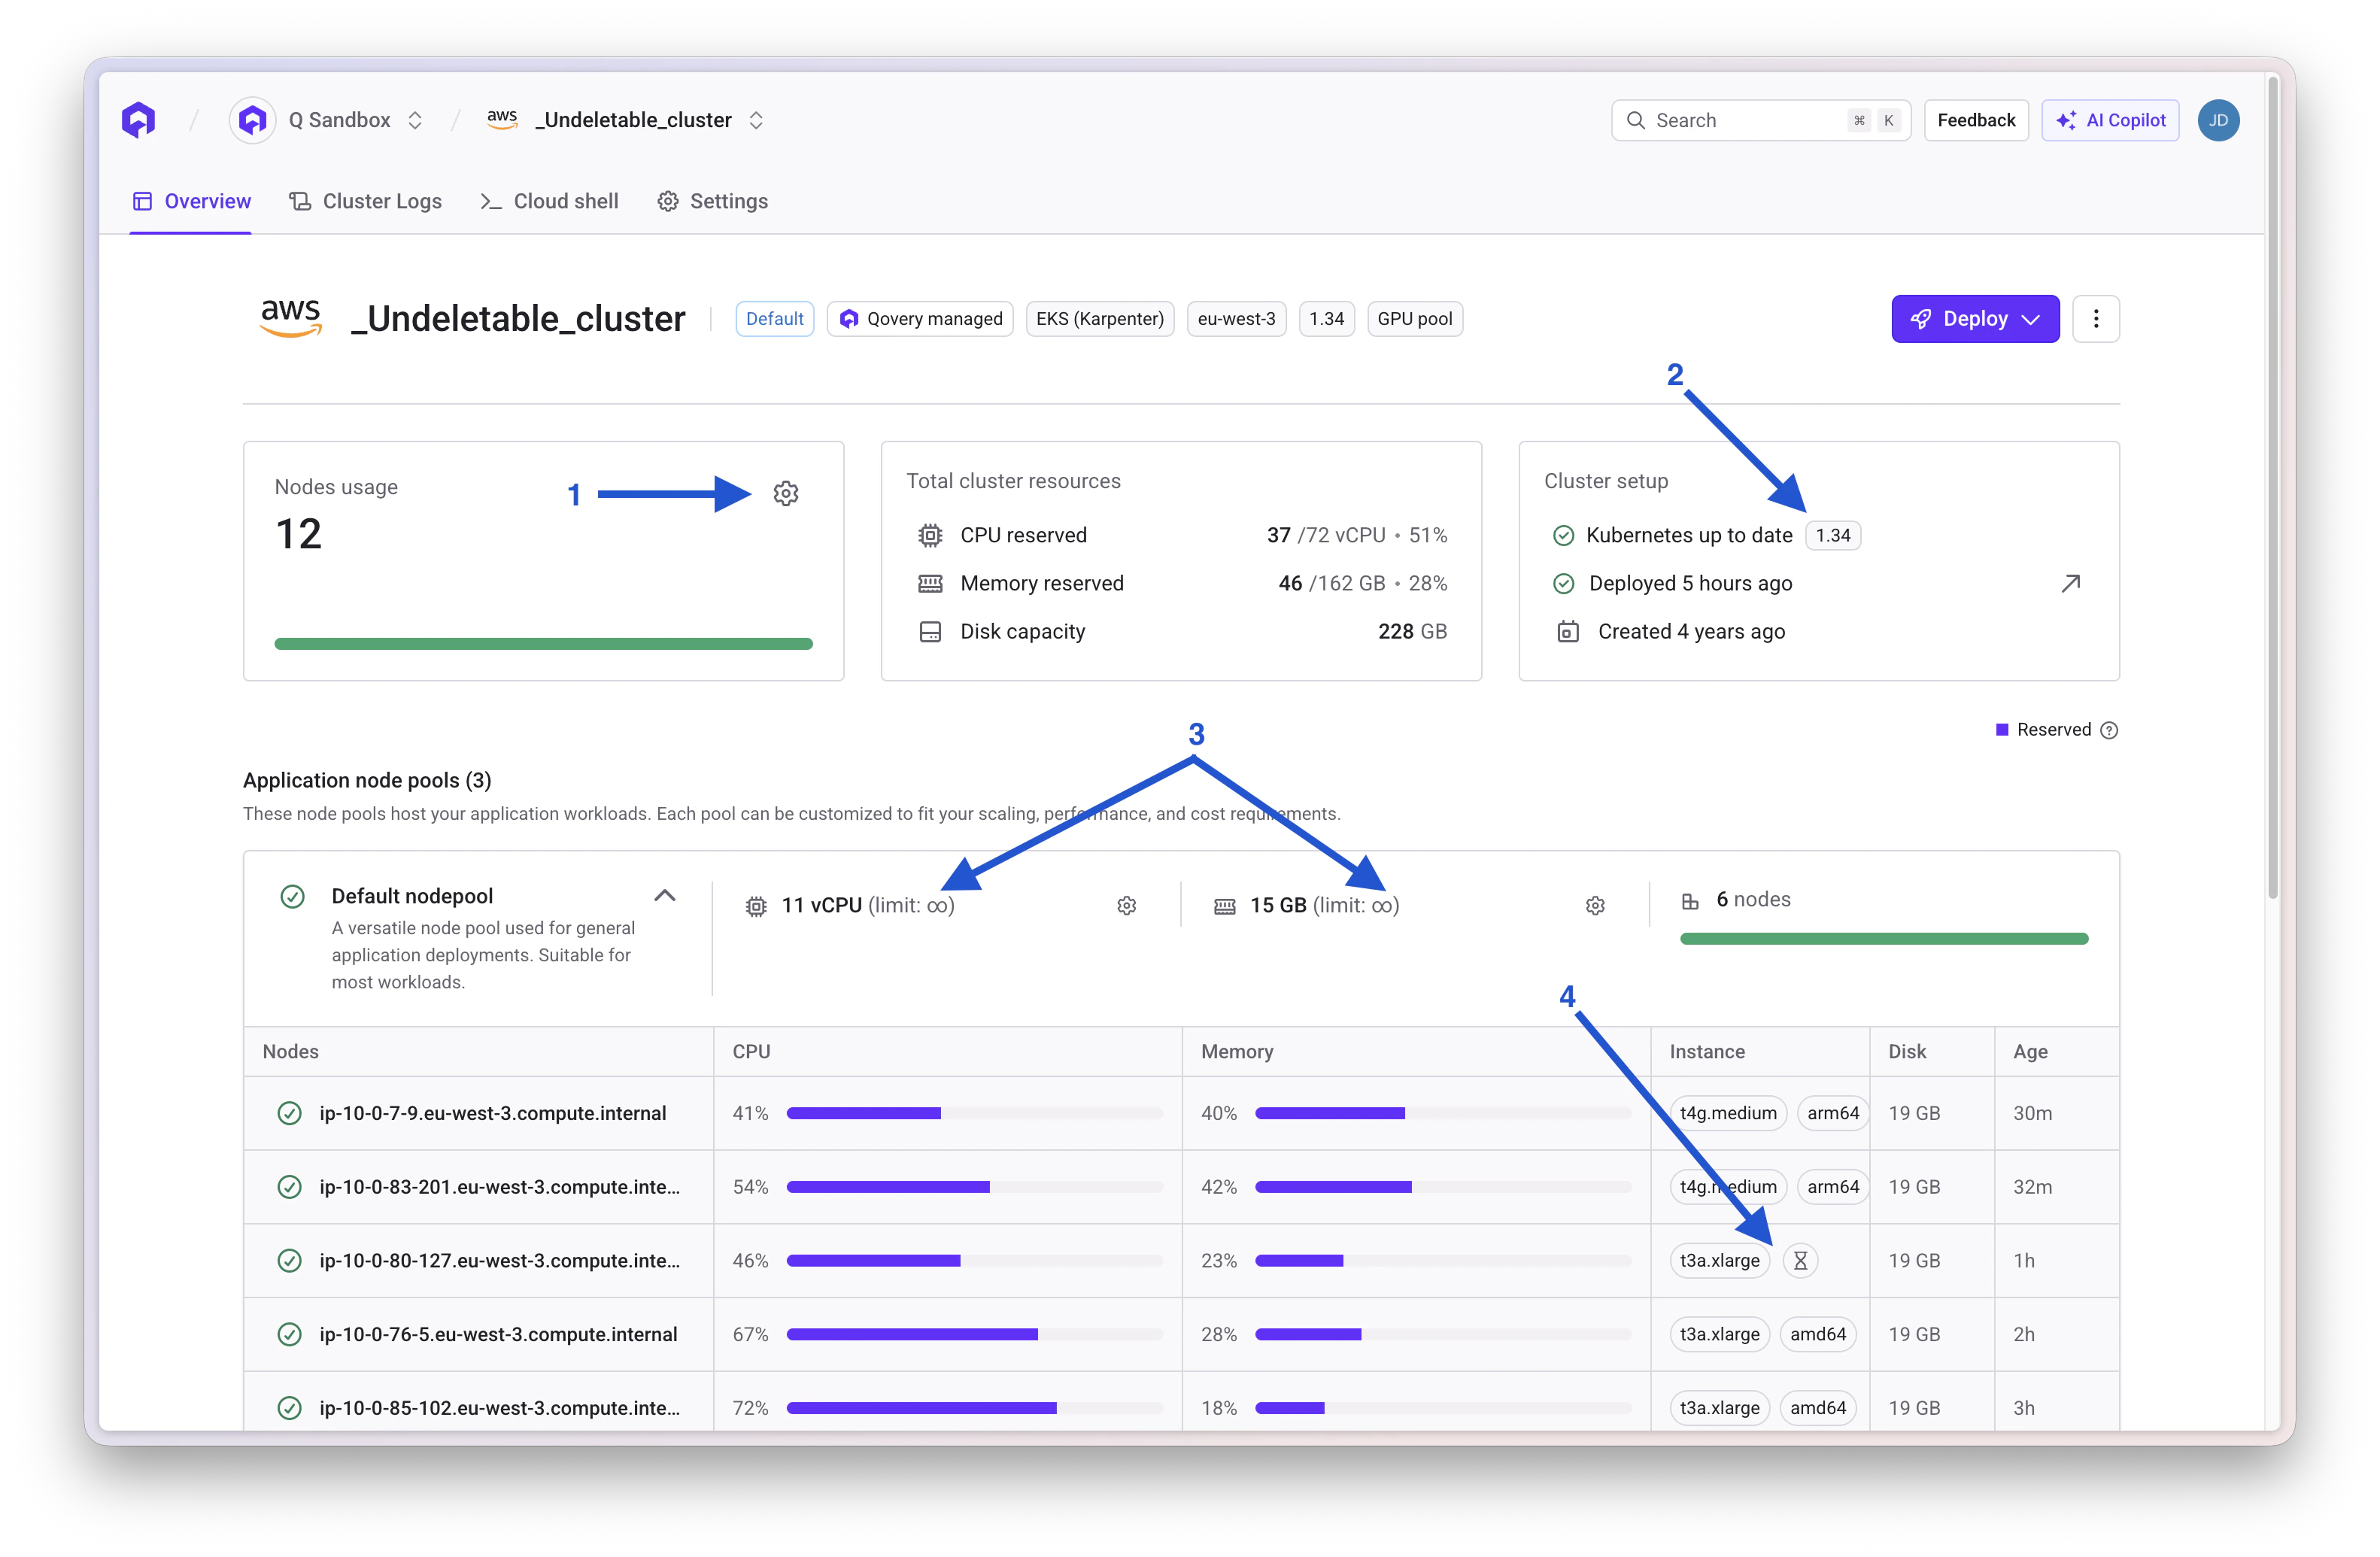
Once your cluster is created, the cluster card displays comprehensive information about your cluster's configuration and health:
**Cluster Details:**
* Deployed nodes and their current statuses
* Instance type configuration (min/max instances)
* Reserved resources: CPU, memory, and disk capacity
* Current Kubernetes version with upgrade warnings if applicable
* Last deployment timestamp and status
* Karpenter nodepool grouping (if using Karpenter)
* Per-node resource allocation
 ### Statuses
Qovery tracks cluster health using two status categories:
#### Cluster Statuses
| Status | Description |
| -------------------------------------------------------------------------------- | ----------------------------------------- |
| **Running** | Cluster is healthy and operational |
| **Warning** | Minor issues detected, requires attention |
| **Error** | Critical issues, intervention required |
| **Status unavailable** | Cluster unreachable or offline |
#### Deployment Statuses
| Status | Description |
| ----------------------------- | ------------------------------------------------- |
| **Deployment Queued** | Deployment is waiting in the queue |
| **Deploying** | Deployment is currently in progress |
| **Last Deployment Failed** | The most recent deployment encountered errors |
| **Last Deployment Succeeded** | The most recent deployment completed successfully |
### Performing Actions on Clusters
Available cluster operations and their cloud provider compatibility:
| Action | AWS | Azure | GCP | Scaleway | Description |
| ----------- | --- | ----- | --- | -------- | ------------------------------------------------------------ |
| **Update** | ✅ | ✅ | ✅ | ✅ | Redeploy cluster after configuration changes |
| **Stop** | ✅ | ✅ | ✅ | ✅ | Temporarily pause cluster (provider charges may still apply) |
| **Restart** | ✅ | ✅ | ✅ | ✅ | Resume a stopped cluster |
| **Delete** | ✅ | ✅ | ✅ | ✅ | Permanently remove cluster |
To perform an action:
1. Navigate to your cluster page
2. Click the action dropdown menu
3. Select the desired action
4. Track progress through cluster logs
#### Updating a Cluster
Redeploys your cluster after making configuration changes through the Qovery Console or API.
#### Stopping a Cluster
Temporarily pauses your cluster to reduce costs.
Some cloud provider charges may continue even when the cluster is stopped
(e.g., storage, reserved IPs, load balancers).
#### Restarting a Cluster
Resumes a stopped cluster and redeploys all services.
#### Deleting a Cluster
Permanently removes your cluster. You have three deletion options:
1. **Default (Recommended)**: Complete cleanup
* Deletes all Qovery-managed resources
* Removes cloud provider infrastructure
* No residual costs
2. **Delete on cloud provider and Qovery configuration**: Manual database handling
* Deletes cluster from cloud provider
* Removes Qovery configuration
* Requires manual database cleanup
3. **Delete Qovery configuration only**: Keep cloud resources
* Removes Qovery management only
* Cloud infrastructure continues running
* Continue managing manually in cloud console
Cluster deletion is **permanent and irreversible**. Ensure you have backups
before proceeding.
#### Additional Actions
**Audit Logs:**
* Access complete cluster activity history
* Track configuration changes and deployments
* Available for compliance and troubleshooting
**Cluster ID:**
* Retrieve unique cluster identifier
* Required for API operations and support tickets
**Kubeconfig:**
* Download Kubernetes configuration file
* Enable direct kubectl access
* Use for advanced debugging and management
**Security Best Practice**: Kubeconfig provides cluster-admin access. Store
securely and never commit to version control.
## Logs
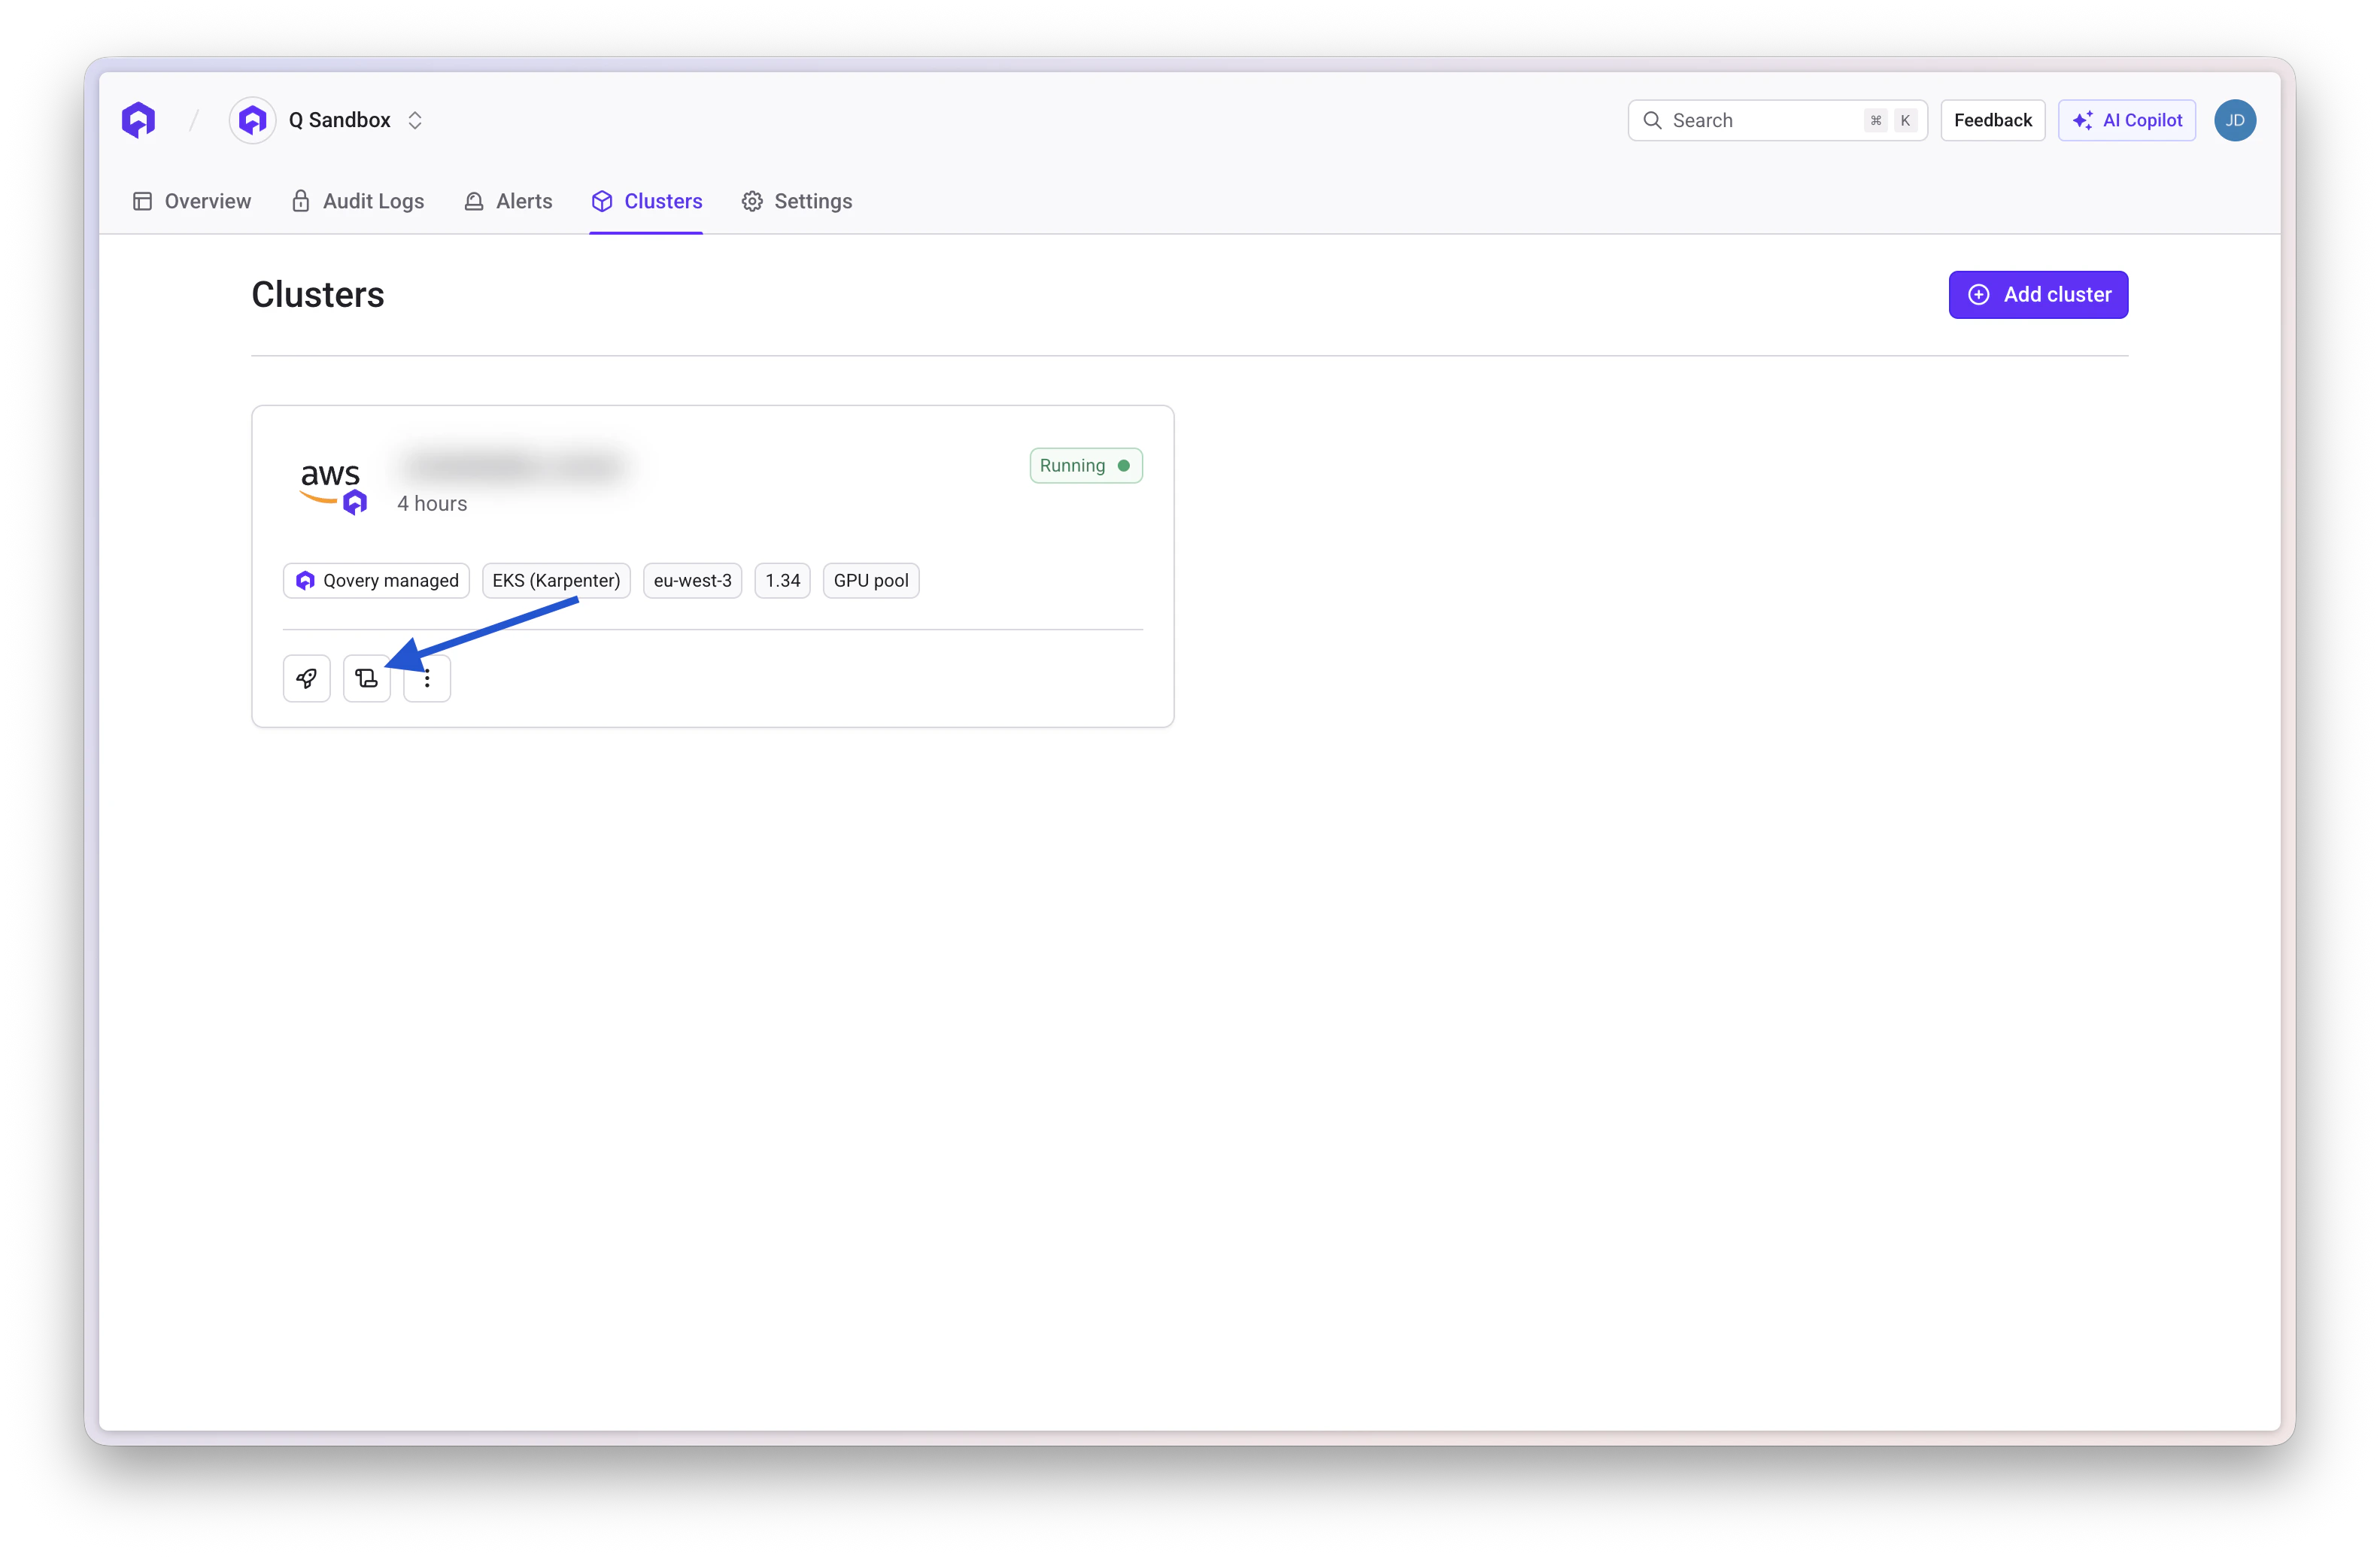
Access cluster logs for troubleshooting and monitoring:
1. Navigate to your cluster page
2. Click **Logs** or **View Logs**
3. Use the tab system to view:
* **Cluster Info**: General cluster information
* **Error Details**: Specific error messages and stack traces
### Statuses
Qovery tracks cluster health using two status categories:
#### Cluster Statuses
| Status | Description |
| -------------------------------------------------------------------------------- | ----------------------------------------- |
| **Running** | Cluster is healthy and operational |
| **Warning** | Minor issues detected, requires attention |
| **Error** | Critical issues, intervention required |
| **Status unavailable** | Cluster unreachable or offline |
#### Deployment Statuses
| Status | Description |
| ----------------------------- | ------------------------------------------------- |
| **Deployment Queued** | Deployment is waiting in the queue |
| **Deploying** | Deployment is currently in progress |
| **Last Deployment Failed** | The most recent deployment encountered errors |
| **Last Deployment Succeeded** | The most recent deployment completed successfully |
### Performing Actions on Clusters
Available cluster operations and their cloud provider compatibility:
| Action | AWS | Azure | GCP | Scaleway | Description |
| ----------- | --- | ----- | --- | -------- | ------------------------------------------------------------ |
| **Update** | ✅ | ✅ | ✅ | ✅ | Redeploy cluster after configuration changes |
| **Stop** | ✅ | ✅ | ✅ | ✅ | Temporarily pause cluster (provider charges may still apply) |
| **Restart** | ✅ | ✅ | ✅ | ✅ | Resume a stopped cluster |
| **Delete** | ✅ | ✅ | ✅ | ✅ | Permanently remove cluster |
To perform an action:
1. Navigate to your cluster page
2. Click the action dropdown menu
3. Select the desired action
4. Track progress through cluster logs
#### Updating a Cluster
Redeploys your cluster after making configuration changes through the Qovery Console or API.
#### Stopping a Cluster
Temporarily pauses your cluster to reduce costs.
Some cloud provider charges may continue even when the cluster is stopped
(e.g., storage, reserved IPs, load balancers).
#### Restarting a Cluster
Resumes a stopped cluster and redeploys all services.
#### Deleting a Cluster
Permanently removes your cluster. You have three deletion options:
1. **Default (Recommended)**: Complete cleanup
* Deletes all Qovery-managed resources
* Removes cloud provider infrastructure
* No residual costs
2. **Delete on cloud provider and Qovery configuration**: Manual database handling
* Deletes cluster from cloud provider
* Removes Qovery configuration
* Requires manual database cleanup
3. **Delete Qovery configuration only**: Keep cloud resources
* Removes Qovery management only
* Cloud infrastructure continues running
* Continue managing manually in cloud console
Cluster deletion is **permanent and irreversible**. Ensure you have backups
before proceeding.
#### Additional Actions
**Audit Logs:**
* Access complete cluster activity history
* Track configuration changes and deployments
* Available for compliance and troubleshooting
**Cluster ID:**
* Retrieve unique cluster identifier
* Required for API operations and support tickets
**Kubeconfig:**
* Download Kubernetes configuration file
* Enable direct kubectl access
* Use for advanced debugging and management
**Security Best Practice**: Kubeconfig provides cluster-admin access. Store
securely and never commit to version control.
## Logs
Access cluster logs for troubleshooting and monitoring:
1. Navigate to your cluster page
2. Click **Logs** or **View Logs**
3. Use the tab system to view:
* **Cluster Info**: General cluster information
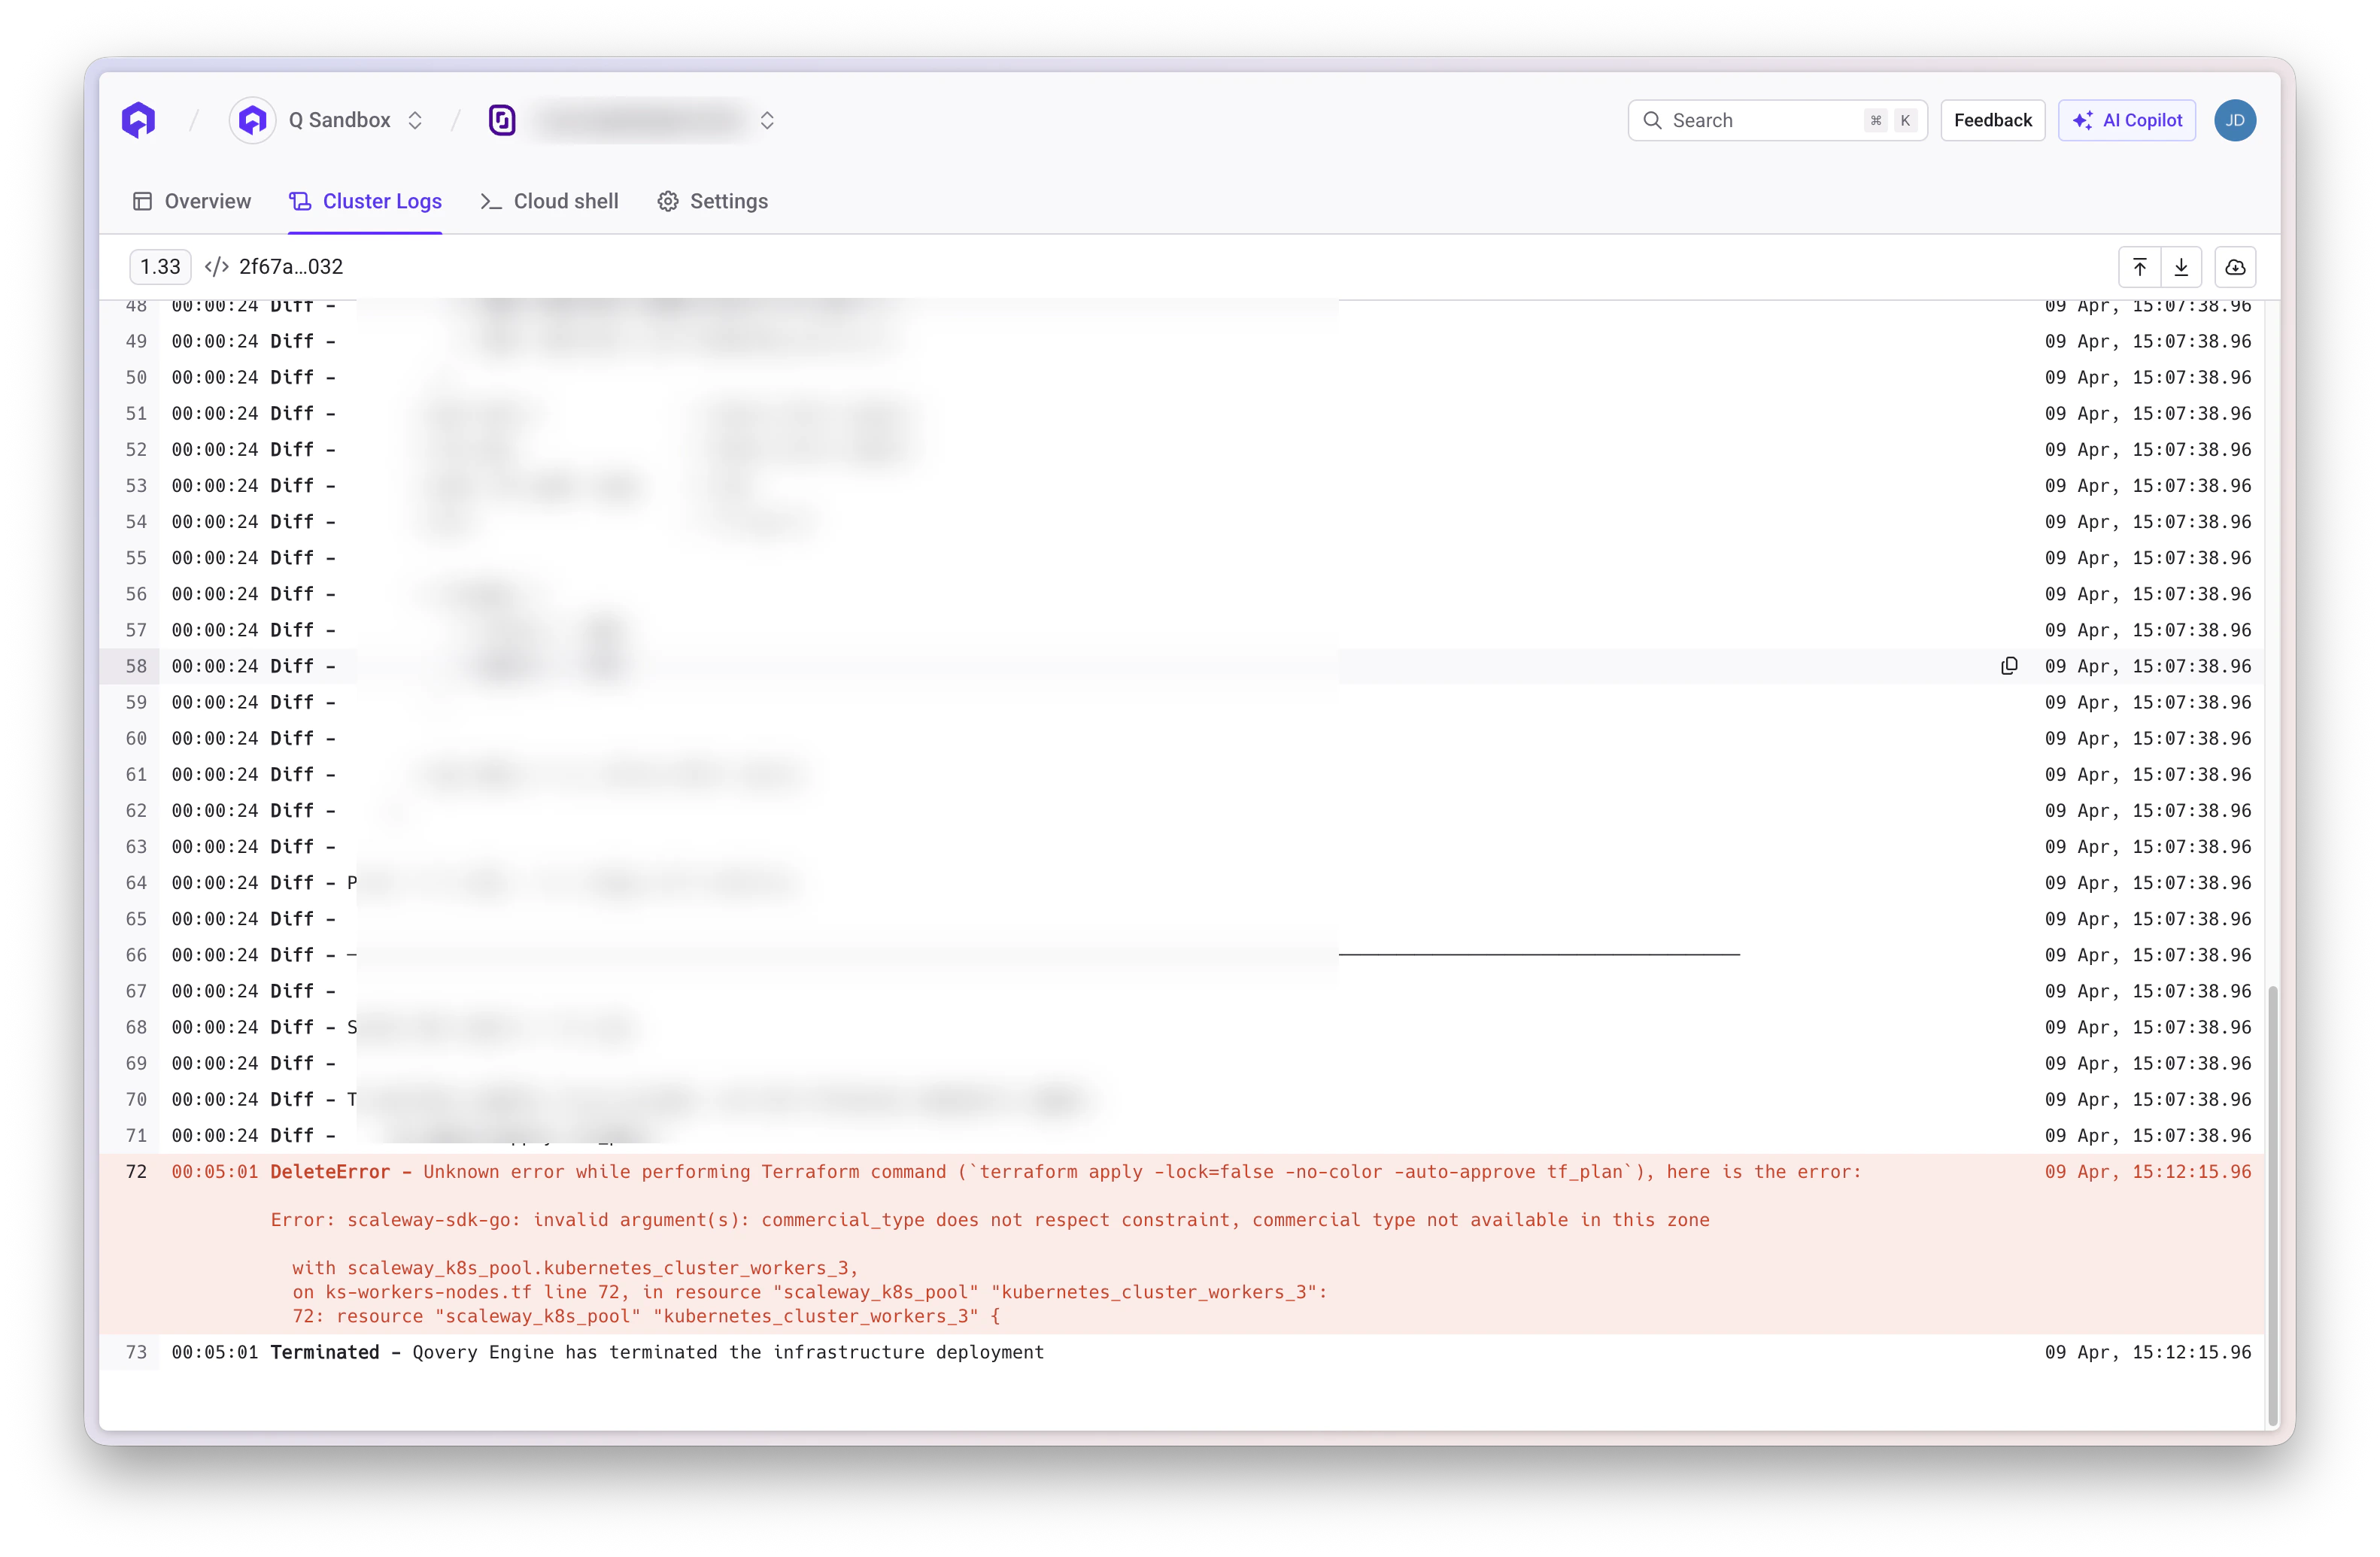
* **Error Details**: Specific error messages and stack traces
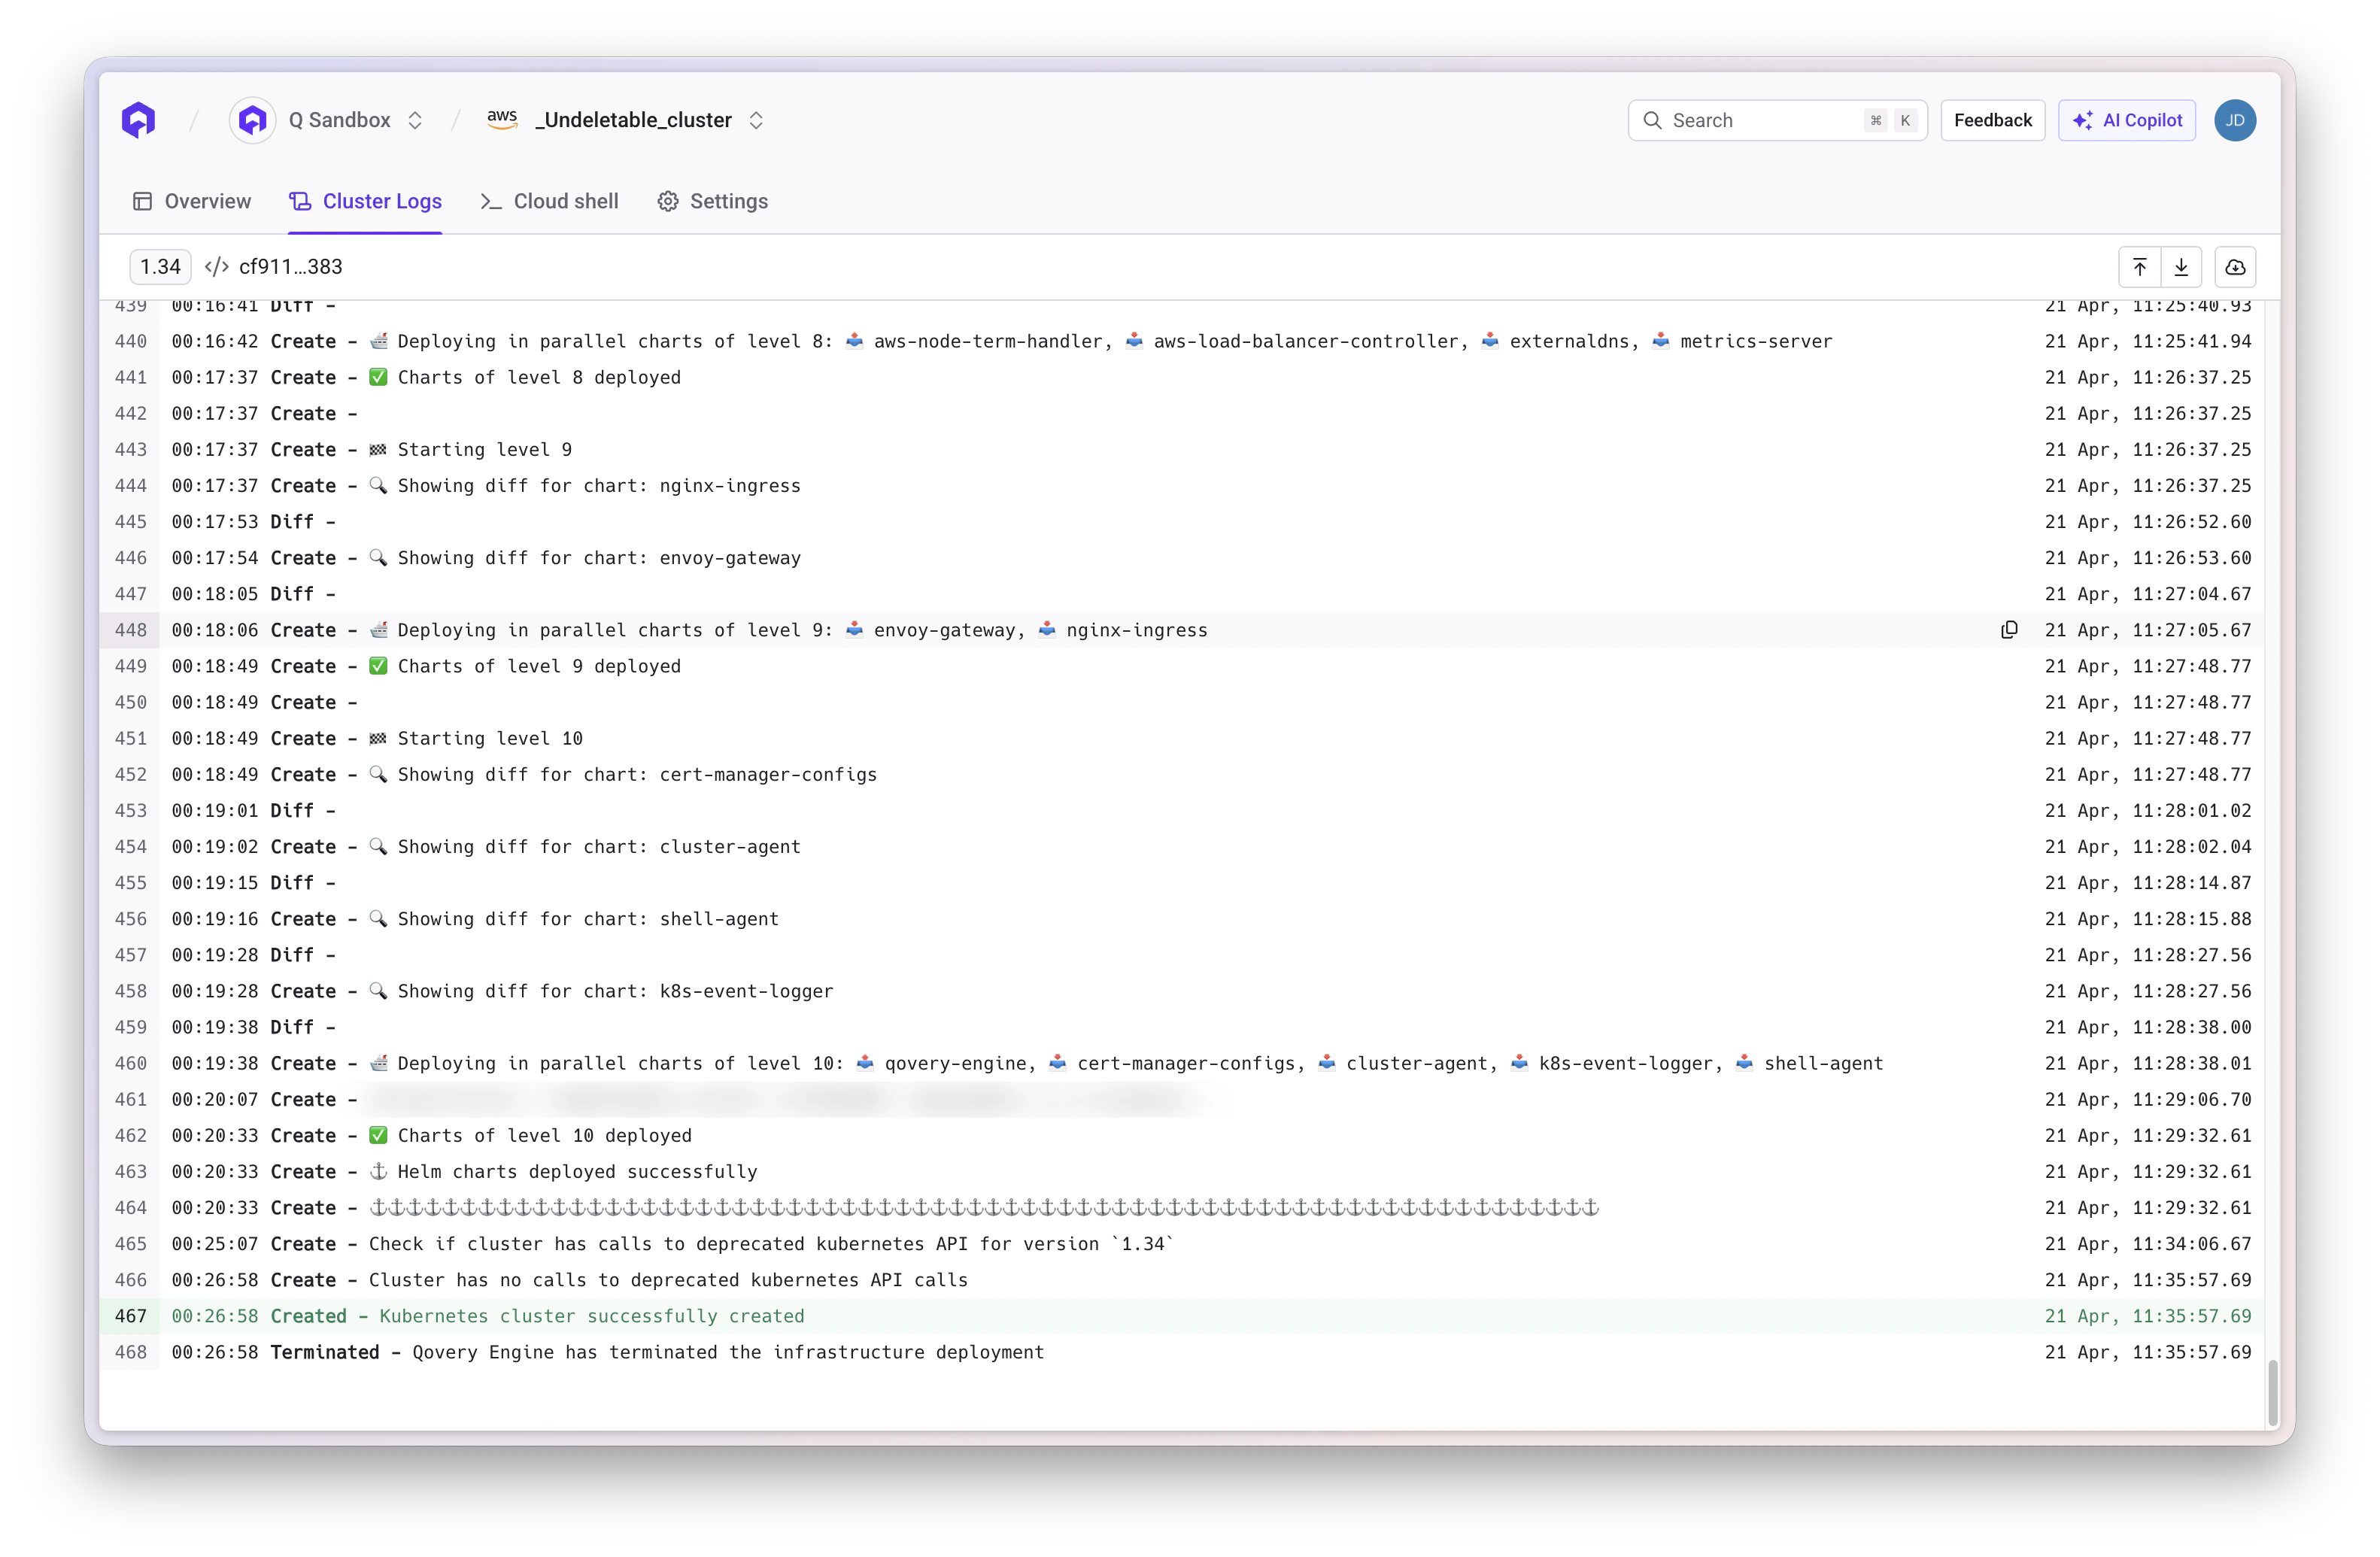
 **Successful Operations:**
 **Error Logs:**
 ## Custom Domain and Wildcard TLS (Beta)
By default, Qovery assigns a subdomain under one of its managed domains (randomly assigned) to your cluster services. However, Let's Encrypt rate limits may affect certificate issuance.
To use your own custom domain with wildcard TLS certificates, Qovery supports **Cloudflare** and **AWS Route53** integration.
### Cloudflare Setup
1. Log into your Cloudflare account
2. Go to **My Profile** → **API Tokens**
3. Click **Create Token**
4. Use the **Edit zone DNS** template or create a custom token
5. Grant these permissions:
* Zone → DNS → Edit
* Zone → Zone → Read
6. Set Zone Resources to include your domain
7. Create and copy the token
Contact Qovery Support via your usual channel (in-app chat, Slack, or email) with the following information:
* Your cluster ID
* Your domain name (e.g., `example.com`)
* Your Cloudflare API token
* Your Cloudflare account email
The Qovery team will configure the integration for you.
Once configured, Qovery will automatically manage DNS records in your Cloudflare account
### AWS Route53 Setup
1. Log into your AWS Console
2. Navigate to **IAM** → **Users**
3. Create a new user or select an existing one
4. Attach the policy with these permissions:
```json theme={null}
{
"Version": "2012-10-17",
"Statement": [
{
"Effect": "Allow",
"Action": [
"route53:ChangeResourceRecordSets",
"route53:ListResourceRecordSets",
"route53:ListTagsForResources"
],
"Resource": [
"arn:aws:route53:::hostedzone/*"
]
},
{
"Effect": "Allow",
"Action": [
"route53:ListHostedZones",
"route53:ListHostedZonesByName"
],
"Resource": [
"*"
]
},
{
"Effect": "Allow",
"Action": "route53:GetChange",
"Resource": "arn:aws:route53:::change/*"
}
]
}
```
5. Create and save the **Access Key ID** and **Secret Access Key**
1. In AWS Console, go to **Route53** → **Hosted zones**
2. Select your domain
3. Copy the **Hosted Zone ID** (format: `Z0123456789ABCDEFGHIJ`)
The Hosted Zone ID is optional. If not provided, Qovery will auto-detect it.
Contact Qovery Support via your usual channel (in-app chat, Slack, or email) with the following information:
* Your cluster ID
* Your domain name (e.g., `example.com`)
* Your AWS Access Key ID
* Your AWS Secret Access Key
* Your AWS region (e.g., `us-east-1`)
* Your Hosted Zone ID (optional)
The Qovery team will configure the integration for you.
Once configured, Qovery will automatically create and manage DNS records in your Route53 hosted zone
This feature is currently in **Beta**. Both **Cloudflare** and **AWS Route53**
are supported. Additional DNS providers will be added in future releases.
## AWS Account Cleanup
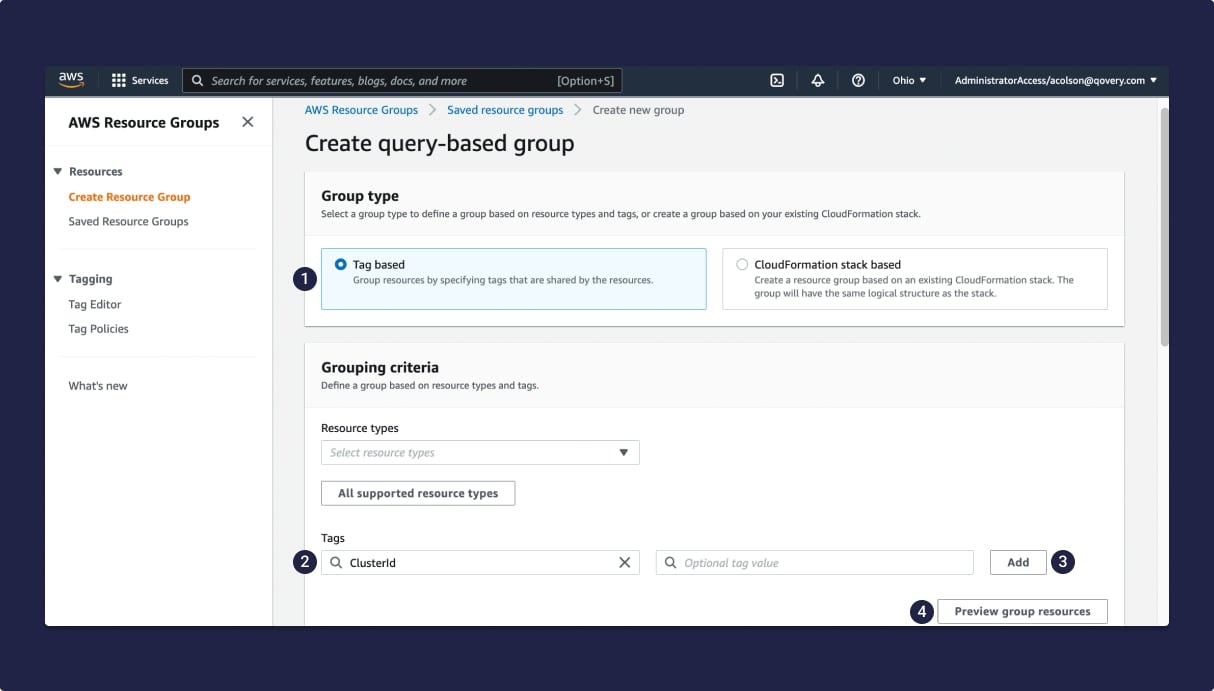
If cluster deletion fails or leaves resources behind, you can manually clean up using AWS Console tags.
### Manual Cleanup Steps
Navigate to the [AWS Resource Groups & Tag Editor](https://console.aws.amazon.com/resource-groups/tag-editor)
1. Select **All supported resource types** 2. Add tag filter: `ClusterId` or
`QoveryCluster` 3. Search for resources
1. Review the list of tagged resources
2. Manually delete each resource through AWS Console
3. Common resources to check:
* EC2 instances
* EKS clusters
* VPCs and networking components
* Load balancers
* EBS volumes
* Security groups
## Custom Domain and Wildcard TLS (Beta)
By default, Qovery assigns a subdomain under one of its managed domains (randomly assigned) to your cluster services. However, Let's Encrypt rate limits may affect certificate issuance.
To use your own custom domain with wildcard TLS certificates, Qovery supports **Cloudflare** and **AWS Route53** integration.
### Cloudflare Setup
1. Log into your Cloudflare account
2. Go to **My Profile** → **API Tokens**
3. Click **Create Token**
4. Use the **Edit zone DNS** template or create a custom token
5. Grant these permissions:
* Zone → DNS → Edit
* Zone → Zone → Read
6. Set Zone Resources to include your domain
7. Create and copy the token
Contact Qovery Support via your usual channel (in-app chat, Slack, or email) with the following information:
* Your cluster ID
* Your domain name (e.g., `example.com`)
* Your Cloudflare API token
* Your Cloudflare account email
The Qovery team will configure the integration for you.
Once configured, Qovery will automatically manage DNS records in your Cloudflare account
### AWS Route53 Setup
1. Log into your AWS Console
2. Navigate to **IAM** → **Users**
3. Create a new user or select an existing one
4. Attach the policy with these permissions:
```json theme={null}
{
"Version": "2012-10-17",
"Statement": [
{
"Effect": "Allow",
"Action": [
"route53:ChangeResourceRecordSets",
"route53:ListResourceRecordSets",
"route53:ListTagsForResources"
],
"Resource": [
"arn:aws:route53:::hostedzone/*"
]
},
{
"Effect": "Allow",
"Action": [
"route53:ListHostedZones",
"route53:ListHostedZonesByName"
],
"Resource": [
"*"
]
},
{
"Effect": "Allow",
"Action": "route53:GetChange",
"Resource": "arn:aws:route53:::change/*"
}
]
}
```
5. Create and save the **Access Key ID** and **Secret Access Key**
1. In AWS Console, go to **Route53** → **Hosted zones**
2. Select your domain
3. Copy the **Hosted Zone ID** (format: `Z0123456789ABCDEFGHIJ`)
The Hosted Zone ID is optional. If not provided, Qovery will auto-detect it.
Contact Qovery Support via your usual channel (in-app chat, Slack, or email) with the following information:
* Your cluster ID
* Your domain name (e.g., `example.com`)
* Your AWS Access Key ID
* Your AWS Secret Access Key
* Your AWS region (e.g., `us-east-1`)
* Your Hosted Zone ID (optional)
The Qovery team will configure the integration for you.
Once configured, Qovery will automatically create and manage DNS records in your Route53 hosted zone
This feature is currently in **Beta**. Both **Cloudflare** and **AWS Route53**
are supported. Additional DNS providers will be added in future releases.
## AWS Account Cleanup
If cluster deletion fails or leaves resources behind, you can manually clean up using AWS Console tags.
### Manual Cleanup Steps
Navigate to the [AWS Resource Groups & Tag Editor](https://console.aws.amazon.com/resource-groups/tag-editor)
1. Select **All supported resource types** 2. Add tag filter: `ClusterId` or
`QoveryCluster` 3. Search for resources
1. Review the list of tagged resources
2. Manually delete each resource through AWS Console
3. Common resources to check:
* EC2 instances
* EKS clusters
* VPCs and networking components
* Load balancers
* EBS volumes
* Security groups
 Manual cleanup should only be performed if automatic Qovery deletion fails.
Always verify resources before deletion to avoid data loss.
## FAQ
A cluster is a group of computing resources (nodes) that work together to run your applications. Learn more in our [Basic Concepts](/docs/basic-concepts) guide.
Clusters provide several key benefits:
* **Kubernetes orchestration**: Automatic container management, scaling, and healing
* **Disaster recovery**: Built-in redundancy and failover capabilities
* **Auto-scaling**: Automatically adjust resources based on demand
* **Environment isolation**: Separate development, staging, and production workloads
* **Multi-region deployment**: Deploy applications closer to your users
Instance availability varies by cloud provider:
**AWS**: 400+ instance types available
* General purpose, compute optimized, memory optimized, storage optimized, GPU instances
* Supports both x86\_64 and ARM architectures (Graviton)
**Scaleway**: Multiple instance ranges
* From cost-effective shared instances to dedicated high-performance options
* x86\_64 architecture
**GCP**: GKE auto-pilot
* Fully managed node provisioning
* Automatic optimization based on workload requirements
* x86\_64 architecture
**Azure**: Various VM series
* Multiple performance tiers and specialized workloads
* x86\_64 architecture
Architecture compatibility: Ensure your container images support your chosen architecture (x86\_64 or ARM).
Qovery follows a careful upgrade process:
1. **Testing period**: Each new Kubernetes version undergoes 1 month of internal testing
2. **Rollout**: After testing, updates roll out to customers over 3 weeks
3. **Manual upgrades**: Option available for customers who want to upgrade immediately
**Never upgrade Kubernetes manually** through your cloud provider console. This can cause incompatibilities with Qovery components. Always use Qovery-managed upgrades.
You'll receive notifications when new versions are available for your clusters.
Security is our main concern. When vulnerabilities surface:
1. **Rapid identification**: Continuous monitoring of security databases
2. **Impact assessment**: Evaluate severity and affected systems
3. **Mitigation solutions**: Develop and test patches
4. **Customer communication**: Transparent notifications with recommended actions
5. **Deployment assistance**: Guided remediation process
Critical security patches may be applied automatically after customer notification.
A mirroring registry is a private container registry that caches images from public registries, providing:
* Faster image pulls (cached locally)
* Protection against rate limits
* Improved reliability and availability
* Better control over image versions
Learn more in our [Image Mirroring documentation](/docs/configuration/deployment/image-mirroring).
An unavailable status can occur due to:
**Common Causes:**
* Cluster manually stopped through cloud provider
* Cloud provider outage or service disruption
* Network connectivity issues
* Accidental deletion of critical resources
* Control plane issues
**Troubleshooting Steps:**
1. Check cloud provider status page for outages
2. Verify cluster hasn't been manually stopped in cloud console
3. Review Qovery cluster logs for error messages
4. Check cloud credentials are still valid
5. Contact Qovery support if issue persists
Always manage clusters through Qovery Console to avoid status inconsistencies. Manual changes in cloud provider consoles can cause unexpected behavior.
## Next Steps
Set up your first environment on the cluster
Deploy your first application
Set up observability and monitoring
Implement security best practices
Kubernetes cluster related updates
Manual cleanup should only be performed if automatic Qovery deletion fails.
Always verify resources before deletion to avoid data loss.
## FAQ
A cluster is a group of computing resources (nodes) that work together to run your applications. Learn more in our [Basic Concepts](/docs/basic-concepts) guide.
Clusters provide several key benefits:
* **Kubernetes orchestration**: Automatic container management, scaling, and healing
* **Disaster recovery**: Built-in redundancy and failover capabilities
* **Auto-scaling**: Automatically adjust resources based on demand
* **Environment isolation**: Separate development, staging, and production workloads
* **Multi-region deployment**: Deploy applications closer to your users
Instance availability varies by cloud provider:
**AWS**: 400+ instance types available
* General purpose, compute optimized, memory optimized, storage optimized, GPU instances
* Supports both x86\_64 and ARM architectures (Graviton)
**Scaleway**: Multiple instance ranges
* From cost-effective shared instances to dedicated high-performance options
* x86\_64 architecture
**GCP**: GKE auto-pilot
* Fully managed node provisioning
* Automatic optimization based on workload requirements
* x86\_64 architecture
**Azure**: Various VM series
* Multiple performance tiers and specialized workloads
* x86\_64 architecture
Architecture compatibility: Ensure your container images support your chosen architecture (x86\_64 or ARM).
Qovery follows a careful upgrade process:
1. **Testing period**: Each new Kubernetes version undergoes 1 month of internal testing
2. **Rollout**: After testing, updates roll out to customers over 3 weeks
3. **Manual upgrades**: Option available for customers who want to upgrade immediately
**Never upgrade Kubernetes manually** through your cloud provider console. This can cause incompatibilities with Qovery components. Always use Qovery-managed upgrades.
You'll receive notifications when new versions are available for your clusters.
Security is our main concern. When vulnerabilities surface:
1. **Rapid identification**: Continuous monitoring of security databases
2. **Impact assessment**: Evaluate severity and affected systems
3. **Mitigation solutions**: Develop and test patches
4. **Customer communication**: Transparent notifications with recommended actions
5. **Deployment assistance**: Guided remediation process
Critical security patches may be applied automatically after customer notification.
A mirroring registry is a private container registry that caches images from public registries, providing:
* Faster image pulls (cached locally)
* Protection against rate limits
* Improved reliability and availability
* Better control over image versions
Learn more in our [Image Mirroring documentation](/docs/configuration/deployment/image-mirroring).
An unavailable status can occur due to:
**Common Causes:**
* Cluster manually stopped through cloud provider
* Cloud provider outage or service disruption
* Network connectivity issues
* Accidental deletion of critical resources
* Control plane issues
**Troubleshooting Steps:**
1. Check cloud provider status page for outages
2. Verify cluster hasn't been manually stopped in cloud console
3. Review Qovery cluster logs for error messages
4. Check cloud credentials are still valid
5. Contact Qovery support if issue persists
Always manage clusters through Qovery Console to avoid status inconsistencies. Manual changes in cloud provider consoles can cause unexpected behavior.
## Next Steps
Set up your first environment on the cluster
Deploy your first application
Set up observability and monitoring
Implement security best practices
Kubernetes cluster related updates