> ## Documentation Index
> Fetch the complete documentation index at: https://www.qovery.com/docs/llms.txt
> Use this file to discover all available pages before exploring further.
# Application
> Configure and deploy applications on Qovery
## Prerequisites
Before creating an application:
* You have created an [Environment](/docs/configuration/environment)
## Overview
An application is a container unit that is part of a Project within an Environment. You can deploy multiple applications within the same environment, and they can communicate with each other and connect to databases.
## Deployment Sources
Qovery supports two deployment sources for applications:
### Git Repository
Qovery pulls your code from a Git repository, builds the application, and deploys it to your Kubernetes cluster.
**Supported Providers**: GitHub, GitLab, Bitbucket
### Container Registry
Qovery pulls a pre-built container image from your configured registry and deploys it to your Kubernetes cluster.
Container registries must be configured at the organization level by
administrators. See [Container Registry
Management](/docs/configuration/organization/container-registry).
## Creating an Application
Choose **Git Repository** or **Container Registry** as your deployment source
**For Git Repository**:
* Select Git provider
* Choose repository
* Select branch
* Specify root application path (if not at repository root)
* Configure Dockerfile path
**For Container Registry**:
* Select configured registry
* Enter image name
* Specify image tag
* **vCPU**: Default 500m (0.5 cores)
* **RAM**: Default 512MB
* **GPU**: Optional GPU allocation (requires GPU-enabled cluster)
* **Auto-scaling**: Configure min/max instances (optional)
* **Internal Port**: Port your application listens on
* **Protocol**: HTTPS, gRPC, TCP, or UDP
* **Publicly Accessible**: Enable to expose via load balancer
* **Liveness Probe**: Determines if container should be restarted
* **Readiness Probe**: Determines if container should receive traffic
Configure environment variables for your application
Review configuration and choose:
* **Create**: Save configuration without deploying
* **Create and Deploy**: Save and immediately deploy
## Configuration
### General Settings
**Git Repository Configuration**:
* Git provider and repository
* Branch selection
* Root application path
* Dockerfile path
* Build arguments
* Multi-stage build target selection
**Container Registry Configuration**:
* Registry selection
* Image name
* Image tag
* Entrypoint override
* CMD arguments override
### Resources
#### CPU and Memory
* **vCPU allocation**: Configure in millicores (e.g., 500m = 0.5 cores)
* **RAM allocation**: Configure in MB or GB
* Adjust based on your application's resource requirements
#### GPU
**Requirements**: AWS with Karpenter enabled
* Number of GPUs per instance
* Ideal for AI/ML workloads
* Available GPU types depend on your cluster configuration
#### Instances & Autoscaling
Qovery offers three autoscaling modes to match your application's needs:
**Not recommended for production workloads**. A single instance has no redundancy—if the pod fails or the node undergoes maintenance, your application will be temporarily unavailable.
For high availability:
* Set minimum instances to **2** if your app can run on 1 instance
* Set minimum instances to **3 or higher** if your app requires multiple instances to handle necessary traffic
* This ensures redundancy during node maintenance or pod failures
**Note**: KEDA (Event-Driven) autoscaling supports setting minimum instances to **0** for scale-to-zero capability on sporadic workloads.
### Fixed Number of Instances (No Autoscaling)
Your application runs with a fixed number of instances.
**Configuration**:
* Set the number of instances to run
* No automatic scaling occurs
**Use Cases**:
* Development environments
* Proof of concepts (POC)
* Testing and experimentation
### Classic Horizontal Pod Autoscaling
Kubernetes HPA automatically scales your application based on CPU utilization, or both CPU and memory utilization.
**Configuration**:
* **Minimum instances**: Baseline number of running pods
* **Maximum instances**: Scale-up limit
* **CPU threshold**: Default 60% (scale up after 15 seconds above threshold)
* **Memory threshold**: Optional, can be configured in addition to CPU
* **Scale down**: Triggered after 5 minutes below threshold
HPA supports CPU-only scaling or combined CPU+Memory scaling. Memory-only scaling is not supported.
**How It Works**:
* Kubernetes metrics-server monitors resource usage
* When average CPU (or CPU+memory) exceeds the threshold, new pods are added
* When usage drops below threshold for 5 minutes, pods are removed
* Scales down to minimum instances during low traffic
**Suitable For**:
* CPU-bound workloads (web servers, APIs)
* Memory-bound applications
* Applications with predictable traffic patterns
**Limitations**:
* Does not consider external events (message queues, streams, etc.)
* Reacts to resource usage, not workload depth
* May lag behind sudden traffic spikes
HPA uses Kubernetes [metrics-server](https://github.com/kubernetes-sigs/metrics-server) to monitor resource usage. Evaluation window is approximately 5 minutes for scale-down decisions.
### Event-Driven Autoscaling with KEDA
Scale your application based on external event sources like message queues, streams, databases, and more.
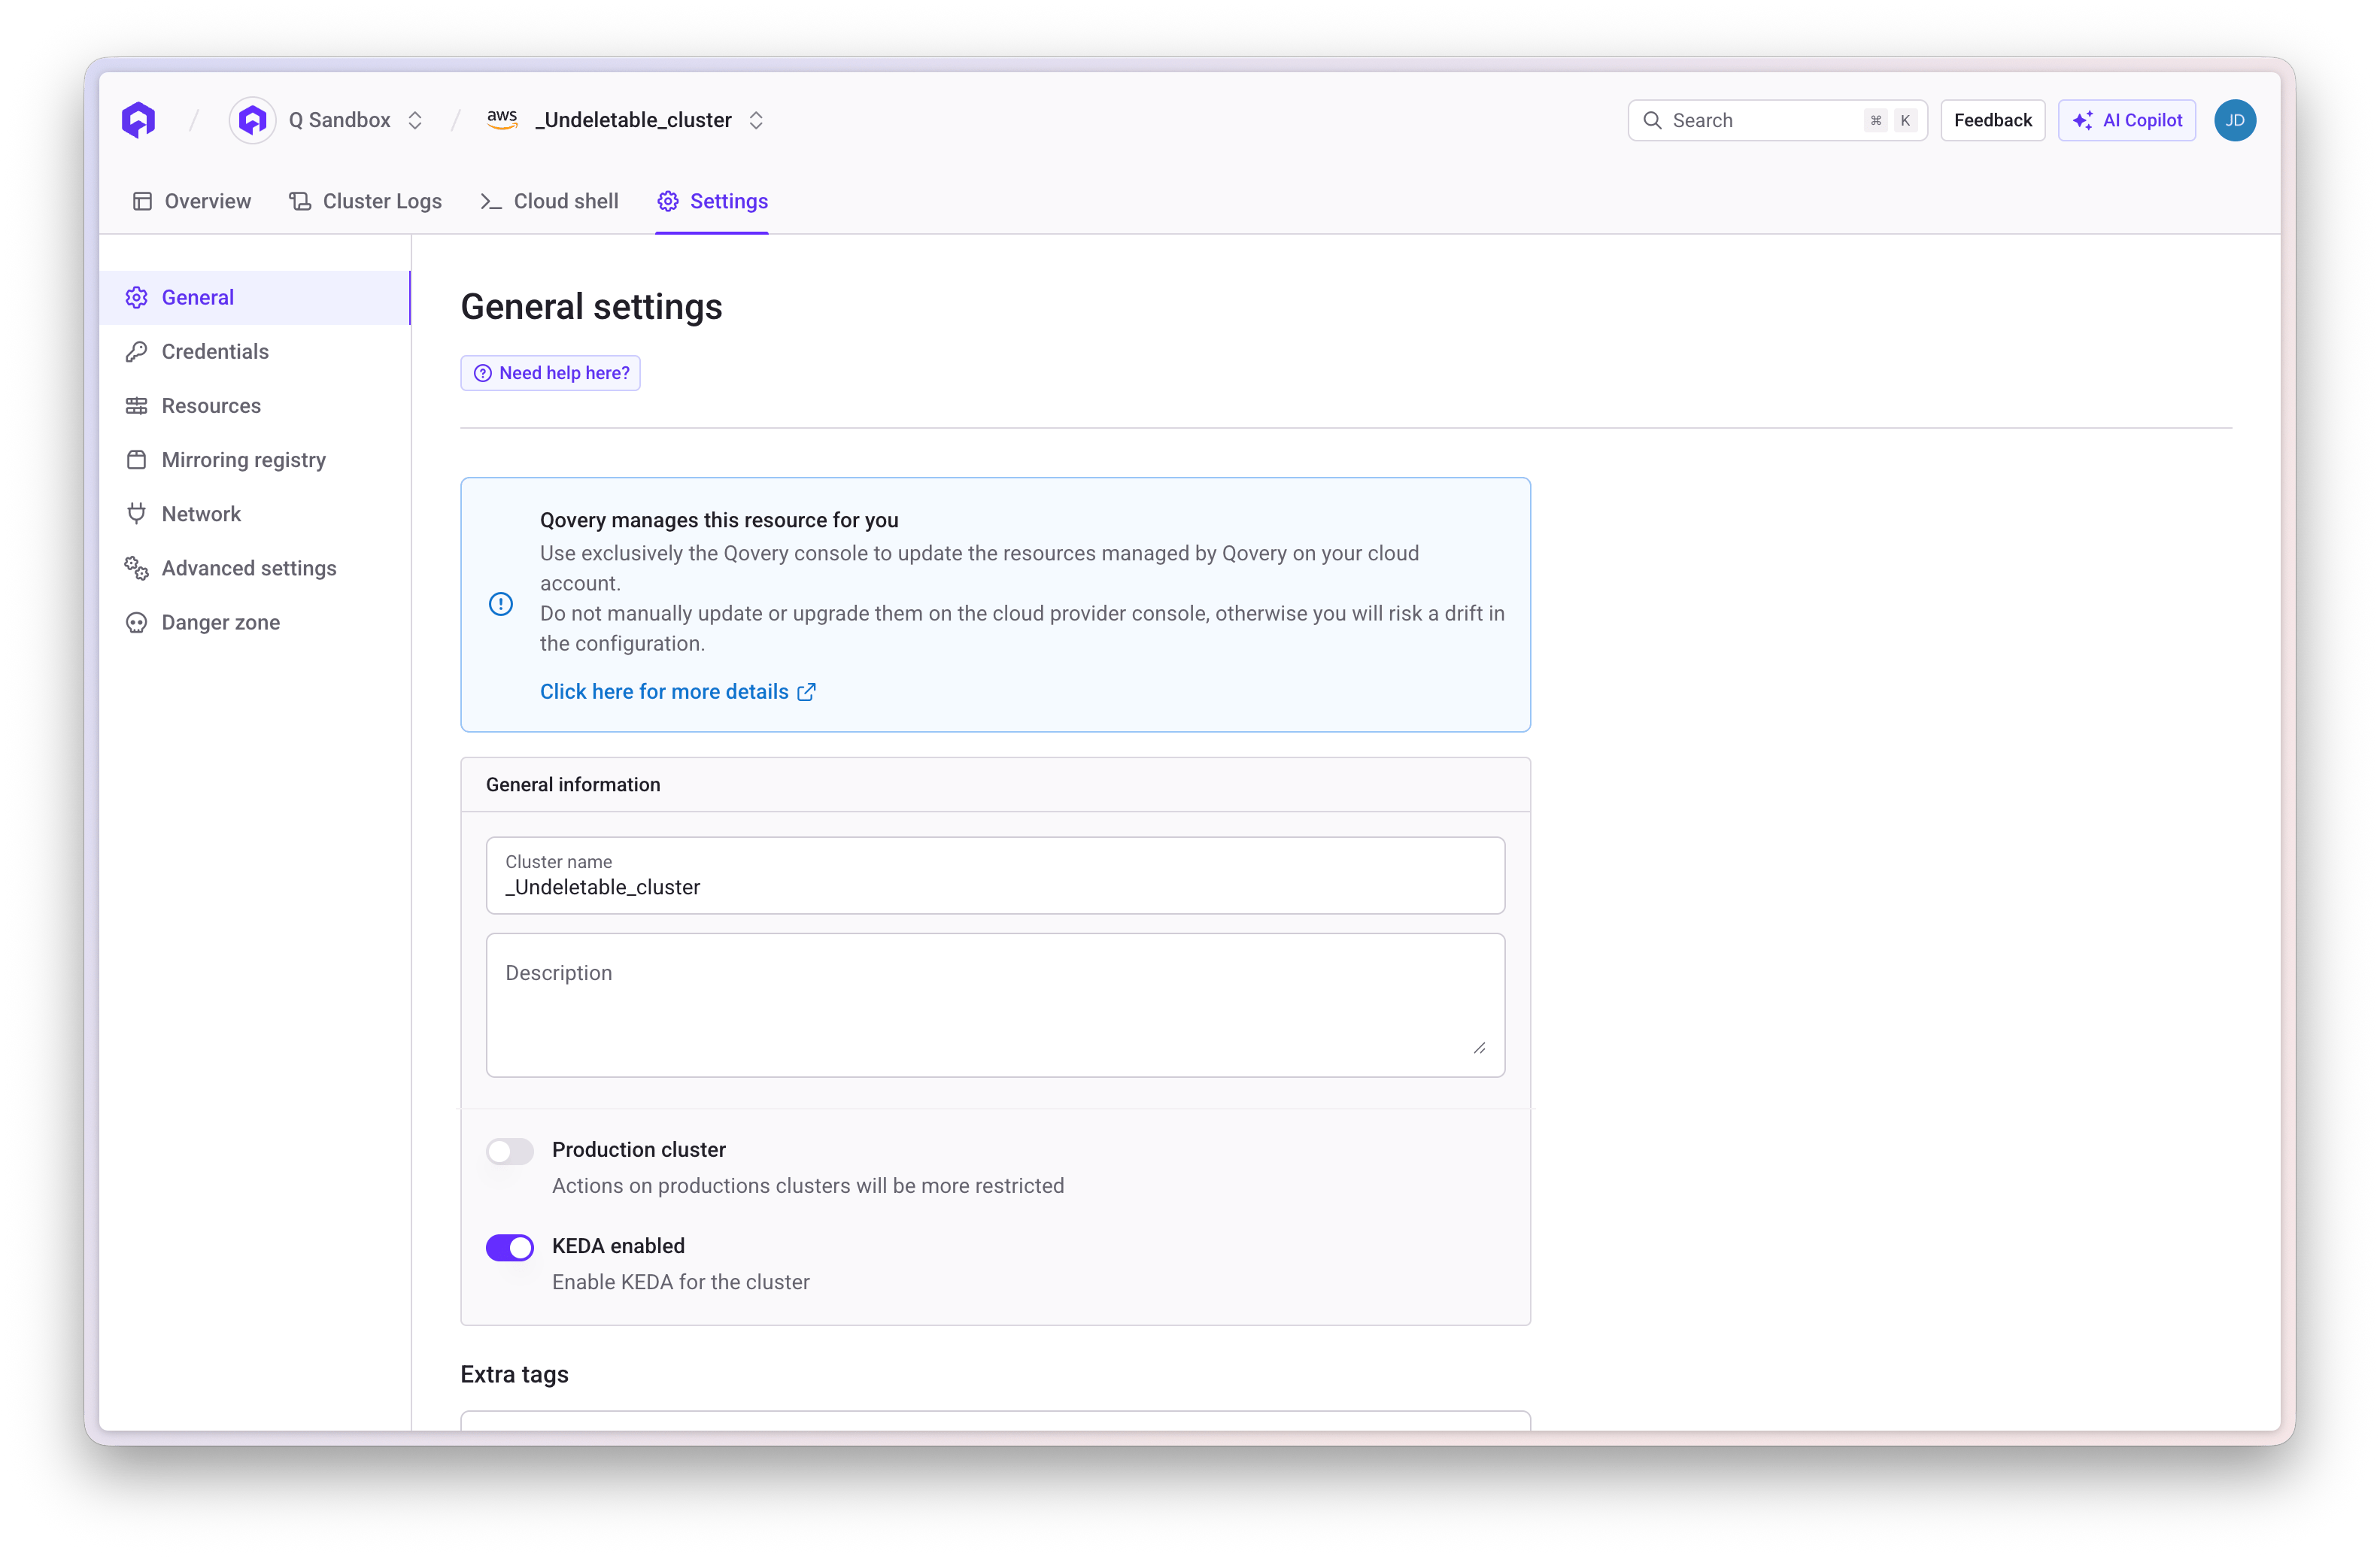
**AWS and GCP clusters only** - KEDA autoscaling is currently available for applications deployed on AWS and GCP.
**Prerequisite: Enable KEDA at Cluster Level**
Before using event-driven autoscaling, KEDA must be enabled on your cluster:
1. Navigate to your cluster settings
2. Go to the **Add-ons** tab
3. Enable the **KEDA** option
4. **Redeploy your cluster** for the changes to take effect
 **What is KEDA?**
[KEDA (Kubernetes Event-Driven Autoscaler)](https://keda.sh) extends Kubernetes autoscaling capabilities by scaling based on external metrics and events rather than just CPU/memory.
**Use Cases**:
* Queue-based workloads (SQS, RabbitMQ, Kafka)
* Stream processing (Kinesis, Kafka)
* Database polling (PostgreSQL, MySQL)
* Custom metrics (Prometheus, Datadog)
* Scheduled scaling (cron-based)
#### Migrating from HPA to KEDA
Direct migration from HPA to KEDA is blocked. The reason is a Kubernetes conflict: both HPA and KEDA's `ScaledObject` target the same Deployment replica count simultaneously, causing unpredictable scaling behavior.
The required migration path is **HPA → No Scaling → KEDA**:
1. Switch your application to **No autoscaling (fixed instances)** mode and save
2. **Redeploy** — this removes the HPA resource from the cluster
3. Switch to **KEDA (Event-Driven)** mode and configure your scalers
4. **Redeploy** again
#### General Configuration
**Required Settings**:
* **Minimum instances**: Baseline number of pods (minimum: 0 for scale-to-zero)
* **Maximum instances**: Upper scaling limit
**Optional Settings**:
* **Polling interval**: How often KEDA checks the event source (default: 30 seconds)
* **Cooldown period**: Wait time before scaling down after scale-up (default: 300 seconds)
**Scale-to-Zero**: KEDA supports setting minimum instances to **0**, allowing your application to scale down completely when there are no events. When events are detected, KEDA automatically scales up from 0 to handle the workload. This is ideal for cost optimization on sporadic workloads.
**Multiple scalers behavior**: If you configure multiple scalers, KEDA uses the scaler that calculates the highest target number of instances. For example, if Scaler A monitors a queue with 15 messages and calculates 15 target instances (1 message per instance), and Scaler B monitors a queue with 50 messages and calculates 5 target instances (10 messages per instance), KEDA scales to 15 instances (the higher target).
#### Scaler Configuration
Each scaler monitors a specific event source. You can add multiple scalers to respond to different metrics.
**Built-in scalers only**: Qovery currently supports KEDA's built-in scalers. External scalers are not supported at this time.
**For Each Scaler**:
1. **Scaler Type**: The event source type (e.g., `aws-sqs-queue`, `rabbitmq`, `kafka`, `prometheus`)
2. **Scaler YAML Configuration**: Source-specific parameters in YAML format
3. **Trigger Authentication YAML** (Optional): Authentication credentials if required
**Scaler YAML Configuration** accepts the following fields:
* `metadata` - Scaler-specific parameters (required). Each scaler type has different metadata fields. See the [KEDA Scalers documentation](https://keda.sh/docs/latest/scalers/) for available parameters per scaler type.
* `metricType` - Metric target type: `Value`, `AverageValue`, or `Utilization` (optional)
* `useCachedMetrics` - Whether to use cached metrics (optional, boolean)
**Common Scaler Types**:
* `aws-sqs-queue` - AWS Simple Queue Service
* `aws-kinesis-stream` - AWS Kinesis Data Streams
* `rabbitmq` - RabbitMQ queues
* `kafka` - Apache Kafka topics
* `prometheus` - Prometheus metrics
* `postgresql` - PostgreSQL queries
* `redis` - Redis lists/streams
* `cron` - Time-based scaling
For the complete list, see [KEDA Scalers documentation](https://keda.sh/docs/latest/scalers/).
***
#### Authentication Methods
KEDA supports multiple authentication methods. Each scaler type supports a subset of these methods.
**Common Authentication Methods**:
**1. podIdentity** - Use IAM roles (AWS) or managed identities (Azure)
```yaml theme={null}
podIdentity:
provider: aws # or azure
identityOwner: workload # inherit from application service account
# OR
roleArn: arn:aws:iam::123456789012:role/MyRole # specify role directly
```
**2. secretTargetRef** - Reference Qovery environment variables or secrets
```yaml theme={null}
secretTargetRef:
- parameter: connectionString # Parameter name defined by the scaler
key: qovery.env.MY_CONNECTION_STRING # Qovery variable reference
```
Use `qovery.env.VARIABLE_NAME` to reference environment variables or secrets defined in your Qovery application.
For complete authentication options, see [KEDA Authentication documentation](https://keda.sh/docs/latest/concepts/authentication/).
***
#### Scaler Examples by Type
### AWS SQS Queue Scaling
Let's explore AWS SQS in detail as it's a common use case.
**How KEDA Works with SQS**:
* KEDA reads queue metrics (number of messages) via AWS CloudWatch
* **KEDA does NOT consume messages** from the queue
* Your application pods consume and process the actual messages
* KEDA only uses metrics to make scaling decisions
**Authentication Requirements**:
AWS SQS requires IAM authentication. Qovery supports two authentication models:
### Shared IAM Role (Application + KEDA)
**When to use**:
* Your application already consumes from SQS
* You want to minimize IAM roles
* Simpler configuration
**How it works**:
* Single IAM role attached to your application's service account
* Both application pods and KEDA use the same IAM role
* No AWS credentials stored as secrets
***
#### Step-by-Step AWS Configuration
This policy grants your application the necessary permissions to interact with SQS (consume, process messages) and allows KEDA to read queue metrics.
1. Go to **IAM Console** → **Policies** → **Create policy**
2. Select the **JSON** tab and paste:
```json theme={null}
{
"Version": "2012-10-17",
"Statement": [
{
"Sid": "SqsFullAccess",
"Effect": "Allow",
"Action": [
"sqs:GetQueueAttributes",
"sqs:GetQueueUrl",
"sqs:ReceiveMessage",
"sqs:DeleteMessage",
"sqs:ChangeMessageVisibility"
],
"Resource": "arn:aws:sqs:::"
}
]
}
```
3. Name the policy: `AppSqsFullAccessPolicy`
4. Click **Create policy**
This policy includes both application permissions (`ReceiveMessage`, `DeleteMessage`) and KEDA metric reading permissions (`GetQueueAttributes`).
Follow the complete tutorial to create an IAM role and configure your application's service account with AWS IAM roles.
Step-by-step guide to create IAM roles and service accounts for Qovery applications
When creating the role:
1. Attach the policy created in Step 1: `AppSqsFullAccessPolicy`
2. Name the role: `AppSqsConsumerRole`
3. Note the role ARN for later use
To allow KEDA to inherit the IAM role from your application's service account, you must update the trust relationship.
1. Open the role you created: `AppSqsConsumerRole`
2. Go to the **Trust relationships** tab and click **Edit trust policy**
3. Update the JSON to allow both your application namespace AND the KEDA operator:
```json theme={null}
{
"Version": "2012-10-17",
"Statement": [
{
"Effect": "Allow",
"Principal": {
"Federated": "arn:aws:iam:::oidc-provider/oidc.eks..amazonaws.com/id/"
},
"Action": "sts:AssumeRoleWithWebIdentity",
"Condition": {
"StringEquals": {
"oidc.eks..amazonaws.com/id/:aud": "sts.amazonaws.com",
"oidc.eks..amazonaws.com/id/:sub": [
"system:serviceaccount::",
"system:serviceaccount:kube-system:keda-operator"
]
}
}
}
]
}
```
4. Click **Update policy**
Replace ``, ``, ``, ``, and `` with your specific values. The key addition is the `keda-operator` service account in the trust relationship.
***
#### Qovery Configuration
After completing the AWS configuration steps above, configure the KEDA scaler in Qovery.
**Scaler YAML** (paste in "Configuration YAML" field):
```yaml theme={null}
metadata:
queueURL: "https://sqs.us-east-1.amazonaws.com/123456789012/my-queue"
awsRegion: "us-east-1"
queueLength: "5"
activationQueueLength: "1"
```
**Trigger Authentication YAML** (paste in "Trigger Authentication YAML" field):
```yaml theme={null}
podIdentity:
provider: aws
identityOwner: workload
```
With `identityOwner: workload`, KEDA automatically inherits the IAM role from your application's service account. This requires the trust relationship configuration from Step 3.
***
#### Resulting Behavior
* **Both application and KEDA use the same IAM role** - The role is shared between your application pods and KEDA operator
* **Application can consume from SQS** - Your application has full permissions to receive and process messages
* **KEDA monitors queue depth** - KEDA uses the same role to read queue metrics for scaling decisions
* **Simplified IAM management** - Only one role to manage and maintain
### Separate IAM Role for KEDA
**When to use**:
* Your application does NOT consume from SQS
* KEDA scales based on queue depth, but another service processes messages
* You want separate security boundaries
**How it works**:
* Dedicated IAM role for KEDA's scaling operations
* Application has no AWS identity
* IAM role ARN specified directly in trigger authentication
***
#### Step-by-Step AWS Configuration
This policy grants KEDA the minimum permissions to read SQS metrics (queue depth) without allowing it to process or delete messages.
1. Go to **IAM Console** → **Policies** → **Create policy**
2. Select the **JSON** tab and paste:
```json theme={null}
{
"Version": "2012-10-17",
"Statement": [
{
"Sid": "KedaSqsMetricReadAccess",
"Effect": "Allow",
"Action": [
"sqs:GetQueueAttributes",
"sqs:GetQueueUrl"
],
"Resource": "arn:aws:sqs:::"
}
]
}
```
3. Name the policy: `KedaSqsMetricReadPolicy`
4. Click **Create policy**
**Not required**: `sqs:ReceiveMessage` - KEDA only reads metrics, it does not consume or delete messages.
This step creates the AWS identity that the KEDA operator will assume using IRSA (IAM Roles for Service Accounts).
1. Navigate to **IAM** → **Roles** → **Create role**
2. Select **Web Identity** as the trusted entity type
3. **Identity provider**: Select your EKS cluster's OIDC URL from the dropdown
4. **Audience**: Select `sts.amazonaws.com`
5. Click **Next**
6. Search for and attach the policy created in Step 1: `KedaSqsMetricReadPolicy`
7. Name the role: `KedaOperatorScalingRole`
8. Click **Create role**
To ensure maximum security, restrict this role so that only the KEDA operator pod in the `kube-system` namespace can use it.
1. Open the role you just created: `KedaOperatorScalingRole`
2. Go to the **Trust relationships** tab and click **Edit trust policy**
3. Update the JSON, replacing the placeholders with your cluster-specific info:
```json theme={null}
{
"Version": "2012-10-17",
"Statement": [
{
"Effect": "Allow",
"Principal": {
"Federated": "arn:aws:iam:::oidc-provider/oidc.eks..amazonaws.com/id/"
},
"Action": "sts:AssumeRoleWithWebIdentity",
"Condition": {
"StringEquals": {
"oidc.eks..amazonaws.com/id/:aud": "sts.amazonaws.com",
"oidc.eks..amazonaws.com/id/:sub": "system:serviceaccount:kube-system:keda-operator"
}
}
}
]
}
```
4. Click **Update policy**
Replace ``, ``, and `` with your AWS account ID, EKS region, and OIDC provider ID. You can find the OIDC provider URL in your EKS cluster details under the **Configuration** tab.
***
#### Qovery Configuration
After completing the AWS configuration steps above, configure the KEDA scaler in Qovery with the IAM role ARN you created.
**Scaler YAML** (paste in "Configuration YAML" field):
```yaml theme={null}
metadata:
queueURL: "https://sqs.us-east-1.amazonaws.com/123456789012/my-queue"
awsRegion: "us-east-1"
queueLength: "5"
activationQueueLength: "1"
```
**Trigger Authentication YAML** (paste in "Trigger Authentication YAML" field):
```yaml theme={null}
podIdentity:
provider: aws
roleArn: arn:aws:iam:::role/KedaOperatorScalingRole
```
Replace `` with your AWS account ID. You can find the complete role ARN in the IAM Console under the **KedaOperatorScalingRole** details page.
No ServiceAccount configuration is required on the application itself. The application runs without AWS identity.
***
#### Resulting Behavior
* **Only KEDA has AWS credentials** - The dedicated IAM role is only accessible to KEDA operator
* **Application runs without AWS identity** - Your application pods have no AWS permissions
* **Scaling is isolated from application permissions** - KEDA can read queue metrics independently of the application's capabilities
### Redis List/Stream Scaling
Scale your application based on Redis list length or stream lag.
**Scaler Types**:
* `redis` - For Redis lists
* `redis-streams` - For Redis streams
**Authentication**:
Redis does NOT use IAM authentication. You can provide credentials directly in the configuration or reference Qovery environment variables/secrets.
***
**Scaler YAML Example** (paste in "Configuration YAML" field):
```yaml theme={null}
metadata:
address: redis-queue.default.svc.cluster.local:6379
listName: myqueue
listLength: "1"
databaseIndex: "0"
```
**Trigger Authentication YAML** (paste in "Trigger Authentication YAML" field):
```yaml theme={null}
secretTargetRef:
- parameter: password
key: qovery.env.REDIS_PASSWORD
```
You can reference Qovery environment variables or secrets using `qovery.env.VARIABLE_NAME`, or provide credentials directly in the YAML configuration.
**Configuration Parameters**:
* `address` - Redis server address (host:port or Kubernetes service DNS)
* `listName` - Name of the Redis list to monitor
* `listLength` - Target list length per instance
* `databaseIndex` - Redis database index (optional, default: "0")
For complete parameter reference, see [KEDA Redis Scaler documentation](https://keda.sh/docs/latest/scalers/redis-lists/).
### RabbitMQ Queue Scaling
Scale your application based on RabbitMQ queue depth.
**Authentication**:
RabbitMQ does NOT use IAM authentication. You can provide credentials directly in the configuration or reference Qovery environment variables/secrets.
***
**Scaler YAML Example** (paste in "Configuration YAML" field):
```yaml theme={null}
metadata:
protocol: amqp
queueName: myqueue
mode: QueueLength
value: "1"
```
**Trigger Authentication YAML** (paste in "Trigger Authentication YAML" field):
```yaml theme={null}
secretTargetRef:
- parameter: host
key: qovery.env.RABBITMQ_URL
```
You can reference Qovery environment variables or secrets using `qovery.env.VARIABLE_NAME`, or provide the connection string directly in the YAML configuration. The RabbitMQ URL format is: `amqp://user:password@rabbitmq.example.com:5672/vhost`
**Configuration Parameters**:
* `protocol` - Connection protocol: `amqp` or `http` (optional, default: `amqp`)
* `queueName` - Name of the RabbitMQ queue to monitor
* `mode` - Scaling mode: `QueueLength` (default) or `MessageRate`
* `value` - Target queue length per instance
For complete parameter reference, see [KEDA RabbitMQ Scaler documentation](https://keda.sh/docs/latest/scalers/rabbitmq-queue/).
***
#### Additional Resources
* [KEDA Official Documentation](https://keda.sh/docs/)
* [KEDA Scalers Reference](https://keda.sh/docs/latest/scalers/)
* [KEDA Authentication Guide](https://keda.sh/docs/latest/concepts/authentication/)
**Testing your KEDA configuration**: Start with a low `queueLength` value and a small `maxInstances` to test scaling behavior. Monitor your application logs and KEDA operator logs to verify scaling triggers work as expected.
### Storage
**Ephemeral Storage** (default):
* Container filesystem
* Data lost on restart
* Use for temporary files and caches
**Persistent Storage**:
* Block storage volumes
* Data persists across restarts
* Configure mount path and size
* SSD storage type (fast\_ssd)
* Typical range: 5GB-10GB
Persistent storage cannot be shared between replicas. For shared storage, use
external services like S3 or blob storage.
### Ports
Configure network exposure for your application:
**Port Configuration**:
* **Internal Port**: Port your application listens on
* **External Port**: HTTPS defaults to 443, HTTP to 80
* **Protocol**: HTTP/HTTPS, gRPC, TCP, UDP
* **Publicly Accessible**: Toggle to expose via load balancer
* **URL Rewriting**: Configure path rewriting (optional)
For HTTP and gRPC protocols, the external port is set to 443 by default with
automatic TLS.
**Connection Timeouts**: Connections on public ports are automatically closed
after 60 seconds by default. Configure custom timeouts in advanced settings
for long-lived connections.
**TCP/UDP Ports**: Exposing TCP/UDP ports publicly requires provisioning a
dedicated load balancer, which takes approximately 15 minutes and incurs
additional cloud provider costs.
### Health Checks
**Liveness Probe**:
* Determines if container should be restarted
* Configure endpoint, port, initial delay, and intervals
**Readiness Probe**:
* Determines if container should receive traffic
* Configure endpoint, port, initial delay, and intervals
### Deployment Restrictions
Configure when deployments should be triggered:
* **File path filters**: Deploy only when specific files change
* **Branch filters**: Deploy only from specific branches
## Internet Connectivity
### Qovery-Assigned Domains
Every publicly accessible application receives an automatic domain with TLS certificate:
```
-..qovery.io
```
### Custom Domains
Add your own custom domain to your application:
Navigate to application settings → Domains → Add Domain
Create a CNAME record in your DNS provider:
```
CNAME: your-domain.com → ..qovery.io
```
Qovery automatically validates DNS configuration and provisions SSL/TLS certificate
### CDN Proxy Mode
Enable CDN proxy mode for custom domains to route traffic through your CDN provider.
## Additional Features
### Service Connections
Applications can connect to:
* Databases within the same environment
* Other applications within the same environment
* External services via environment variables
Connection details are automatically injected as environment variables. See [Environment Variables](/docs/configuration/environment-variables).
### SSH Access
Access running containers via SSH using the [Qovery CLI](/docs/cli/commands/shell):
```bash theme={null}
qovery shell
```
### Clone Service
Duplicate an application configuration to the same or different environment. Cloning copies:
* General configuration
* Resource settings
* Port configuration
* Storage configuration
* Build settings
Cloning excludes custom domains and some built-in environment variables to
prevent conflicts.
### Advanced Settings
Configure advanced options including:
* Build timeout and resources
* Deployment strategy
* Network settings
* Node affinity
* Annotations and labels
See [Service Advanced Settings](/docs/configuration/service-advanced-settings) for details.
### Delete Application
To delete an application:
1. Navigate to application settings
2. Click **Delete Application**
3. Confirm deletion
Deleting an application is permanent and cannot be undone. All associated data
and configurations will be removed.
## Related Resources
Step-by-step deployment guide
Manage configuration and secrets
Connect databases to your application
Set up automatic deployments
**What is KEDA?**
[KEDA (Kubernetes Event-Driven Autoscaler)](https://keda.sh) extends Kubernetes autoscaling capabilities by scaling based on external metrics and events rather than just CPU/memory.
**Use Cases**:
* Queue-based workloads (SQS, RabbitMQ, Kafka)
* Stream processing (Kinesis, Kafka)
* Database polling (PostgreSQL, MySQL)
* Custom metrics (Prometheus, Datadog)
* Scheduled scaling (cron-based)
#### Migrating from HPA to KEDA
Direct migration from HPA to KEDA is blocked. The reason is a Kubernetes conflict: both HPA and KEDA's `ScaledObject` target the same Deployment replica count simultaneously, causing unpredictable scaling behavior.
The required migration path is **HPA → No Scaling → KEDA**:
1. Switch your application to **No autoscaling (fixed instances)** mode and save
2. **Redeploy** — this removes the HPA resource from the cluster
3. Switch to **KEDA (Event-Driven)** mode and configure your scalers
4. **Redeploy** again
#### General Configuration
**Required Settings**:
* **Minimum instances**: Baseline number of pods (minimum: 0 for scale-to-zero)
* **Maximum instances**: Upper scaling limit
**Optional Settings**:
* **Polling interval**: How often KEDA checks the event source (default: 30 seconds)
* **Cooldown period**: Wait time before scaling down after scale-up (default: 300 seconds)
**Scale-to-Zero**: KEDA supports setting minimum instances to **0**, allowing your application to scale down completely when there are no events. When events are detected, KEDA automatically scales up from 0 to handle the workload. This is ideal for cost optimization on sporadic workloads.
**Multiple scalers behavior**: If you configure multiple scalers, KEDA uses the scaler that calculates the highest target number of instances. For example, if Scaler A monitors a queue with 15 messages and calculates 15 target instances (1 message per instance), and Scaler B monitors a queue with 50 messages and calculates 5 target instances (10 messages per instance), KEDA scales to 15 instances (the higher target).
#### Scaler Configuration
Each scaler monitors a specific event source. You can add multiple scalers to respond to different metrics.
**Built-in scalers only**: Qovery currently supports KEDA's built-in scalers. External scalers are not supported at this time.
**For Each Scaler**:
1. **Scaler Type**: The event source type (e.g., `aws-sqs-queue`, `rabbitmq`, `kafka`, `prometheus`)
2. **Scaler YAML Configuration**: Source-specific parameters in YAML format
3. **Trigger Authentication YAML** (Optional): Authentication credentials if required
**Scaler YAML Configuration** accepts the following fields:
* `metadata` - Scaler-specific parameters (required). Each scaler type has different metadata fields. See the [KEDA Scalers documentation](https://keda.sh/docs/latest/scalers/) for available parameters per scaler type.
* `metricType` - Metric target type: `Value`, `AverageValue`, or `Utilization` (optional)
* `useCachedMetrics` - Whether to use cached metrics (optional, boolean)
**Common Scaler Types**:
* `aws-sqs-queue` - AWS Simple Queue Service
* `aws-kinesis-stream` - AWS Kinesis Data Streams
* `rabbitmq` - RabbitMQ queues
* `kafka` - Apache Kafka topics
* `prometheus` - Prometheus metrics
* `postgresql` - PostgreSQL queries
* `redis` - Redis lists/streams
* `cron` - Time-based scaling
For the complete list, see [KEDA Scalers documentation](https://keda.sh/docs/latest/scalers/).
***
#### Authentication Methods
KEDA supports multiple authentication methods. Each scaler type supports a subset of these methods.
**Common Authentication Methods**:
**1. podIdentity** - Use IAM roles (AWS) or managed identities (Azure)
```yaml theme={null}
podIdentity:
provider: aws # or azure
identityOwner: workload # inherit from application service account
# OR
roleArn: arn:aws:iam::123456789012:role/MyRole # specify role directly
```
**2. secretTargetRef** - Reference Qovery environment variables or secrets
```yaml theme={null}
secretTargetRef:
- parameter: connectionString # Parameter name defined by the scaler
key: qovery.env.MY_CONNECTION_STRING # Qovery variable reference
```
Use `qovery.env.VARIABLE_NAME` to reference environment variables or secrets defined in your Qovery application.
For complete authentication options, see [KEDA Authentication documentation](https://keda.sh/docs/latest/concepts/authentication/).
***
#### Scaler Examples by Type
### AWS SQS Queue Scaling
Let's explore AWS SQS in detail as it's a common use case.
**How KEDA Works with SQS**:
* KEDA reads queue metrics (number of messages) via AWS CloudWatch
* **KEDA does NOT consume messages** from the queue
* Your application pods consume and process the actual messages
* KEDA only uses metrics to make scaling decisions
**Authentication Requirements**:
AWS SQS requires IAM authentication. Qovery supports two authentication models:
### Shared IAM Role (Application + KEDA)
**When to use**:
* Your application already consumes from SQS
* You want to minimize IAM roles
* Simpler configuration
**How it works**:
* Single IAM role attached to your application's service account
* Both application pods and KEDA use the same IAM role
* No AWS credentials stored as secrets
***
#### Step-by-Step AWS Configuration
This policy grants your application the necessary permissions to interact with SQS (consume, process messages) and allows KEDA to read queue metrics.
1. Go to **IAM Console** → **Policies** → **Create policy**
2. Select the **JSON** tab and paste:
```json theme={null}
{
"Version": "2012-10-17",
"Statement": [
{
"Sid": "SqsFullAccess",
"Effect": "Allow",
"Action": [
"sqs:GetQueueAttributes",
"sqs:GetQueueUrl",
"sqs:ReceiveMessage",
"sqs:DeleteMessage",
"sqs:ChangeMessageVisibility"
],
"Resource": "arn:aws:sqs:::"
}
]
}
```
3. Name the policy: `AppSqsFullAccessPolicy`
4. Click **Create policy**
This policy includes both application permissions (`ReceiveMessage`, `DeleteMessage`) and KEDA metric reading permissions (`GetQueueAttributes`).
Follow the complete tutorial to create an IAM role and configure your application's service account with AWS IAM roles.
Step-by-step guide to create IAM roles and service accounts for Qovery applications
When creating the role:
1. Attach the policy created in Step 1: `AppSqsFullAccessPolicy`
2. Name the role: `AppSqsConsumerRole`
3. Note the role ARN for later use
To allow KEDA to inherit the IAM role from your application's service account, you must update the trust relationship.
1. Open the role you created: `AppSqsConsumerRole`
2. Go to the **Trust relationships** tab and click **Edit trust policy**
3. Update the JSON to allow both your application namespace AND the KEDA operator:
```json theme={null}
{
"Version": "2012-10-17",
"Statement": [
{
"Effect": "Allow",
"Principal": {
"Federated": "arn:aws:iam:::oidc-provider/oidc.eks..amazonaws.com/id/"
},
"Action": "sts:AssumeRoleWithWebIdentity",
"Condition": {
"StringEquals": {
"oidc.eks..amazonaws.com/id/:aud": "sts.amazonaws.com",
"oidc.eks..amazonaws.com/id/:sub": [
"system:serviceaccount::",
"system:serviceaccount:kube-system:keda-operator"
]
}
}
}
]
}
```
4. Click **Update policy**
Replace ``, ``, ``, ``, and `` with your specific values. The key addition is the `keda-operator` service account in the trust relationship.
***
#### Qovery Configuration
After completing the AWS configuration steps above, configure the KEDA scaler in Qovery.
**Scaler YAML** (paste in "Configuration YAML" field):
```yaml theme={null}
metadata:
queueURL: "https://sqs.us-east-1.amazonaws.com/123456789012/my-queue"
awsRegion: "us-east-1"
queueLength: "5"
activationQueueLength: "1"
```
**Trigger Authentication YAML** (paste in "Trigger Authentication YAML" field):
```yaml theme={null}
podIdentity:
provider: aws
identityOwner: workload
```
With `identityOwner: workload`, KEDA automatically inherits the IAM role from your application's service account. This requires the trust relationship configuration from Step 3.
***
#### Resulting Behavior
* **Both application and KEDA use the same IAM role** - The role is shared between your application pods and KEDA operator
* **Application can consume from SQS** - Your application has full permissions to receive and process messages
* **KEDA monitors queue depth** - KEDA uses the same role to read queue metrics for scaling decisions
* **Simplified IAM management** - Only one role to manage and maintain
### Separate IAM Role for KEDA
**When to use**:
* Your application does NOT consume from SQS
* KEDA scales based on queue depth, but another service processes messages
* You want separate security boundaries
**How it works**:
* Dedicated IAM role for KEDA's scaling operations
* Application has no AWS identity
* IAM role ARN specified directly in trigger authentication
***
#### Step-by-Step AWS Configuration
This policy grants KEDA the minimum permissions to read SQS metrics (queue depth) without allowing it to process or delete messages.
1. Go to **IAM Console** → **Policies** → **Create policy**
2. Select the **JSON** tab and paste:
```json theme={null}
{
"Version": "2012-10-17",
"Statement": [
{
"Sid": "KedaSqsMetricReadAccess",
"Effect": "Allow",
"Action": [
"sqs:GetQueueAttributes",
"sqs:GetQueueUrl"
],
"Resource": "arn:aws:sqs:::"
}
]
}
```
3. Name the policy: `KedaSqsMetricReadPolicy`
4. Click **Create policy**
**Not required**: `sqs:ReceiveMessage` - KEDA only reads metrics, it does not consume or delete messages.
This step creates the AWS identity that the KEDA operator will assume using IRSA (IAM Roles for Service Accounts).
1. Navigate to **IAM** → **Roles** → **Create role**
2. Select **Web Identity** as the trusted entity type
3. **Identity provider**: Select your EKS cluster's OIDC URL from the dropdown
4. **Audience**: Select `sts.amazonaws.com`
5. Click **Next**
6. Search for and attach the policy created in Step 1: `KedaSqsMetricReadPolicy`
7. Name the role: `KedaOperatorScalingRole`
8. Click **Create role**
To ensure maximum security, restrict this role so that only the KEDA operator pod in the `kube-system` namespace can use it.
1. Open the role you just created: `KedaOperatorScalingRole`
2. Go to the **Trust relationships** tab and click **Edit trust policy**
3. Update the JSON, replacing the placeholders with your cluster-specific info:
```json theme={null}
{
"Version": "2012-10-17",
"Statement": [
{
"Effect": "Allow",
"Principal": {
"Federated": "arn:aws:iam:::oidc-provider/oidc.eks..amazonaws.com/id/"
},
"Action": "sts:AssumeRoleWithWebIdentity",
"Condition": {
"StringEquals": {
"oidc.eks..amazonaws.com/id/:aud": "sts.amazonaws.com",
"oidc.eks..amazonaws.com/id/:sub": "system:serviceaccount:kube-system:keda-operator"
}
}
}
]
}
```
4. Click **Update policy**
Replace ``, ``, and `` with your AWS account ID, EKS region, and OIDC provider ID. You can find the OIDC provider URL in your EKS cluster details under the **Configuration** tab.
***
#### Qovery Configuration
After completing the AWS configuration steps above, configure the KEDA scaler in Qovery with the IAM role ARN you created.
**Scaler YAML** (paste in "Configuration YAML" field):
```yaml theme={null}
metadata:
queueURL: "https://sqs.us-east-1.amazonaws.com/123456789012/my-queue"
awsRegion: "us-east-1"
queueLength: "5"
activationQueueLength: "1"
```
**Trigger Authentication YAML** (paste in "Trigger Authentication YAML" field):
```yaml theme={null}
podIdentity:
provider: aws
roleArn: arn:aws:iam:::role/KedaOperatorScalingRole
```
Replace `` with your AWS account ID. You can find the complete role ARN in the IAM Console under the **KedaOperatorScalingRole** details page.
No ServiceAccount configuration is required on the application itself. The application runs without AWS identity.
***
#### Resulting Behavior
* **Only KEDA has AWS credentials** - The dedicated IAM role is only accessible to KEDA operator
* **Application runs without AWS identity** - Your application pods have no AWS permissions
* **Scaling is isolated from application permissions** - KEDA can read queue metrics independently of the application's capabilities
### Redis List/Stream Scaling
Scale your application based on Redis list length or stream lag.
**Scaler Types**:
* `redis` - For Redis lists
* `redis-streams` - For Redis streams
**Authentication**:
Redis does NOT use IAM authentication. You can provide credentials directly in the configuration or reference Qovery environment variables/secrets.
***
**Scaler YAML Example** (paste in "Configuration YAML" field):
```yaml theme={null}
metadata:
address: redis-queue.default.svc.cluster.local:6379
listName: myqueue
listLength: "1"
databaseIndex: "0"
```
**Trigger Authentication YAML** (paste in "Trigger Authentication YAML" field):
```yaml theme={null}
secretTargetRef:
- parameter: password
key: qovery.env.REDIS_PASSWORD
```
You can reference Qovery environment variables or secrets using `qovery.env.VARIABLE_NAME`, or provide credentials directly in the YAML configuration.
**Configuration Parameters**:
* `address` - Redis server address (host:port or Kubernetes service DNS)
* `listName` - Name of the Redis list to monitor
* `listLength` - Target list length per instance
* `databaseIndex` - Redis database index (optional, default: "0")
For complete parameter reference, see [KEDA Redis Scaler documentation](https://keda.sh/docs/latest/scalers/redis-lists/).
### RabbitMQ Queue Scaling
Scale your application based on RabbitMQ queue depth.
**Authentication**:
RabbitMQ does NOT use IAM authentication. You can provide credentials directly in the configuration or reference Qovery environment variables/secrets.
***
**Scaler YAML Example** (paste in "Configuration YAML" field):
```yaml theme={null}
metadata:
protocol: amqp
queueName: myqueue
mode: QueueLength
value: "1"
```
**Trigger Authentication YAML** (paste in "Trigger Authentication YAML" field):
```yaml theme={null}
secretTargetRef:
- parameter: host
key: qovery.env.RABBITMQ_URL
```
You can reference Qovery environment variables or secrets using `qovery.env.VARIABLE_NAME`, or provide the connection string directly in the YAML configuration. The RabbitMQ URL format is: `amqp://user:password@rabbitmq.example.com:5672/vhost`
**Configuration Parameters**:
* `protocol` - Connection protocol: `amqp` or `http` (optional, default: `amqp`)
* `queueName` - Name of the RabbitMQ queue to monitor
* `mode` - Scaling mode: `QueueLength` (default) or `MessageRate`
* `value` - Target queue length per instance
For complete parameter reference, see [KEDA RabbitMQ Scaler documentation](https://keda.sh/docs/latest/scalers/rabbitmq-queue/).
***
#### Additional Resources
* [KEDA Official Documentation](https://keda.sh/docs/)
* [KEDA Scalers Reference](https://keda.sh/docs/latest/scalers/)
* [KEDA Authentication Guide](https://keda.sh/docs/latest/concepts/authentication/)
**Testing your KEDA configuration**: Start with a low `queueLength` value and a small `maxInstances` to test scaling behavior. Monitor your application logs and KEDA operator logs to verify scaling triggers work as expected.
### Storage
**Ephemeral Storage** (default):
* Container filesystem
* Data lost on restart
* Use for temporary files and caches
**Persistent Storage**:
* Block storage volumes
* Data persists across restarts
* Configure mount path and size
* SSD storage type (fast\_ssd)
* Typical range: 5GB-10GB
Persistent storage cannot be shared between replicas. For shared storage, use
external services like S3 or blob storage.
### Ports
Configure network exposure for your application:
**Port Configuration**:
* **Internal Port**: Port your application listens on
* **External Port**: HTTPS defaults to 443, HTTP to 80
* **Protocol**: HTTP/HTTPS, gRPC, TCP, UDP
* **Publicly Accessible**: Toggle to expose via load balancer
* **URL Rewriting**: Configure path rewriting (optional)
For HTTP and gRPC protocols, the external port is set to 443 by default with
automatic TLS.
**Connection Timeouts**: Connections on public ports are automatically closed
after 60 seconds by default. Configure custom timeouts in advanced settings
for long-lived connections.
**TCP/UDP Ports**: Exposing TCP/UDP ports publicly requires provisioning a
dedicated load balancer, which takes approximately 15 minutes and incurs
additional cloud provider costs.
### Health Checks
**Liveness Probe**:
* Determines if container should be restarted
* Configure endpoint, port, initial delay, and intervals
**Readiness Probe**:
* Determines if container should receive traffic
* Configure endpoint, port, initial delay, and intervals
### Deployment Restrictions
Configure when deployments should be triggered:
* **File path filters**: Deploy only when specific files change
* **Branch filters**: Deploy only from specific branches
## Internet Connectivity
### Qovery-Assigned Domains
Every publicly accessible application receives an automatic domain with TLS certificate:
```
-..qovery.io
```
### Custom Domains
Add your own custom domain to your application:
Navigate to application settings → Domains → Add Domain
Create a CNAME record in your DNS provider:
```
CNAME: your-domain.com → ..qovery.io
```
Qovery automatically validates DNS configuration and provisions SSL/TLS certificate
### CDN Proxy Mode
Enable CDN proxy mode for custom domains to route traffic through your CDN provider.
## Additional Features
### Service Connections
Applications can connect to:
* Databases within the same environment
* Other applications within the same environment
* External services via environment variables
Connection details are automatically injected as environment variables. See [Environment Variables](/docs/configuration/environment-variables).
### SSH Access
Access running containers via SSH using the [Qovery CLI](/docs/cli/commands/shell):
```bash theme={null}
qovery shell
```
### Clone Service
Duplicate an application configuration to the same or different environment. Cloning copies:
* General configuration
* Resource settings
* Port configuration
* Storage configuration
* Build settings
Cloning excludes custom domains and some built-in environment variables to
prevent conflicts.
### Advanced Settings
Configure advanced options including:
* Build timeout and resources
* Deployment strategy
* Network settings
* Node affinity
* Annotations and labels
See [Service Advanced Settings](/docs/configuration/service-advanced-settings) for details.
### Delete Application
To delete an application:
1. Navigate to application settings
2. Click **Delete Application**
3. Confirm deletion
Deleting an application is permanent and cannot be undone. All associated data
and configurations will be removed.
## Related Resources
Step-by-step deployment guide
Manage configuration and secrets
Connect databases to your application
Set up automatic deployments